-
Products
-
SonicPlatform
SonicPlatform is the cybersecurity platform purpose-built for MSPs, making managing complex security environments among multiple tenants easy and streamlined.
Discover More
-
-
Solutions
-
Federal
Protect Federal Agencies and Networks with scalable, purpose-built cybersecurity solutions
Learn MoreFederalProtect Federal Agencies and Networks with scalable, purpose-built cybersecurity solutions
Learn More - Industries
- Use Cases
-
-
Partners
-
Partner Portal
Access to deal registration, MDF, sales and marketing tools, training and more
Learn MorePartner PortalAccess to deal registration, MDF, sales and marketing tools, training and more
Learn More - SonicWall Partners
- Partner Resources
-
-
Support
-
Support Portal
Find answers to your questions by searching across our knowledge base, community, technical documentation and video tutorials
Learn MoreSupport PortalFind answers to your questions by searching across our knowledge base, community, technical documentation and video tutorials
Learn More - Support
- Resources
- Capture Labs
-
- Company
- Contact Us
How to configure the packet monitor to send the captured packets to FileZilla FTP server


Description
How to configure SonicWall packet monitor to send the captured packets to FileZilla FTP server.
Resolution
Step 1: Configuration of FileZilla in the Local Machine
Login to your Local Machine in which you have FileZilla FTP Server installed.If it is a new setup, you may follow the below link and install FileZilla server on local machine.
On the File Zilla Server Interface, Click on User group and add a user group with a friendly name.
E.g. Here i named it as Packet captures

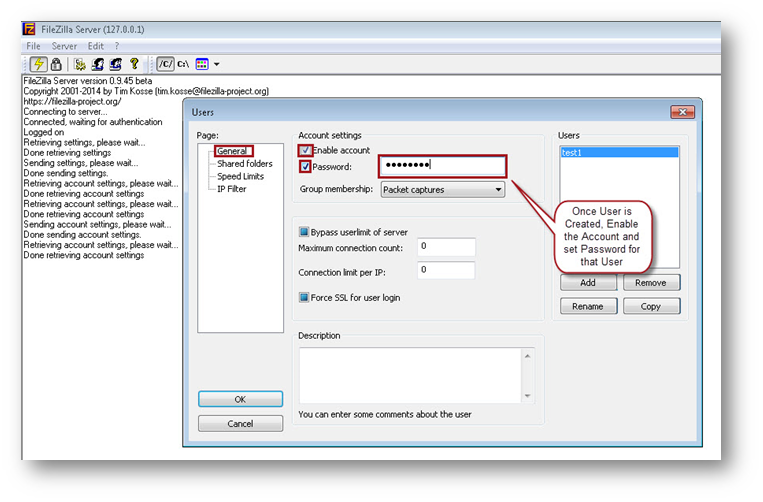
Once User group is added, create a new user by clicking on user icon as shown below.Add a test user and use any friendly name and select the relevant user group.

Once user is created enable the account and set the password for that user as below.

Create a new folder in My Documents as SonicWall Packet captures and Sub folder as captures and share that folder to that user which we created above.
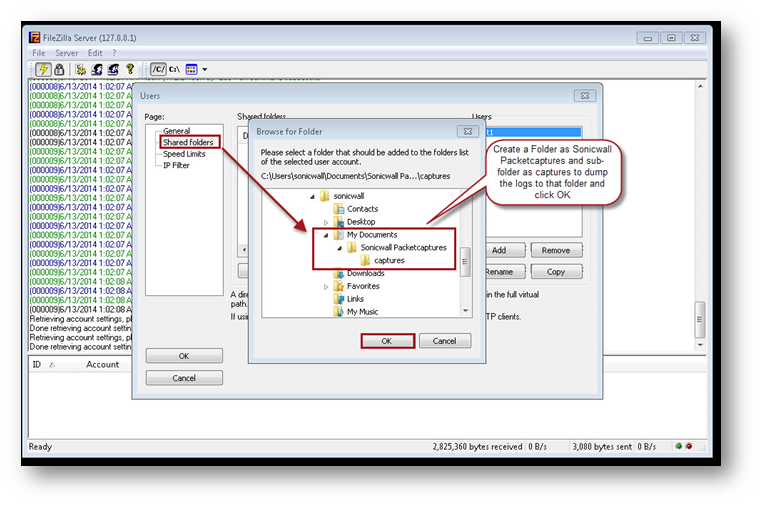

Make sure that you have given read and write options for that user to access the files.

Step 2: Configuration of Packet Capture in SonicWall

 TIP: Make sure to select the path as home directory
Step 2: Configuration of Packet Capture in SonicWall
RESOLUTION FOR SONICOS 7.X
This release includes significant user interface changes and many new features that are different from the SonicOS 6.5 and earlier firmware. The below resolution is for customers using SonicOS 7.X firmware.
This release includes significant user interface changes and many new features that are different from the SonicOS 6.5 and earlier firmware. The below resolution is for customers using SonicOS 7.X firmware.
- Navigate to Monitor|Tools & Monitors|Packet Monitor|General|Logging
- Enter the FTP server address,Login ID,Password and Directory Path
- Ensure that you have enabled Log to FTP Server Automatically and Log HTML File Along with .cap File and then click on SAVE

- Start the Capture so that SonicWall will capture the packet and then will dump into the FTP server Automatically.
- If you login to FileZilla Server Interface will see that captures are dump into it automatically.
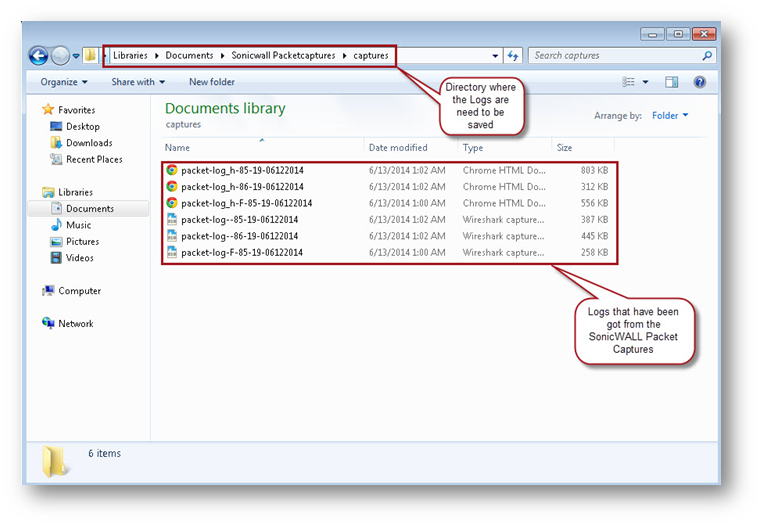
- If we navigate to the directory or the folder that been specified on the machine, we can see the packet captures and can analyze it according to our needs.
RESOLUTION FOR SONICOS 6.x
This release includes user interface options for the SonicOS 6.2 and above firmwares.
Login to the SonicWall Management Page.
- On the SonicWall navigate to System | Packet Monitor or Dashboard | Packet Monitor
- Click on configure, on the monitor filter go with your requirement IP type as TCP,UDP and with respective source or destination ip address or port numbers.
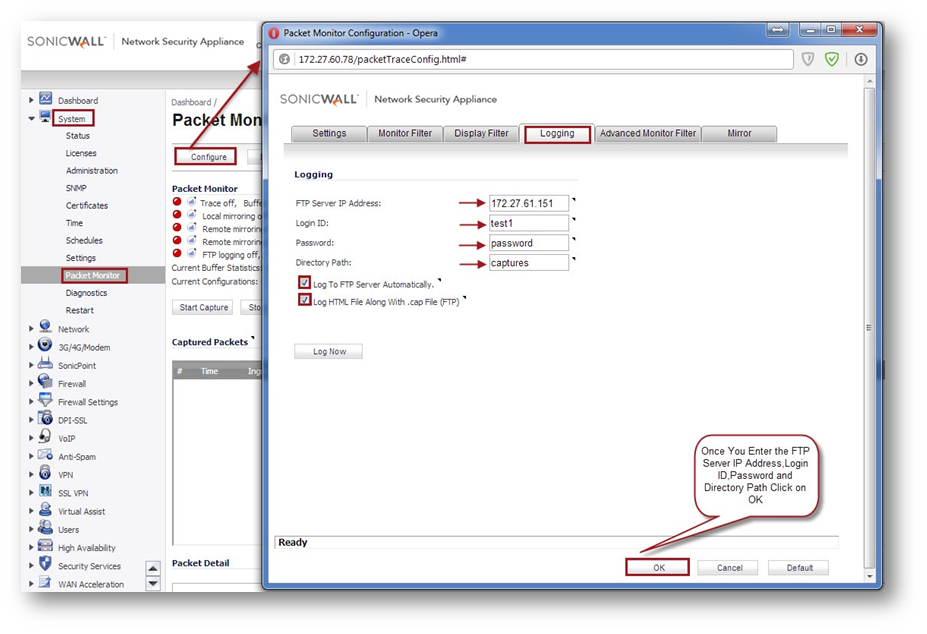
- On Logging tab, Enter the FTP server address,Login ID,Password and Directory Path.
- Ensure that you have enabled Log to FTP Server Automatically and Log HTML File Along with .cap File and then click on OK.
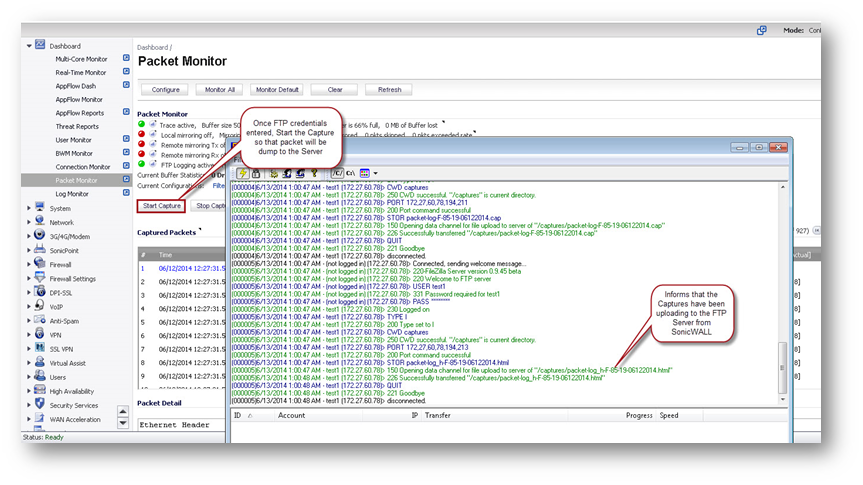
- Start the Capture so that SonicWall will capture the packet and then will dump into the FTP server Automatically.
- If you login to FileZilla Server Interface will see that captures are dump into it automatically.
- If we navigate to the directory or the folder that been specified on the machine, we can see the packet captures and can analyze it according to our needs.
Related Articles
- How to Block Google QUIC Protocol on SonicOSX 7.0?
- How to block certain Keywords on SonicOSX 7.0?
- How internal Interfaces can obtain Global IPv6 Addresses using DHCPv6 Prefix Delegation
Categories
- Firewalls > TZ Series
- Firewalls > SonicWall SuperMassive E10000 Series
- Firewalls > SonicWall SuperMassive 9000 Series
- Firewalls > SonicWall NSA Series


 YES
YES NO
NO