-
Products
-
SonicPlatform
SonicPlatform is the cybersecurity platform purpose-built for MSPs, making managing complex security environments among multiple tenants easy and streamlined.
Discover More
-
-
Solutions
-
Federal
Protect Federal Agencies and Networks with scalable, purpose-built cybersecurity solutions
Learn MoreFederalProtect Federal Agencies and Networks with scalable, purpose-built cybersecurity solutions
Learn More - Industries
- Use Cases
-
-
Partners
-
Partner Portal
Access to deal registration, MDF, sales and marketing tools, training and more
Learn MorePartner PortalAccess to deal registration, MDF, sales and marketing tools, training and more
Learn More - SonicWall Partners
- Partner Resources
-
-
Support
-
Support Portal
Find answers to your questions by searching across our knowledge base, community, technical documentation and video tutorials
Learn MoreSupport PortalFind answers to your questions by searching across our knowledge base, community, technical documentation and video tutorials
Learn More - Support
- Resources
- Capture Labs
-
- Company
- Contact Us
How to configure SonicWall as a Radius accounting server for Single Sign On


Description
Configuring the SonicWall to use RADIUS Accounting messages sent from the customer's network access server for Single sign-on (SSO)in the network.
When customer uses a third-party network access appliance to perform user authentication (typically for remote or wireless access) and the appliance supports RADIUS accounting, a SonicWall appliance can act as the RADIUS Accounting Server and can use RADIUS Accounting messages sent from the customer's network access server for single sign-on (SSO) in the network.
RADIUS Accounting Messages:
RADIUS accounting uses two types of accounting messages:
Accounting-Request
Accounting-Response
An Accounting-Request can send one of three request types specified by the Status-Type attribute:
Start sent when a user logs in.
Stop sent when a user logs out.
Interim-Update sent periodically during a user login session.
For SonicWall appliances to be compatible with third party network appliances for SSO via RADIUS Accounting, the third party appliance must be able to do the following:
Support RADIUS Accounting.
Send both Start and Stop messages. Sending Interim-Update messages is not required.
Send the user's IP address in either Framed-IP-Address or Calling-Station-Id attribute in both Start and Stop messages.
The user's login name should be sent in the User-Name attribute of Start messages and Interim-Update messages. The user's login name can also be sent in the User-Name attribute of Stop messages, but is not required. The User-Name attribute must contain the user's account name and may include the domain also, or it must contain the user's distinguished name (DN)
Resolution
Resolution for SonicOS 7.X
This release includes significant user interface changes and many new features that are different from the SonicOS 6.5 and earlier firmware. The below resolution is for customers using SonicOS 7.X firmware.
To configure your SonicWall security appliance, perform the following steps:
- Login to your SonicWall Management Interface.
- Click Device in the top navigation menu.
- Navigate to Users > Settings.
- Click on Configure SSO and SSO configuration page will appear.
- Click on Radius Accounting tab.
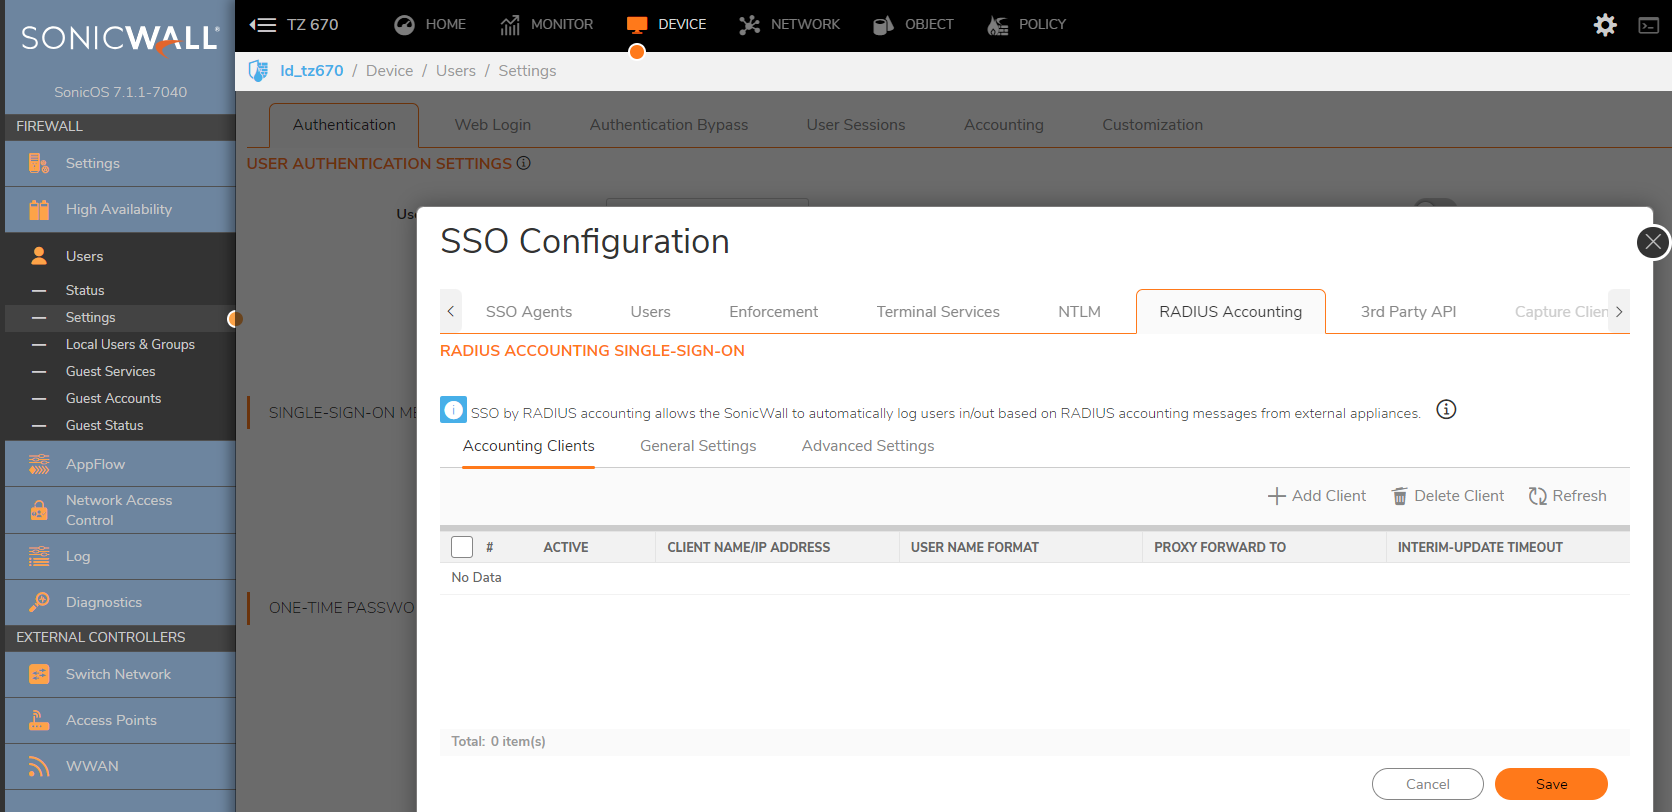
- Under Accounting Clients Click ADD
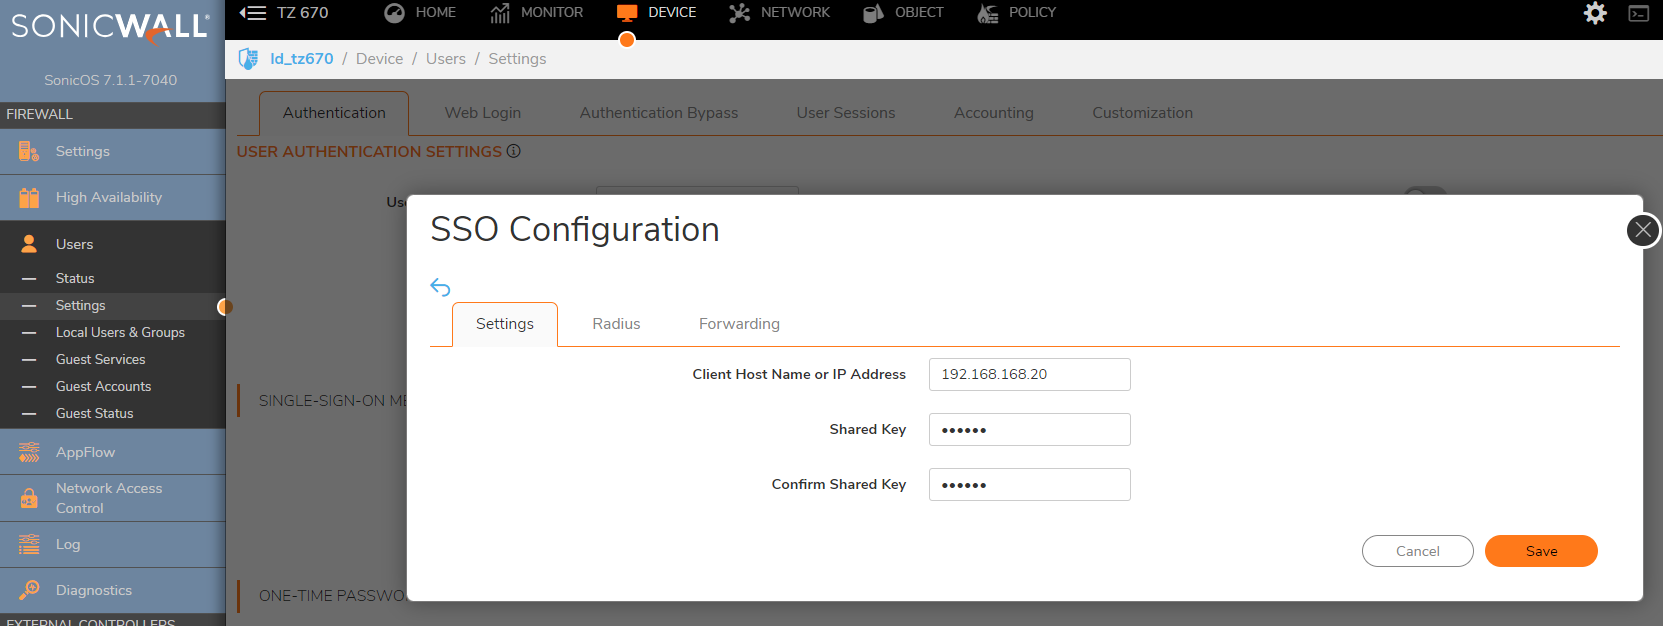
- In the Client host name or IP Address field, enter the name or IP Address of the third party network access appliance.
- In the Shared Secret field, enter the shared key that you created or generated in the network access appliance. The shared secret must match exactly. Re-enter the shared key in the Confirm Secret field.
-
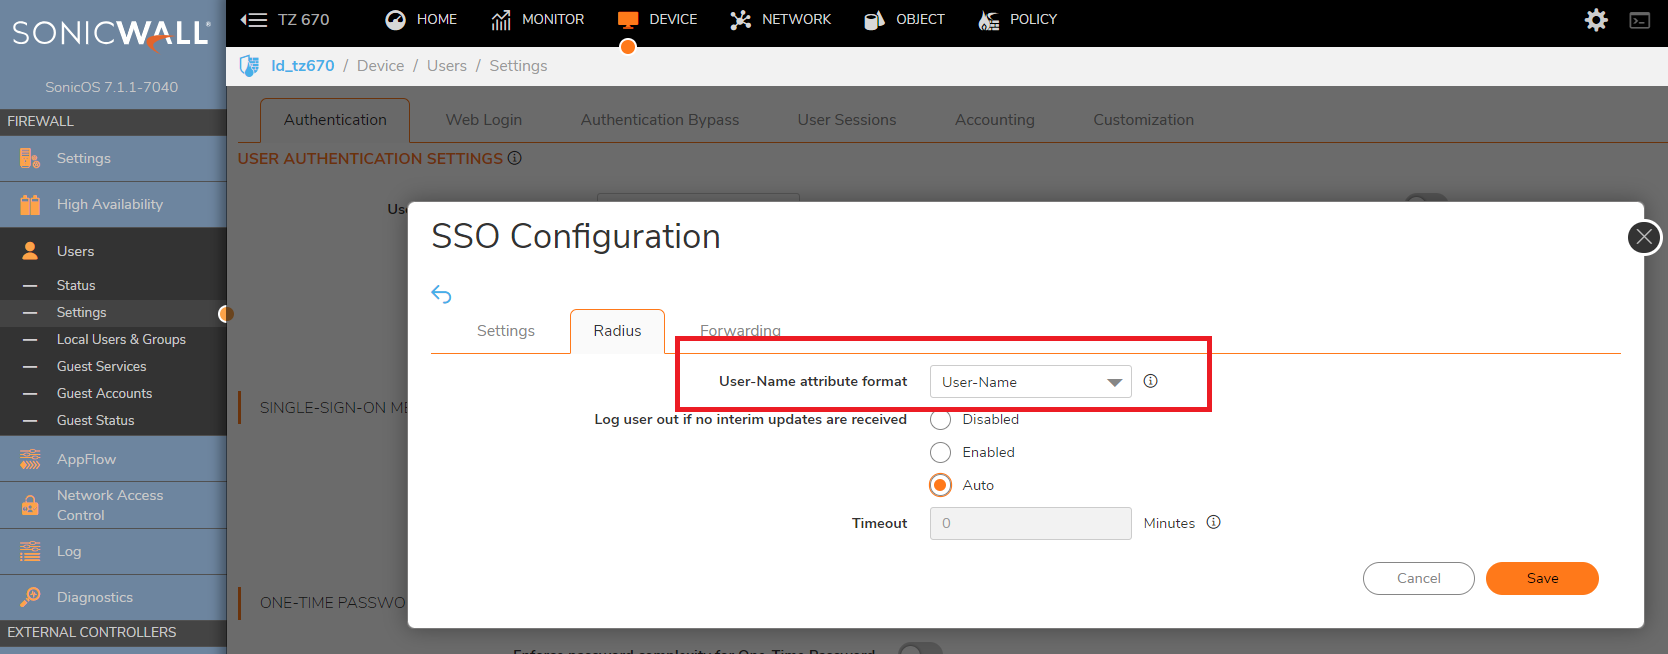
Click on Radius tab, and select the User-name attribute format from the drop-down list. SonicWall will use this format to identify the user from the Radius Accounting messages sent from the access servers.
-
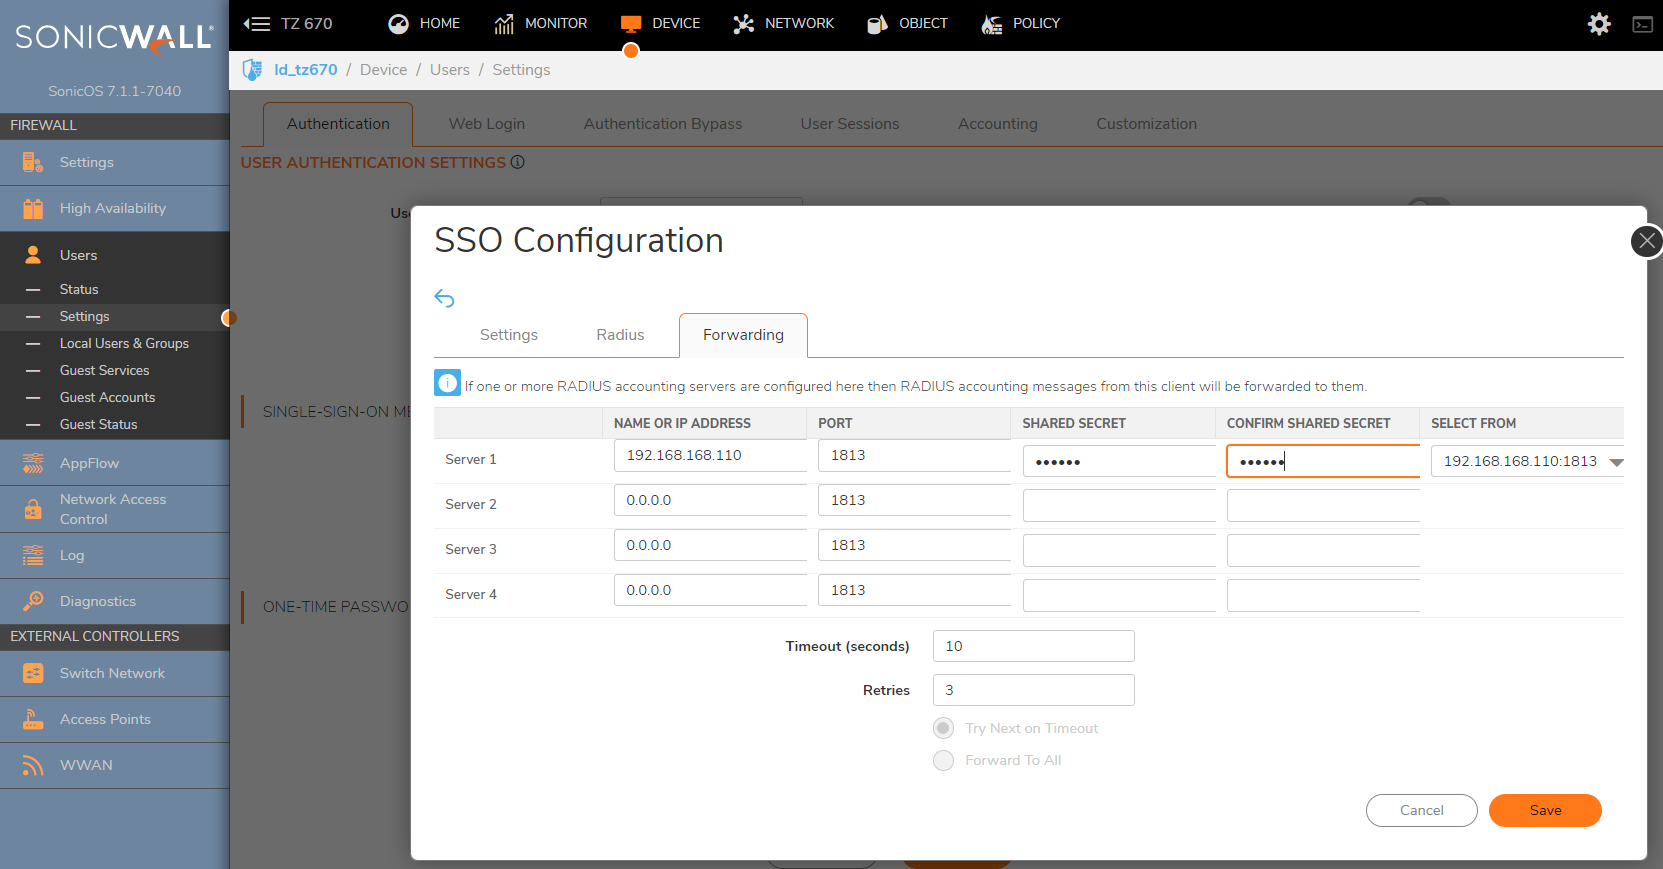
Click on Forwarding tab and enter the name or IP address of the Radius accounting servers. SonicWall can proxy-forward each Radius accounting messages to these Accounting servers.
-
Click on General settings page and select the check box "Enable SSO by Radius Accounting".
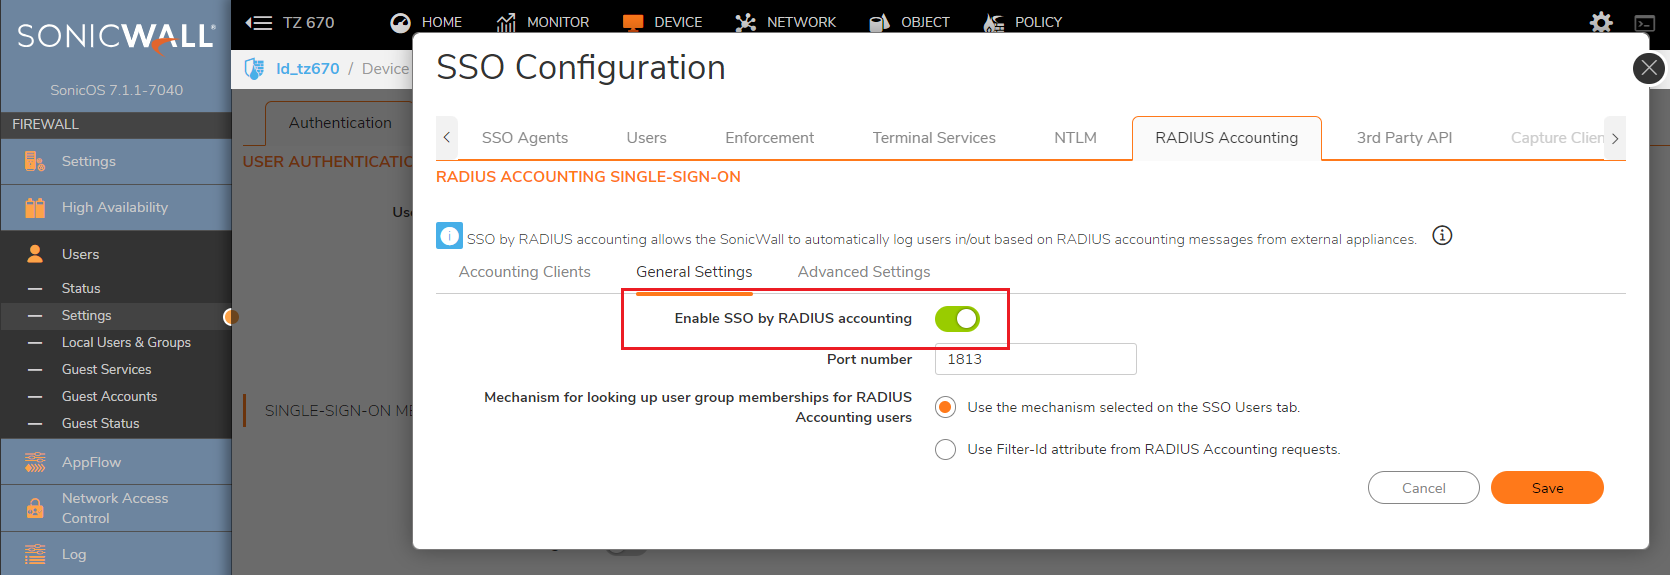
The SonicWall appliance listens on port 1813 by default. Other port numbers can be configured for the RADIUS accounting port, but the appliance can only listen on only one port. So, if you are using multiple network access servers (NASs), they must all be configured to communicate on the same port number.
Troubleshooting:
After configuring Radius accounting and still you are not able to see the authenticated users under User>Status page, run a packet capture on the device for the UDP port number 1813.
Export the capture in wireshark and check whether the Radius Accounting Request is sent from the access servers. The Radius Accounting Request Status type should be Start and it should contain the Framed-IP-Address (Client's IP address), User name attribute.
Resolution for SonicOS 6.5
This release includes significant user interface changes and many new features that are different from the SonicOS 6.2 and earlier firmware. The below resolution is for customers using SonicOS 6.5 firmware.
To configure your SonicWall security appliance, perform the following steps:
- Login to your SonicWall Management Interface.
- Click Manage in the top navigation menu.
- Navigate to Users > Settings.
- Click on Configure SSO and SSO configuration page will appear.
- Click on Radius Accounting tab.
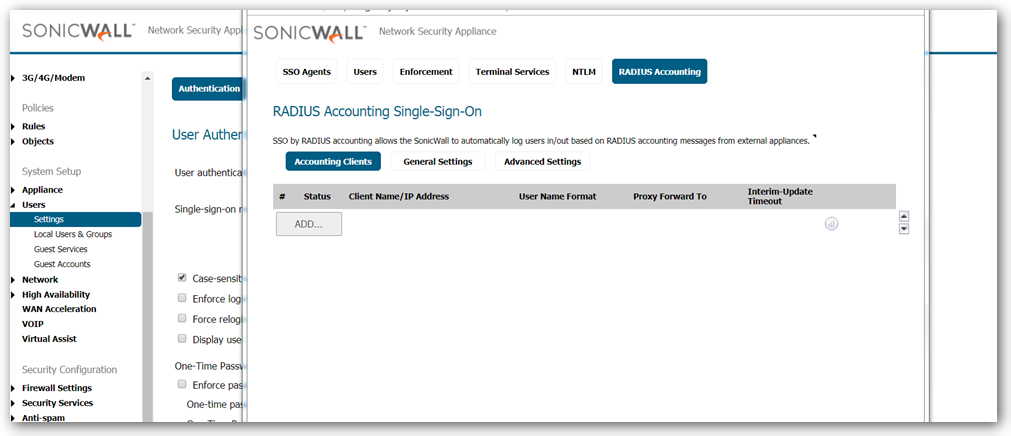
- Under Accounting Clients Click ADD
- In the Client host name or IP Address field, enter the name or IP Address of the third party network access appliance.
- In the Shared Secret field, enter the shared key that you created or generated in the network access appliance. The shared secret must match exactly. Re-enter the shared key in the Confirm Secret field.
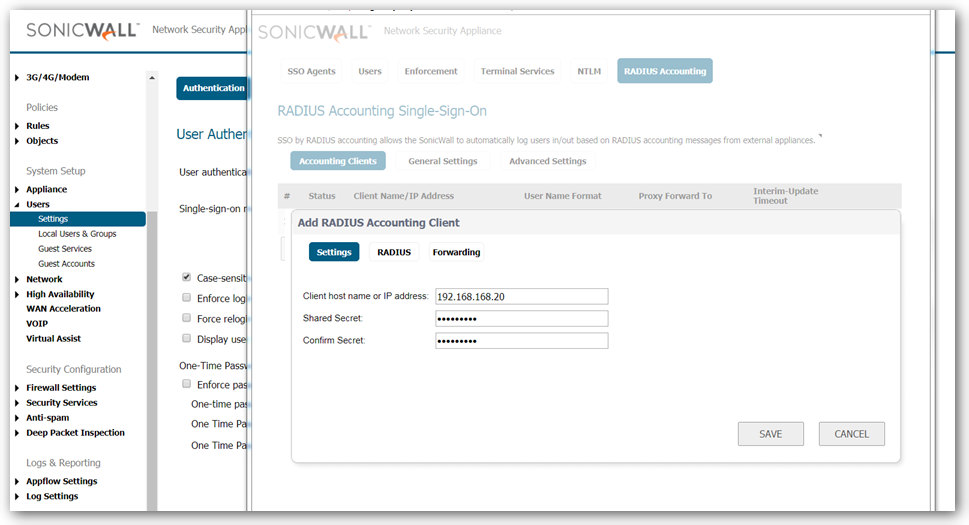
- Click on Radius tab, and select the User-name attribute format from the drop-down list. SonicWall will use this format to identify the user from the Radius Accounting messages sent from the access servers.
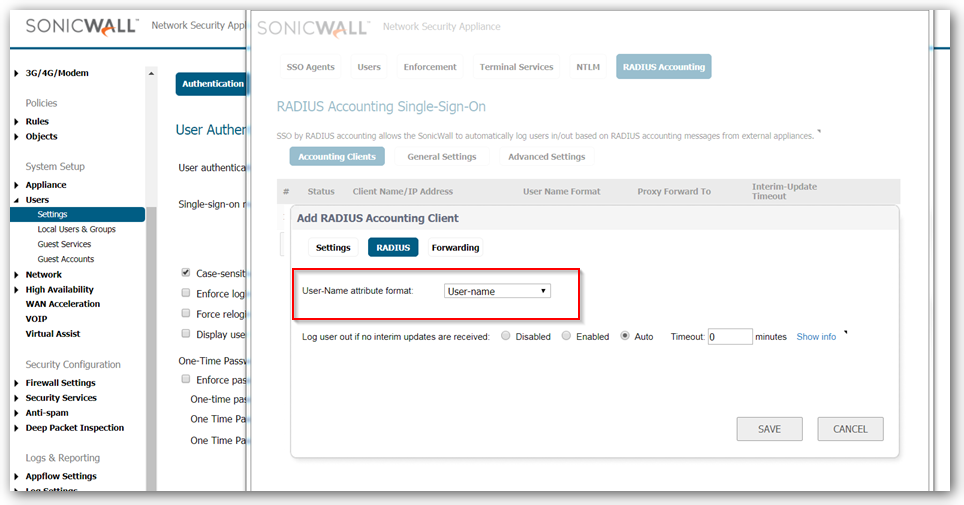
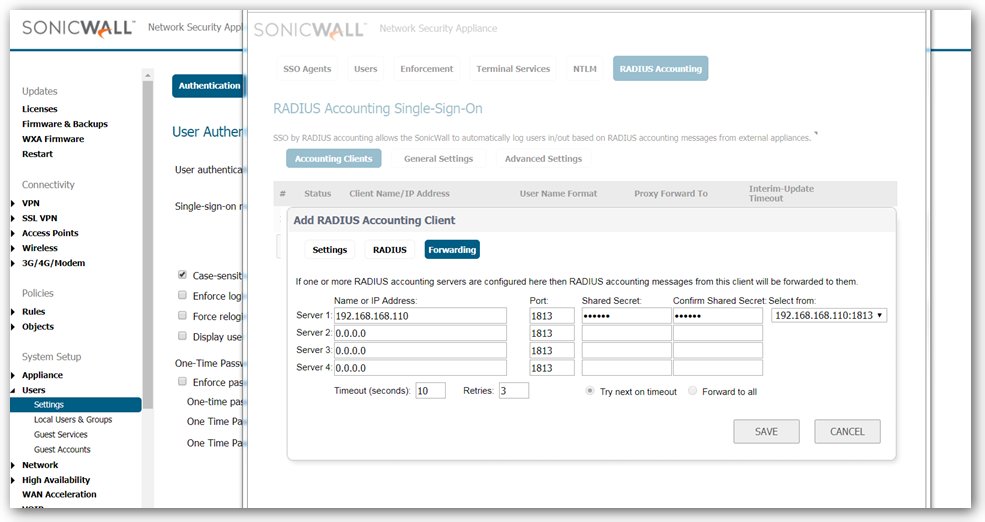
- Click on Forwarding tab and enter the name or IP address of the Radius accounting servers. SonicWall can proxy-forward each Radius accounting messages to these Accounting servers.
- Click on General settings page and select the check box "Enable SSO by Radius Accounting".
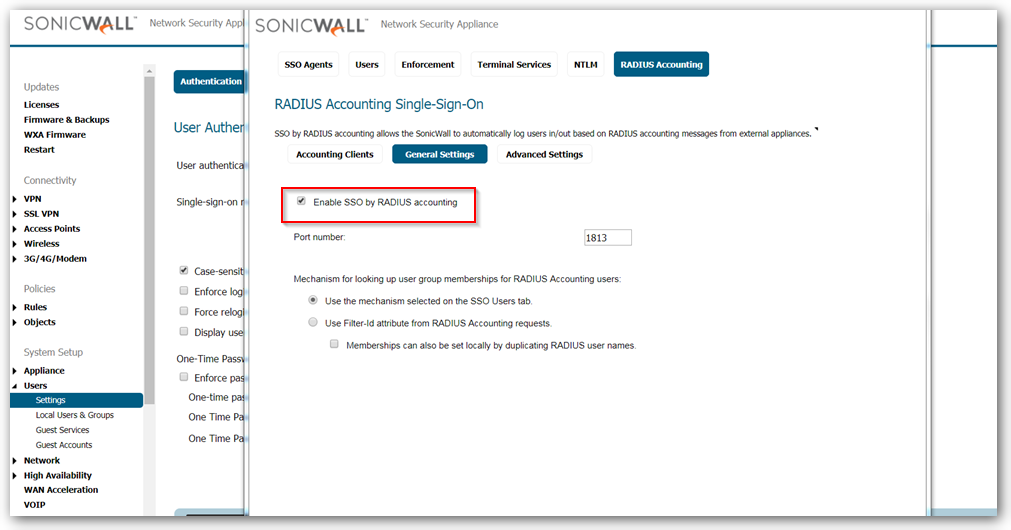
The SonicWall appliance listens on port 1813 by default. Other port numbers can be configured for the RADIUS accounting port, but the appliance can only listen on only one port. So, if you are using multiple network access servers (NASs), they must all be configured to communicate on the same port number.
Troubleshooting:
After configuring Radius accounting and still you are not able to see the authenticated users under User>Status page, run a packet capture on the device for the UDP port number 1813.
Export the capture in wireshark and check whether the Radius Accounting Request is sent from the access servers. The Radius Accounting Request Status type should be Start and it should contain the Framed-IP-Address (Client's IP address), User name attribute.
Resolution for SonicOS 6.2 and Below
The below resolution is for customers using SonicOS 6.2 and earlier firmware. For firewalls that are generation 6 and newer we suggest to upgrade to the latest general release of SonicOS 6.5 firmware.
To configure your SonicWall security appliance, perform the following steps:
Step 1 Login to your SonicWall security appliance.
Step 2 Navigate to Users > Settings.
Step 3 Click on Configure SSO and SSO configuration page will appear.
Step 4 Click on Radius Accounting tab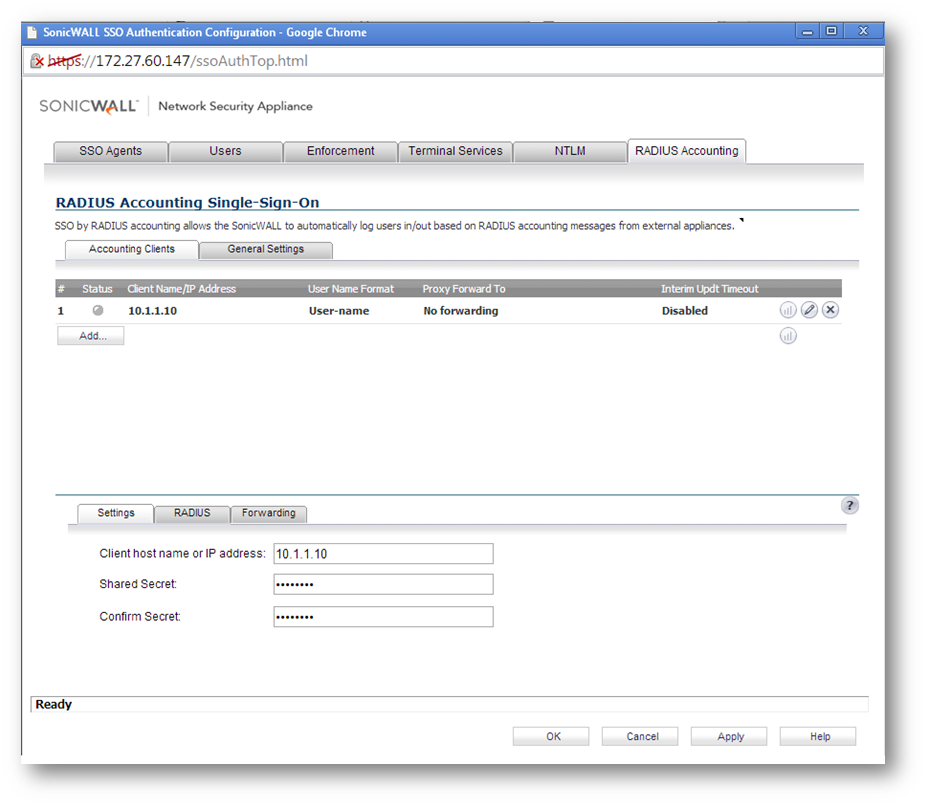
Step 5 In the Client host name or IP Address field, enter the name or IP Address of the third party network access appliance.
Step 6 In the Shared Secret field, enter the shared key that you created or generated in the network access appliance. The shared secret must match exactly. Re-enter the shared key in the Confirm Secret field.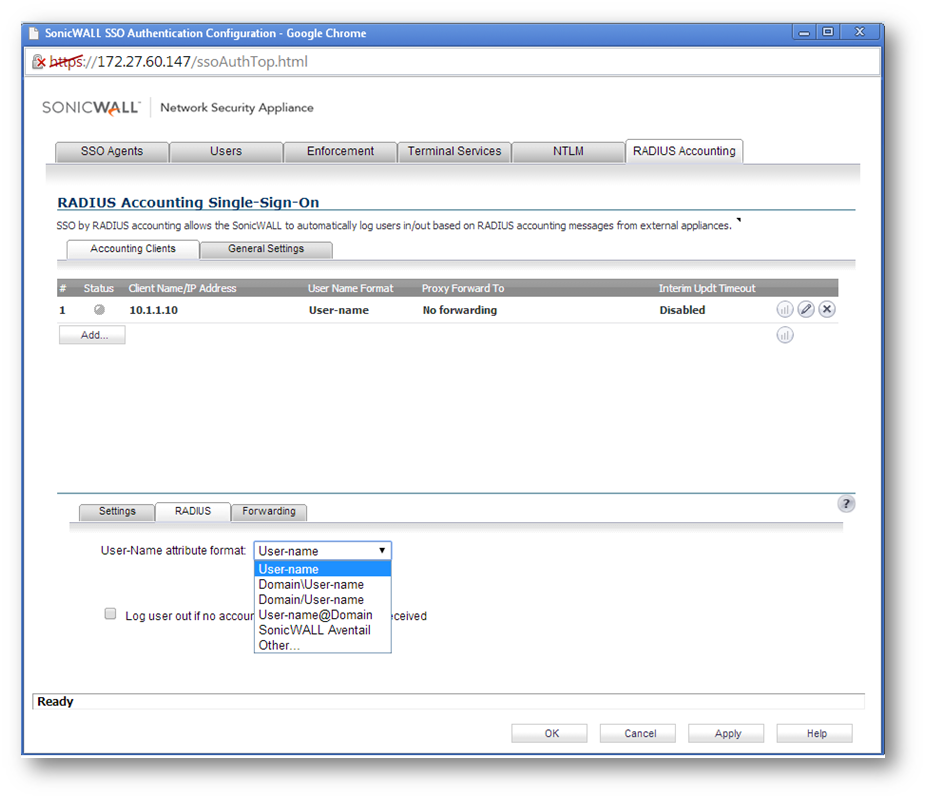
Step 7 Click on Radius tab, and select the User-name attribute format from the drop-down list. SonicWall will use this format to identify the user from the Radius Accounting messages sent from the access servers.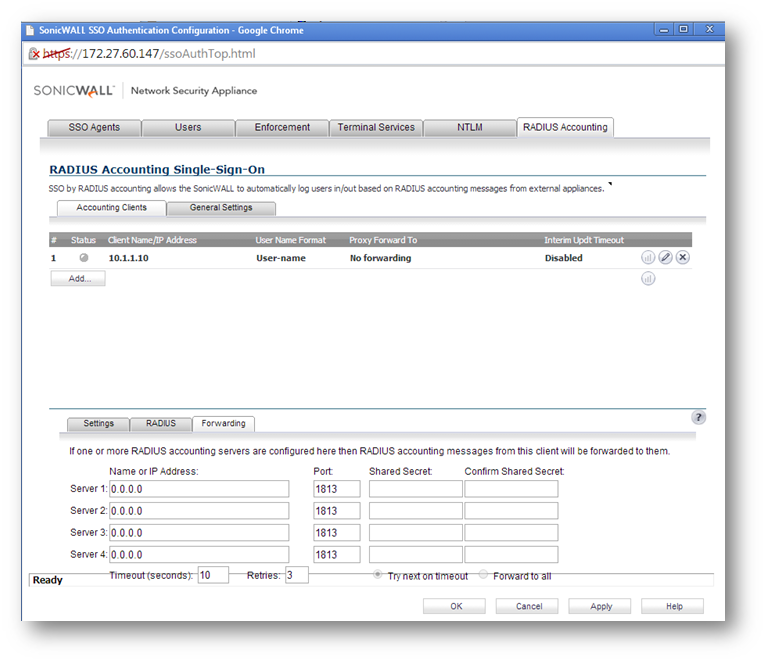
Step 8 Click on Forwarding tab and enter the name or IP address of the Radius accounting servers. SonicWall can proxy-forward each Radius accounting messages to these Accounting servers.
Step 9 Click on General settings page and select the check box "Enable SSO by Radius Accounting". 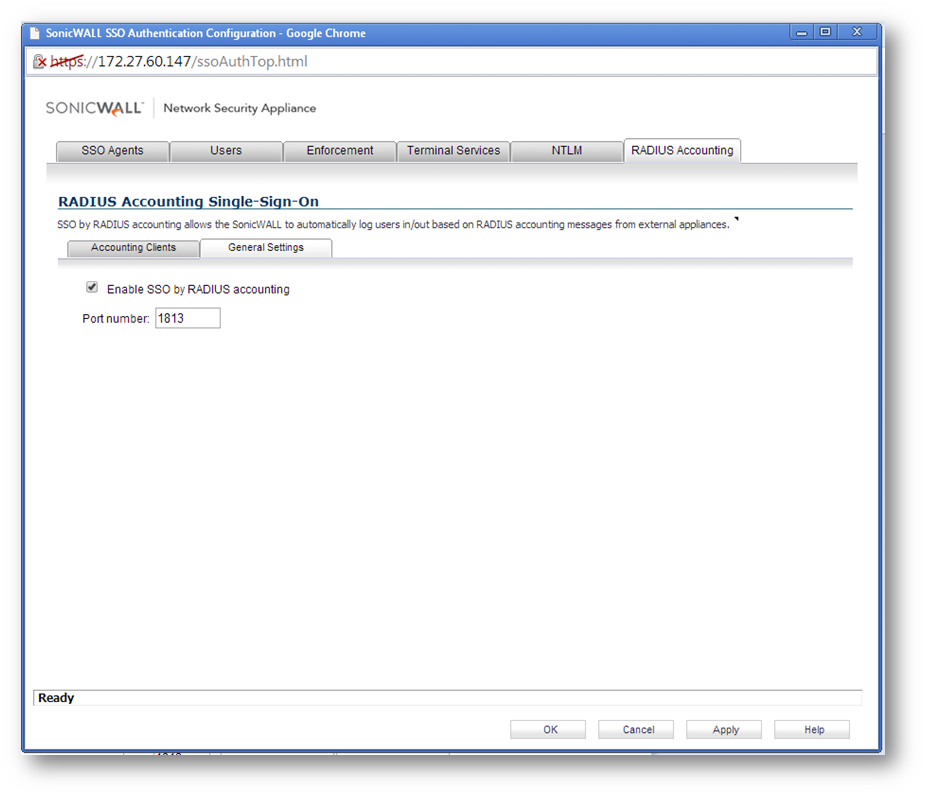
The SonicWall appliance listens on port 1813 by default. Other port numbers can be configured for the RADIUS accounting port, but the appliance can only listen on only one port. So, if you are using multiple network access servers (NASs), they must all be configured to communicate on the same port number.
Troubleshooting:
>After configuring Radius accounting and still you are not able to see the authenticated users under User>Status page, run a packet capture on the device for the UDP port number 1813.
>Export the capture in wireshark and check whether the Radius Accounting Request is sent from the access servers. The Radius Accounting Request Status type should be Start and it should contain the Framed-IP-Address (Client's IP address), User name attribute.
Related Articles
- Error:"Invalid API Argument" when modifying the access rules
- Cysurance Partner FAQ
- Configure probe monitoring for WAN Failover and Loadbalancing - SonicWall UTM
Categories
- Firewalls > TZ Series
- Firewalls > SonicWall SuperMassive 9000 Series
- Firewalls > SonicWall SuperMassive E10000 Series


 YES
YES NO
NO