


-
Products
-
SonicPlatform
SonicPlatform is the cybersecurity platform purpose-built for MSPs, making managing complex security environments among multiple tenants easy and streamlined.
Discover More
-
-
Solutions
-
Federal
Protect Federal Agencies and Networks with scalable, purpose-built cybersecurity solutions
Learn MoreFederalProtect Federal Agencies and Networks with scalable, purpose-built cybersecurity solutions
Learn More - Industries
- Use Cases
-
-
Partners
-
Partner Portal
Access to deal registration, MDF, sales and marketing tools, training and more
Learn MorePartner PortalAccess to deal registration, MDF, sales and marketing tools, training and more
Learn More - SonicWall Partners
- Partner Resources
-
-
Support
-
Support Portal
Find answers to your questions by searching across our knowledge base, community, technical documentation and video tutorials
Learn MoreSupport PortalFind answers to your questions by searching across our knowledge base, community, technical documentation and video tutorials
Learn More - Support
- Resources
- Capture Labs
-
- Company
- Contact Us
How to configure redundant routes for Route Based VPN
 10/14/2021
  883 People found this article helpful
 492,044 Views

Description
Route Based VPN configuration, introduced in SonicOS Enhanced 5.5, creates a Tunnel Interface between two end points. Static routes can then be added to the Tunnel Interface for reaching the remote networks.The static route may contain the source, destination and service to the Tunnel Interface. The advantages of Route Based VPN are:
- Any number of overlapping static routes can be added for the tunneled traffic.
- Multiple route entries can be configured to use the same tunnel interface for different networks.
- Multiple overlapping static routes, each static route using a different tunnel interface to route the traffic, provides routing redundancy for the traffic to reach the destination.
This article illustrates how to configure redundant static routes to route traffic to a destination network over a secondary Tunnel Interface when the primary interface fails.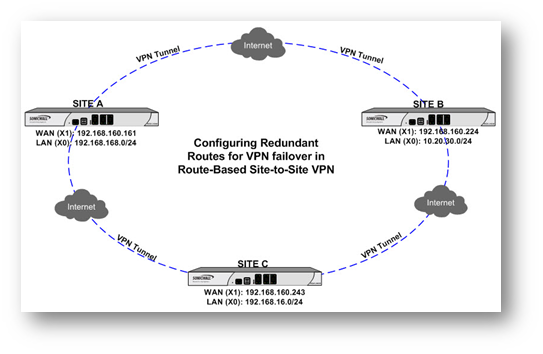
Resolution
Resolution for SonicOS 6.5
This release includes significant user interface changes and many new features that are different from the SonicOS 6.2 and earlier firmware. The below resolution is for customers using SonicOS 6.5 firmware.
The scenario illustrated here is of 3 sites connected to each other over VPN using static routes. Each site has two VPN tunnels to the other side. The objective is - when one VPN tunnel is down, traffic is automatically routed throught second tunnel. The IP addresses shown here are examples only.
| Site A (New York) Configuration | Site B (Seattle) Configuration | Site C (San Jose) Configuration |
| WAN (X1) IP: 192.168.160.161 LAN (X0) Subnet: 192.168.168.0/24 | WAN (X1) IP: 192.168.160.224 LAN (X0) Subnet: 10.20.30.0/24 | WAN (X1) IP: 192.168.160.243 LAN (X0) Subnet: 192.168.16.0/24 |
This article does not describe how to create a Route-Based VPN. For configuring a Route-Based VPN, please check this KB article ID: 7902
Site A (New York) Configuration
Login to the SonicWall Management GUI.
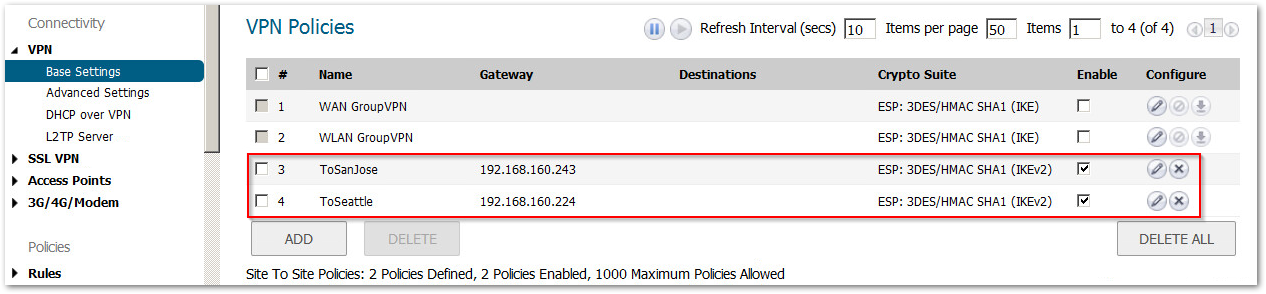
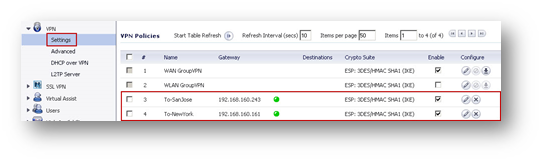
Under Manage in the top navigation menu. Click VPN | Base Settings and create the following Tunnel Interface VPNs:
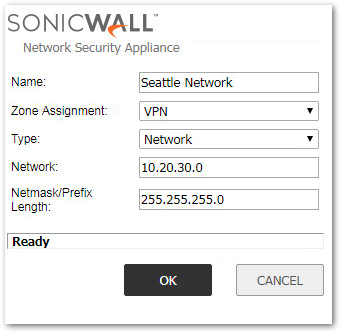
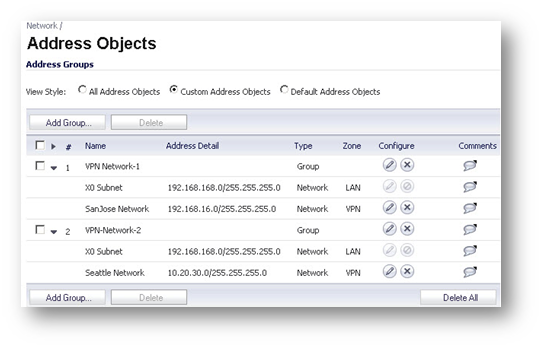
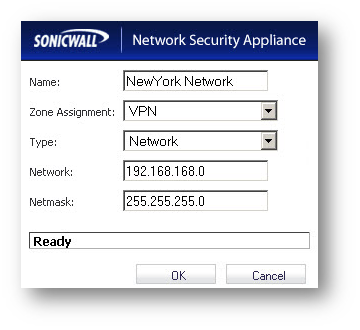
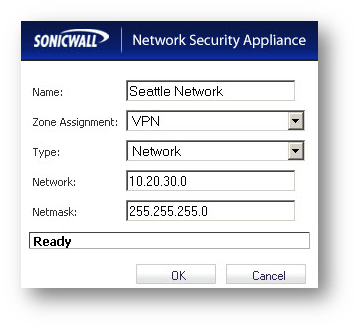
Create the following Address Objects for the destination networks under Objects | Address Objects.

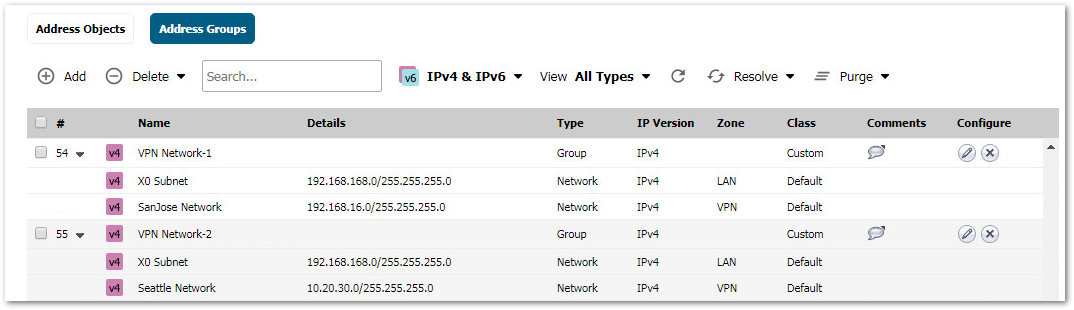
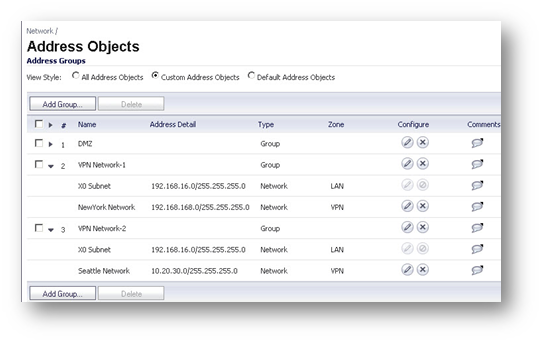
Create the following Address Groups containing the local subnet and one of the destination network in each group.
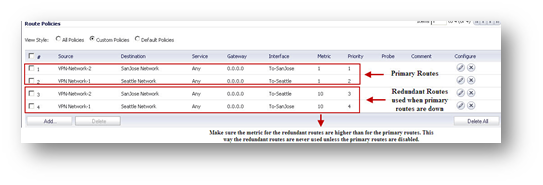
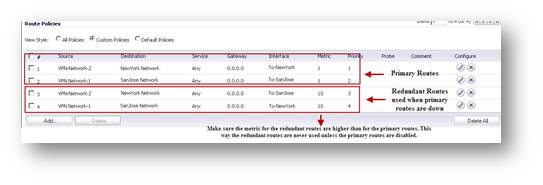
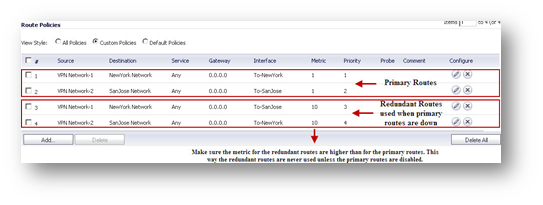
Create the following static routes under Network | Routing. Make sure the metric for the redundant routes are higher than for the primary routes. This way the redundant routes are never used unless the primary routes are disabled.
When creating the routes enable the following options:
- Enable option Auto-add Access Rule to create LAN to VPN and VPN to LAN access rules
- Enable option Disable route when the interface is disconnected
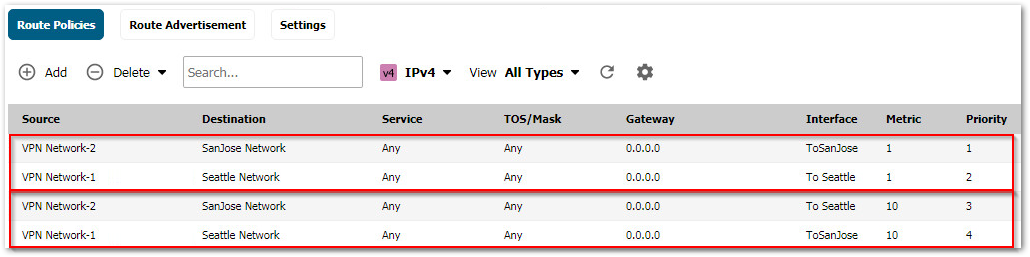
Site B (Seattle) Configuration
Login to the SonicWall Management GUI.
Under Manage in the top navigation menu. Click VPN | Base Settings and create the following Tunnel Interface VPNs:

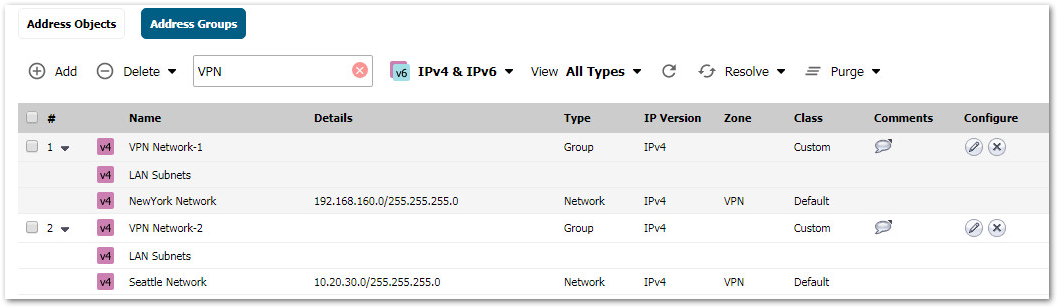
Create the following Address Objects for the destination networks under Objects | Address Objects.


Create the following Address Groups containing the local subnet and one of the destination network in each group.
Create the following static routes under Network | Routing. Make sure the metric for the redundant routes are higher than for the primary routes. This way the redundant routes are never used unless the primary routes are disabled.
When creating the routes enable the following options:
- Enable option Auto-add Access Rule to create LAN > VPN and VPN > LAN access rules
- Enable option Disable route when the interface is disconnected.
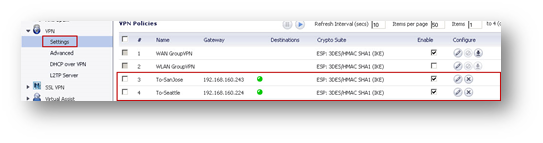
Site C (San Jose) Configuration
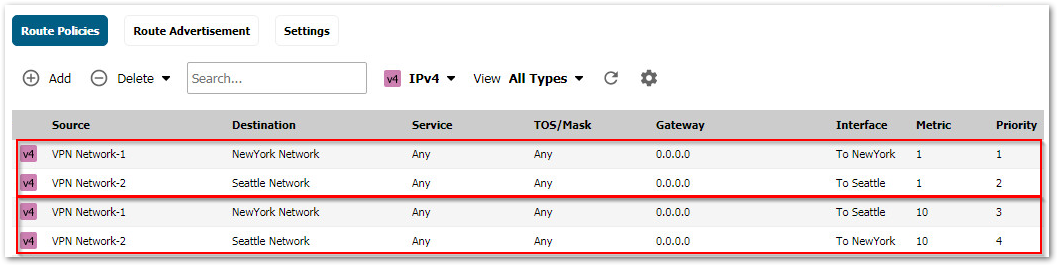
Login to the SonicWall Management GUI.
Under Manage in the top navigation menu. Click VPN | Base Settings and create the following Tunnel Interface VPNs:
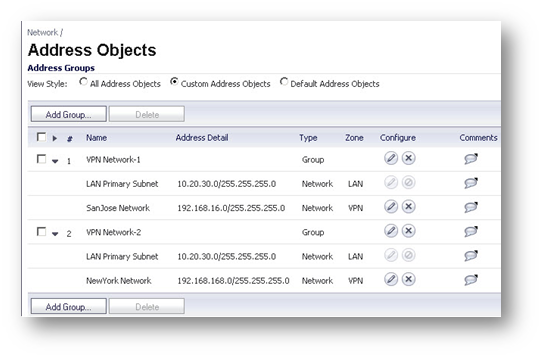
Create the following Address Objects for the destination networks under Objects | Address Objects.
Create the following Address Groups containing the local subnet and one of the destination network in each group.
Create the following static routes under Network | Routing. Make sure the metric for the redundant routes are higher than for the primary routes. This way the redundant routes are never used unless the primary routes are disabled.
When creating the routes enable the following options:
- Enable option Auto-add Access Rule to create LAN > VPN and VPN > LAN access rules
- Enable option Disable route when the interface is disconnected.
How to Test:
- Make sure the tunnels are up and traffic is passing between all sites.
- Start a continuous ping from Site A to Site C.
- In Site A, disable the VPN to Site C.
- The ping to Site C should continue after a brief interruption during the switch over to the alternate route.
- This would prove the redundant routes are working.
- Perform similar tests from Site B and Site C.
Troubleshooting:
If unable to ping the remote site when the VPN to that site is down, the failover routes are not working.
- Check whether the Zones of the address objects for the remote sites is VPN.
- Make sure Disable route when the interface is disconnected is checked is enabled.
- Check whether LAN > VPN and VPN > LAN access rules have been auto-added. If not added, create them manually.
- Make sure there are no conflicting deny rules in the Access Rules.
- Check whether the Source of each route, across all sites, contains the local subnet as well as one of the remote sites. For eg. a route to reach Site C should have in its Source the local subnet and Site B network.
- Do a packet capture to see where the packet is dropping.
Resolution for SonicOS 6.2 and Below
The below resolution is for customers using SonicOS 6.2 and earlier firmware. For firewalls that are generation 6 and newer we suggest to upgrade to the latest general release of SonicOS 6.5 firmware.
The scenario illustrated here is of 3 sites connected to each other over VPN using static routes. Each site has two VPN tunnels to the other side. The objective is - when one VPN tunnel is down, traffic is automatically routed throught second tunnel. The IP addresses shown here are examples only.
| Site A (New York) Configuration | Site B (Seattle) Configuration | Site C (San Jose) Configuration |
| WAN (X1) IP: 192.168.160.161 LAN (X0) Subnet: 192.168.168.0/24 | WAN (X1) IP: 192.168.160.224 LAN (X0) Subnet: 10.20.30.0/24 | WAN (X1) IP: 192.168.160.243 LAN (X0) Subnet: 192.168.16.0/24 |
This article does not describe how to create a Route-Based VPN. For configuring a Route-Based VPN, please check this KB article ID: 7902
Site A (New York) Configuration
Login to the SonicWall Management GUI.
Create the following Tunnel Interface VPNs under VPN > Settings.
Create the following Address Objects for the destination networks under Network > Address Objects.


Create the following Address groups containing the local subnet and one of the destination network in each group.
Create the following static routes under Network > Routing. Make sure the metric for the redundant routes are higher than for the primary routes. This way the redundant routes are never used unless the primary routes are disabled.
When creating the routes enable the following options:
- Enable option Auto-add Access Rule to create LAN to VPN and VPN to LAN access rules
- Enable option Disable route when the interface is disconnected
Site B (Seattle) Configuration
Login to the SonicWall Management GUI.
Create the following Tunnel Interface VPNs under VPN > Settings.
Create the following Address Objects for the destination networks under Network > Address Objects.


Create the following Address Groups containing the local subnet and one of the destination network in each group.
Create the following static routes under Network > Routing. Make sure the metric for the redundant routes are higher than for the primary routes. This way the redundant routes are never used unless the primary routes are disabled.
When creating the routes enable the following options:
- Enable option Auto-add Access Rule to create LAN > VPN and VPN > LAN access rules
- Enable option Disable route when the interface is disconnected.
Site C (San Jose) Configuration
Login to the SonicWall Management GUI.
Create the following Tunnel Interface VPNs under VPN > Settings.

Create the following Address Objects for the destination networks under Network > Address Objects.
Create the following Address Groups containing the local subnet and one of the destination network in each group.
Create the following static routes under Network > Routing. Make sure the metric for the redundant routes are higher than for the primary routes. This way the redundant routes are never used unless the primary routes are disabled.
When creating the routes enable the following options:
- Enable option Auto-add Access Rule to create LAN > VPN and VPN > LAN access rules
- Enable option Disable route when the interface is disconnected.
How to Test:
- Make sure the tunnels are up and traffic is passing between all sites.
- Start a continuous ping from Site A to Site C.
- In Site A, disable the VPN to Site C.
- The ping to Site C should continue after a brief interruption during the switch over to the alternate route.
- This would prove the redundant routes are working.
- Perform similar tests from Site B and Site C.
Troubleshooting:
If unable to ping the remote site when the VPN to that site is down, the failover routes are not working.
- Check whether the Zones of the address objects for the remote sites is VPN.
- Make sure Disable route when the interface is disconnected is checked is enabled.
- Check whether LAN > VPN and VPN > LAN access rules have been auto-added. If not added, create them manually.
- Make sure there are no conflicting deny rules in the Access Rules.
- Check whether the Source of each route, across all sites, contains the local subnet as well as one of the remote sites. For eg. a route to reach Site C should have in its Source the local subnet and Site B network.
- Do a packet capture to see where the packet is dropping.
Related Articles
- How to Block Google QUIC Protocol on SonicOSX 7.0?
- How to block certain Keywords on SonicOSX 7.0?
- How internal Interfaces can obtain Global IPv6 Addresses using DHCPv6 Prefix Delegation
Categories
- Firewalls > TZ Series
- Firewalls > SonicWall NSA Series
- Firewalls > SonicWall SuperMassive 9000 Series
- Firewalls > SonicWall SuperMassive E10000 Series
 YES
YES NO
NO