-
Products
-
SonicPlatform
SonicPlatform is the cybersecurity platform purpose-built for MSPs, making managing complex security environments among multiple tenants easy and streamlined.
Discover More
-
-
Solutions
-
Federal
Protect Federal Agencies and Networks with scalable, purpose-built cybersecurity solutions
Learn MoreFederalProtect Federal Agencies and Networks with scalable, purpose-built cybersecurity solutions
Learn More - Industries
- Use Cases
-
-
Partners
-
Partner Portal
Access to deal registration, MDF, sales and marketing tools, training and more
Learn MorePartner PortalAccess to deal registration, MDF, sales and marketing tools, training and more
Learn More - SonicWall Partners
- Partner Resources
-
-
Support
-
Support Portal
Find answers to your questions by searching across our knowledge base, community, technical documentation and video tutorials
Learn MoreSupport PortalFind answers to your questions by searching across our knowledge base, community, technical documentation and video tutorials
Learn More - Support
- Resources
- Capture Labs
-
- Company
- Contact Us
How to configure Per-IP Bandwidth Management on SonicOS 6.2 and above


Description
BWM Elementals is to provide a method of allowing a single BWM rule to apply to the individual elements of that rule. "Per-IP Bandwidth Management" BWM is introduced as the first "Elemental" feature. This feature is a sub-option of Bandwidth Object. When Per-IP BWM is enabled, each individual IP under its parent rule will be applied to the elemental bandwidth settings.
Resolution
This release includes significant user interface changes and many new features that are different from the SonicOS 6.2 and earlier firmware. The below resolution is for customers using SonicOS 6.5 firmware.Resolution for SonicOS 6.5
Step 1: Enabling Bandwidth Management Settings
- Login to the SonicWall Management GUI.
- Navigate to the Manage > Security Configuration > Firewall Settings | Bandwidth Management page.
- Select radio-button Advanced under Bandwidth Management Type.
- Click on Accept to save changes.
Note: Every time the Bandwidth Management Type is changed, all bandwidth management settings on the Firewall Rules will be reset to the factory defaults; therefore, you MUST reconfigure those rules.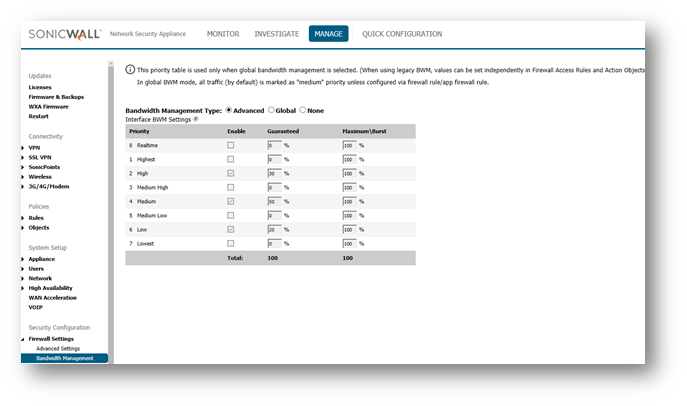
Step 2: Creating Bandwidth Object
Navigate to the Manage > Policies > Objects > Bandwidth Objects page, on top click Add button.
On the General tab
- Name: per-ip limitation (Type any Friendly Name)
- Guaranteed Bandwidth: 0 kbps (Type the required value which should be given out of total bandwidth)
- Maximum Bandwidth: 5 Mbps (Type the maximum value which can be given in more bandwidth available)
- Traffic Priority: 0 Realtime (Select priority out of eight default queue)
- Violation Action: Delay (Either select Delay or Drop for the traffic violating this bandwidth).
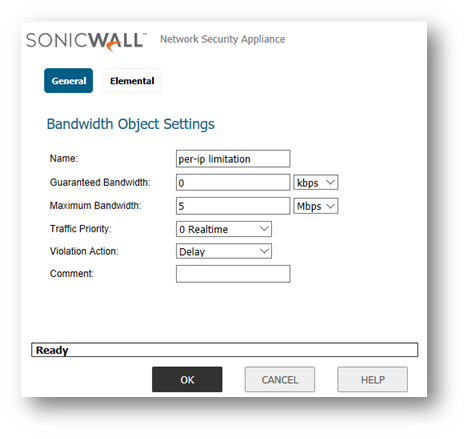
Click the Elemental tab
- Select Enable Per-IP Bandwidth Management
- Maximum Bandwidth: 1 Mbps (enter the maximum elemental bandwidth that can be allocated to a protocol under the parent traffic class)
- Click OK button to create the bandwidth object

Step 3: Creating access rule with Bandwidth Management
- Navigate to Manage > Policies > Rules > Access Rule page.
- Select the Matrix in the View Style section and go to LAN to WAN access rules.
- Click the Edit button of the default rule on the right side.
- Click the BWM tab.
-
Select "Enable Egress Bandwidth Management ('Allow' rules only)"
Bandwidth Object: per-ip limitation (Select the bandwidth object which you created) -
Select "Enable Ingress Bandwidth Management ('Allow' rules only)"
Bandwidth Object: per-ip limitation (Select the bandwidth object which you created) -
Click OK button to create access rule with bandwidth management.
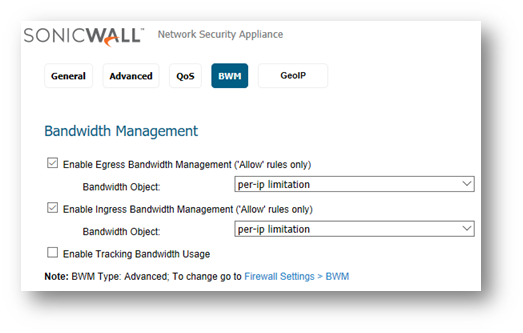
The access rule will have the bandwidth icon in it with status information
Step 4: Test on the client PC
FTP or other download tools could be used to test the download and upload speed, which should be less than 1Mbps per IP in this case. Here a speed test website was used on the client PC to verify the Bandwidth Management.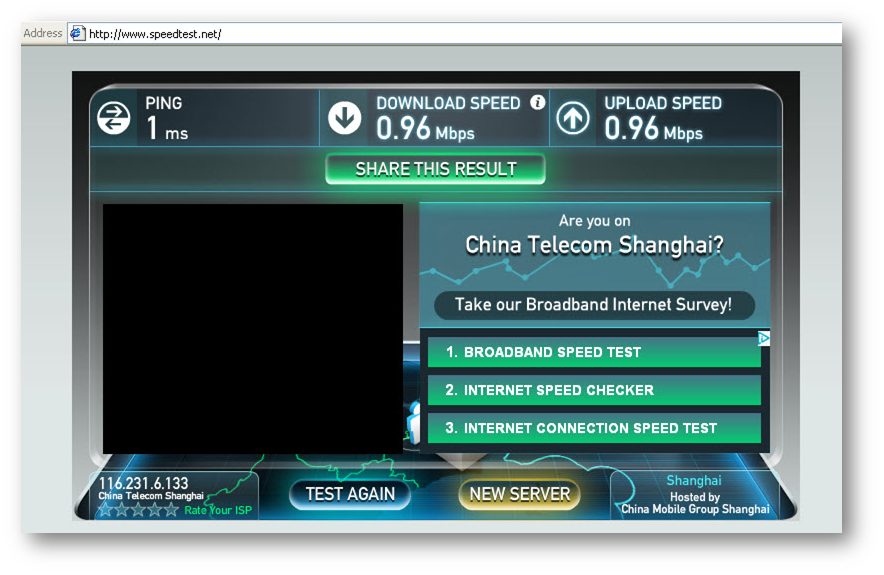
Resolution for SonicOS 6.2 and Below
The below resolution is for customers using SonicOS 6.2 and earlier firmware. For firewalls that are generation 6 and newer we suggest to upgrade to the latest general release of SonicOS 6.5 firmware.
Step 1: Enabling Bandwidth Management Settings
- Login to the SonicWall Management GUI.
- Navigate to the Firewall Settings | BWM page.
- Select radio-button Advanced under Bandwidth Management Type.
- Click on Accept to save changes.
Note: Every time the Bandwidth Management Type is changed, all bandwidth management settings on the Firewall Rules will be reset to the factory defaults; therefore, you MUST reconfigure those rules.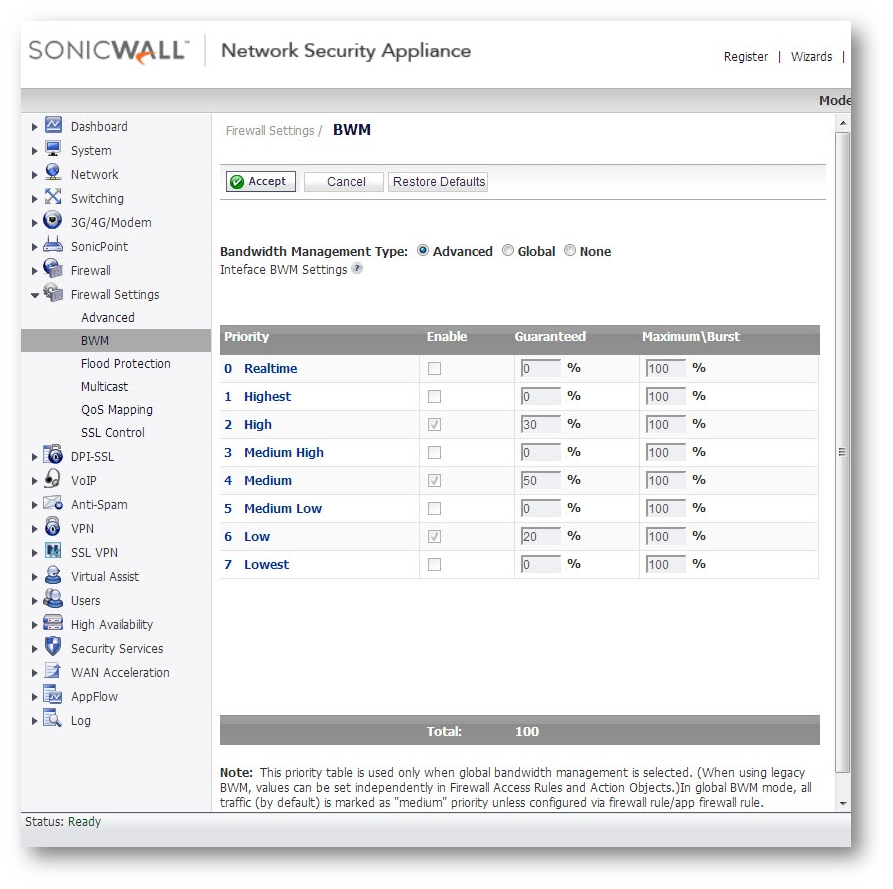
Step 2: Creating Bandwidth Object
Navigate to the Firewall | Bandwidth Objects page, on the left side click Add button.
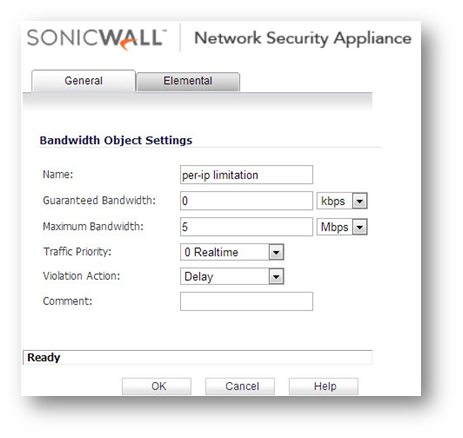
On the General tab
- Name: per-ip limitation (Type any Friendly Name)
- Guaranteed Bandwidth: 0 kbps (Type the required value which should be given out of total bandwidth)
- Maximum Bandwidth: 5 Mbps (Type the maximum value which can be given in more bandwidth available)
- Traffic Priority: 0 Realtime (Select priority out of eight default queue)
- Violation Action: Delay (Either select Delay or Drop for the traffic violating this bandwidth).
Click the Elemental tab
- Select Enable Per-IP Bandwidth Management
- Maximum Bandwidth: 1 Mbps (enter the maximum elemental bandwidth that can be allocated to a protocol under the parent traffic class)
- Click OK button to create the bandwidth object

Step 3: Creating access rule with Bandwidth Management
- Navigate to Firewall | Access Rule page.
- Select the Matrix in the View Style section and go to LAN to WAN access rules.
- Click the Edit button of the default rule on the right side.
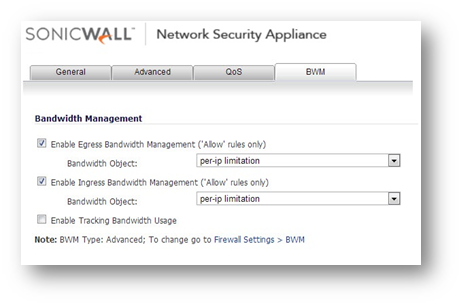
- Click the BWM tab.
-
Select "Enable Egress Bandwidth Management ('Allow' rules only)"
Bandwidth Object: per-ip limitation (Select the bandwidth object which you created) -
Select "Enable Ingress Bandwidth Management ('Allow' rules only)"
Bandwidth Object: per-ip limitation (Select the bandwidth object which you created) -
Click OK button to create access rule with bandwidth management.
The access rule will have the bandwidth icon in it with status information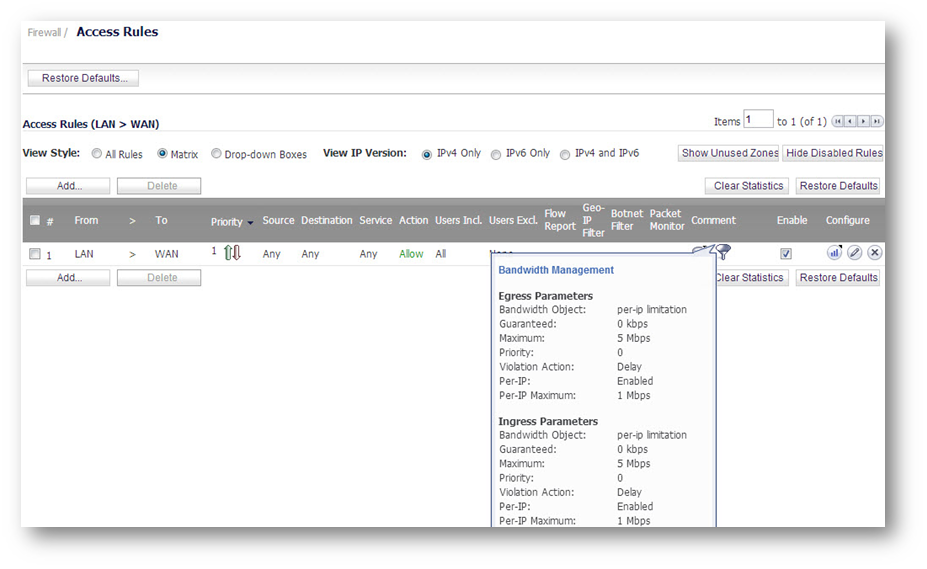
Step 4: Test on the client PC
FTP or other download tools could be used to test the download and upload speed, which should be less than 1Mbps per IP in this case. Here a speed test website was used on the client PC to verify the Bandwidth Management.
Related Articles
- Error:"Invalid API Argument" when modifying the access rules
- Cysurance Partner FAQ
- Configure probe monitoring for WAN Failover and Loadbalancing - SonicWall UTM
Categories
- Firewalls > TZ Series
- Firewalls > SonicWall NSA Series
- Firewalls > SonicWall SuperMassive 9000 Series
- Firewalls > SonicWall SuperMassive E10000 Series


 YES
YES NO
NO