-
Products
-
SonicPlatform
SonicPlatform is the cybersecurity platform purpose-built for MSPs, making managing complex security environments among multiple tenants easy and streamlined.
Discover More
-
-
Solutions
-
Federal
Protect Federal Agencies and Networks with scalable, purpose-built cybersecurity solutions
Learn MoreFederalProtect Federal Agencies and Networks with scalable, purpose-built cybersecurity solutions
Learn More - Industries
- Use Cases
-
-
Partners
-
Partner Portal
Access to deal registration, MDF, sales and marketing tools, training and more
Learn MorePartner PortalAccess to deal registration, MDF, sales and marketing tools, training and more
Learn More - SonicWall Partners
- Partner Resources
-
-
Support
-
Support Portal
Find answers to your questions by searching across our knowledge base, community, technical documentation and video tutorials
Learn MoreSupport PortalFind answers to your questions by searching across our knowledge base, community, technical documentation and video tutorials
Learn More - Support
- Resources
- Capture Labs
-
- Company
- Contact Us
How to Configure DNS Tunnel Detection in SonicOS 7.1.1


Description
DNS tunneling is a method of bypassing security controls and exfiltrating data from a targeted organization. A DNS tunnel can be used as a full remote-control channel for a compromised internal host. Capabilities include Operating System (OS) commands, file transfers, or even a full IP tunnel. SonicOS provides the ability to detect DNS tunneling attacks, displays suspicious clients, and allows you to create white lists for DNS tunnel detection.
When DNS tunneling detection is enabled, SonicOS logs whenever suspicious DNS packets are dropped.DNS Tunneling settings can be made at the group or unit level.
Topics Included are:
- Configuring DNS Tunnel Detection
- Detected Suspicious Client Information
- Creating White list for DNS Tunnel Detection
- Deleting White List Entries for DNS Tunnel Detection
Resolution
Configuring DNS Tunnel Detection
To configure DNS tunnel detection
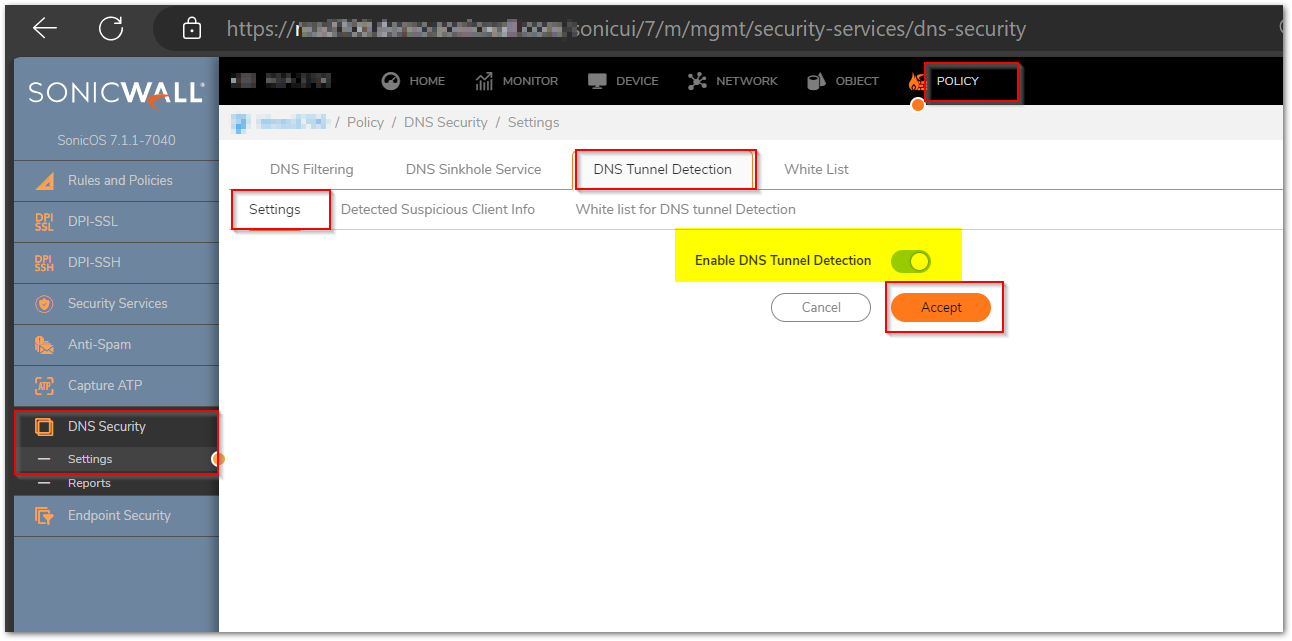
- Navigate to POLICY | DNS Security | Settings.
- Click the DNS Tunnel Detection tab.
- Under Settings, select Enable DNS Tunnel Detection to enable DNS tunnel detection.
- To block all the DNS traffic from the detected clients, select Block All The Clients DNS Traffic.
- Click Accept.

Detected Suspicious Client Information
SonicOS displays information about all hosts that have established a DNS tunnel in the Detected Suspicious Clients Info table.
To view detected suspicious client Information
- Navigate to POLICY | DNS Security | Settings.
- Hover over to the DNS Tunnel Detection tab.
- Click on the Detected Suspicious Clients Info tab

This table is populated only if DNS tunnel detection is enabled. Hosts are dropped only if blocking clients' DNS traffic is enabled.

Creating White list for DNS Tunnel Detection
You can create white lists for IP address you consider safe. If a detected DNS tunnel IP address matches an address in the white list, DNS tunnel detection is bypassed.
To create a DNS white list
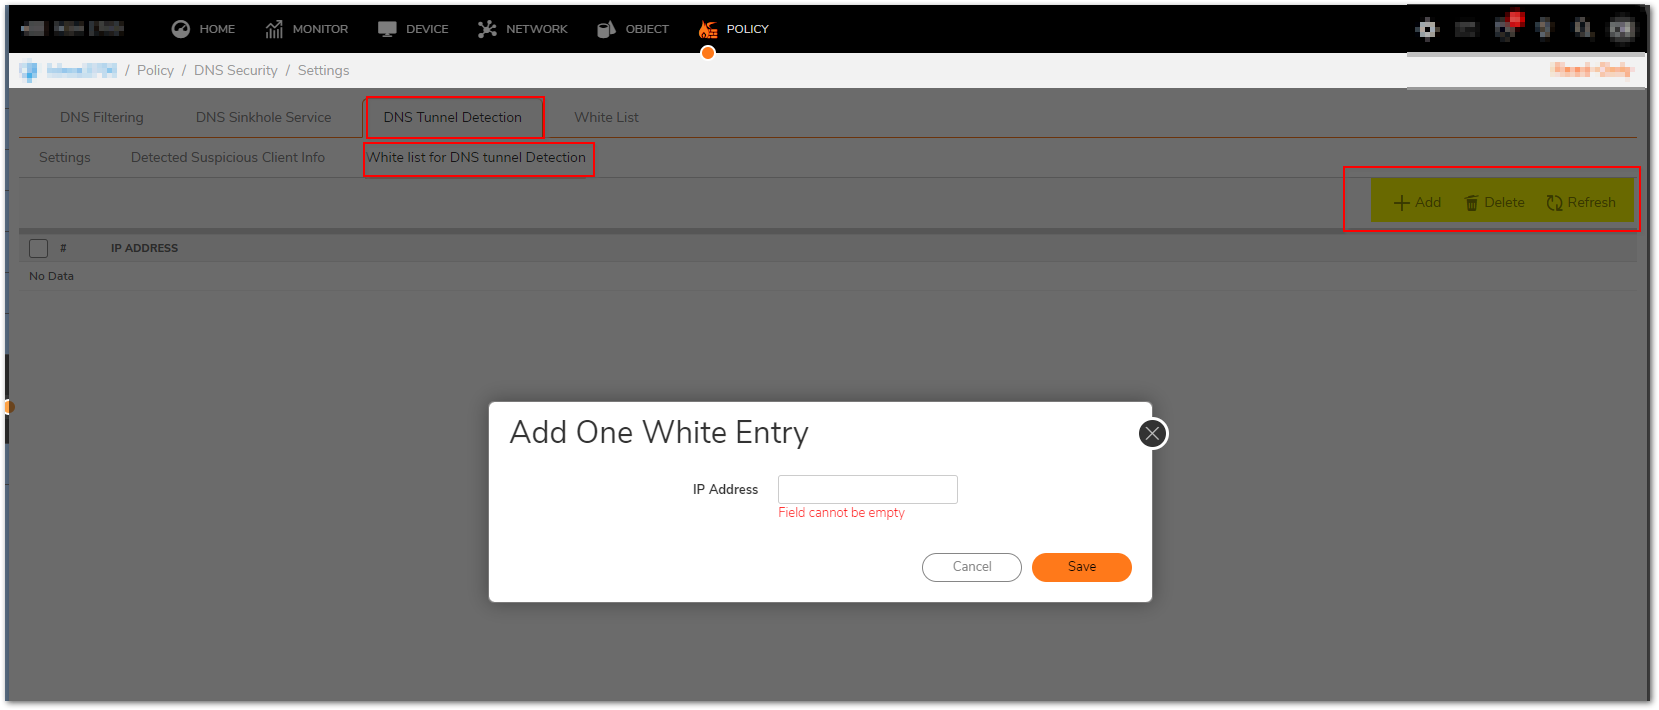
- Navigate to POLICY | DNS Security | Settings.
- Hover over to the DNS Tunnel Detection tab.
- Click on the White List for DNS Tunnel Detection tab.
- For each IP address, you want to add to the white list:
Click +Add. The Add One White Entry dialog displays.
In the IP Address field, enter the IP address of the domain to be added to the whitelist.
Click Save.
Deleting White List Entries for DNS Tunnel Detection
To delete all white list entries for DNS tunnel detection
- Navigate to POLICY | DNS Security | Settings.
- Hover over to the DNS Tunnel Detection tab.
- Click on the White List for DNS Tunnel Detection tab.
- Select an entry to delete or select the top checkbox next to the IP Address column to select all of the items.
- Click Delete.
To delete white list entry, click on the entry and click on DELETE.
Related Articles
- How to Block Google QUIC Protocol on SonicOSX 7.0?
- How to block certain Keywords on SonicOSX 7.0?
- How internal Interfaces can obtain Global IPv6 Addresses using DHCPv6 Prefix Delegation


 YES
YES NO
NO