-
Products
-
SonicPlatform
SonicPlatform is the cybersecurity platform purpose-built for MSPs, making managing complex security environments among multiple tenants easy and streamlined.
Discover More
-
-
Solutions
-
Federal
Protect Federal Agencies and Networks with scalable, purpose-built cybersecurity solutions
Learn MoreFederalProtect Federal Agencies and Networks with scalable, purpose-built cybersecurity solutions
Learn More - Industries
- Use Cases
-
-
Partners
-
Partner Portal
Access to deal registration, MDF, sales and marketing tools, training and more
Learn MorePartner PortalAccess to deal registration, MDF, sales and marketing tools, training and more
Learn More - SonicWall Partners
- Partner Resources
-
-
Support
-
Support Portal
Find answers to your questions by searching across our knowledge base, community, technical documentation and video tutorials
Learn MoreSupport PortalFind answers to your questions by searching across our knowledge base, community, technical documentation and video tutorials
Learn More - Support
- Resources
- Capture Labs
-
- Company
- Contact Us
How to configure DHCP Option 43 and Option 60


Description
The SonicWall DHCP server options feature provides support for DHCP options, also known as vendor extensions, as defined primarily in RFC 2131 and 2132. DHCP options allow users to specify additional DHCP parameters in the form of pre-defined, vendor-specific information that is stored in the options field of a DHCP message. When the DHCP message is sent to clients on the network, it provides vendor-specific configuration and service information.
This article describes how to configure DHCP option 43 and Option 60 in the SonicWall.
Cause
DHCP Option 43 is sent from server to client and contains Vendor-specific information that the DHCP server has been configured to offer to the client. The information is sent to the client only if the server has a Vendor Class Identifier (VCI) in its table that matches the VCI in the client’s DHCPREQUEST.
It is mainly designed to help Access Points in obtaining Controller IP address from the DHCP server while DHCP request to get an ip address is sent to the DHCP server by the Access Point. In addition to offering it an IP address , DHCP server may return one or more controller IP address to the AP.
DHCP Option 60 is used to define the VCI (Vendor class identifier) on the DHCP server and it is the same VCI which is included in the initial DHCP discover message that a DHCP client broadcasts in search of an IP address. Option 60 is used by DHCP clients (Access Points) in order to identify itself to the DHCP server.
When we define an option 60 in our DHCP scope in combination with the option 43, We instruct the DHCP server to return the content of option 43 only to those clients that present the right option 60. When the DHCP server sees a already configured VCI in a DHCP discover from a DHCP client, it returns the mapped vendor specific information in its DHCP offer to the client as DHCP Option 43. On the DHCP server , option 43 is defined in each DHCP pool (Scope) that offers IP address to the APs.
The purpose is to not send the content of option 43 to clients that do not need it, only to the clients using VCI in option 60.
WARNING: Don't configure Option 60 if you have different AP series in the same subnet and the VCI of the APs is different
Resolution
Resolution for SonicOS 7.X
This release includes significant user interface changes and many new features that are different from the SonicOS 6.5 and earlier firmware. The below resolution is for customers using SonicOS 7.X firmware.
STEP 1: Create the DHCP Option Object
To configure DHCP Option objects, perform the following steps:
- Login to the SonicWall Management GUI
- Click Network | System | DHCP Server page
- Click on the Advanced button alongside the Enable DHCPv4 Server.
- In the DHCP Advanced Settings window | Option Objects click on the + Add button and enter the following:
- Option Name: Enter a name for this object
- Option Number: Select 43 (Vendor Specific Information)
- Enable check box Option Array to enter multiple values separated by a semi-colon (;).
- Option Type: it will remain grayed out as One Byte Data
- Option Value: Enter the IP of the Controller using semi-colon instead of dots. For example, if the Controller IP is 192.168.168.50, it would become 192;168;168;50
 CAUTION: On some occasions, the prefix 01;04; will be needed and the final option value would become 01;04;192;168;168;50
 - Click Save.
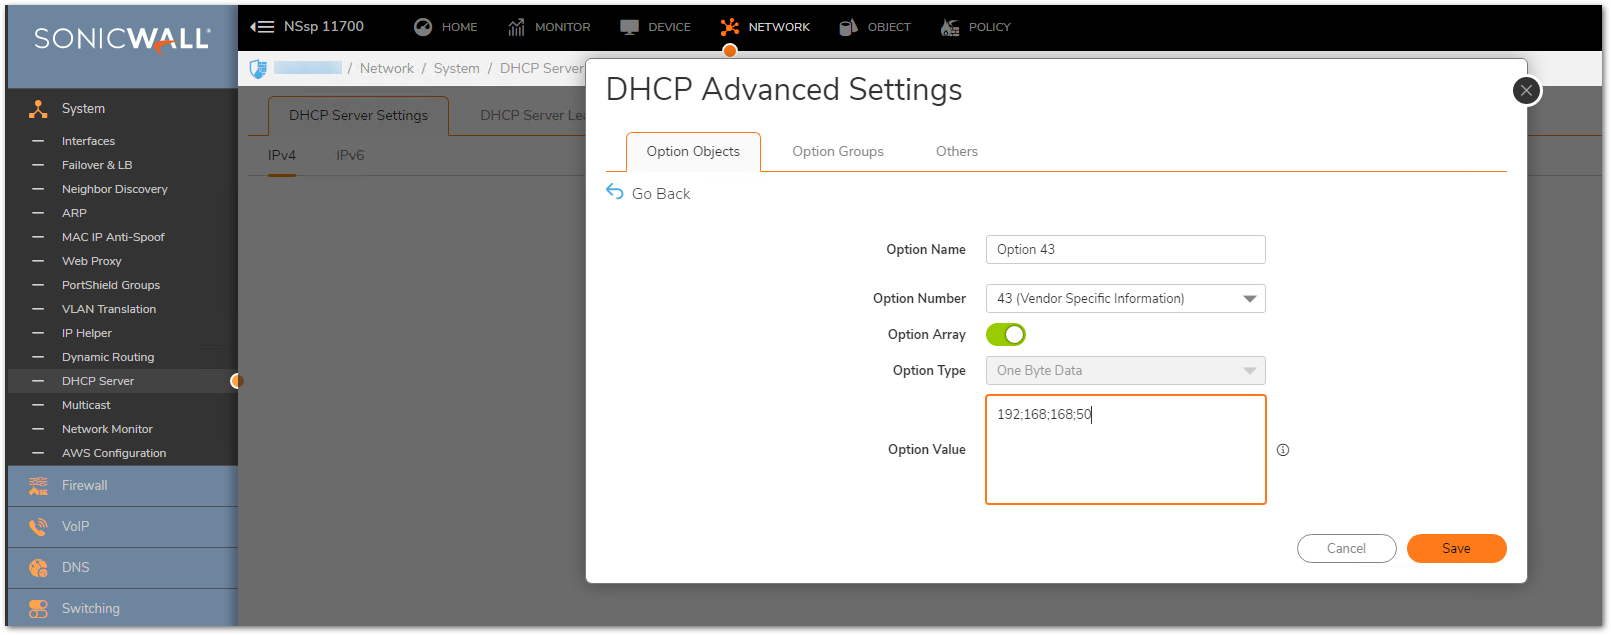
- Optionally, repeat the steps to configure Option 60
- Option Name: Enter a name for this object
- Ooption Number: Select 60 (Class Identifier)
- Option Array will remain unchecked and grayed out.
- Option Type: it will remain grayed out as String.
- Option Value: This String value is provided by the vendor or found examining a DHCP Request Packet Capture from the Client. For example, Aruba Access Points can use the string "ArubaAP" or "ArubaInstantAP".
- Click Save.
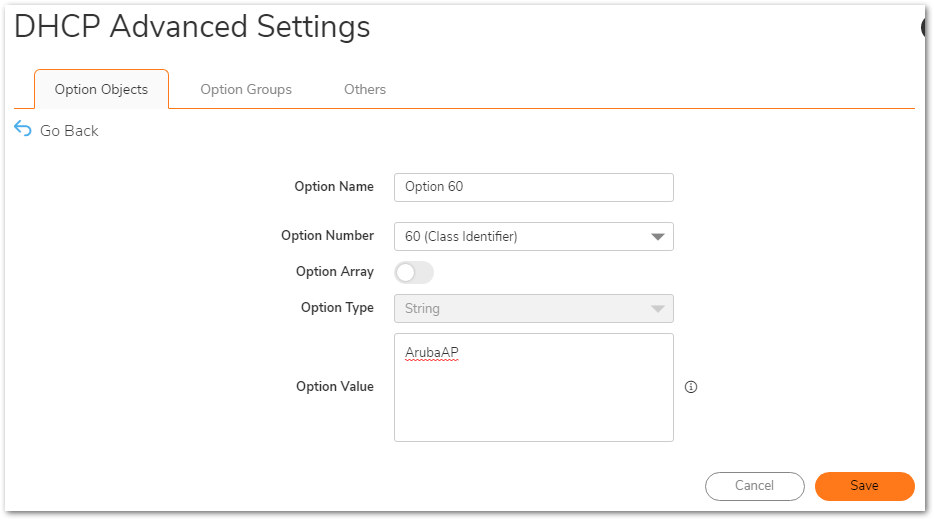
- Once The object is saved, it will appear listed as follows:

In case we have Option 43 and Option 60 configured, we can merge it into an Option Group by navigating to Option Groups tab and clicking + Add button: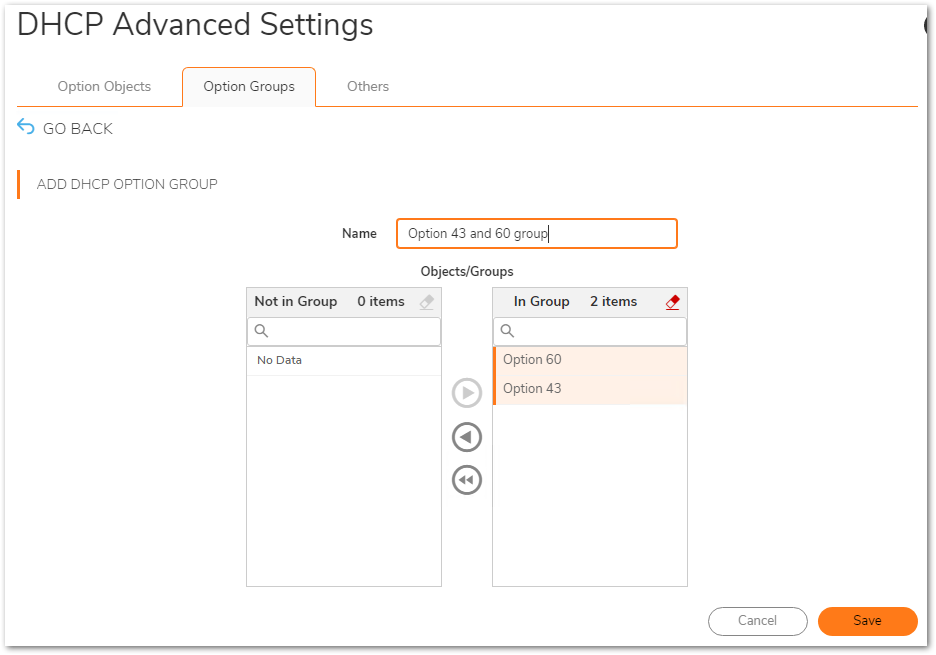

STEP 2: Assign the Option Objects to a DHCP Lease Scope
To assign the Option Object to a DHCP Lease Scope, perform the following steps:
- Click on configure on an already created DHCP Dynamic or Static Lease Scope. If not already created, create a new DHCP Dynamic or Static Lease Scope.
- Click on the Advanced tab in the configuration window.
- Under DHCP Generic Options, select the newly created DHCP Options Object / Group.
- Enable checkbox Send Generic options always.
- Click on OK to save.

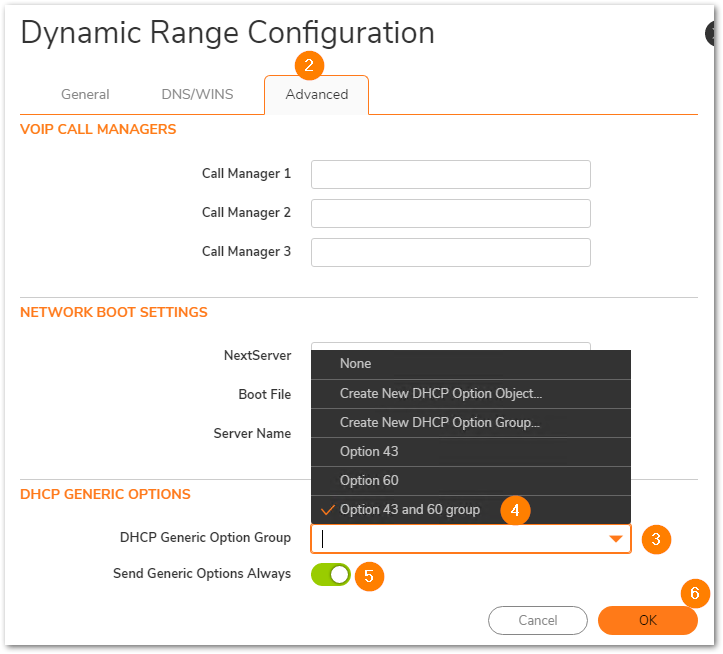
Resolution for SonicOS 6.5
This release includes significant user interface changes and many new features that are different from the SonicOS 6.2 and earlier firmware. The below resolution is for customers using SonicOS 6.5 firmware.
STEP 1: Create the DHCP Option Object
To configure DHCP Option objects, perform the following steps:
- Login to the SonicWall Management GUI
- Navigate to Manage | Network | DHCP Server page
- Click on the Advanced button alongside the Enable DHCPv4 Server.
- In the DHCP Advanced Settings window | Option Objects
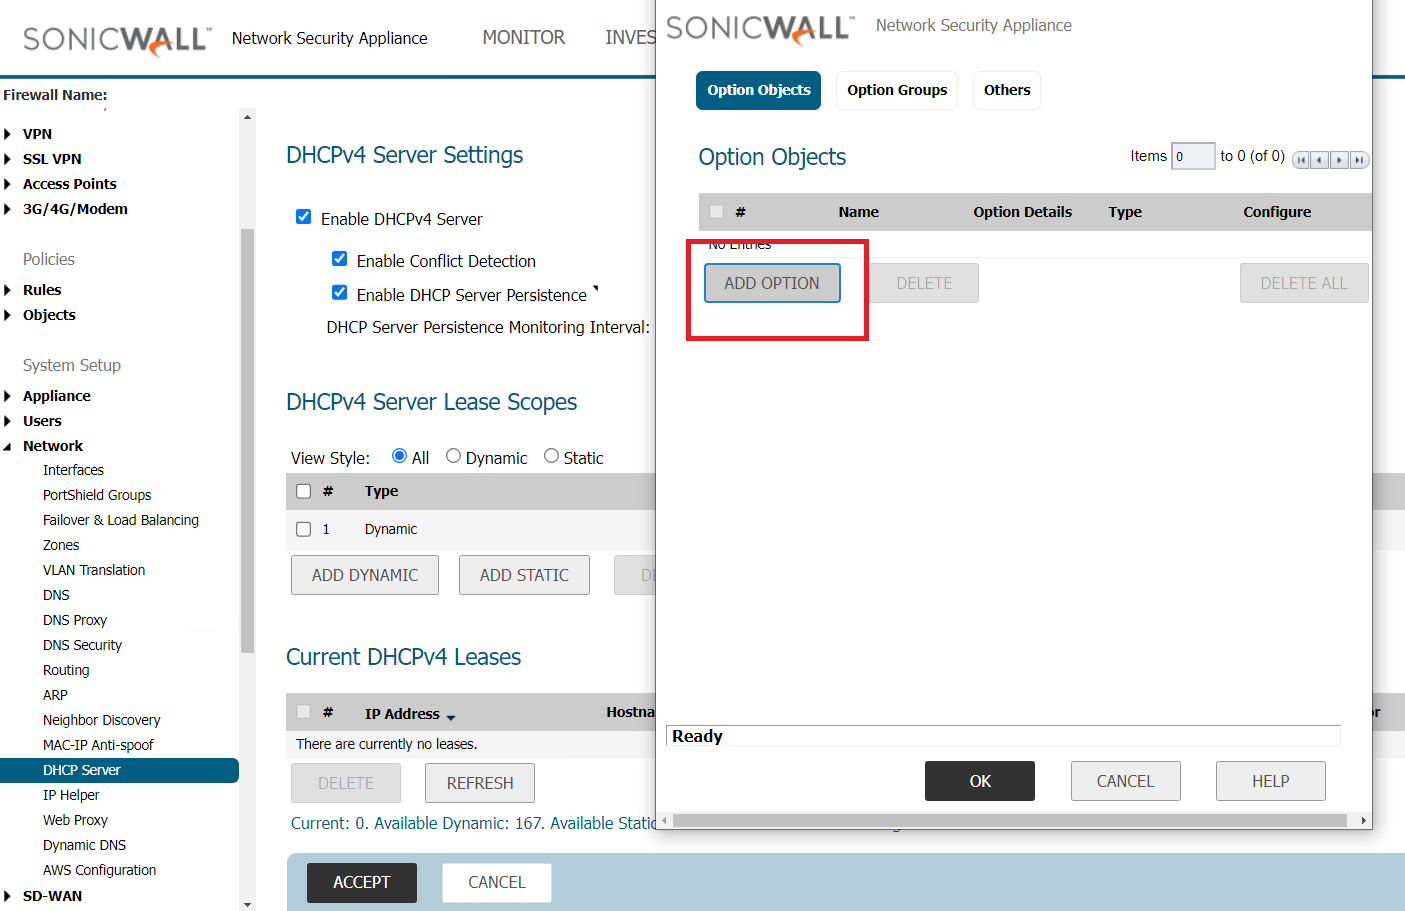
- click on the + Add button and enter the following:Option Name: Enter a name for this object
- Option Number: Select 43 (Vendor Specific Information)
- Enable check box Option Array to enter multiple values separated by a semi-colon (;).
- Option Type: it will remain grayed out as One Byte Data
- Option Value: Enter the IP of the Controller using semi-colon instead of dots. For example, if the Controller IP is 192.168.168.50, it would become 192;168;168;50
 CAUTION: On some occasions, the prefix 01;04; will be needed and the final option value would become 01;04;192;168;168;50
 - Click OK.
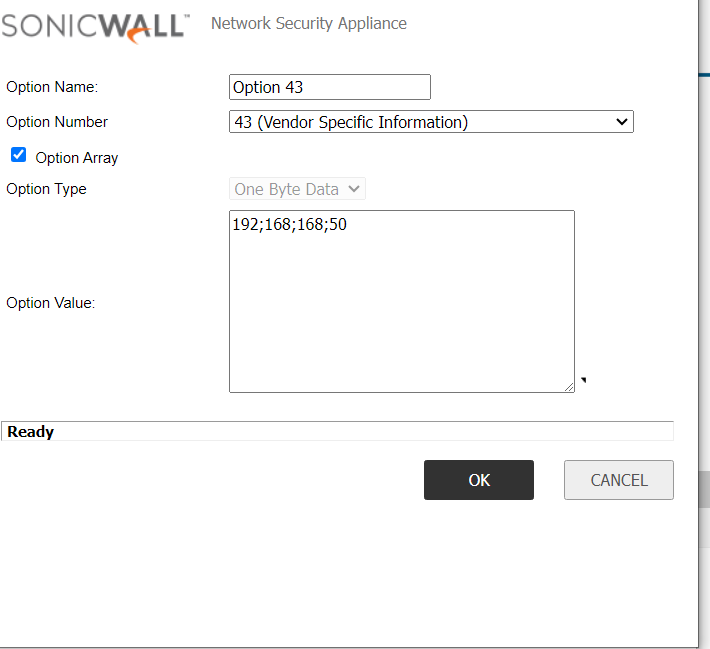
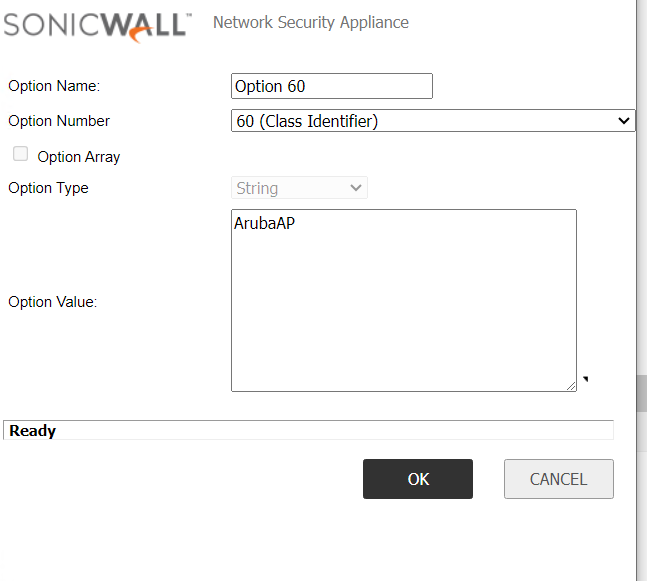
- Optionally, repeat the steps to configure Option 60:Option Name: Enter a name for this object
- Option Number: Select 60 (Class Identifier)
- Option Array will remain unchecked and grayed out.
- Option Type: it will remain grayed out as String.
- Option Value: This String value is provided by the vendor or found examining a DHCP Request Packet Capture from the Client. For example, Aruba Access Points can use the string "ArubaAP" or "ArubaInstantAP".
- Click OK.
- Once The object is saved, it will appear listed as follows:
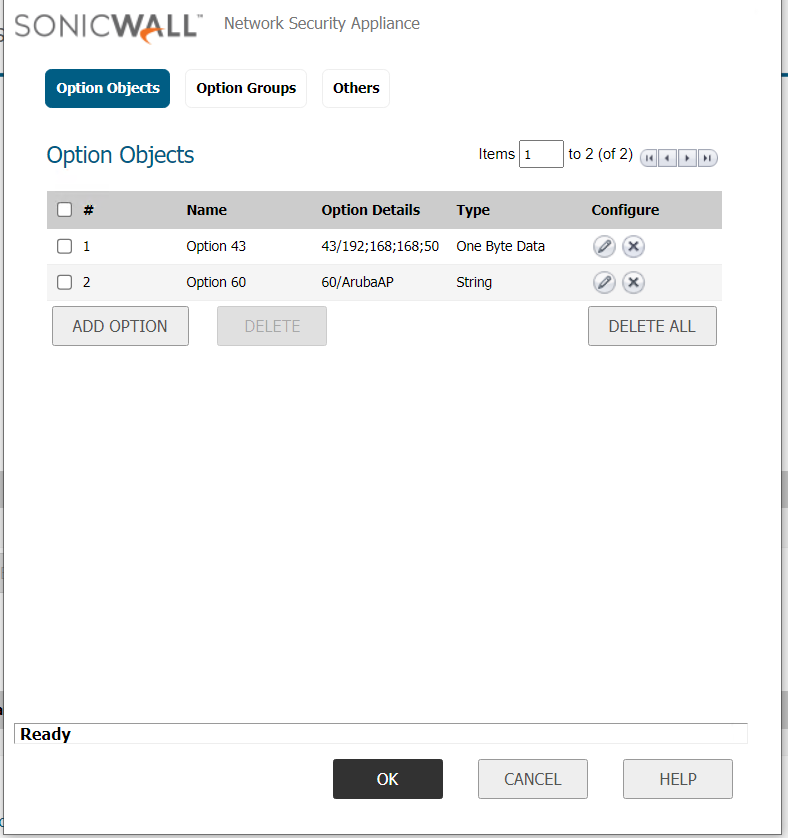
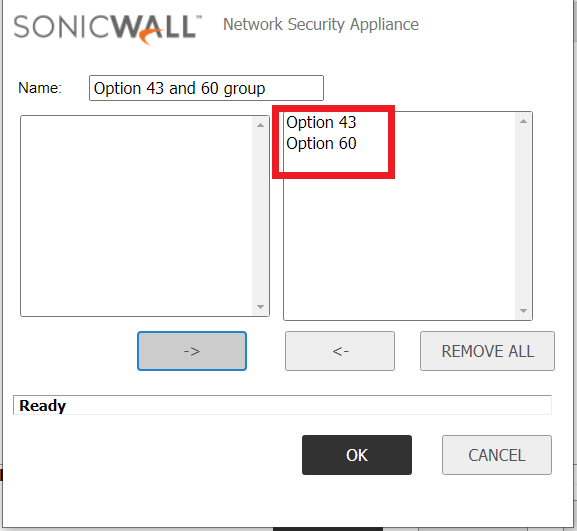
In case we have Option 43 and Option 60 configured, we can merge it into an Option Group by navigating to Option Groups tab and clicking + Add button
STEP 2: Assign the Option Objects to a DHCP Lease Scope
To assign the Option Object to a DHCP Lease Scope, perform the following steps:
- Click on configure on an already created DHCP Dynamic or Static Lease Scope. If not already created, create a new DHCP Dynamic or Static Lease Scope.
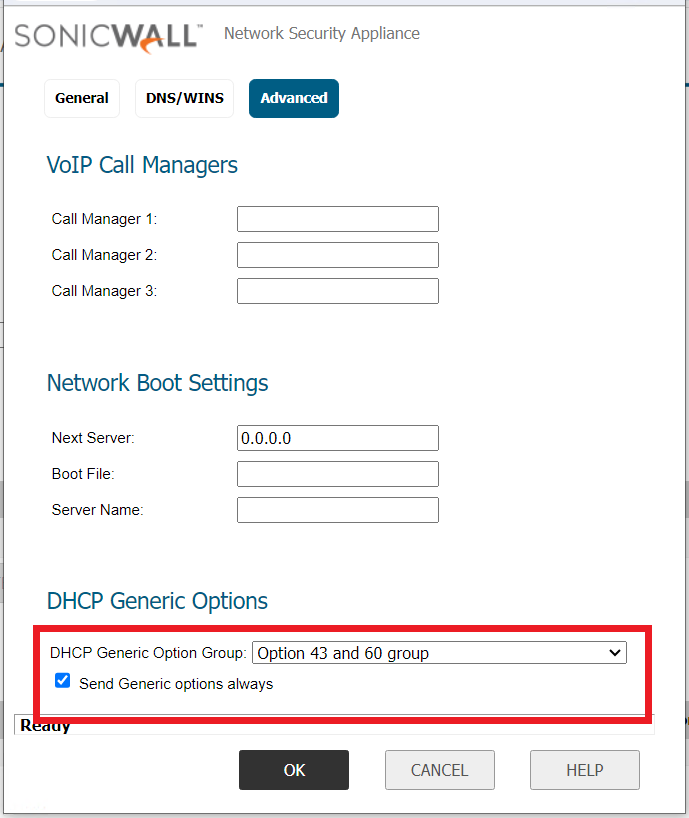
- Click on the Advanced tab in the configuration window.
- Under DHCP Generic Options, select the newly created DHCP Options Object / Group.
- Enable checkbox Send Generic options always.
- Click on OK to save.

Related Articles
- Error:"Invalid API Argument" when modifying the access rules
- Cysurance Partner FAQ
- Configure probe monitoring for WAN Failover and Loadbalancing - SonicWall UTM
Categories
- Firewalls > NSa Series > DHCP Server
- Firewalls > NSsp Series > DHCP Server
- Firewalls > TZ Series > DHCP Server


 YES
YES NO
NO