-
Products
-
SonicPlatform
SonicPlatform is the cybersecurity platform purpose-built for MSPs, making managing complex security environments among multiple tenants easy and streamlined.
Discover More
-
-
Solutions
-
Federal
Protect Federal Agencies and Networks with scalable, purpose-built cybersecurity solutions
Learn MoreFederalProtect Federal Agencies and Networks with scalable, purpose-built cybersecurity solutions
Learn More - Industries
- Use Cases
-
-
Partners
-
Partner Portal
Access to deal registration, MDF, sales and marketing tools, training and more
Learn MorePartner PortalAccess to deal registration, MDF, sales and marketing tools, training and more
Learn More - SonicWall Partners
- Partner Resources
-
-
Support
-
Support Portal
Find answers to your questions by searching across our knowledge base, community, technical documentation and video tutorials
Learn MoreSupport PortalFind answers to your questions by searching across our knowledge base, community, technical documentation and video tutorials
Learn More - Support
- Resources
- Capture Labs
-
- Company
- Contact Us
How to Configure DHCP Option 2 (Time Offset) in the SonicWall


Description
The SonicWall DHCP server options feature provides support for DHCP options, also known as vendor extensions, as defined primarily in RFCs 2131 and 2132. DHCP options allow users to specify additional DHCP parameters in the form of pre-defined, vendor-specific information that is stored in the options field of a DHCP message. When the DHCP message is sent to clients on the network, it provides vendor-specific configuration and service information.
"The time offset field specifies the offset of the client's subnet in seconds from Coordinated Universal Time (UTC). The offset is expressed as a two's complement 32-bit integer. A positive offset indicates a location east of the zero meridian and a negative offset indicates a location west of the zero meridian. The code for the time offset option is 2, and its length is 4 octets" RFC 2132.
The following table gives the conversion of the different time zones around the world. The hexadecimal values are set to have a fixed length of 32 bits as specified in Option 2 of the DHCP RFC 2132. SonicWall does not accept negative numbers for the time offset, Hex must be used.
| GMT offset (in hr) | GMT offset in seconds | GMT offset in Hexadecimal |
| 0 | 0 | 0x00000000 |
| +1 | 3600 | 0x00000E10 |
| +2 | 7200 | 0x00001C20 |
| +3 | 10800 | 0x00002A30 |
| +4 | 14400 | 0x00003840 |
| +5 | 18000 | 0x00004650 |
| +6 | 21600 | 0x00005460 |
| +7 | 25200 | 0x00006270 |
| +8 | 28800 | 0x00007080 |
| +9 | 32400 | 0x00007E90 |
| +10 | 36000 | 0x00008CA0 |
| +11 | 39600 | 0x00009AB0 |
| +12 | 43200 | 0x0000A8CD |
| -1 | N/A | 0xFFFFF1F0 |
| -2 | N/A | 0xFFFFE3E0 |
| -3 | N/A | 0xFFFFD5D0 |
| -4 | N/A | 0xFFFFC7CD |
| -5 | N/A | 0xFFFFB9B0 |
| -6 | N/A | 0xFFFFABA0 |
| -7 | N/A | 0xFFFF9D90 |
| -8 | N/A | 0xFFFF8F80 |
| -9 | N/A | 0xFFFF8170 |
| -10 | N/A | 0xFFFF7360 |
| -11 | N/A | 0xFFFF6550 |
Resolution
Resolution for SonicOS 7.X
This release includes significant user interface changes and many new features that are different from the SonicOS 6.5 and earlier firmware. The below resolution is for customers using SonicOS 7.X firmware.
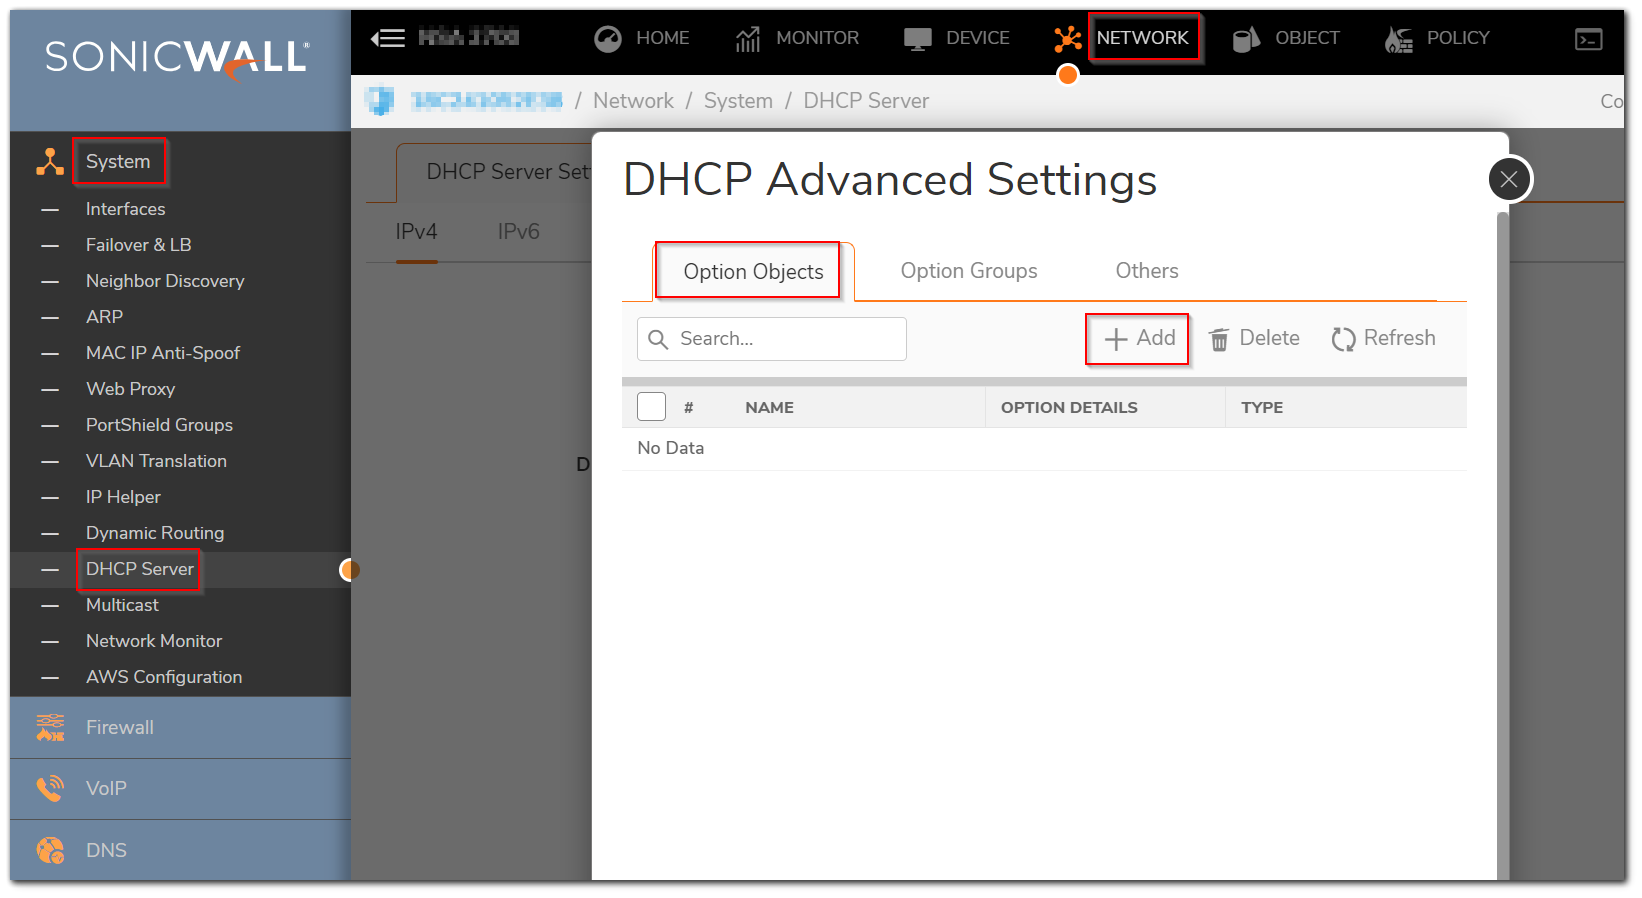
To configure DHCP Option objects, perform the following steps:
Login to the SonicWall Management GUI
- Click Network in the top navigation menu
- Navigate to the System | DHCP Server.
- Click on the Advanced button alonside the Enable DHCP Server check-box.
- In the DHCP Advanced Settings window,
- Click on the Add Option.. button.
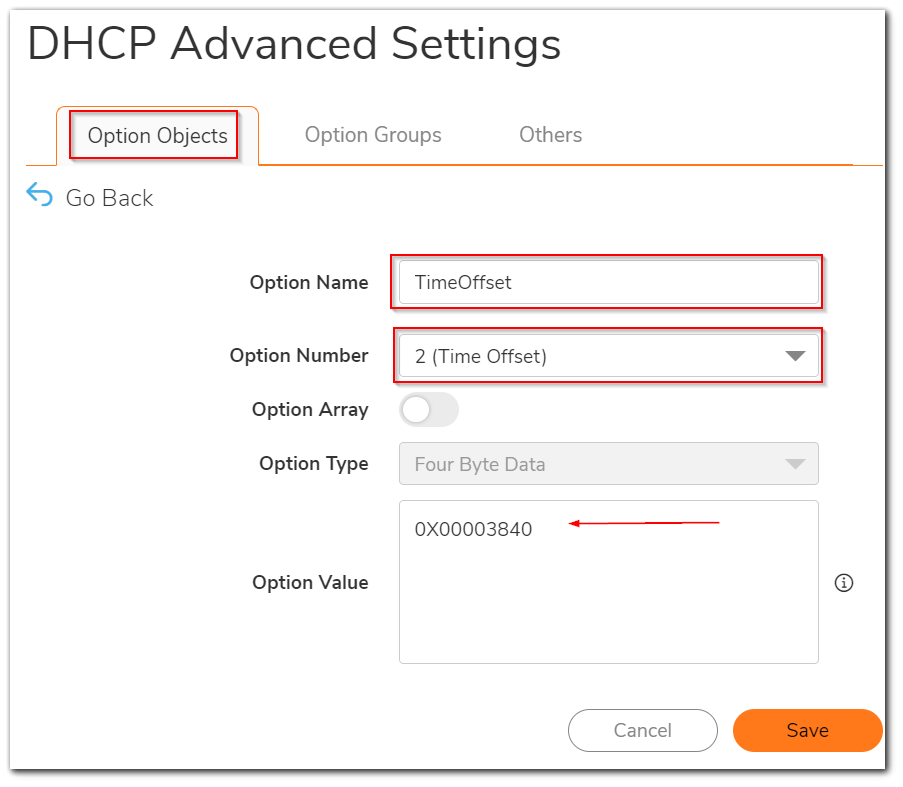
- In the Add DHCP Option Object window, enter the following:
- Option Name: Enter a name for this object
- Option Number: Select 2 (Time Offset)
- Under Option Value, enter the offset value in hexadecimal. For example:0xFFFF8F80.
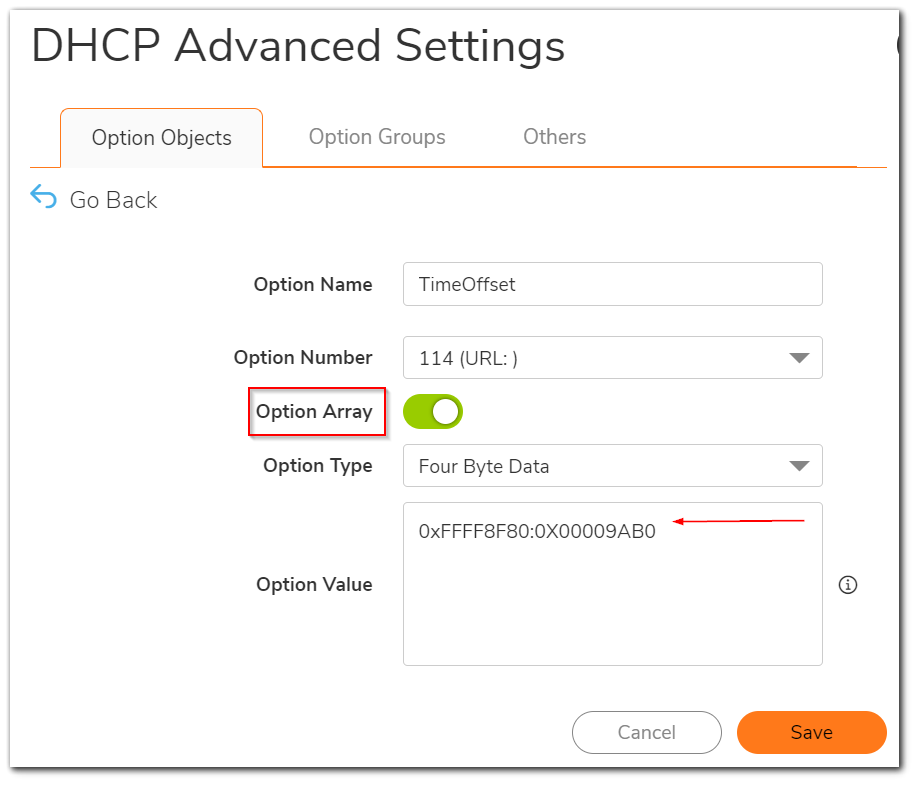
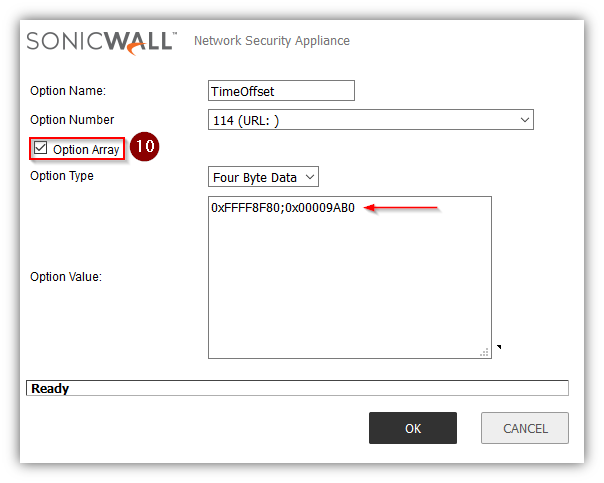
- Enable check box Option Array to enter multiple values separated by a semi-colon (;). For example: 0xFFFF8F80;0x00009AB0. Click on OK to save.
Resolution for SonicOS 6.5
This release includes significant user interface changes and many new features that are different from the SonicOS 6.2 and earlier firmware. The below resolution is for customers using SonicOS 6.5 firmware.
To configure DHCP Option objects, perform the following steps:
Login to the SonicWall Management GUI
- Click Manage in the top navigation menu
- Navigate to the Network | DHCP Server page.
- Click on the Advanced button alonside the Enable DHCP Server check-box.
- In the DHCP Advanced Settings window,
- Click on the Add Option.. button.
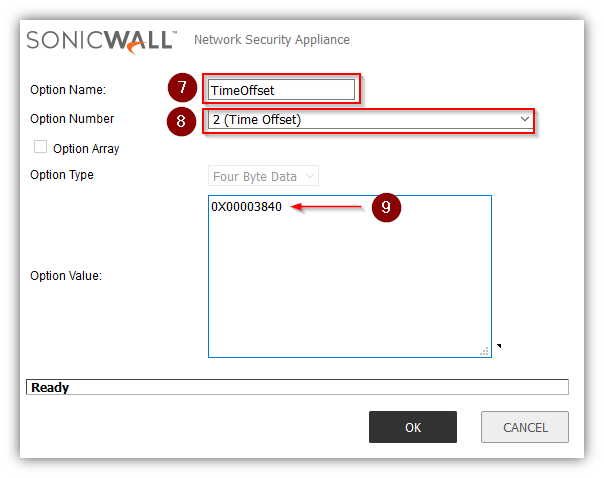
- In the Add DHCP Option Object window, enter the following:
- Option Name: Enter a name for this object
- Option Number: Select 2 (Time Offset)
- Under Option Value, enter the offset value in hexadecimal. For example:0xFFFF8F80.
- Enable check box Option Array to enter multiple values separated by a semi-colon (;). For example: 0xFFFF8F80;0x00009AB0. Click on OK to save.

Resolution for SonicOS 6.2 and Below
The below resolution is for customers using SonicOS 6.2 and earlier firmware. For firewalls that are generation 6 and newer we suggest to upgrade to the latest general release of SonicOS 6.5 firmware.
To configure DHCP Option objects, perform the following steps:
- Login to the SonicWall Mangement GUI
- Navigate to the Network | DHCP Server page.
- Click on the Advanced button alonside the Enable DHCP Server check-box. Note: In Gen4 devices the Option Objects button is under DHCP Server Lease Scopes. Although the screenshots in the KB article are of a Gen4 NSA device, the options are similar in Gen3 devices.
- In the DHCP Advanced Settings window, click on the Add Option.. button.
- In the Add DHCP Option Object window, enter the following:
- Option Name: Enter a name for this object
- Option Number: Select 2 (Time Offset)
- Under Option Value, enter the offset value in hexadecimal. For example:0xFFFF8F80.
- Enable check box Option Array to enter multiple values separated by a semi-colon (;). For example: 0xFFFF8F80;0x00009AB0.
- Click on OK to save.


Related Articles
- Error:"Invalid API Argument" when modifying the access rules
- Cysurance Partner FAQ
- Configure probe monitoring for WAN Failover and Loadbalancing - SonicWall UTM
Categories
- Firewalls > SonicWall NSA Series > DHCP Server
- Firewalls > SonicWall SuperMassive 9000 Series > DHCP Server
- Firewalls > SonicWall SuperMassive E10000 Series
- Firewalls > TZ Series > DHCP Server


 YES
YES NO
NO