-
Products
-
SonicPlatform
SonicPlatform is the cybersecurity platform purpose-built for MSPs, making managing complex security environments among multiple tenants easy and streamlined.
Discover More
-
-
Solutions
-
Federal
Protect Federal Agencies and Networks with scalable, purpose-built cybersecurity solutions
Learn MoreFederalProtect Federal Agencies and Networks with scalable, purpose-built cybersecurity solutions
Learn More - Industries
- Use Cases
-
-
Partners
-
Partner Portal
Access to deal registration, MDF, sales and marketing tools, training and more
Learn MorePartner PortalAccess to deal registration, MDF, sales and marketing tools, training and more
Learn More - SonicWall Partners
- Partner Resources
-
-
Support
-
Support Portal
Find answers to your questions by searching across our knowledge base, community, technical documentation and video tutorials
Learn MoreSupport PortalFind answers to your questions by searching across our knowledge base, community, technical documentation and video tutorials
Learn More - Support
- Resources
- Capture Labs
-
- Company
- Contact Us
How to configure a physical interface with a static IP


Description
Depending upon the model of firewall, the number of physical interfaces vary on each of them.
Each interface is configurable with various IP assignments depending upon the zone type:
- LAN : Static IP Mode (default), Transparent IP Mode (Splice L3 Subnet), Layer 2 Bridged Mode (IP Route Option), Wire Mode (2-Port Wire), Tap Mode (1-Port Tap), IP Unnumbered, PortShield Switch Mode, NativeBridge Mode
- WAN : Static (default), DHCP, PPPoE, PPTP, L2TP, Wire Mode, (2-Port Wire), Tap Mode (1-Port Tap)
- DMZ : Static IP Mode (default), Transparent IP Mode (Splice L3 Subnet), Layer 2 Bridged Mode (IP Route Option), Wire Mode (2-Port Wire), Tap Mode (1-Port Tap), IP Unnumbered, PortShield Switch Mode, NativeBridge Mode
- WLAN : Static IP Mode (default), PortShield Switch Mode, Layer 2 Bridged Mode, NativeBridge Mode
This article describes how to configure the physical interfaces on SonicWall with a static IP Mode.
Resolution
Resolution for SonicOS 7.X
This release includes significant user interface changes and many new features that are different from the SonicOS 6.5 and earlier firmware. The below resolution is for customers using SonicOS 7.X firmware.
To configure a physical interface on SonicWALL with a static IP Mode:
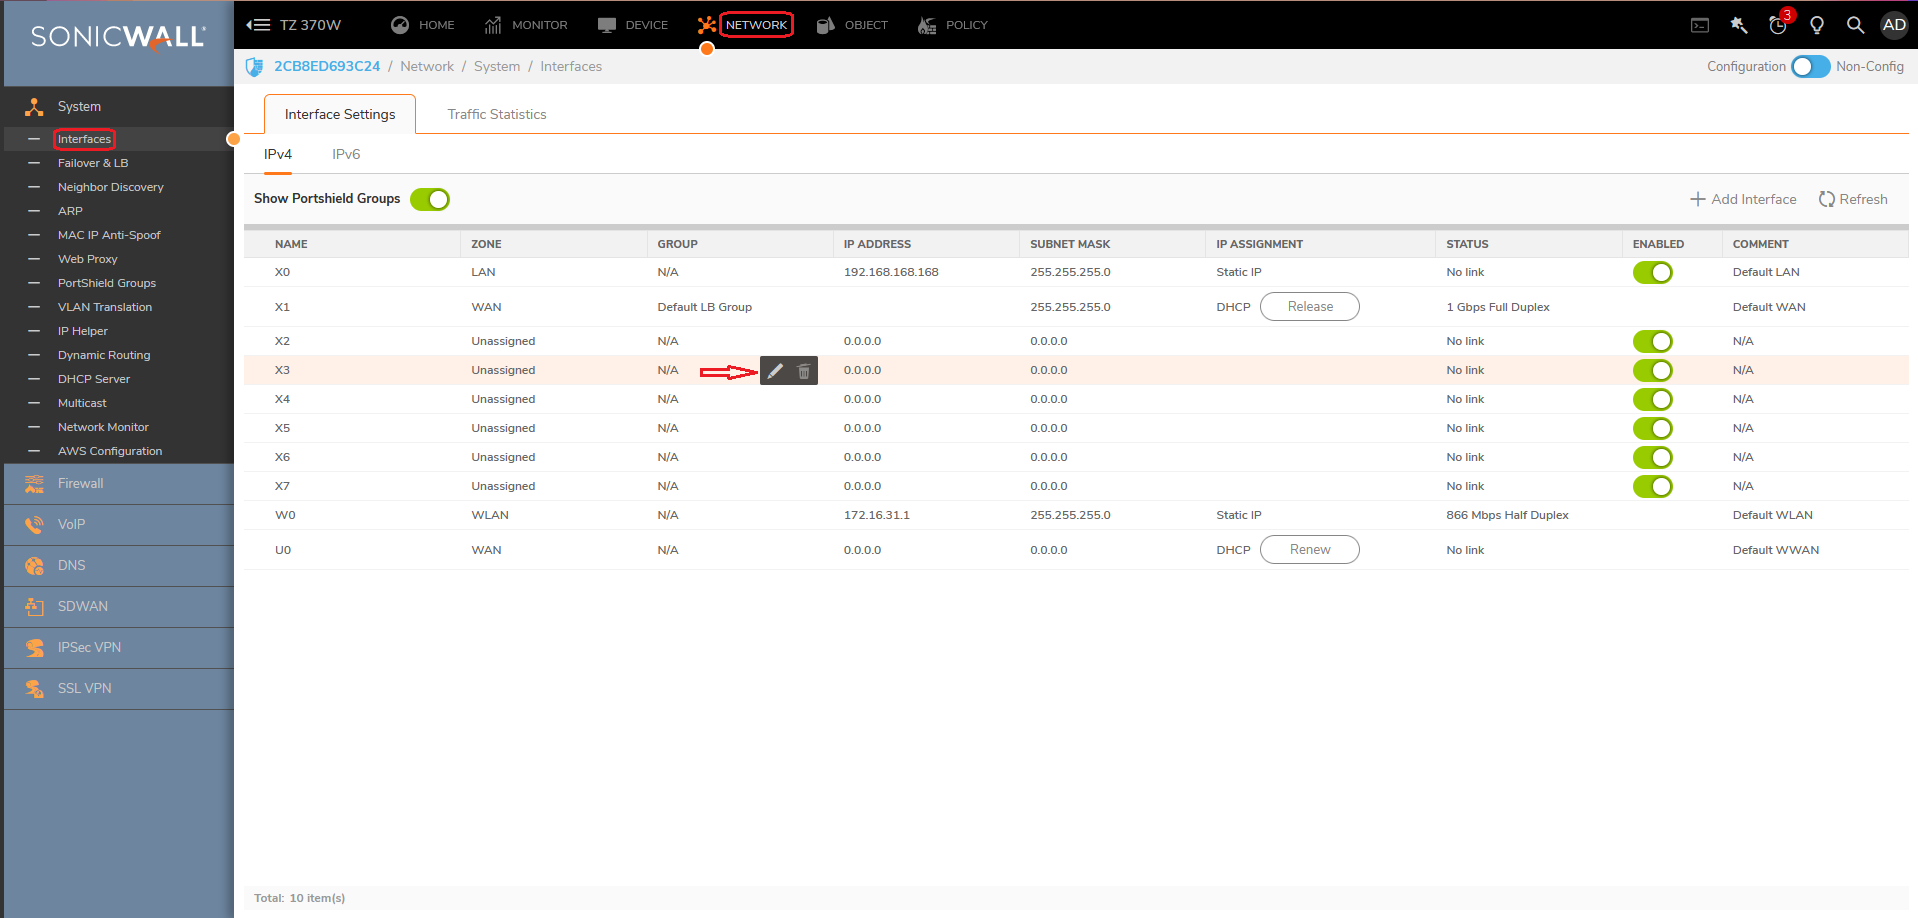
- Navigate to NETWORK | System | Interfaces.
- In the Interface Settings table, point the arrow on top of it, and press "Edit this Interface."
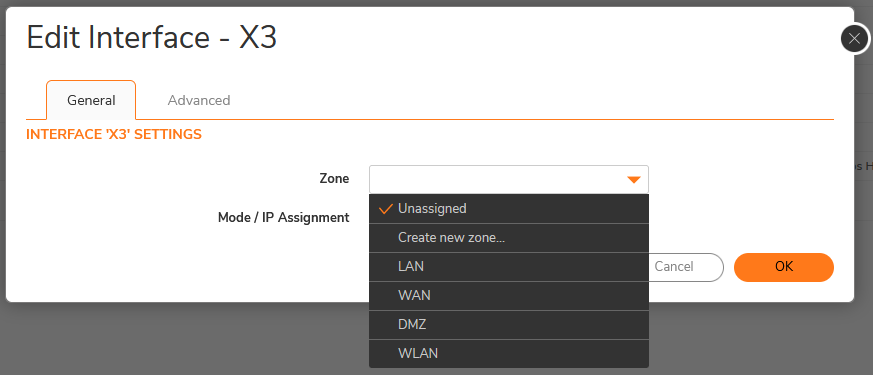
- Select a zone to assign to the interface from Zone - LAN, WAN, DMZ, WLAN or any Custom zone you’ve created.
NOTE: You can Create new zone as well.
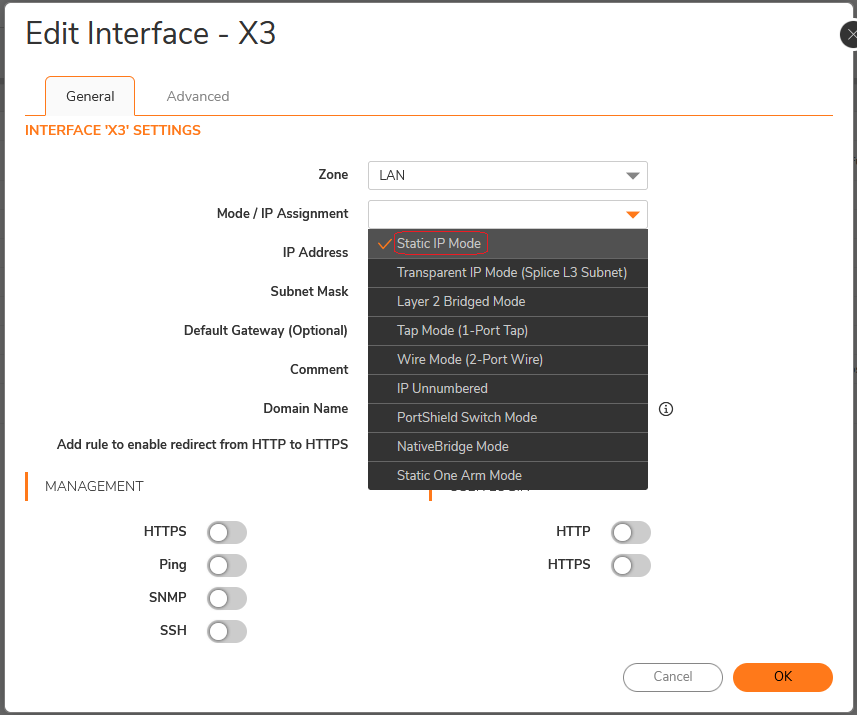
4. From Mode / IP Assignment select Static (default for WAN) or Static IP Mode (default for LAN)
5. Enter the IP address and subnet mask for the interface into the IP Address and Subnet Mask fields.
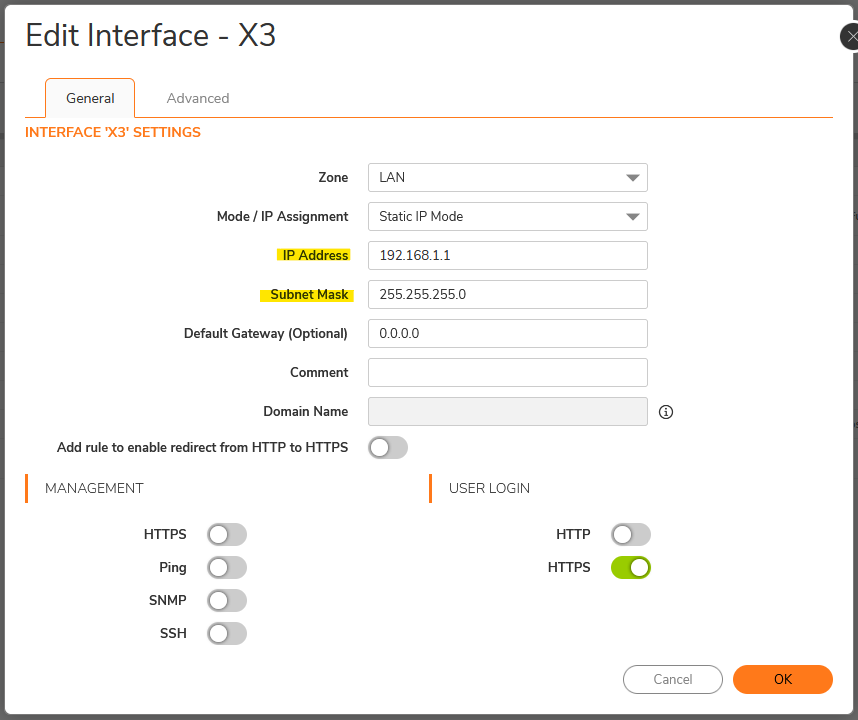
6. If configuring a WAN zone interface or the MGMT interface, enter the IP address of the gateway device into the Default Gateway field. But if configuring a LAN zone interface or a DMZ zone interface, optionally enter the IP address of the gateway device into the Default Gateway (Optional) field.
NOTE: You cannot enter an IP address that is in the same subnet as another zone.
7. Incase of WAN zone interface, enter the IP addresses of up to three DNS servers into the DNS Server fields.
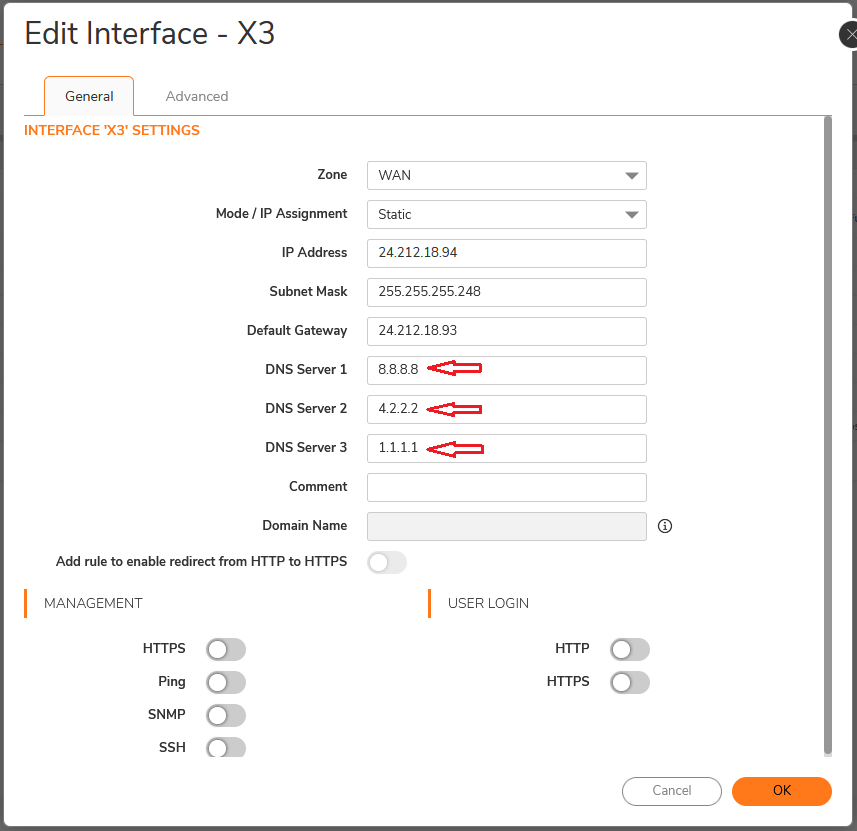
8. Enter any optional comment text in the Comment field.
9. If you want to enable remote management of the Security Appliance from this interface, choose the
supported Management protocol(s) - HTTPS, Ping, SNMP, SSH.
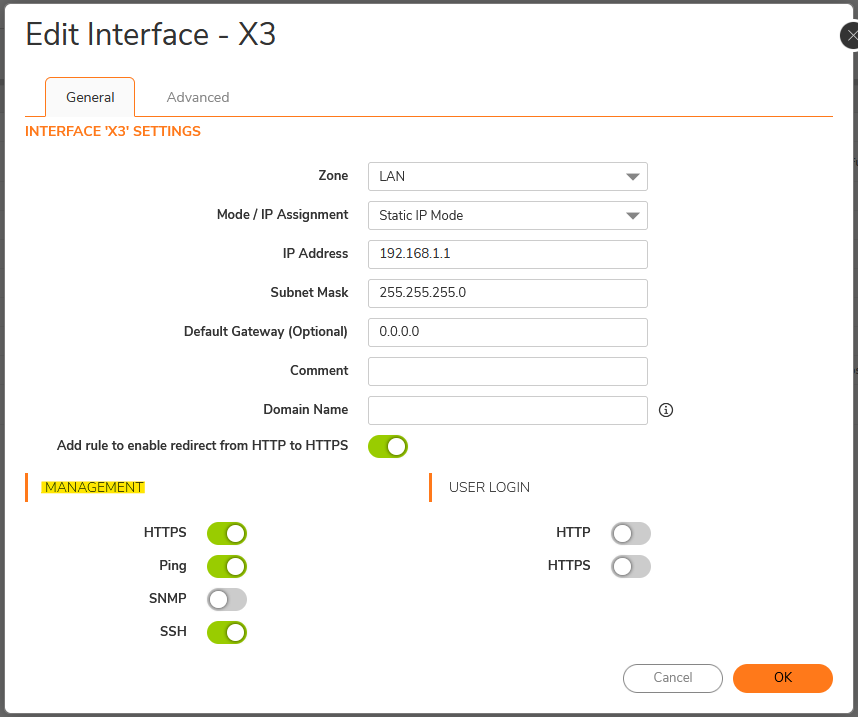
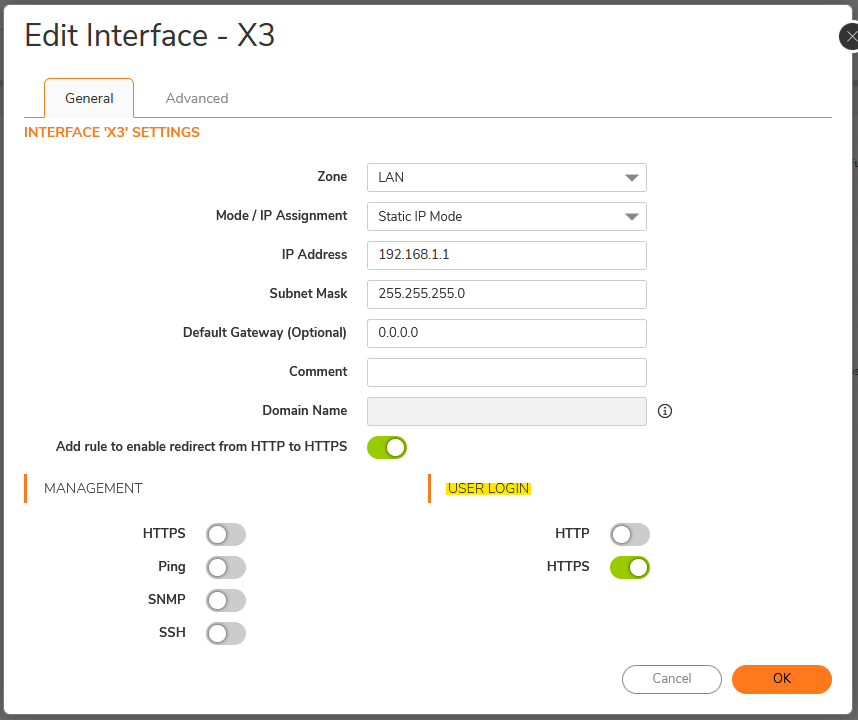
10. If you want to allow selected users with limited management rights to log in to the Security Appliance,
choose HTTP, HTTPS in User Login.
Resolution for SonicOS 6.5
This release includes significant user interface changes and many new features that are different from the SonicOS 6.2 and earlier firmware. The below resolution is for customers using SonicOS 6.5 firmware.
To configure a physical interface on SonicWALL with a static IP Mode:
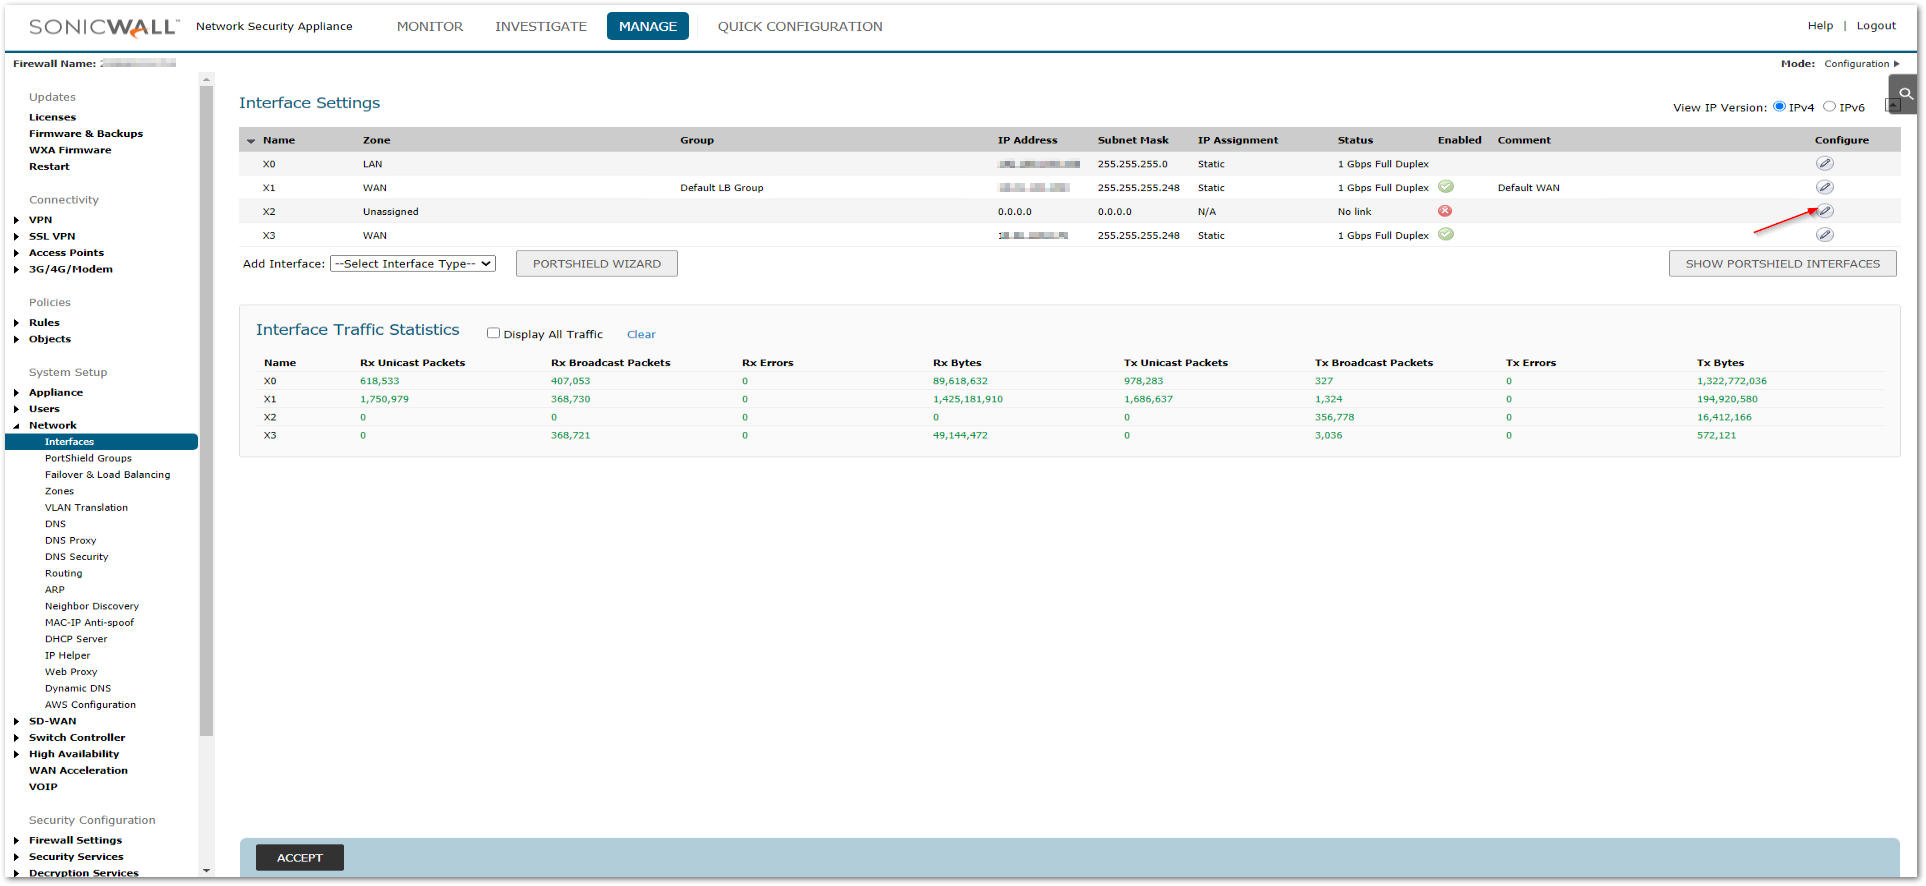
- Navigate to MANAGE | Network | Interfaces.
- In the Interface Settings table, click the Edit icon for the interface you want to configure. The Edit Interface dialog displays.
- Select a zone to assign to the interface from Zone - LAN, WAN, DMZ, WLAN or any Custom zone you’ve created.
 NOTE: You can Create new zone as well.
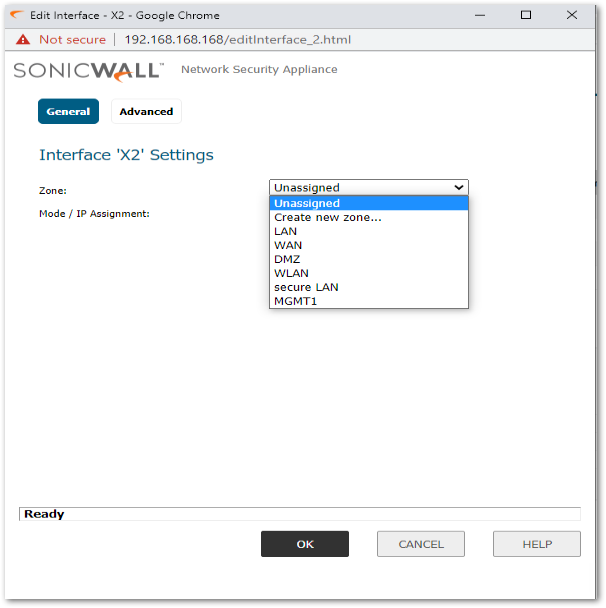
- From Mode / IP Assignment select Static (default for WAN) or Static IP Mode (default for LAN)
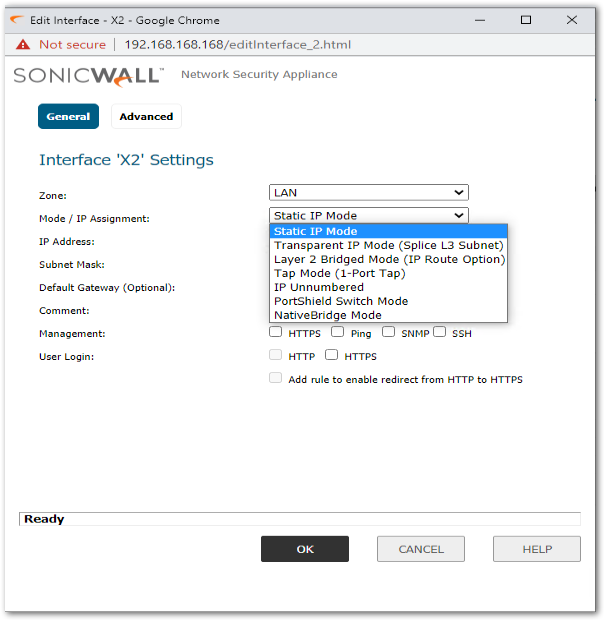
- Enter the IP address and subnet mask for the interface into the IP Address and Subnet Mask fields.
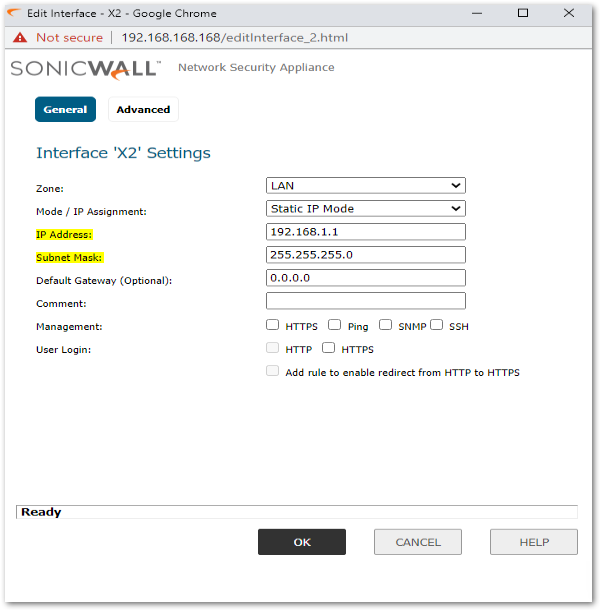
- If configuring a WAN zone interface or the MGMT interface, enter the IP address of the gateway device into the Default Gateway field. But if configuring a LAN zone interface or a DMZ zone interface, optionally enter the IP address of the gateway device into the Default Gateway (Optional) field.
 NOTE: You cannot enter an IP address that is in the same subnet as another zone.
 - Incase of WAN zone interface, enter the IP addresses of up to three DNS servers into the DNS Server fields.
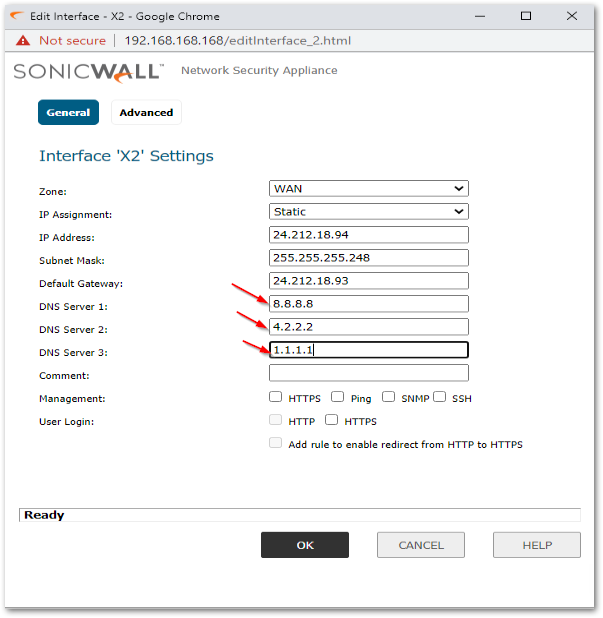
- Enter any optional comment text in the Comment field.
- If you want to enable remote management of the Security Appliance from this interface, choose the
supported Management protocol(s) - HTTPS, Ping, SNMP, SSH.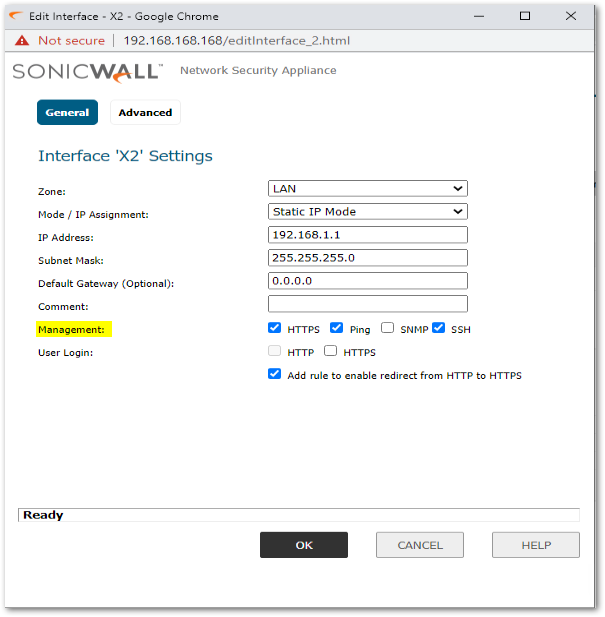
- If you want to allow selected users with limited management rights to log in to the Security Appliance,
choose HTTP, HTTPS in User Login.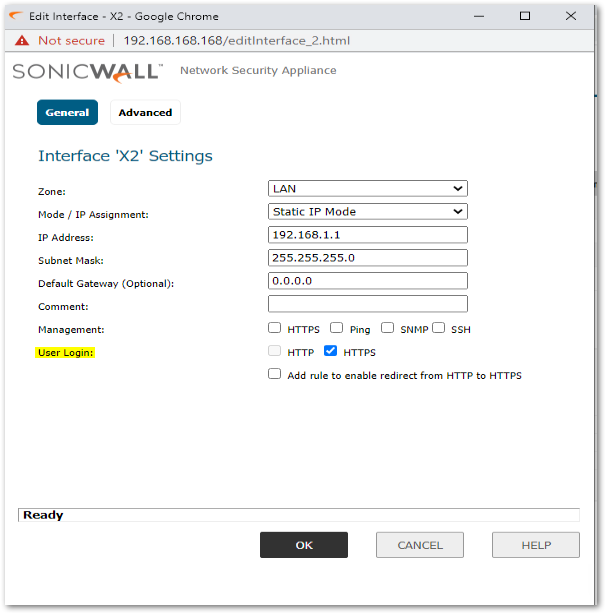
Configuring Advanced Settings for a Static Interface:
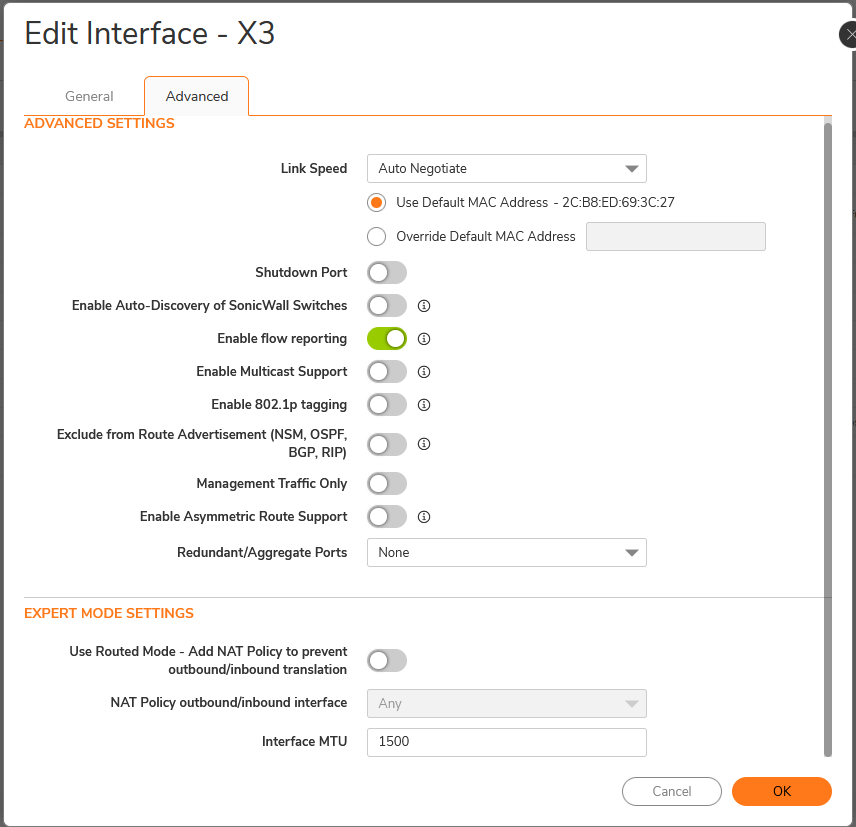
SonicOS 7.X
SonicOS 6.5
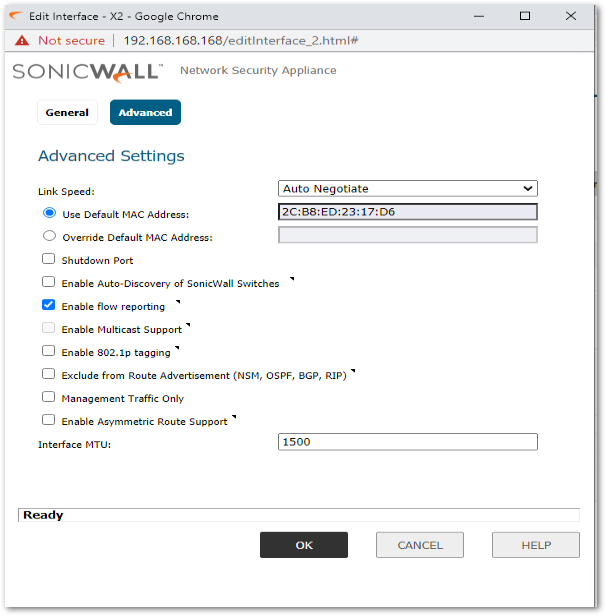
- For Link Speed, Auto Negotiate is selected by default, which causes the connected devices to negotiate the speed and duplex mode of the Ethernet connection automatically. To force Ethernet speed select an option from Link Speed drop down menu.
 CAUTION: If you select a specific Ethernet speed and duplex, you must force the connection speed and
duplex from the Ethernet card to the Security Appliance as well. - Use Default MAC Address is selected by default. You can override Use Default MAC Address for the Interface
by choosing Override Default MAC Address and entering the MAC address in the field. - Select Shutdown Port to temporarily take this interface offline for maintenance or other reasons. If
connected, the link goes down. This option is not selected by default. NOTE: You cannot shut down the management interface or the interface you are currently
using. - For the AppFlow feature, select Enable flow reporting to allow flow reporting on flows created for this
interface. This option is selected by default. - Optionally, select Enable Multicast Support to allow Multicast reception on this interface. This option is
not selected by default. - Optionally, select Enable Default 802.1p tagging to tag information passing through this interface with
802.1p priority information for Quality of Service (QoS) management. This option is not selected by
default. - Optionally, to exclude the interface from Route Advertisement, select Exclude from Route
Advertisement (NSM, OSPF, BGP, RIP). This option is not selected by default. - Optionally, select Management Traffic Only to restrict traffic to only SonicWall management traffic and
routing protocols. This option is not selected by default. - Optionally, if you have enabled DNS Proxy, the Enable DNS Proxy option for displays for LAN, DMZ, or
WLAN interfaces. To enable DNS Proxy on the interface, select the option. This option is not selected by
default. - Optionally, enable Asymmetric Route Support on the interface by selecting Enable Asymmetric Route
Support. If enabled, the traffic initialized from this interface supports asymmetric routes, that is, the
initial packet or response packet can pass through from other interfaces. This option is not selected by
default. - Optionally, select Link Aggregation or Port Redundancy from Redundant /Aggregate Ports.
- To specify the largest packet size (MTU – maximum transmission unit) that a WAN interface can forward
without fragmenting the packet, enter the size of the packets that the port receives and transmits in the
Interface MTU field.
To calculate Interface MTU for a WAN interface, click How Can I Test And Change The MTU Size Of WAN Interfaces? - Optionally, to fragment non-VPN outbound packets larger than the interface’s MTU, select Fragment
non-VPN outbound packets larger than this Interface’s MTU. This option is selected by default. - Optionally, to override the Do-not-fragment packet bit, select Ignore Don’t Fragment (DF) bit.
This option is not selected by default. - To block notification that the WAN interface can receive fragmented packets, select Do not send ICMP
Fragmentation Needed for outbound packets over the Interface MTU. This option is not selected by
default. - If configuring bandwidth management for this interface, go to Enabling Bandwidth Management on an
Interface. - Click OK.
Related Articles
- Error:"Invalid API Argument" when modifying the access rules
- Cysurance Partner FAQ
- Configure probe monitoring for WAN Failover and Loadbalancing - SonicWall UTM
Categories
- Firewalls > TZ Series
- Firewalls > NSa Series
- Firewalls > SonicWall SuperMassive 9000 Series
- Firewalls > SonicWall NSA Series


 YES
YES NO
NO