-
Products
-
SonicPlatform
SonicPlatform is the cybersecurity platform purpose-built for MSPs, making managing complex security environments among multiple tenants easy and streamlined.
Discover More
-
-
Solutions
-
Federal
Protect Federal Agencies and Networks with scalable, purpose-built cybersecurity solutions
Learn MoreFederalProtect Federal Agencies and Networks with scalable, purpose-built cybersecurity solutions
Learn More - Industries
- Use Cases
-
-
Partners
-
Partner Portal
Access to deal registration, MDF, sales and marketing tools, training and more
Learn MorePartner PortalAccess to deal registration, MDF, sales and marketing tools, training and more
Learn More - SonicWall Partners
- Partner Resources
-
-
Support
-
Support Portal
Find answers to your questions by searching across our knowledge base, community, technical documentation and video tutorials
Learn MoreSupport PortalFind answers to your questions by searching across our knowledge base, community, technical documentation and video tutorials
Learn More - Support
- Resources
- Capture Labs
-
- Company
- Contact Us
How to configure a manual 6rd Tunnel Interface


Description
IPv6 Rapid Deployment (6rd) enables IPv6 to be deployed across an IPv4 network quickly and easily. 6rd utilizes a Service Provider's existing IPv6 address prefixes, ensuring that the 6rd operational domain is limited to the Service Provider's network and is under the Service Provider's direct control.
IPv4 Mask Length
With the 6rd prefix and with the hex converted IPv4 public IP address configured on WAN (X1) we derive the IPv6 64 bit prefix. Using the example 6rd prefix above, if the X1 IPv4 address is 182.71.241.146, the 64 bit prefix would be: 2603:200:B647:F192::
2. Assign the LAN or DMZ network behind the SonicWall with IPv6 addresses with the above 64 bit prefix.
This article describes how to configure a manual 6rd tunnel interface using both methods.
Resolution
In this method, no changes are made to the existing LAN or DMZ IPv6 network configuration. The existing hosts in the network must have a Unique Local IPv6 Address or Unique Global IPv6 Address. Hosts must not be configured only with link-local addresses.
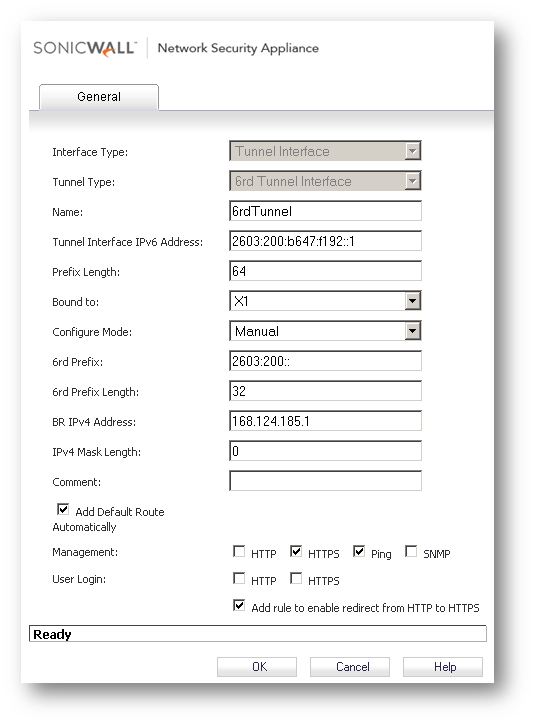
A 6rd tunnel interface is configured in the same way as other IPv6 tunnel interfaces. A bound interface is required to configure a 6rd tunnel interface. To configure a 6rd tunnel interface:
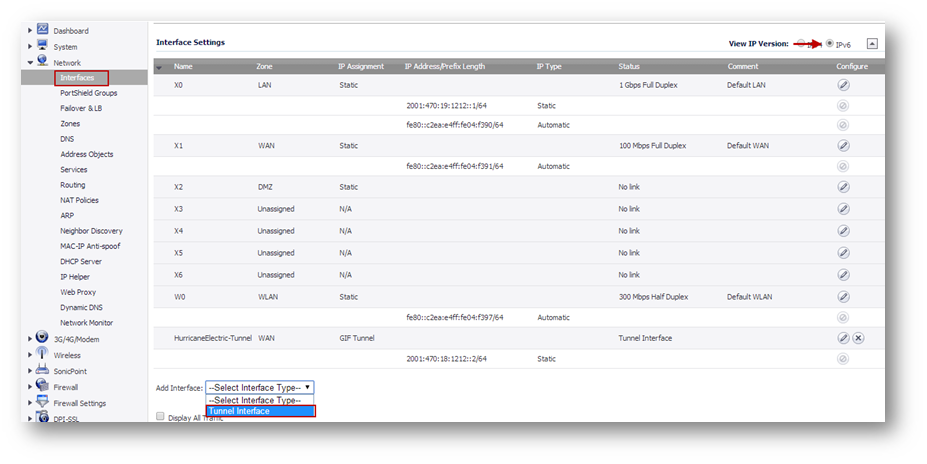
2. Navigate to the Network > Interfaces page.
4. At the bottom of the Interface Settings panel, from the Add Interface menu, select Tunnel Interface. The Edit Interface for IPv6 dialog appears.

5. From the Zone menu, select WAN. The Interface Type menu would be disabled with Tunnel Interface selected.
15. In the Comment box, enter a comment to describe the tunnel interface.(Optional)
18. Click on OK to save.

20. Select radio-button IPv6 Only or IPv4 and IPv6
20. Click on Add to open the Add NAT Policy window.
21. In the Original Source, select Any
22. Set Translated Source as 6rd Tunnel IPv6 Primary Static Address. This address object would have been auto-created when the 6rd Tunnel Interface was created.
23. Set Original Destination as Any.
24. Set Translated Destination as Original.
25. Set Original Service as Any
26. Set Translated Service as Original
27. Set Inbound Interface as Any.
28. Set Outbound Interface as 6rd Tunnel.
29. Enter a comment under the Comment field (optional)
30. Click on Add.

This ends one method of configuring a 6rd tunnel. To test IPv6 connectivity, browse to, or ping, an IPv6 enabled website (example, ipv6.google.com) either by name or its IPv6 address. Before accessing by name, make sure the DNS server is capable of serving IPv6 addresses. If not, use the public 4.2.2.2 or 8.8.8.8 DNS server addresses.
Method- 2: Assign IPv6 address with 6rd prefix to internal networks
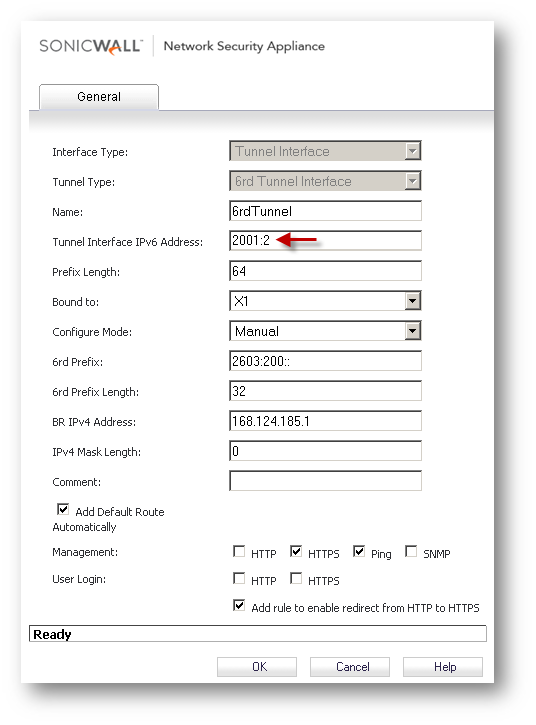
In this method, as in the first method, we create a 6rd Tunnel Interface with the same information as earlier. However, instead of assigning the Tunnel Interface with an IPv6 address with the 6rd prefix we assign it any or no IPv6 address. In the next step we configure the X0 interface with an IPv6 address with the 6rd prefix and enable advertisement of the 6rd prefix to internal hosts. Internal IPv6 hosts will automatically assign themselves with globally unique IPv6 address using the 6rd prefix. This address will be globally routable.
1. Navigate to the Network > Interfaces page.
2. Create a 6rd Tunnel Interface as under. Notice how the tunnel interface IP has changed. All other information remains the same.

3. Click on Configure on the X0 interface.
4. Set IP Assignment to Static.
5. In the IPv6 Address field, enter the IPv6 address with 6rd prefix. For example, 2603:200:B647:F192::1
6. Set Prefix Length to 64
7. Enable check box Enable Router Advertisement
8. Enable check box Advertise Subnet Prefix of IPv6 Primary Static Address. Enable this option only if no DHCPv6 is configured in the network.
9. Select the Management options that you want, or select the User Login options that you want.
10. Click on OK to save.

This concludes the second method of configuring a 6rd tunnel. To test IPv6 connectivity, browse to, or ping, an IPv6 enabled website (example, ipv6.google.com) either by name or its IPv6 address. Before accessing by name, make sure the DNS server is capable of serving IPv6 addresses. If not, use the public 4.2.2.2 or 8.8.8.8 DNS server addresses.
Related Articles
- Error:"Invalid API Argument" when modifying the access rules
- Cysurance Partner FAQ
- Configure probe monitoring for WAN Failover and Loadbalancing - SonicWall UTM
Categories
- Firewalls > TZ Series
- Firewalls > SonicWall SuperMassive E10000 Series
- Firewalls > SonicWall SuperMassive 9000 Series
- Firewalls > SonicWall NSA Series


 YES
YES NO
NO