-
Products
-
SonicPlatform
SonicPlatform is the cybersecurity platform purpose-built for MSPs, making managing complex security environments among multiple tenants easy and streamlined.
Discover More
-
-
Solutions
-
Federal
Protect Federal Agencies and Networks with scalable, purpose-built cybersecurity solutions
Learn MoreFederalProtect Federal Agencies and Networks with scalable, purpose-built cybersecurity solutions
Learn More - Industries
- Use Cases
-
-
Partners
-
Partner Portal
Access to deal registration, MDF, sales and marketing tools, training and more
Learn MorePartner PortalAccess to deal registration, MDF, sales and marketing tools, training and more
Learn More - SonicWall Partners
- Partner Resources
-
-
Support
-
Support Portal
Find answers to your questions by searching across our knowledge base, community, technical documentation and video tutorials
Learn MoreSupport PortalFind answers to your questions by searching across our knowledge base, community, technical documentation and video tutorials
Learn More - Support
- Resources
- Capture Labs
-
- Company
- Contact Us
How to block Ultrasurf browser Plugin using App Control Signatures


Description
How to block Ultrasurf browser Plugin using App Control Signatures
Resolution
Resolution for SonicOS 6.5
This release includes significant user interface changes and many new features that are different from the SonicOS 6.2 and earlier firmware. The below resolution is for customers using SonicOS 6.5 firmware.
Feature/Application:
Ultrasurf allows end users to circumvent gateway security devices like web filters and secure web gateways in order to surf the Internet without restrictions. Ultrasurf browser add-on enables the user to browse the Internet without restrictions.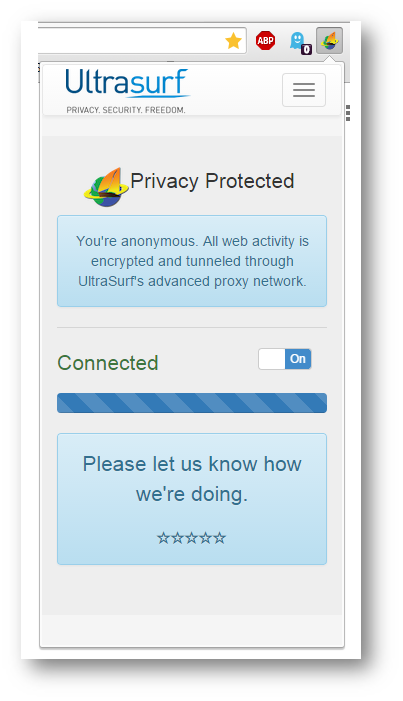
This article describes how to block Ultrasurf browser add-on using App Control Advanced signatures.
To block Ultrasurf browser add-on,
- Enable DPI-SSL Client Inspection
- Enable the check box Intrusion Prevention and enable the following application signatures must be enabled:
1. PROXY-ACCESS > Ultrasurf
2. PROXY-ACCESS > HTTP Proxy
3. PROXY-ACCESS > Encrypted Key Exchange -- TCP Random Encryption - SID 5
Procedure:
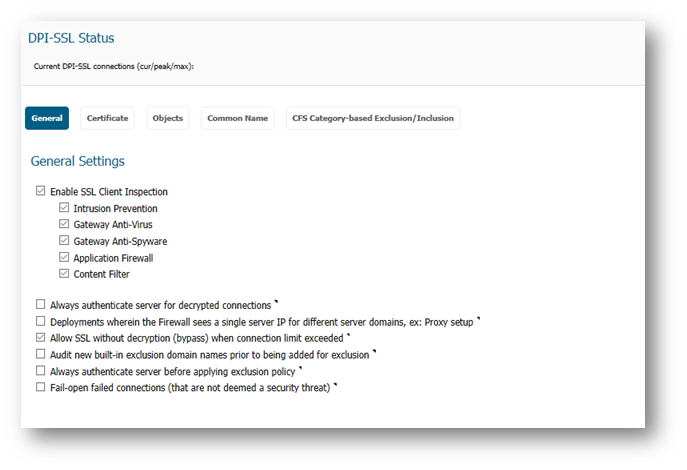
Enabling DPI-SSL Client Inspection
1. Login to the SonicWall Management GUI
2. Navigate to the Manage > Deep Packet Inspection > SSL Client deployment page
3. Enable the check box Enable SSL Client Inspection
4. Enable the check box Intrusion Prevention
5. Click on Accept at the bottom to save the changes.
For information on Client DPI-SSL, refer the following KB articles
![]() UTM: How to Configure Server DPI-SSL (5.6 onwards) (SW8729
UTM: How to Configure Server DPI-SSL (5.6 onwards) (SW8729
![]() Troubleshooting common problems when implementing DPI-SSL (SW13543)
Troubleshooting common problems when implementing DPI-SSL (SW13543)
![]() Client DPI-SSL Frequently Asked Questions (FAQ) (SW10764)
Client DPI-SSL Frequently Asked Questions (FAQ) (SW10764)
Enabling UltraSurf application signatures
1. Navigate to Manage > Rules > Advanced Application control
2. Check the box under Enable App Control and click on the Accept button at the top to enable App Control.
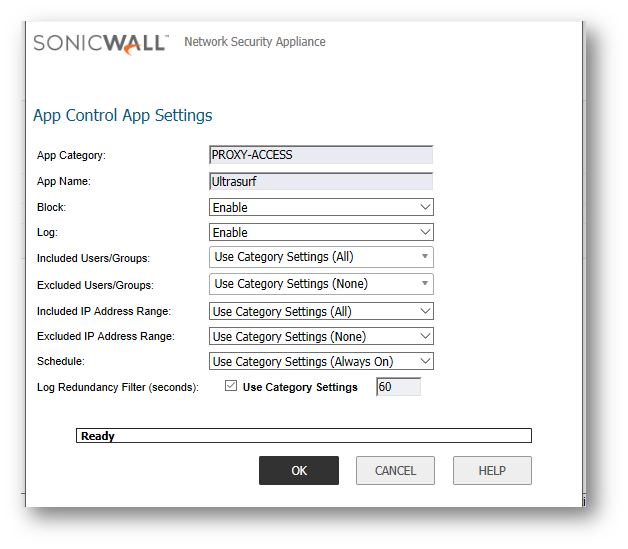
3. Under App Control Advanced > View Style select PROXY-ACCESS under Category;
4. From the drop-down under Application, select Ultrasurf
5. Click on Configure
6. In the new window, select Enable under the Block and Log fields.
7. Click on OK to save
Enabling HTTP Proxy application signatures
1. From the drop-down under Application, select HTTP Proxy
2. Click on Configure
3. In the new window, select Enable under the Block and Log fields.
4. Click on OK to save

Enabling SID 5 Encrypted Key Exchange -- TCP Random Encryption
1. In the Lookup Signature ID field enter 5 and click on the search icon
2. In the new window, select Enable under the Block and Log fields.
3. Click on OK to save

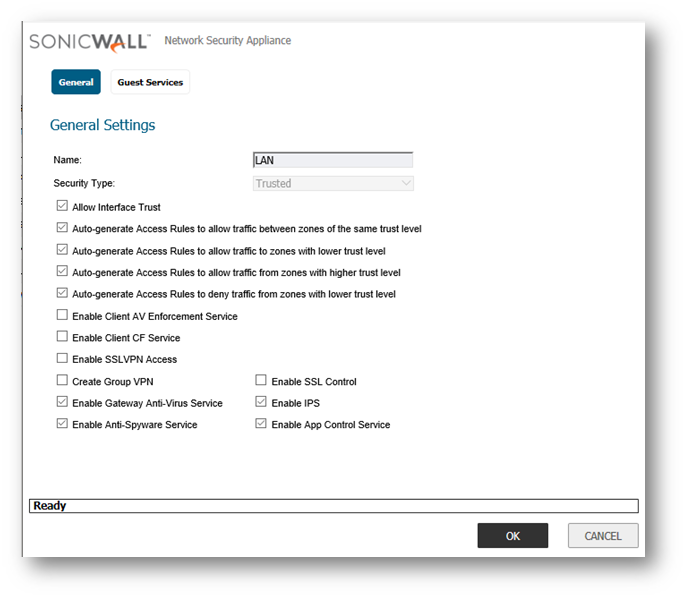
Enabling Application Control on zones
· Navigate to Manage > Network > Zones
· Click on the configure button under the zone where you want to enable App Control.
· Check Enable App Control Service.
· Click on OK to save.
Resolution for SonicOS 6.2 and Below
The below resolution is for customers using SonicOS 6.2 and earlier firmware. For firewalls that are generation 6 and newer we suggest to upgrade to the latest general release of SonicOS 6.5 firmware.
Feature/Application:
Ultrasurf allows end users to circumvent gateway security devices like web filters and secure web gateways in order to surf the Internet without restrictions. Ultrasurf browser add-on enables the user to browse the Internet without restrictions.
This article describes how to block Ultrasurf browser add-on using App Control Advanced signatures.
To block Ultrasurf browser add-on,
- Enable DPI-SSL Client Inspection
- Enable the check box Intrusion Prevention
and enable the following application signatures must be enabled:
1. PROXY-ACCESS > Ultrasurf
2. PROXY-ACCESS > HTTP Proxy
3. PROXY-ACCESS > Encrypted Key Exchange -- TCP Random Encryption - SID 5
Procedure:
Enabling DPI-SSL Client Inspection
- Login to the SonicWall Management GUI
- Navigate to the DPI-SSL > Client SSL page
- Enable the check box Enable SSL Client Inspection
- Enable the check box Intrusion Prevention
- Click on Accept at the top to save the changes

For information on Client DPI-SSL, refer the following KB articles
- UTM: How to Configure Server DPI-SSL (5.6 onwards) (SW8729
- Troubleshooting common problems when implementing DPI-SSL (SW13543)
- Client DPI-SSL Frequently Asked Questions (FAQ) (SW10764)
Enabling UltraSurf application signatures
- Navigate to the Firewall > App Control Advanced page. In Gen5 TZ devices this page is under Security Services > App Control
- Check the box under Enable App Control and click on the Accept button at the top to enable App Control.
- Under App Control Advanced > View Style select PROXY-ACCESS under Category;
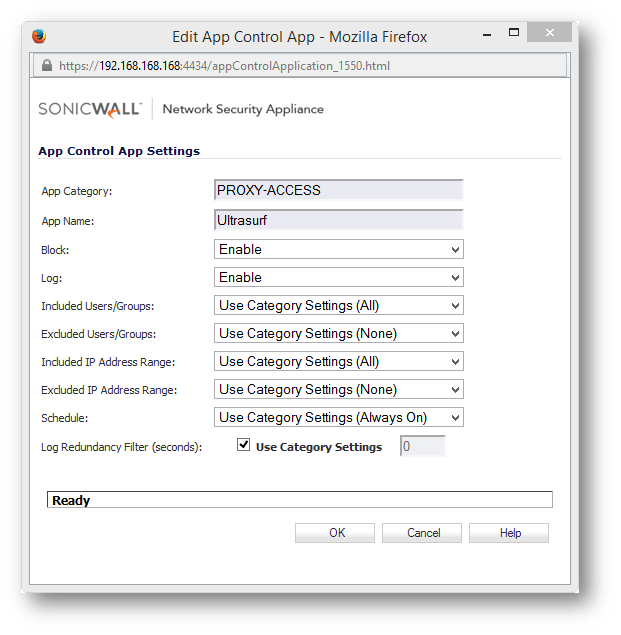
- From the drop-down under Application, select Ultrasurf
- Click on Configure
- In the new window, select Enable under the Block and Log fields.
- Click on OK to save
Enabling HTTP Proxy application signatures
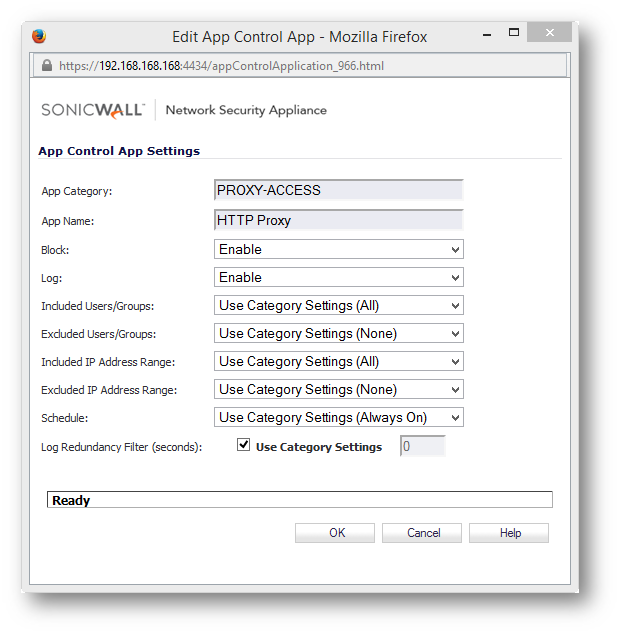
- From the drop-down under Application, select HTTP Proxy
- Click on Configure
- In the new window, select Enable under the Block and Log fields.
- Click on OK to save
Enabling SID 5 Encrypted Key Exchange -- TCP Random Encryption
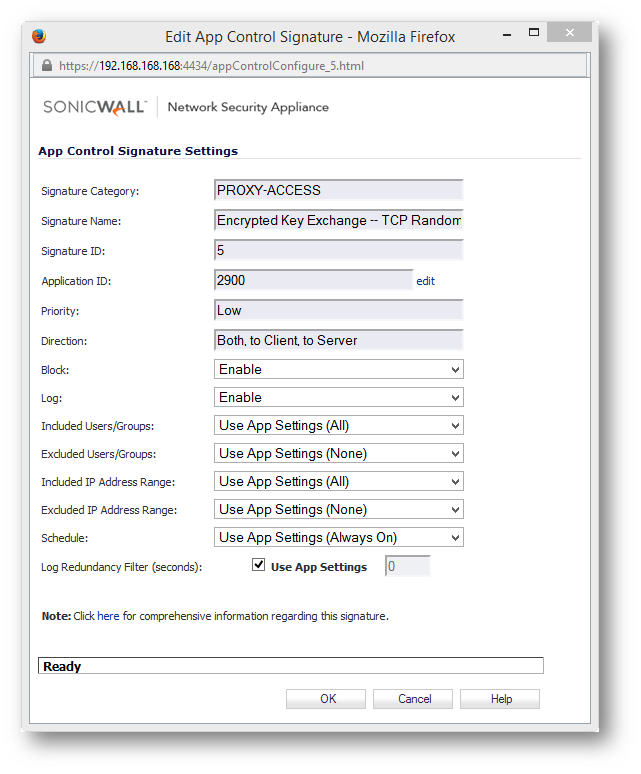
- In the Lookup Signature ID field enter 5 and click on the search icon
- In the new window, select Enable under the Block and Log fields.
- Click on OK to save
Enabling Application Control on zones
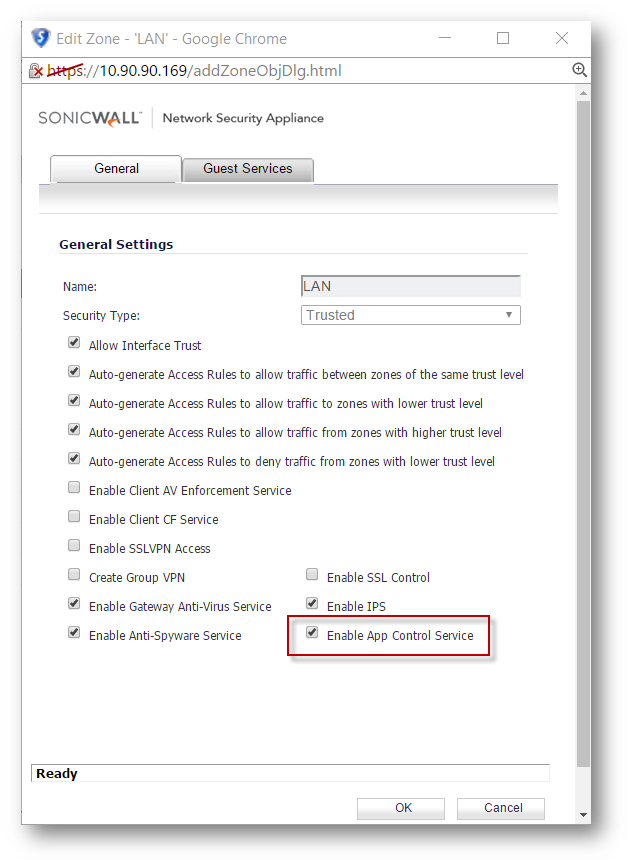
- Navigate to Network > Zones
- Click on the configure button under the zone where you want to enable App Control.
- Check Enable App Control Service.
- Click on OK to save.
Related Articles
- Error:"Invalid API Argument" when modifying the access rules
- Cysurance Partner FAQ
- Configure probe monitoring for WAN Failover and Loadbalancing - SonicWall UTM
Categories
- Firewalls > TZ Series
- Firewalls > SonicWall NSA Series
- Firewalls > SonicWall SuperMassive 9000 Series
- Firewalls > SonicWall SuperMassive E10000 Series


 YES
YES NO
NO