-
Products
-
SonicPlatform
SonicPlatform is the cybersecurity platform purpose-built for MSPs, making managing complex security environments among multiple tenants easy and streamlined.
Discover More
-
-
Solutions
-
Federal
Protect Federal Agencies and Networks with scalable, purpose-built cybersecurity solutions
Learn MoreFederalProtect Federal Agencies and Networks with scalable, purpose-built cybersecurity solutions
Learn More - Industries
- Use Cases
-
-
Partners
-
Partner Portal
Access to deal registration, MDF, sales and marketing tools, training and more
Learn MorePartner PortalAccess to deal registration, MDF, sales and marketing tools, training and more
Learn More - SonicWall Partners
- Partner Resources
-
-
Support
-
Support Portal
Find answers to your questions by searching across our knowledge base, community, technical documentation and video tutorials
Learn MoreSupport PortalFind answers to your questions by searching across our knowledge base, community, technical documentation and video tutorials
Learn More - Support
- Resources
- Capture Labs
-
- Company
- Contact Us
How to block SSLv3 (SSL version 3.0) using IPS signatures


Description
SSLv3 (SSL version 3.0) is known to be vulnerable to multiple attacks (POODLE, BEAST, CRIME etc.). SonicWall Threat Team has released signature, Downgraded TLS Traffic, ID 5770, to prevent a server from negotiating an SSLv3 connection when the client proposes higher level protocols like TLS 1.0, 1.1 or 1.2. This article describes how to enable this signature. NOTE: This signature does not block a connection when the Client proposes and the Server is enabled for SSL 3.0. To block SSL 3.0 completely, refer this article - How to Block SSLv3.0 (SSL version 3.0) connections using App Control Advanced
Resolution
Resolution for SonicOS 7.X
This release includes significant user interface changes and many new features that are different from the SonicOS 6.5 and earlier firmware. The below resolution is for customers using SonicOS 7.X firmware.
Feature/Application:
SSLv3 (SSL version 3.0) is known to be vulnerable to multiple attacks (POODLE, BEAST, CRIME etc.). SonicWall Threat Team has released signature, Downgraded TLS Traffic, ID 5770, to prevent a server from negotiating an SSLv3 connection when the client proposes higher level protocols like TLS 1.0, 1.1 or 1.2. This KB article describes how to enable this signature. NOTE: This signature does not block a connection when the Client proposes and the Server is enabled for SSL 3.0. To block SSL 3.0 completely, refer this KB article - How to Block SSLv3.0 (SSL version 3.0) connections using App Control Advanced
Procedure:
Enabling Signature ID 5770
- Login to the SonicWall management GUI
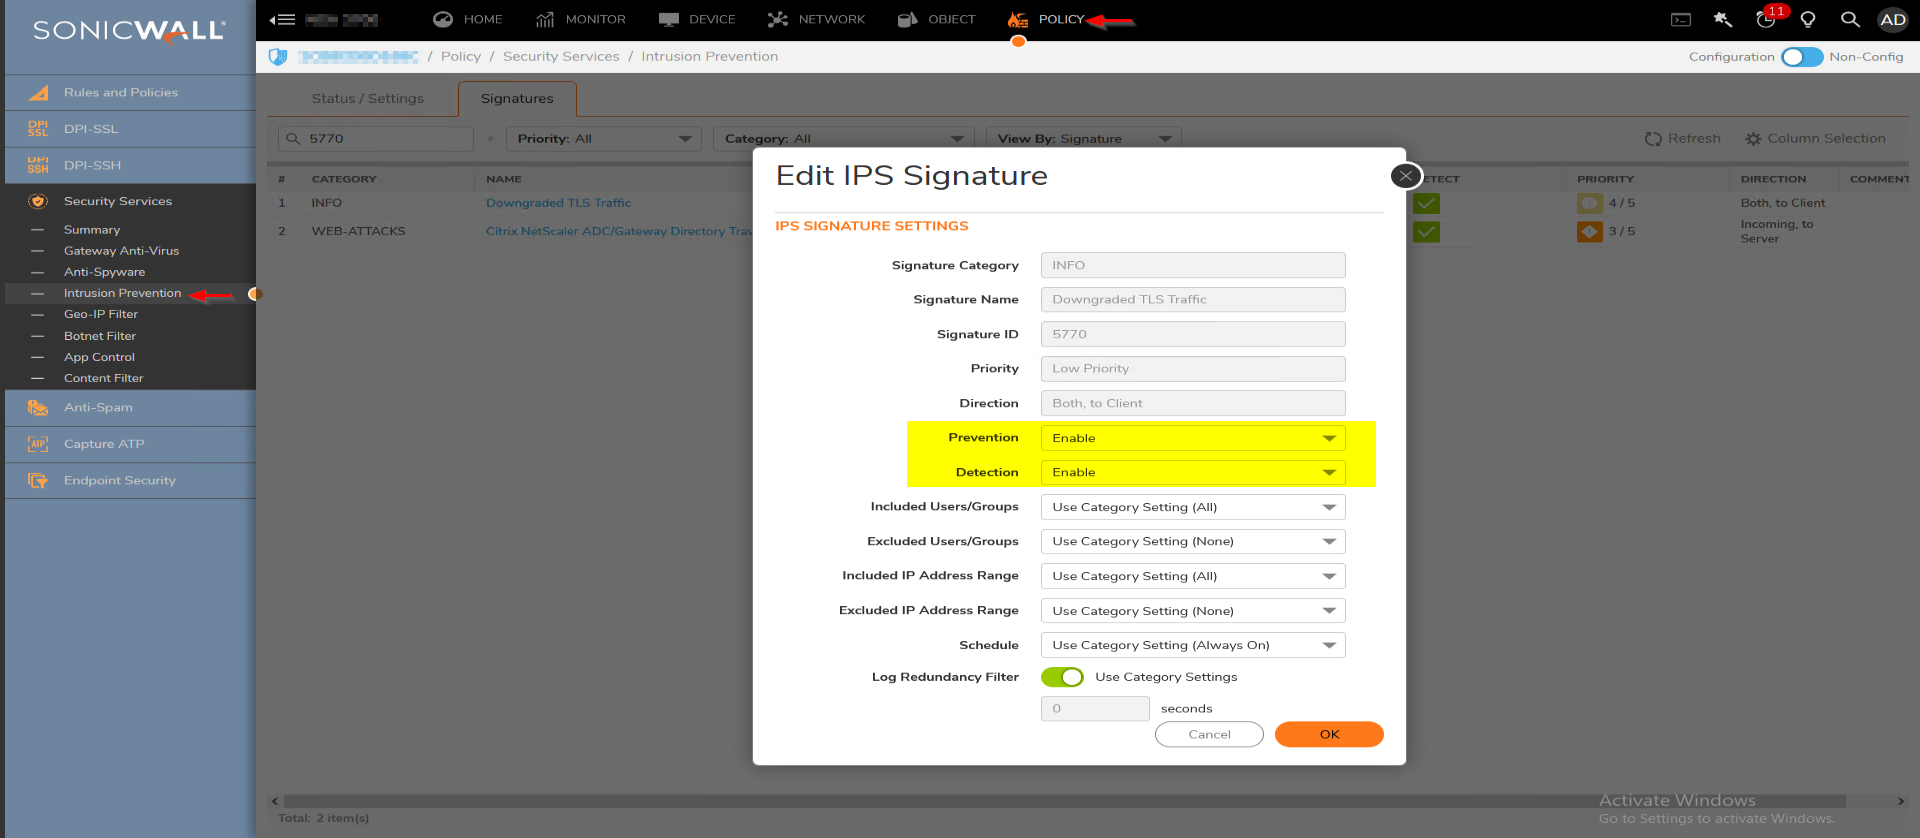
- Navigate to the Policy | Security Services | Intrusion Prevention page
- Make sure Enable IPS is checked.
- Enable the checkboxes under Prevent All and Detect All for High and Medium Priority Attacks
- Enable the checkbox under Detect All for Low Priority Attacks.
- Under Lookup Signature ID, enter 5770 and click on the find icon
- In the Edit IPS Signature window, set Prevention and Detection to Enable.
- Click on OK to save and close the window.
Enabling IPS on zones
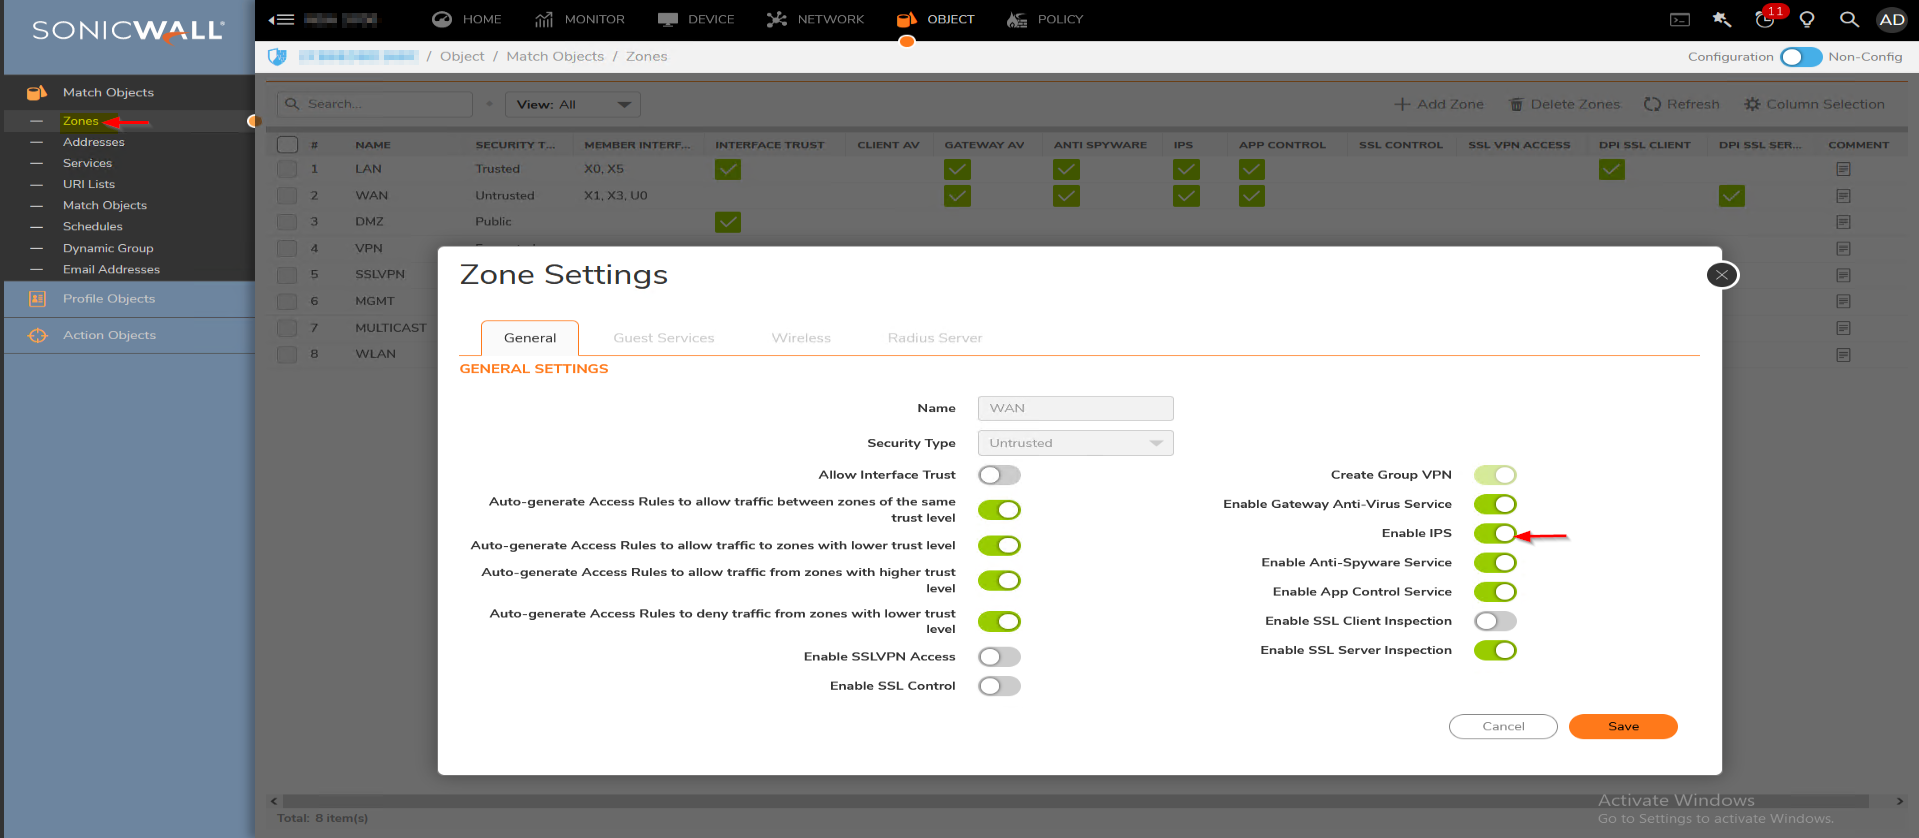
- Navigate to Object | Zones
- Click on the configure button under the zone where you want to enable IPS.
- Enable the checkbox Enable IPS.
- Click on OK to save.
Testing
With this signature enabled, when an SSL client proposes TLS 1.x in its Client Hello and the server responds with SSL 3.0, the response is blocked by SonicWall IPS. The following log message is generated when this signature blocks such traffic:
Navigate to Monitor| Logs | System Logs

Resolution for SonicOS 6.5
This release includes significant user interface changes and many new features that are different from the SonicOS 6.2 and earlier firmware. The below resolution is for customers using SonicOS 6.5 firmware.
Feature/Application:
SSLv3 (SSL version 3.0) is known to be vulnerable to multiple attacks (POODLE, BEAST, CRIME etc.). SonicWall Threat Team has released signature, Downgraded TLS Traffic, ID 5770, to prevent a server from negotiating an SSLv3 connection when the client proposes higher level protocols like TLS 1.0, 1.1 or 1.2. This KB article describes how to enable this signature. NOTE: This signature does not block a connection when the Client proposes and the Server is enabled for SSL 3.0. To block SSL 3.0 completely, refer this KB article - How to Block SSLv3.0 (SSL version 3.0) connections using App Control Advanced
Procedure:
Enabling Signature ID 5770
- Login to the SonicWall management GUI
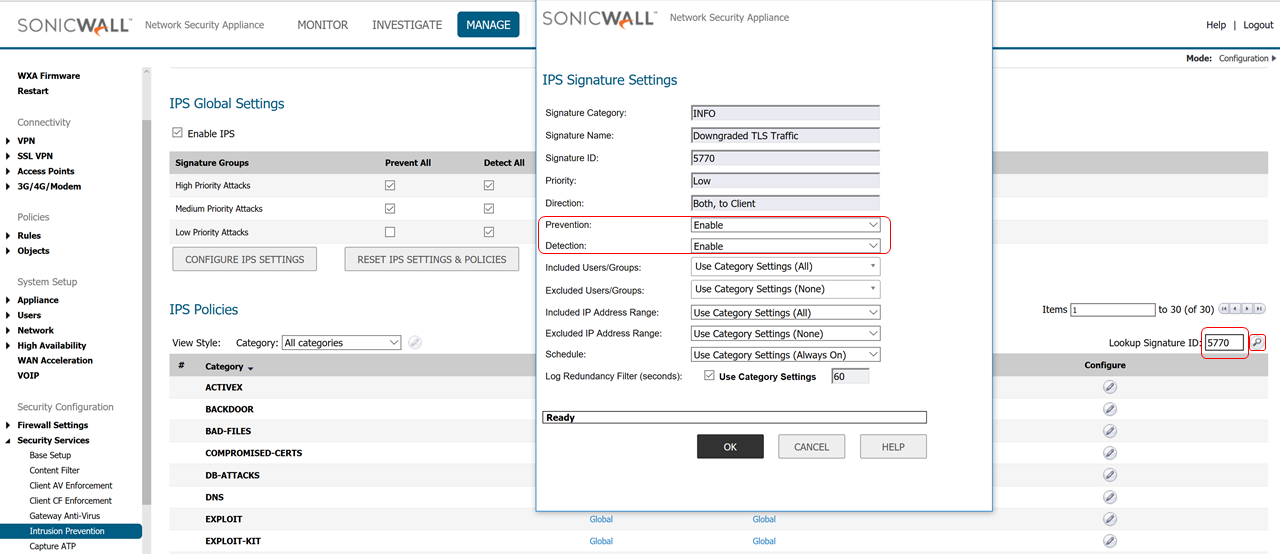
- Navigate to the Manage | Security Services | Intrusion Prevention page
- Make sure Enable IPS is checked.
- Enable the checkboxes under Prevent All and Detect All for High and Medium Priority Attacks
- Enable the checkbox under Detect All for Low Priority Attacks.
- Under Lookup Signature ID, enter 5770 and click on the find icon
- In the Edit IPS Signature window, set Prevention and Detection to Enable.
- Click on OK to save and close the window.
Enabling IPS on zones
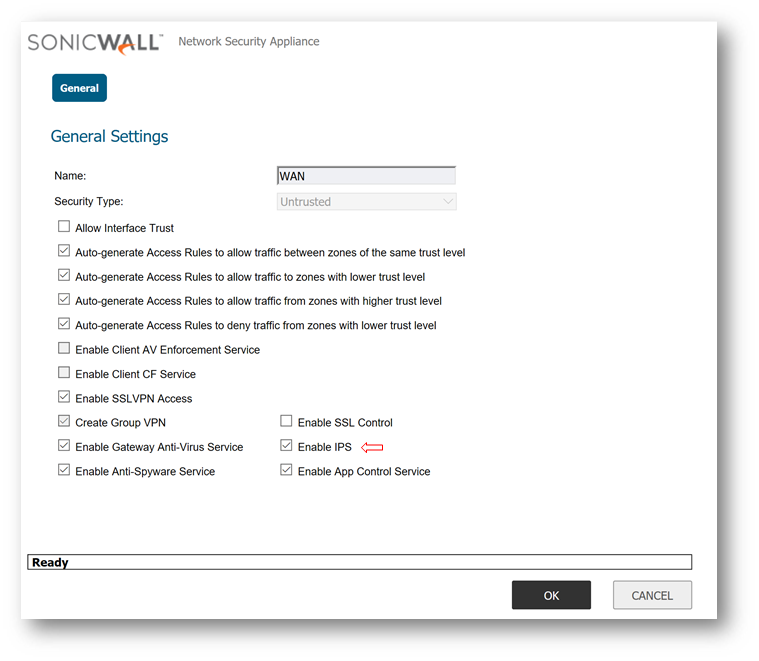
- Navigate to Manage | Network | Zones
- Click on the configure button under the zone where you want to enable IPS.
- Enable the checkbox Enable IPS.
- Click on OK to save.
Testing
With this signature enabled, when an SSL client proposes TLS 1.x in its Client Hello and the server responds with SSL 3.0, the response is blocked by SonicWall IPS. The following log message is generated when this signature blocks such traffic:
Resolution for SonicOS 6.2 and Below
The below resolution is for customers using SonicOS 6.2 and earlier firmware. For firewalls that are generation 6 and newer we suggest to upgrade to the latest general release of SonicOS 6.5 firmware.
Procedure:
Enabling Signature ID 5770
- Login to the SonicWall management GUI
- Navigate to the Manage | Security Services | Intrusion Prevention page
- Make sure Enable IPS is checked.
- Enable the checkboxes under Prevent All and Detect All for High and Medium Priority Attacks
- Enable the checkbox under Detect All for Low Priority Attacks.
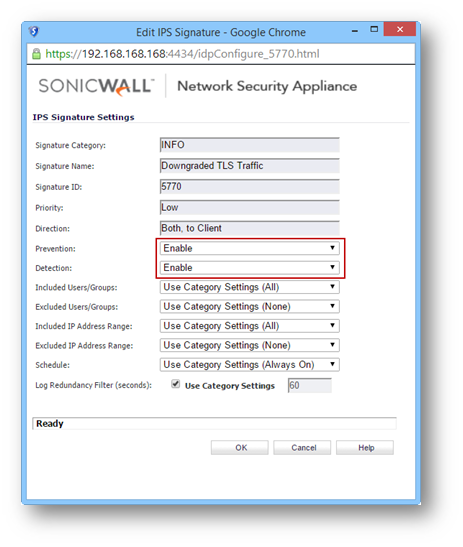
- Under Lookup Signature ID, enter 5770 and click on the find icon
- In the Edit IPS Signature window, set Prevention and Detection to Enable.
- Click on OK to save and close the window.
Enabling IPS on zones
- Navigate to Manage | Network | Zones
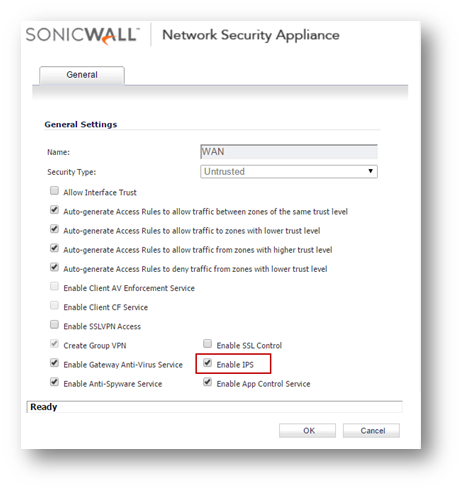
- Click on the configure button under the zone where you want to enable IPS.
- Enable the checkbox Enable IPS.
- Click on OK to save.
Testing
With this signature enabled, when an SSL client proposes TLS 1.x in its Client Hello and the server responds with SSL 3.0, the response is blocked by SonicWall IPS. The following log message is generated when this signature blocks such traffic:
Related Articles
- Error:"Invalid API Argument" when modifying the access rules
- Cysurance Partner FAQ
- Configure probe monitoring for WAN Failover and Loadbalancing - SonicWall UTM
Categories
- Firewalls > TZ Series > IPS/GAV/Spyware
- Firewalls > SonicWall NSA Series > IPS/GAV/Spyware
- Firewalls > SonicWall SuperMassive 9000 Series > IPS/GAV/Spyware
- Firewalls > SonicWall SuperMassive E10000 Series > IPS/GAV/Spyware


 YES
YES NO
NO