-
Products
-
SonicPlatform
SonicPlatform is the cybersecurity platform purpose-built for MSPs, making managing complex security environments among multiple tenants easy and streamlined.
Discover More
-
-
Solutions
-
Federal
Protect Federal Agencies and Networks with scalable, purpose-built cybersecurity solutions
Learn MoreFederalProtect Federal Agencies and Networks with scalable, purpose-built cybersecurity solutions
Learn More - Industries
- Use Cases
-
-
Partners
-
Partner Portal
Access to deal registration, MDF, sales and marketing tools, training and more
Learn MorePartner PortalAccess to deal registration, MDF, sales and marketing tools, training and more
Learn More - SonicWall Partners
- Partner Resources
-
-
Support
-
Support Portal
Find answers to your questions by searching across our knowledge base, community, technical documentation and video tutorials
Learn MoreSupport PortalFind answers to your questions by searching across our knowledge base, community, technical documentation and video tutorials
Learn More - Support
- Resources
- Capture Labs
-
- Company
- Contact Us
How to block Instant Messaging (IM) and Peer-to-Peer (P2P) applications


Description
SonicWall Intrusion Prevention Service (SonicWall IPS) delivers a configurable, high performance Deep Packet Inspection engine for extended protection of key network services
such as Web, instant messaging applications, e-mail, file transfer, Windows services and DNS. SonicWall IPS is designed to protect against application vulnerabilities as well as worms, Trojans, and peer-to-peer (P2P), spyware and backdoor exploits while improving employee productivity and conserving bandwidth.
The extensible signature language used in SonicWall’s Deep Packet Inspection engine also provides proactive defense against newly discovered application and protocol vulnerabilities. Signature granularity allows SonicWall IPS to detect and prevent attacks based on a global, attack group, or per-signature basis to provide maximum flexibility and control false positives.
NOTE: Some Peer-to-Peer applications and Instant Messaging applications (e.g. Kazaa, Gnutella, AIM or ICQ) cannot be blocked using firewall access rules because the ports used these programs are shared by other well-known applications (like HTTP port 80).
Resolution
Step 1: Applying SonicWall IPS Protection on Zones
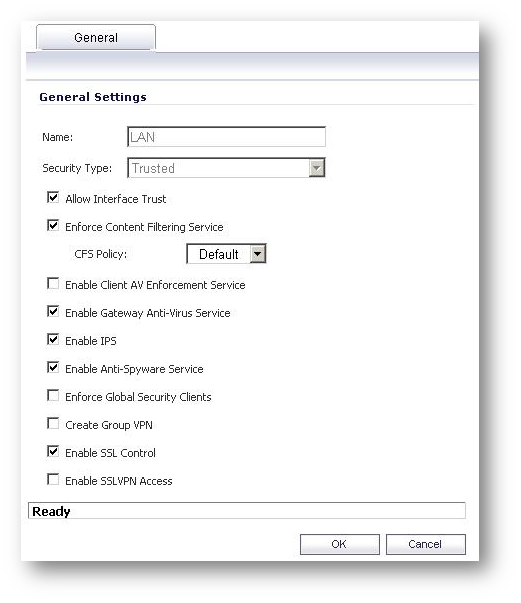
You can apply SonicWall IPS to zones on the Network | Zones page to enforce SonicWall IPS not only between each network zone and the WAN, but also between internal zones. For example, enabling SonicWall IPS on the LAN zone enforces SonicWall IPS on all incoming and outgoing LAN traffic.
1. In the SonicWall security appliance management interface, select Network | Zones or from the IPS Status section, on the Security Services | Intrusion Prevention page, click the Network | Zones link. The Network | Zones page is displayed.
2. In the Configure column in the Zone Settings table, click the edit icon for the zone you want to apply SonicWall IPS. The Edit Zone window is displayed.

3. Click the Enable IPS checkbox. A checkmark appears. To disable SonicWall IPS, uncheck the box.
4. Click OK.
Step 2: Enabling SonicWall IPS on Security Services | Intrusion Prevention page
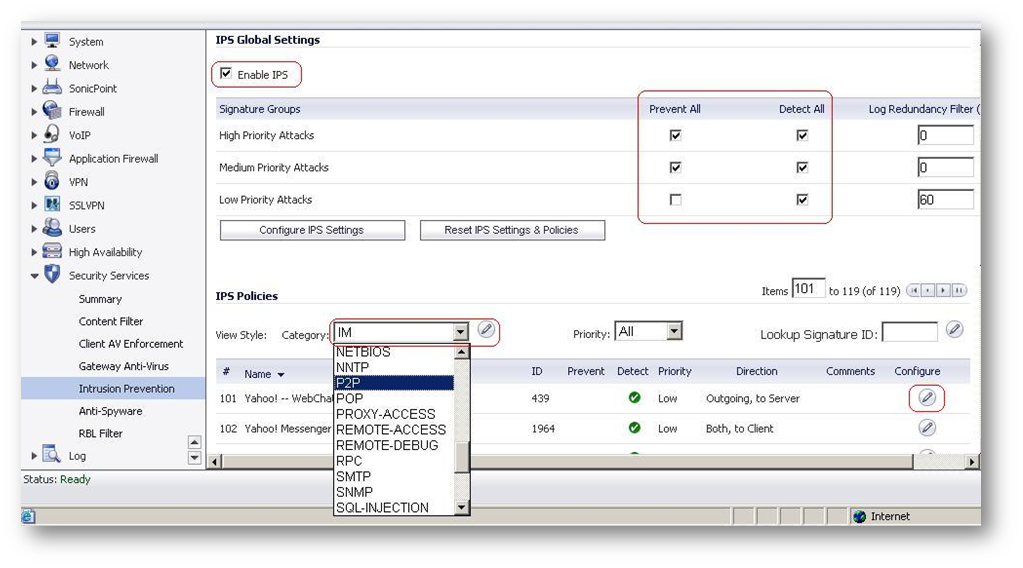
On the Security Services | Intrusion Prevention page the SonicWall IPS must be globally enabled on your SonicWall security appliance by checking the Enable IPS check box in the IPS Global Settings section. A checkmark in the Enable IPS check box turns on the service on your SonicWall security appliance.
Note: Checking the Enable IPS check box does not automatically start SonicWall IPS protection. You must also enable the IPS Global Settings section.You must specify a Prevent All action in the Signature Groups table to activate intrusion prevention on the SonicWall security appliance, and specify the interface or zones you want to protect.
Step 3. Specifying Global Attack Level Protection
SonicWall IPS allows you to globally manage your network protection against attacks by simply selecting the class of attacks: High Priority Attacks, Medium Priority Attacks, and
Low Priority Attacks. Selecting the Prevent All and Detect All check boxes for High Priority Attacks and Medium Priority Attacks in the Signature Groups table, and then clicking Apply protects your network against the most dangerous and disruptive attacks.
Please Note: IM and P2P signatures are categorized under "Low Priority Attacks", however the Prevent All for Low Priority Attacks (global settings) is unchecked purposely because when you enable this option globally other well known applications also might be blocked. So in the next section we will discuss how to override global settings for an entire category or an individual signature.

Note: Leaving the High Priority Attacks, Medium Priority Attacks, and Low Priority Attacks signature groups with no Prevent All action checked means no intrusion prevention is occurring on the SonicWall security appliance.
Step 4: Overriding Global Prevent and Detect Settings by Category (IM and P2P)
1. In the Security Services | Intrusion Prevention page, navigate to IPS policies section.
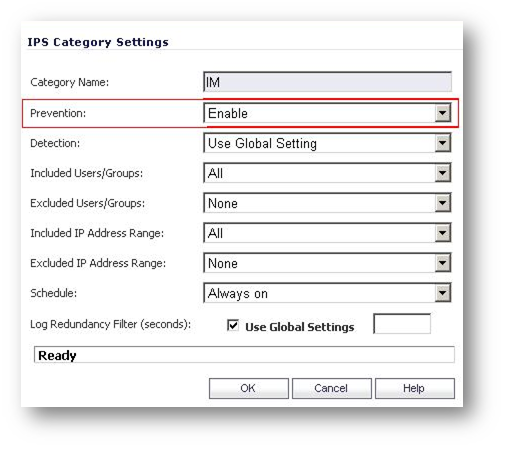
2. Select IM category from the Category menu. click on the edit icon for the category, the Edit IPS Category window is displayed.

3. Select IM category from the Category menu. click on the edit icon for the category, the Edit IPS Category window is displayed.
4. To change the Global Setting for Prevention, select Enable from the Prevention menu.
5. Click OK to save your changes and exit.
(Repeat step 4 to modify P2P category)
Related Articles
- Error:"Invalid API Argument" when modifying the access rules
- Cysurance Partner FAQ
- Configure probe monitoring for WAN Failover and Loadbalancing - SonicWall UTM
Categories
- Firewalls > TZ Series
- Firewalls > SonicWall SuperMassive E10000 Series
- Firewalls > SonicWall SuperMassive 9000 Series
- Firewalls > SonicWall NSA Series


 YES
YES NO
NO