-
Products
-
SonicPlatform
SonicPlatform is the cybersecurity platform purpose-built for MSPs, making managing complex security environments among multiple tenants easy and streamlined.
Discover More
-
-
Solutions
-
Federal
Protect Federal Agencies and Networks with scalable, purpose-built cybersecurity solutions
Learn MoreFederalProtect Federal Agencies and Networks with scalable, purpose-built cybersecurity solutions
Learn More - Industries
- Use Cases
-
-
Partners
-
Partner Portal
Access to deal registration, MDF, sales and marketing tools, training and more
Learn MorePartner PortalAccess to deal registration, MDF, sales and marketing tools, training and more
Learn More - SonicWall Partners
- Partner Resources
-
-
Support
-
Support Portal
Find answers to your questions by searching across our knowledge base, community, technical documentation and video tutorials
Learn MoreSupport PortalFind answers to your questions by searching across our knowledge base, community, technical documentation and video tutorials
Learn More - Support
- Resources
- Capture Labs
-
- Company
- Contact Us
How to add Reputation based web filtering to an existing Content Filter Policy?


Description
With the release of SonicOS 7.1, Reputation-based web filtering is possible in the CFS 5.0. Reputation-based web filtering feature will allow SonicWall to Allow/Block access to websites based on the reputation score of the websites.
Reputation-based filtering provides a score that forecasts the security risk of a URL. Reputation score is an integer value between 0-100. The higher the value, the safer the URL is.
The reputation score is divided into Six categories as displayed in the following table:
| Threat Reputation | Score level |
| High Risk | 1-20 |
| Suspicious | 21-40 |
| Moderate Risk | 41-60 |
| Low Risk | 61-80 |
| Trustworthy | 81-100 |
| URL without Reputation | 0 |
Resolution
Resolution for SonicOS 7.X
This release includes significant user interface changes and many new features that are different from the SonicOS 6.5 and earlier firmware. The below resolution is for customers using SonicOS 7.X firmware.
Following are the steps required to enhance the existing Content Filtering policies to check the Reputation score for the websites and Allow/Block access. [Assuming that the Content Filter policies are already configured.] If you require assistance with creating Content Filter Policies please refer to: CFS Policies Configuration
- Navigate to OBJECT | Match Objects > Reputation. You will be able to see the default object CFS Default Reputation Object already available.

- You can Click on the Add option on the top right-hand to create a new reputation object or modify the default one using the CONFIGURE option. In the following image, you can also view the Default Values under the ACTIONS Field.

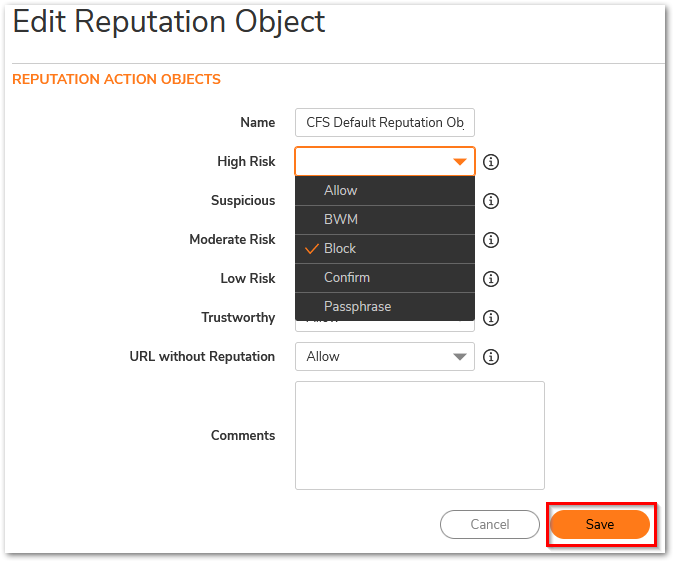
- Click on Configure to modify the reputation Object. You can set the Actions as per your requirements and Click Save. The Dropdown allows us to Choose between the following options: Allow, BWM, Block, Confirm, Passphrase. [These Actions will be applied based on the Configurations of the CFS Action Object selected for the CFS Policy].

- Navigate to OBJECT | Profile Objects > Content Filter. Edit the Profile that you are currently using on the CFS Policy.

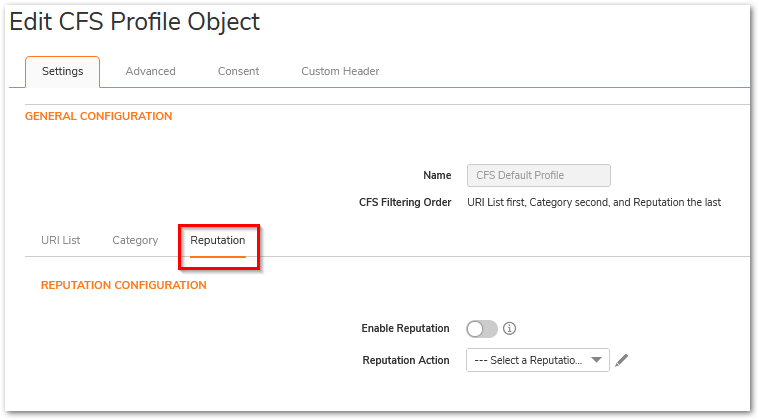
- After Clicking on Edit for the CFS Profile Object, a Window will open. Browse to the Reputation configuration.

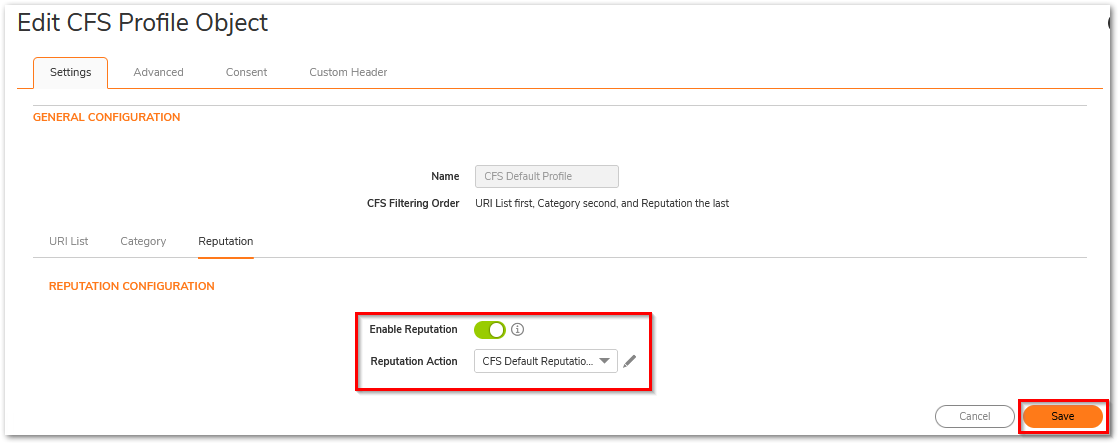
- By default the Enable Reputation option is disabled. Enable it and Select the Reputation Action from the Dropdown. Click Save to Apply the Settings.

After Applying the settings, CFS will Allow / Block URLs based on Reputation along with the Category and URI lists.
 NOTE: The Reputation check for a URL will happen when the URL is not part of the Allowed or Blocked URI list and the Category for the URL is set to Allow.
Related Articles
- Error:"Invalid API Argument" when modifying the access rules
- Cysurance Partner FAQ
- Configure probe monitoring for WAN Failover and Loadbalancing - SonicWall UTM
Categories
- Firewalls > NSa Series > Content Filtering Service
- Firewalls > NSsp Series > Content Filtering Service
- Firewalls > NSv Series > Content Filtering Service
- Firewalls > SonicWall NSA Series > Content Filtering Service
- Firewalls > TZ Series > Content Filtering Service


 YES
YES NO
NO