-
Products
-
SonicPlatform
SonicPlatform is the cybersecurity platform purpose-built for MSPs, making managing complex security environments among multiple tenants easy and streamlined.
Discover More
-
-
Solutions
-
Federal
Protect Federal Agencies and Networks with scalable, purpose-built cybersecurity solutions
Learn MoreFederalProtect Federal Agencies and Networks with scalable, purpose-built cybersecurity solutions
Learn More - Industries
- Use Cases
-
-
Partners
-
Partner Portal
Access to deal registration, MDF, sales and marketing tools, training and more
Learn MorePartner PortalAccess to deal registration, MDF, sales and marketing tools, training and more
Learn More - SonicWall Partners
- Partner Resources
-
-
Support
-
Support Portal
Find answers to your questions by searching across our knowledge base, community, technical documentation and video tutorials
Learn MoreSupport PortalFind answers to your questions by searching across our knowledge base, community, technical documentation and video tutorials
Learn More - Support
- Resources
- Capture Labs
-
- Company
- Contact Us
How do I transfer my LAN or WAN network from one interface to another?


Description
Modern SonicWall firewalls have the capability to transfer 1, 2.5, or 10 gig speeds (depending on model) that allows organizations to get more done. This article covers how to transfer an existing WAN network from the X3 interface (default 1 gig) to the X20 interface which is set for 10 gig speeds. The example screenshots in this article are from an NSa 6650 on SonicOS 6.5.2 firmware.
 NOTE: This article is only designed for taking the existing network of a LAN or WAN interface and transferring it to another interface. This article is not meant to be followed if, while using a faster interface, a different network than the existing LAN/WAN network has been designated.
The following examples and calculated times are based off of a basic firewall setup. Your times may very.
Expected downtime for end-users: 10 minutes
Expected time of burden to complete interface transfer: 30 minutes
Resolution
In our example we will take the X3 interface (set at 1 gig speeds) and transfer the network and settings to the X20 interface (set at 10 gig speeds). The basic steps that will be performed are as follows:
WAN interface transfer:
- Adjust IP of current WAN to an unused address on a fake network (we need to release the network from one interface in order to use it on the new interface).
- Create/enable new interface with correct IP of existing WAN network.
- Adjust WAN Failover & Load Balancing to contain new interface, remove old.
- Adjust any references of old interface IP or old interface subnet objects to new interface IP/subnet respectively (except default cases).
- Delete old interface config and un-assign.
Adjust IP of current WAN interface to a fake network
 CAUTION: This will begin the network downtime until the new interface on the SonicWall set up, failover and load balancing has been completed, and basic network convergence has taken place (i.e. ARP and interface tables have been updated by north or south facing network equipment).
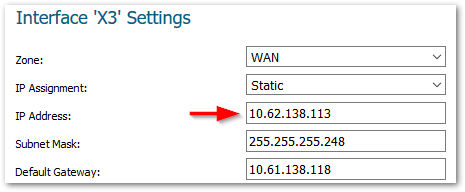
- Edit the X3 interface. The existing WAN IP is 10.61.138.113/29. We'll change the IP to 10.62.138.113/29 which is an un-used network in our environment. Click OK.


- Confirm that the X20 interface has been assigned and is up by looking at the Interfaces page:

- Under Default LB Group click edit. Remove the X3 interface and replace it with the new X20 interface:

Adjust any references of old interface IP or old interface subnet objects to new interface IP/subnet respectively (except default cases)
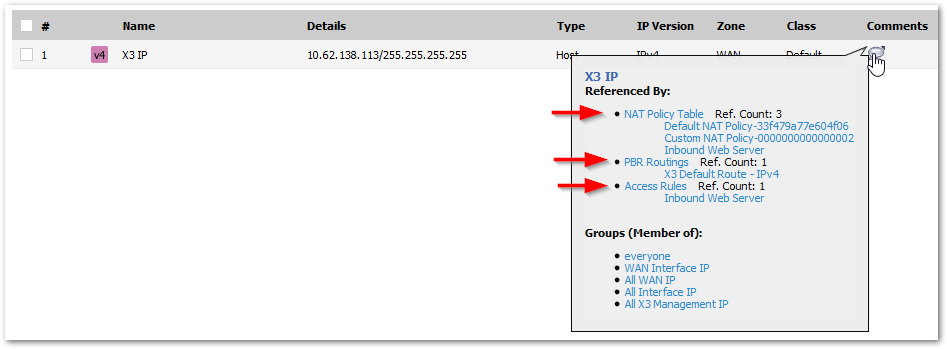
- If you have NAT policies or access rules using the old interface object you will need to update each policy. A quick way to determine if the old interface object is in use is by navigating to Objects | Address Objects and hovering over the note (in this example the X3 IP address object):

To
To
- Change the Zone to Unassigned and click OK

Related Articles
- How to Block Google QUIC Protocol on SonicOSX 7.0?
- How to block certain Keywords on SonicOSX 7.0?
- How internal Interfaces can obtain Global IPv6 Addresses using DHCPv6 Prefix Delegation


 YES
YES NO
NO