-
Products
-
SonicPlatform
SonicPlatform is the cybersecurity platform purpose-built for MSPs, making managing complex security environments among multiple tenants easy and streamlined.
Discover More
-
-
Solutions
-
Federal
Protect Federal Agencies and Networks with scalable, purpose-built cybersecurity solutions
Learn MoreFederalProtect Federal Agencies and Networks with scalable, purpose-built cybersecurity solutions
Learn More - Industries
- Use Cases
-
-
Partners
-
Partner Portal
Access to deal registration, MDF, sales and marketing tools, training and more
Learn MorePartner PortalAccess to deal registration, MDF, sales and marketing tools, training and more
Learn More - SonicWall Partners
- Partner Resources
-
-
Support
-
Support Portal
Find answers to your questions by searching across our knowledge base, community, technical documentation and video tutorials
Learn MoreSupport PortalFind answers to your questions by searching across our knowledge base, community, technical documentation and video tutorials
Learn More - Support
- Resources
- Capture Labs
-
- Company
- Contact Us
How do I present to the Internet an internal IP with another Public IP from the WAN subnet?


Description
This article describes how to present to the Internet an internal IP Host, Range or Subnet with a different Public IP from the ISP Pool than the SonicWall Interface WAN IP.
 CAUTION: The IP must be part of the WAN subnet and assigned to you by your ISP if you're going to the Internet.
Manually presenting to the Internet an internal IP Host, Range or Subnet with a different Public IP from the ISP Pool than the SonicWall Interface WAN IP involves the following steps:
- Creating the necessary Address Objects
- Creating the appropriate NAT Policy for Outbound
- Check the Access Rule LAN to WAN is in place
Resolution
Resolution for SonicOS 7.X
This release includes significant user interface changes and many new features that are different from the SonicOS 6.5 and earlier firmware. The below resolution is for customers using SonicOS 7.X firmware.
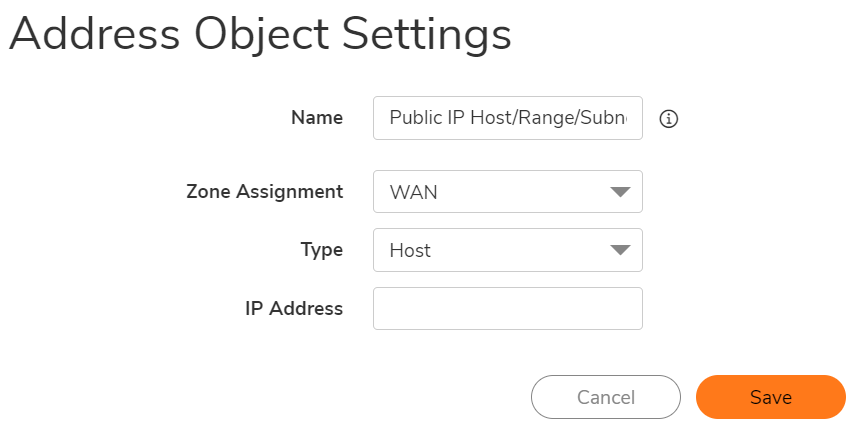
Step 1: Creating the necessary Address Objects
- Log into the SonicWall GUI.
- Click Object | Match Object| Addresses
- Click the Add a new Address Object button and create two Address Objects for the Server's Public IP and the Server's Private IP.
- Click OK to add the Address Object to the SonicWall's Address Object Table.


Step 2: Creating the appropriate NAT Policy for Outbound
A NAT Policy will allow SonicOS to translate incoming Packets destined for a Public IP Address to a Private IP Address, and/or a specific Port to another specific Port. Every Packet contains information about the Source and Destination IP Addresses and Ports and with a NAT Policy SonicOS can examine Packets and rewrite those Addresses and Ports for incoming and outgoing traffic.
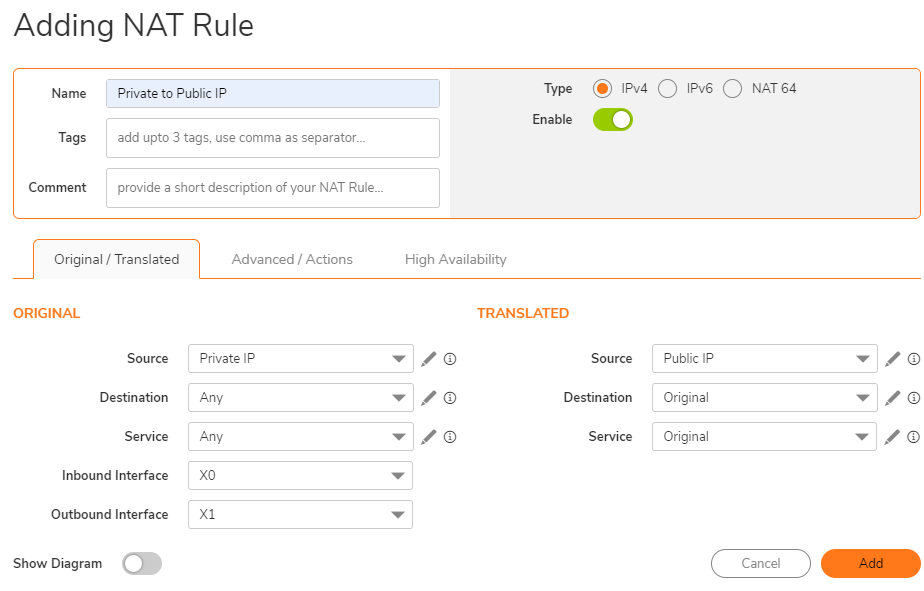
- Click Policy | Rules and Policies |NAT Rules.
- Click the Add a new NAT Policy button and a pop-up window will appear.
- Click Add to add the NAT Policy to the SonicWall NAT Policy Table.
 NOTE: When creating a NAT Policy you may select the "Create a reflexive policy" checkbox. This will create an inverse Policy automatically, in case you need the internal device to be accessed from the outside as well. This option is not available when configuring an existing NAT Policy, only when creating a new Policy.
For more info, please use the following KB: [[How to Enable Port Forwarding and Allow Access to a Server Through the SonicWall|170503477349850]]

- Original Source: Private IP Address Object
- Translated Source: Public IP Address Object
- Original Destination: Any
- Translated Destination: Original
- Original Service: Any
- Translated Service: Original
- Inbound Interface: The LAN interface, (Select Any if the devices are located in many interfaces)
- Outbound Interface: The WAN interface. (Select Any when using multiple WAN interfaces)
- Enable NAT Policy: Checked
- Create a reflexive policy: Unchecked
Step 3. Check the Access Rule LAN to WAN is allowing the NAT Policy to work
In order to work, please ensure that the LAN to WAN Access Rule is in place to allow the Private IPs to reach the WAN.

Resolution for SonicOS 6.5
This release includes significant user interface changes and many new features that are different from the SonicOS 6.2 and earlier firmware. The below resolution is for customers using SonicOS 6.5 firmware.
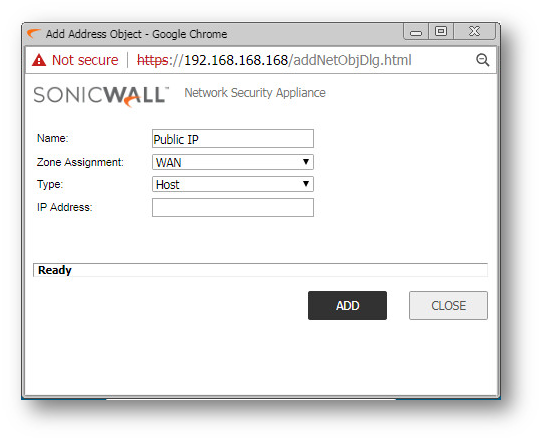
Step 1: Creating the necessary Address Objects
- Log into the SonicWall GUI.
- Click Network | Address Objects.
- Click the Add a new Address Object button and create two Address Objects for the Server's Public IP and the Server's Private IP.
- Click OK to add the Address Object to the SonicWall's Address Object Table.


Step 2: Creating the appropriate NAT Policy for Outbound
A NAT Policy will allow SonicOS to translate incoming Packets destined for a Public IP Address to a Private IP Address, and/or a specific Port to another specific Port. Every Packet contains information about the Source and Destination IP Addresses and Ports and with a NAT Policy SonicOS can examine Packets and rewrite those Addresses and Ports for incoming and outgoing traffic.
- Click Network | NAT Policies.
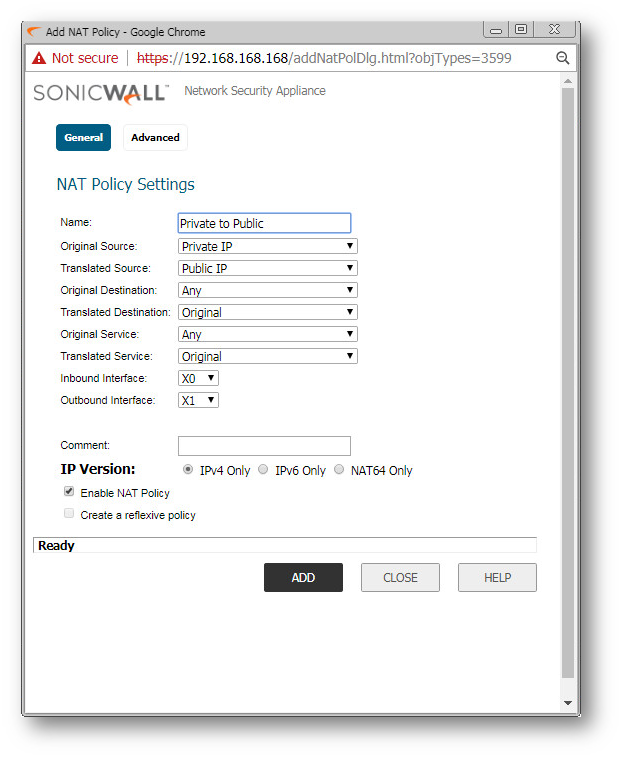
- Click the Add a new NAT Policy button and a pop-up window will appear.
- Click Add to add the NAT Policy to the SonicWall NAT Policy Table.
 NOTE: When creating a NAT Policy you may select the "Create a reflexive policy" checkbox. This will create an inverse Policy automatically, in case you need the internal device to be accessed from the outside as well. This option is not available when configuring an existing NAT Policy, only when creating a new Policy.
For more info, please use the following KB: [[How to Enable Port Forwarding and Allow Access to a Server Through the SonicWall|170503477349850]]

- Original Source: Private IP Address Object
- Translated Source: Public IP Address Object
- Original Destination: Any
- Translated Destination: Original
- Original Service: Any
- Translated Service: Original
- Inbound Interface: The LAN interface, (Select Any if the devices are located in many interfaces)
- Outbound Interface: The WAN interface. (Select Any when using multiple WAN interfaces)
- Enable NAT Policy: Checked
- Create a reflexive policy: Unchecked
Step 3. Check the Access Rule LAN to WAN is allowing the NAT Policy to work
In order to work, please ensure that the LAN to WAN Access Rule is in place to allow the Private IPs to reach the WAN.

Verification
Go to any "What's my IP" website from the internal device you want to test and it will now be identified by the Public IP chosen.
Related Articles
- Error:"Invalid API Argument" when modifying the access rules
- Cysurance Partner FAQ
- Configure probe monitoring for WAN Failover and Loadbalancing - SonicWall UTM
Categories
- Firewalls > NSa Series > Networking
- Firewalls > SonicWall NSA Series > Networking
- Firewalls > TZ Series > Networking


 YES
YES NO
NO