-
Products
-
SonicPlatform
SonicPlatform is the cybersecurity platform purpose-built for MSPs, making managing complex security environments among multiple tenants easy and streamlined.
Discover More
-
-
Solutions
-
Federal
Protect Federal Agencies and Networks with scalable, purpose-built cybersecurity solutions
Learn MoreFederalProtect Federal Agencies and Networks with scalable, purpose-built cybersecurity solutions
Learn More - Industries
- Use Cases
-
-
Partners
-
Partner Portal
Access to deal registration, MDF, sales and marketing tools, training and more
Learn MorePartner PortalAccess to deal registration, MDF, sales and marketing tools, training and more
Learn More - SonicWall Partners
- Partner Resources
-
-
Support
-
Support Portal
Find answers to your questions by searching across our knowledge base, community, technical documentation and video tutorials
Learn MoreSupport PortalFind answers to your questions by searching across our knowledge base, community, technical documentation and video tutorials
Learn More - Support
- Resources
- Capture Labs
-
- Company
- Contact Us
How do I configure WAN GroupVPN / GVC between sites with same subnets?


Description
Global VPN Client enables remote users to connect to the corporate network using a secure VPN tunnel. Sometimes one or more remote users' physical network may be in the same subnet as the corporate network being accessed. In such cases the user will not able to access the corporate network.
This article describes one of various methods to work around this problem. The solution provided here is to configure a virtual subnet with identical subnet mask as the corporate (physical) network, which would do a one to one mapping of the virtual IP addresses to the corporate (physical) network.
Resolution
For the purpose of this article we’ll be using the following IP addresses as examples. You can substitute your IP addresses for the examples shown here:
- LAN subnet (X0 Subnet) behind SonicWall (corporate network): 192.168.168.0/24
- LAN subnet to which the GVC Client PC belongs: 192.168.168.0/24 (overlapping)
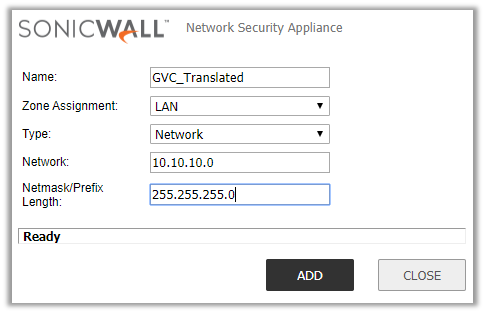
- Virtual subnet used to enable remote VPN client access to the corporate network: 10.10.10.0/24 (This has to be a unique subnet with the same subnet mask as the corporate network)
The following steps are required to successfully connect a GVC client PC to the network behind the SonicWall when both the client PC and the SonicWall network are overlapping:
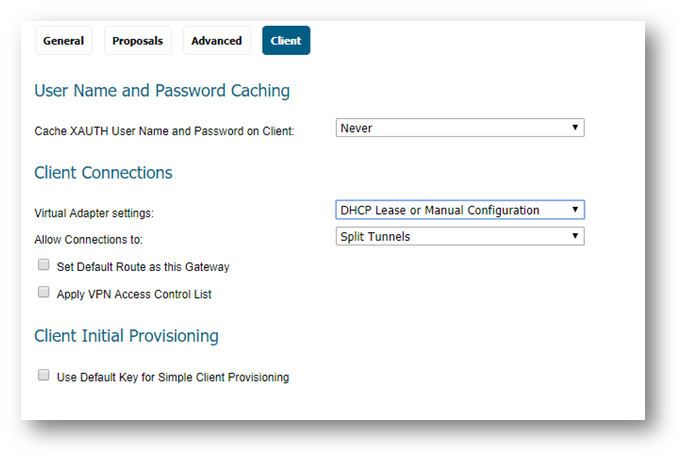
- Configure WAN GroupVPN settings.
- Login to the SonicWall management interface.
- Navigate to the Manage | VPN | Base Settings page.
- Click on configure on WANGroupVPN.
- Click on the Client tab.
- Set the Virtual Adapter settings to DHCP Lease or Manual Configuration.
- Create an Address Object for the translated network for GVC clients.
- Navigate to the Objects | Address Objects page.
- Create an address object as per the screen shot.
- Create an Access Rule
- Navigate to the Rules | Access Rules page.
- Go to the VPN to LAN page.
- Create the following access rule:
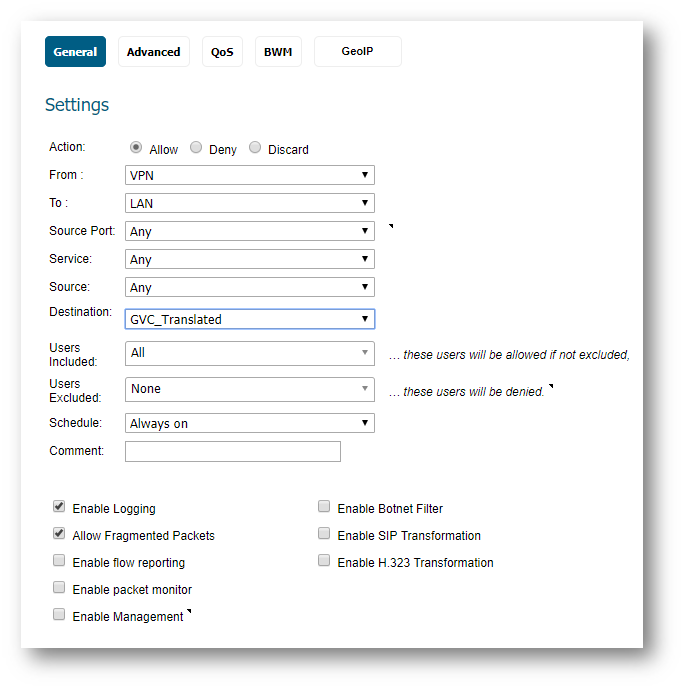
TIP: To create a more granular control you can define the Source Network which could be "VPN DHCP Clients" or you can create a custom object for the Source Network (in this case source network will match destination network).
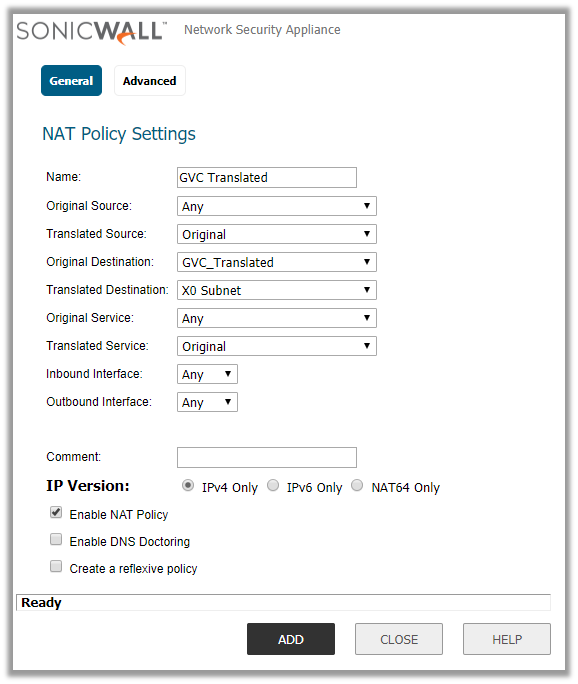
- Create a NAT Policy
- Navigate to the Rules | NAT Policies page.
- Create the following NAT Policy:
- Configuring VPN Access List
Assign the virtual network to the GVC user instead of the corporate network.
How to Test:
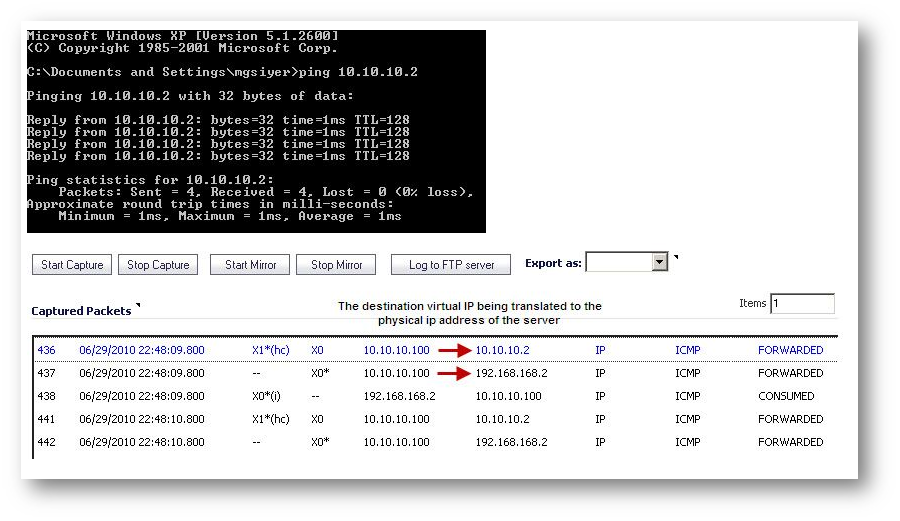
When GVC users with overlapping networks try to access a network resource in the corporate network, the above NAT policy will translate the destination IP address to the corresponding address in the corporate network. For instance, a server in the corporate network with an IP address of 192.168.168.2 has to be accessed by GVC users using the IP address 10.10.10.2. Please note that this is only applicable to GVC users with overlapping networks. Normal users should access the corporate network by using the physical ip address of 192.168.168.2.
Related Articles
- Error:"Invalid API Argument" when modifying the access rules
- Cysurance Partner FAQ
- Configure probe monitoring for WAN Failover and Loadbalancing - SonicWall UTM
Categories
- Firewalls > NSa Series > GVC/L2TP
- Firewalls > NSv Series > GVC/L2TP
- Firewalls > TZ Series > GVC/L2TP


 YES
YES NO
NO