-
Products
-
SonicPlatform
SonicPlatform is the cybersecurity platform purpose-built for MSPs, making managing complex security environments among multiple tenants easy and streamlined.
Discover More
-
-
Solutions
-
Federal
Protect Federal Agencies and Networks with scalable, purpose-built cybersecurity solutions
Learn MoreFederalProtect Federal Agencies and Networks with scalable, purpose-built cybersecurity solutions
Learn More - Industries
- Use Cases
-
-
Partners
-
Partner Portal
Access to deal registration, MDF, sales and marketing tools, training and more
Learn MorePartner PortalAccess to deal registration, MDF, sales and marketing tools, training and more
Learn More - SonicWall Partners
- Partner Resources
-
-
Support
-
Support Portal
Find answers to your questions by searching across our knowledge base, community, technical documentation and video tutorials
Learn MoreSupport PortalFind answers to your questions by searching across our knowledge base, community, technical documentation and video tutorials
Learn More - Support
- Resources
- Capture Labs
-
- Company
- Contact Us
How do I configure SD-WAN using VPN numbered tunnel interfaces?


Description
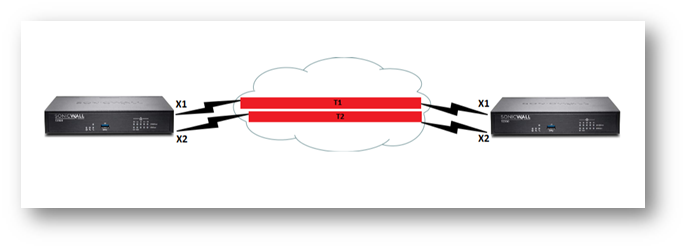
This article details how to configure SD-WAN using VPN Numbered tunnel interface between Central and Branch Office with both having 2 WAN links each.
The WAN links are configured on X1 and X2 interface of SonicWall at both the sites.
The article presents configuration for 2 VPN tunnels T1 and T2.
VPN Tunnel T1 is terminated on X1 WAN interface and VPN Tunnel T2 is terminated on X2 WAN interface of both the firewalls.
Resolution
Resolution for SonicOS 7.X
This release includes significant user interface changes and many new features that are different from the SonicOS 6.5 and earlier firmware. The below resolution is for customers using SonicOS 7.X firmware.
 TIP: The Appliance should be on firmware version 7.x and above.
Configure X1 interface.
- Navigate to Network |System| Interfaces and Click on Configure. The Interface 'X1' Settings windows is displayed. Follow images below to configure the interface.
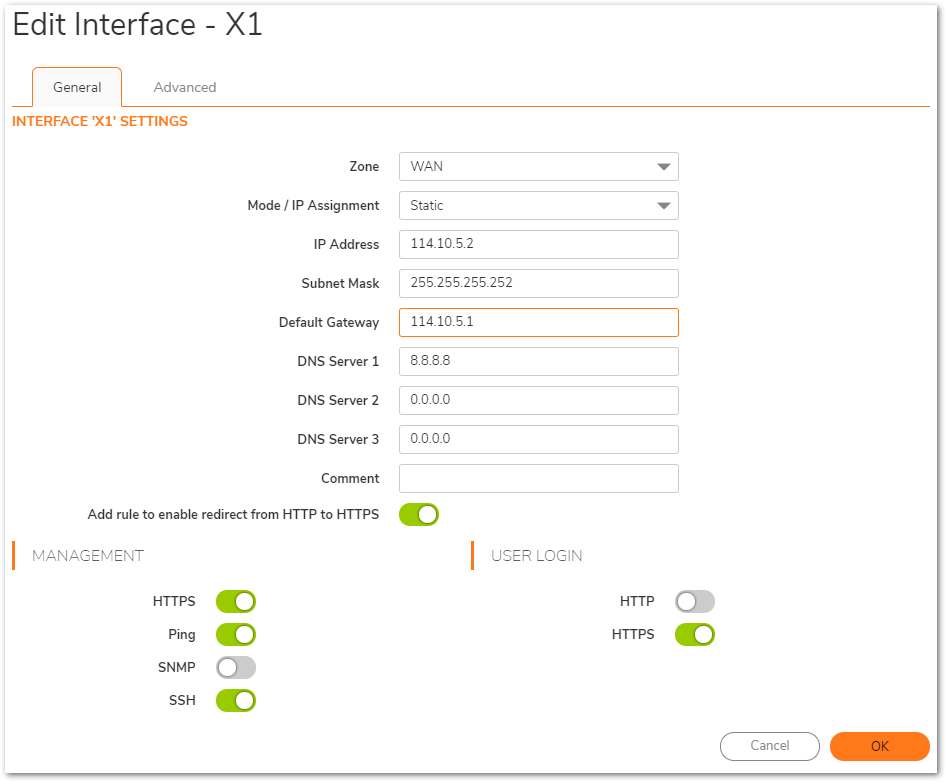
- Repeat step 2 to configure X2 interface.
Add the VPN Policy.
- Navigate to Network | VPN | IPsec VPN| Rules and Settings and click on Add. The VPN Policy window is displayed. Follow images below to configure the policies.
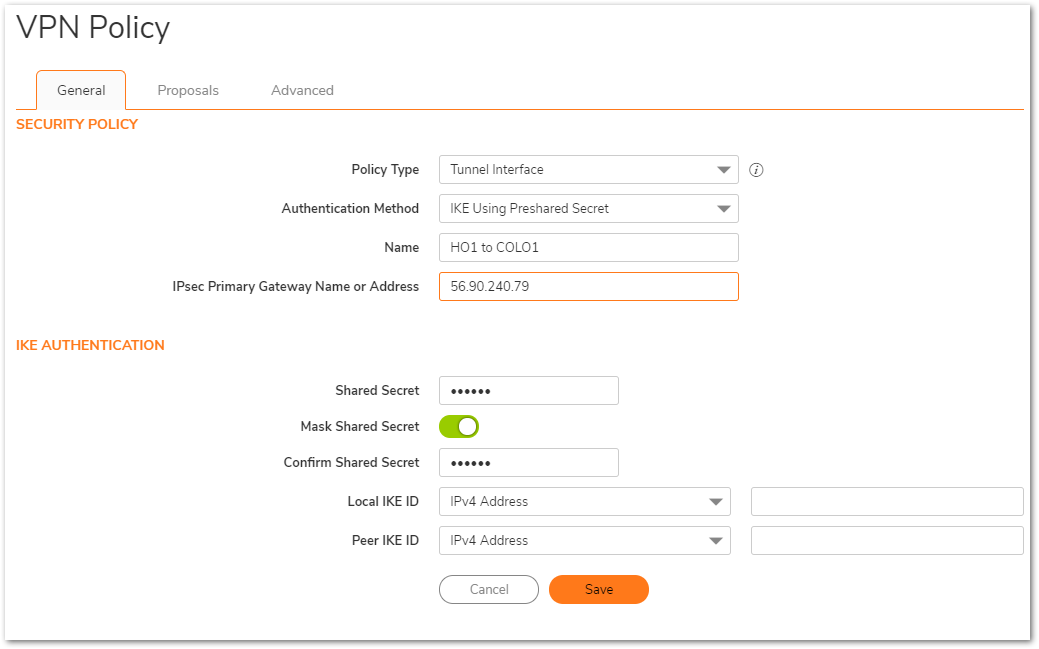
 NOTE: The settings used on the Proposals tab are not shown, but these must be identical on the Tunnel Interface VPNs done on both appliances.
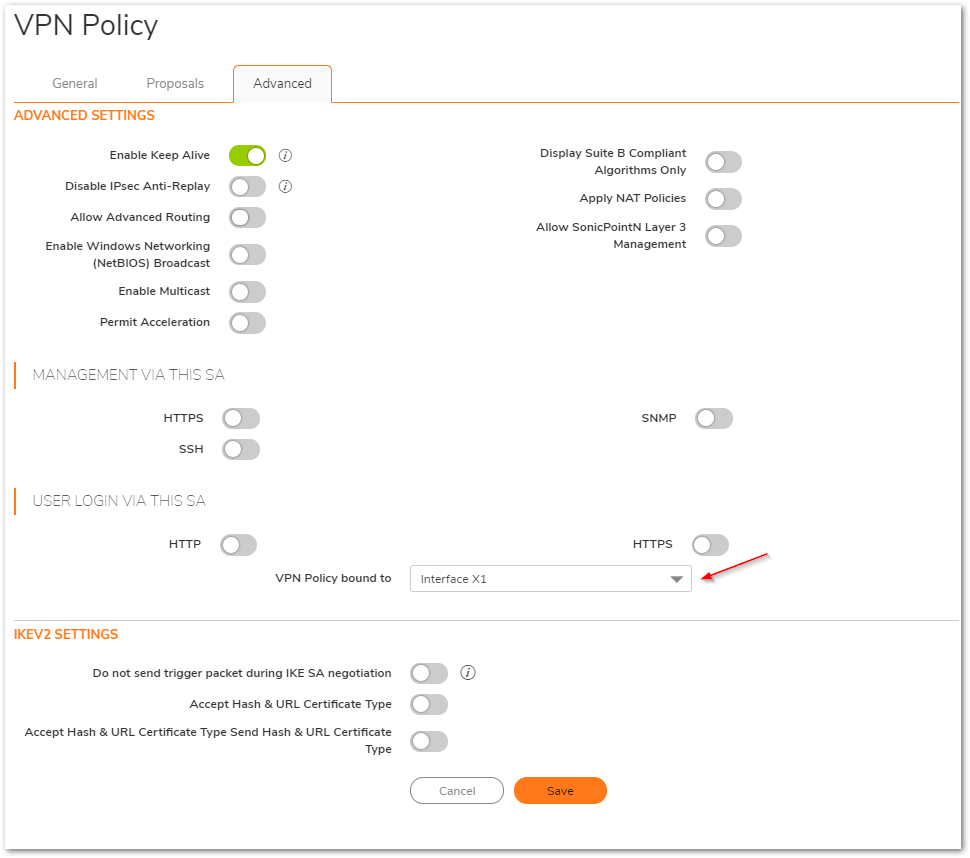
 NOTE: On the Advance tab please make sure to bind the VPN policy to the appropriate WAN interface.
- Repeat step 3 to configure 2nd VPN policy and bind the policy to X2 interface.
Add the Tunnel Interface.
- Navigate to Network | System| Interfaces, under Add Interface field, select VPN Tunnel Interface. The Interface Settings windows is displayed. Follow images below to configure the Interface.
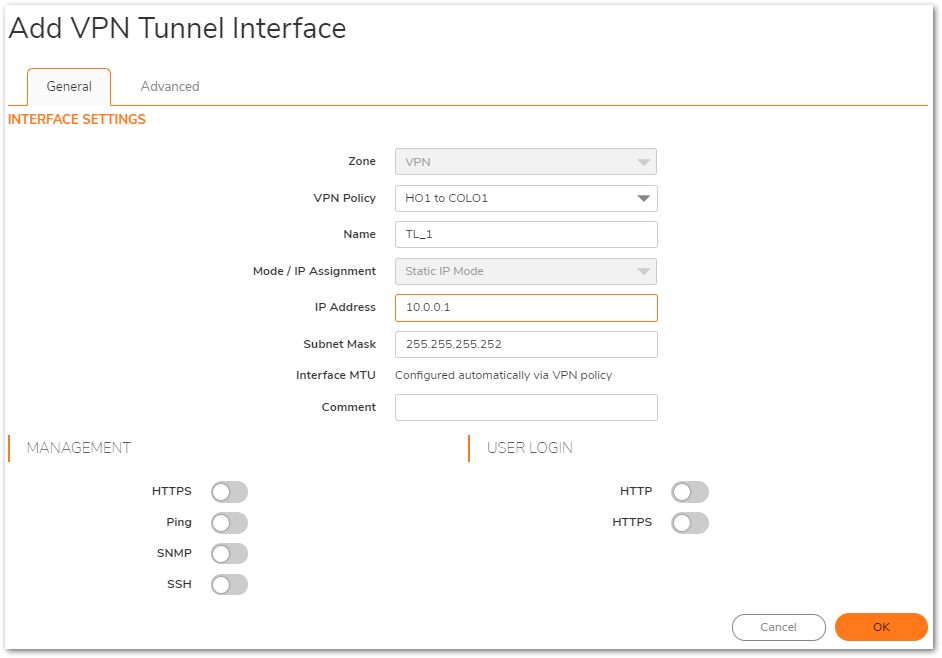
- Repeat step 4 to configure T2 Tunnel interface.
Add the SD-WAN group.
- Navigate to Network | SD-WAN | Groups and click on Add. The SD-WAN Group window is displayed. Follow images below to configure the SD-WAN Group.
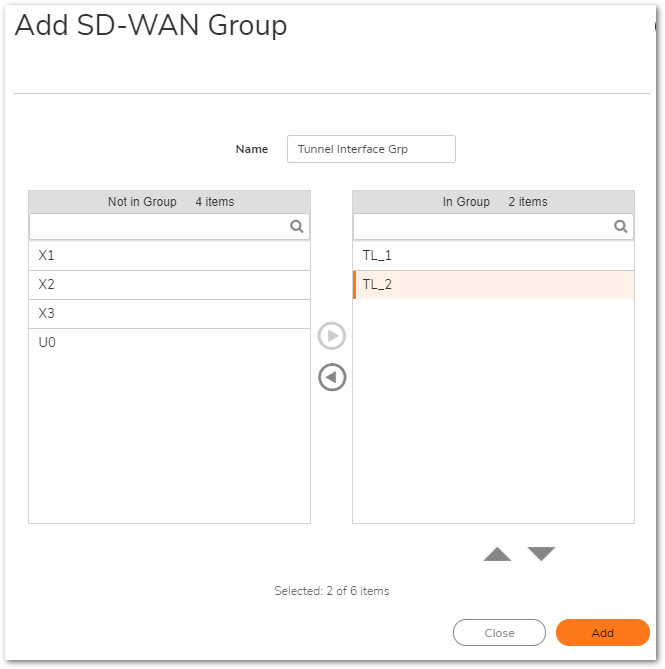
Performance Probe.
- Navigate to Network | SD-WAN | SLA Probes. The Performance Probes Policy page is displayed.
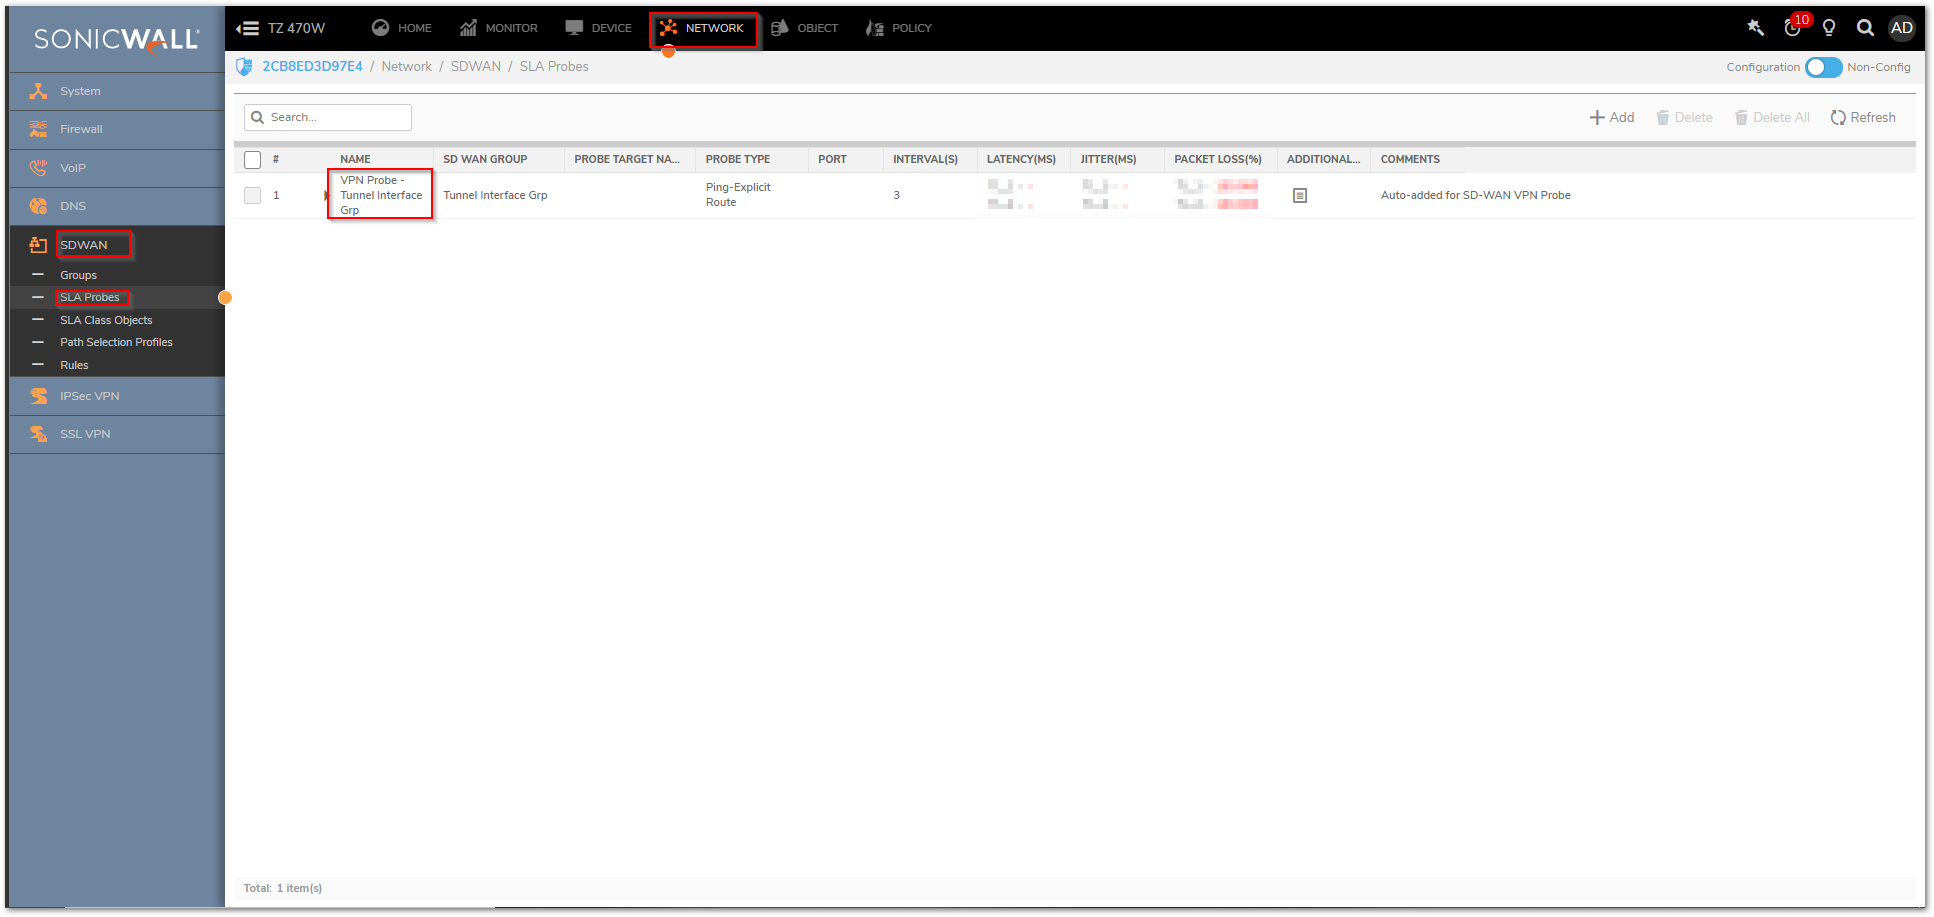
 NOTE: For the SD-WAN on VPN Tunnel interfaces, the Performance Probe object is auto created and it cannot be modified or deleted.
Add the SLA Class Object.
- Navigate to Network | SD-WAN | SLA Class Objects and click Add. The Performance Class Object window is displayed. Follow images below to configure the Performance Class Object policy.
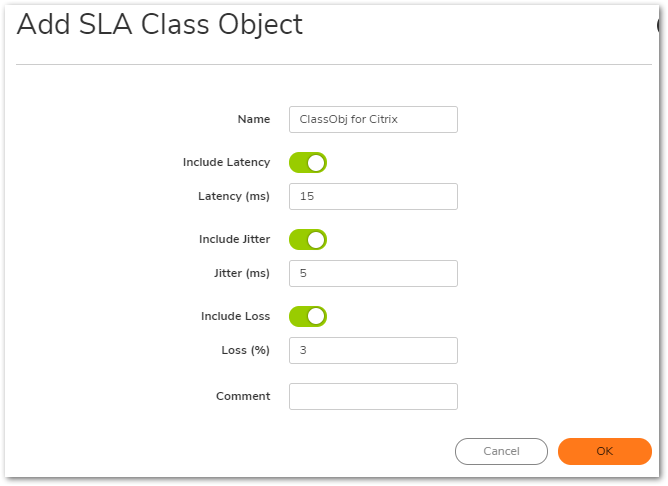
Add the Path Selection Profile.
- Navigate to Network | SD-WAN | Path Selection Profiles and click Add. The Path Selection Profile window is displayed. Follow images below to configure the Path Selection Profile policy.
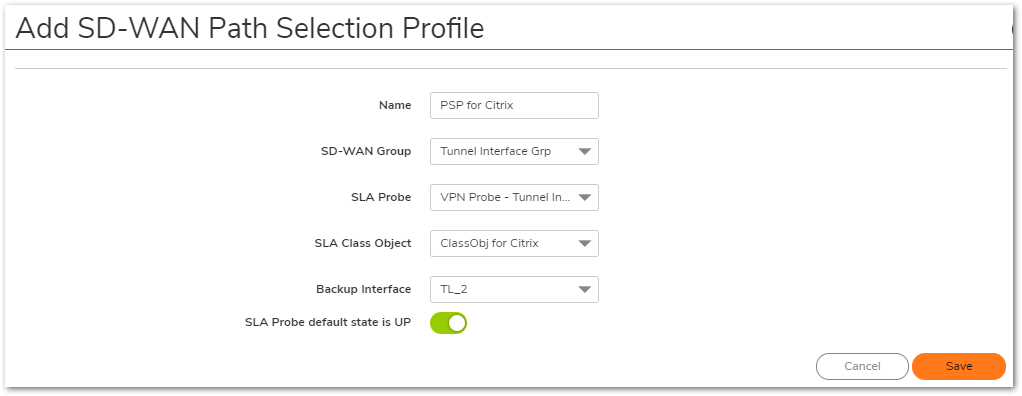
 NOTE: - Backup Interface is picked when none of the interfaces/path in the SDWAN group are up or meet the performance criteria (as per the Performance class).
- Performance Probe default state is UP specifies whether the default state of performance probe should be treated as Up or Down. its enabled by default.
Add the SD-WAN route policy.
- Navigate to Network | SD-WAN | Rules and click Add. The SD-WAN Rules window is displayed. Follow images below to configure the SD-WAN Rule Policy.
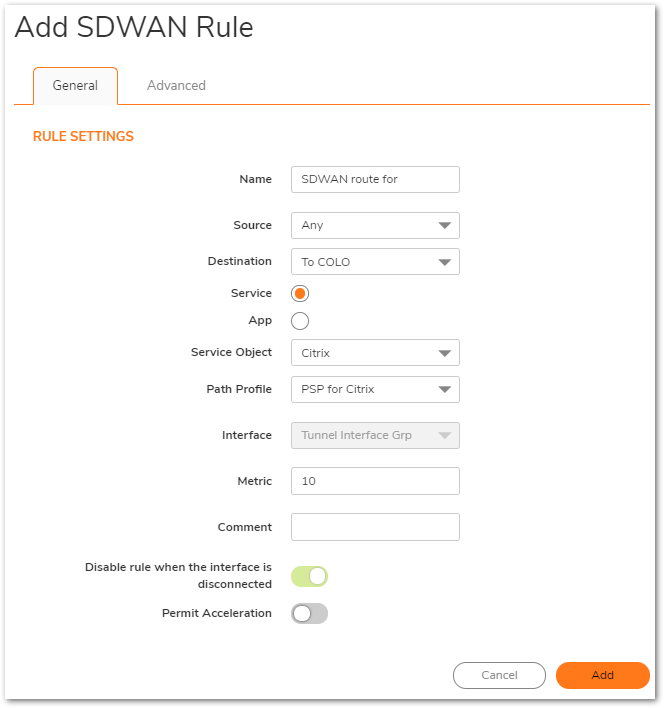
 NOTE: - The Interface and the Disable route when the interface is disconnected options are grayed out. These options cannot be edited in SD-WAN route policies.
- The Interface option is populated with the SD-WAN group associated with the Path Selection Profile and cannot be changed.
- SD-WAN routes can also be created from Policy | Rules and Policies | Routing rules.
 TIP: Complete these steps on the other SonicWall.
Resolution for SonicOS 6.5
This release includes significant user interface changes and many new features that are different from the SonicOS 6.2 and earlier firmware. The below resolution is for customers using SonicOS 6.5 firmware.
 TIP: The Appliance should be on firmware version 6.5.3.x and above.
Configure X1 interface
- Navigate to MANAGE | Network | Interfaces and Click on Configure. The Interface 'X1' Settings windows is displayed. Follow images below to configure the interface.
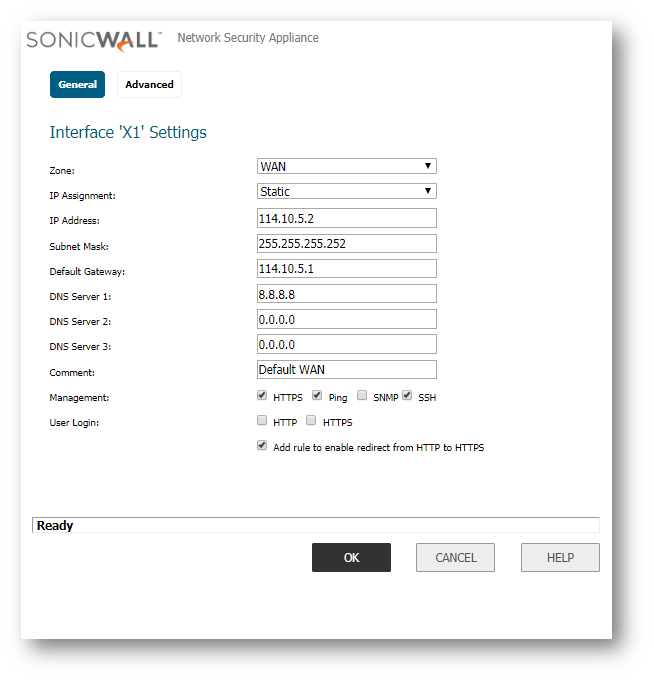
- Repeat step 2 to configure X2 interface.
Add the VPN Policy.
- Navigate to MANAGE | VPN | Base Settings and click on Add. The VPN Policy window is displayed. Follow images below to configure the policies.
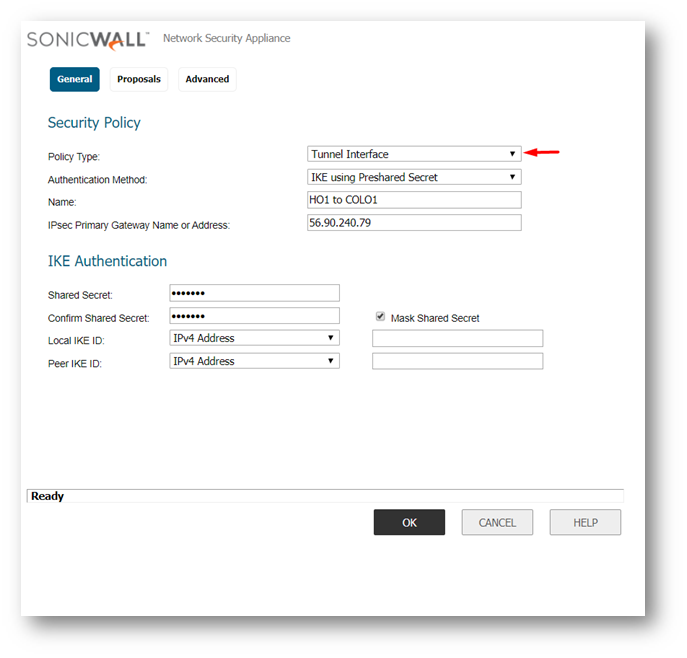
 NOTE: The settings used on the Proposals tab are not shown, but these must be identical on the Tunnel Interface VPNs done on both appliances.
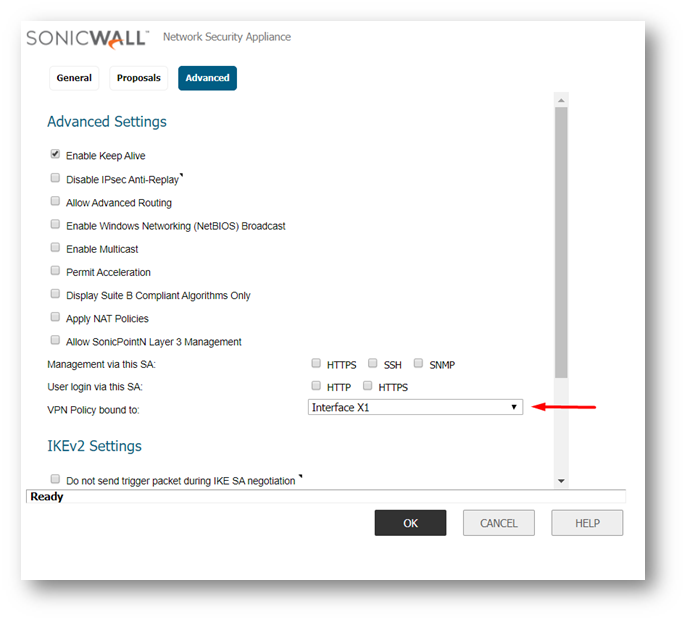
 NOTE: On the Advance tab please make sure to bind the VPN policy to the appropriate WAN interface.
- Repeat step 3 to configure 2nd VPN policy and bind the policy to X2 interface
Add the Tunnel Interface.
- Navigate to MANAGE | Network | Interfaces, under Add Interface field, select VPN Tunnel Interface. The Interface Settings windows is displayed. Follow images below to configure the Interface.
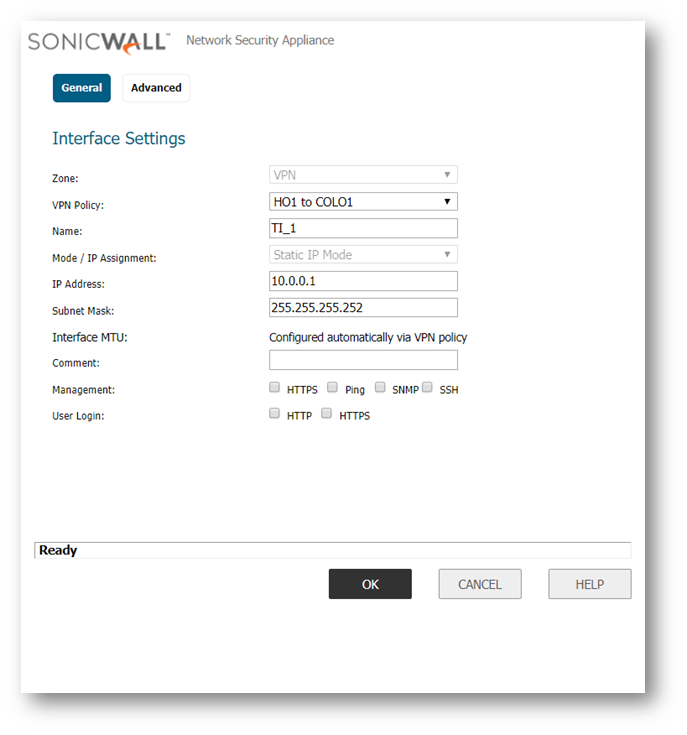
- Repeat step 4 to configure T2 Tunnel interface
Add the SD-WAN group.
- Navigate to MANAGE | SD-WAN | SD-WAN Groups and click on Add. The SD-WAN Group window is displayed. Follow images below to configure the SD-WAN Group.
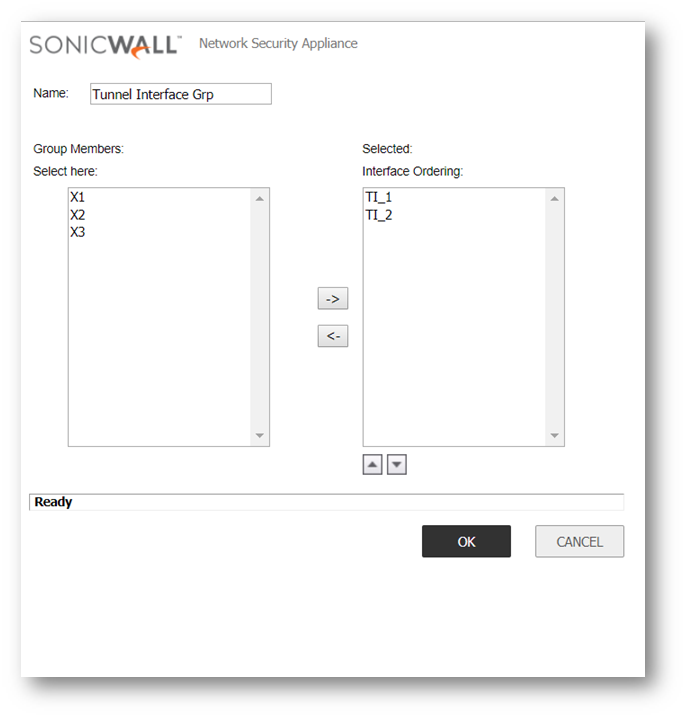
 NOTE: An interfaces cannot be a member of more than one SD-WAN group.
Performance Probe.
- Navigate to MANAGE | SD-WAN | Performance Probes. The Performance Probes Policy page is displayed.
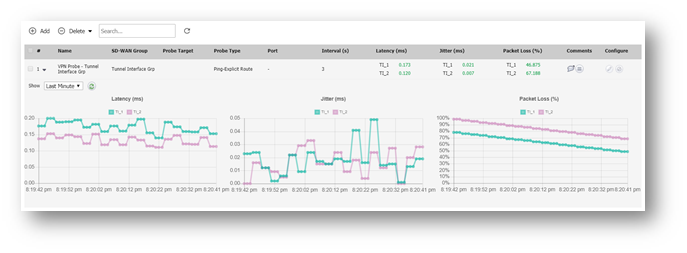
 NOTE: For the SD-WAN on VPN Tunnel interfaces, the Performance Probe object is auto created and it cannot be modified or deleted.
Add the Performance Class Object.
- Navigate to MANAGE | SD-WAN | Performance Class Objects and click Add. The Performance Class Object window is displayed. Follow images below to configure the Performance Class Object policy.
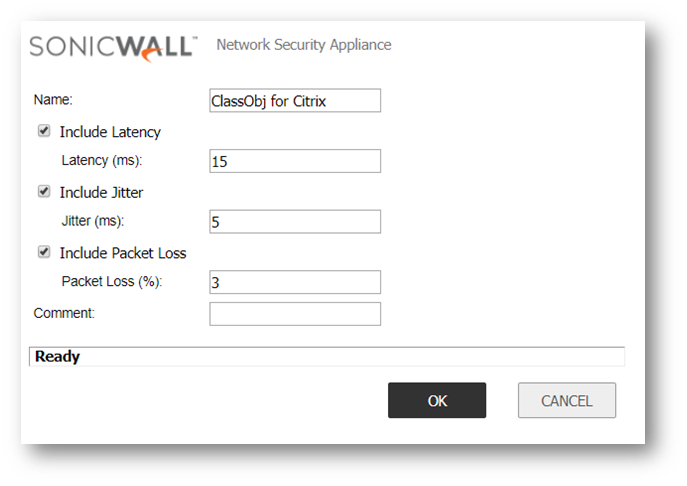
Add the Path Selection Profile.
- Navigate to MANAGE | SD-WAN | Path Selection Profile and click Add. The Path Selection Profile window is displayed. Follow images below to configure the Path Selection Profile policy.
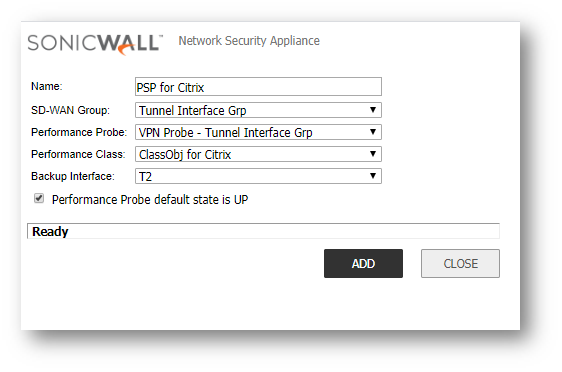
 NOTE: - Backup Interface is picked when none of the interfaces/path in the SDWAN group are up or meet the performance criteria (as per the Performance class).
- Performance Probe default state is UP specifies whether the default state of performance probe should be treated as Up or Down. its enabled by default.
Add the SD-WAN route policy.
- Navigate to MANAGE | SD-WAN | SD-WAN Route Policies and click Add. The SD-WAN Route Policy Settings window is displayed. Follow images below to configure the SD-WAN Route Policy.
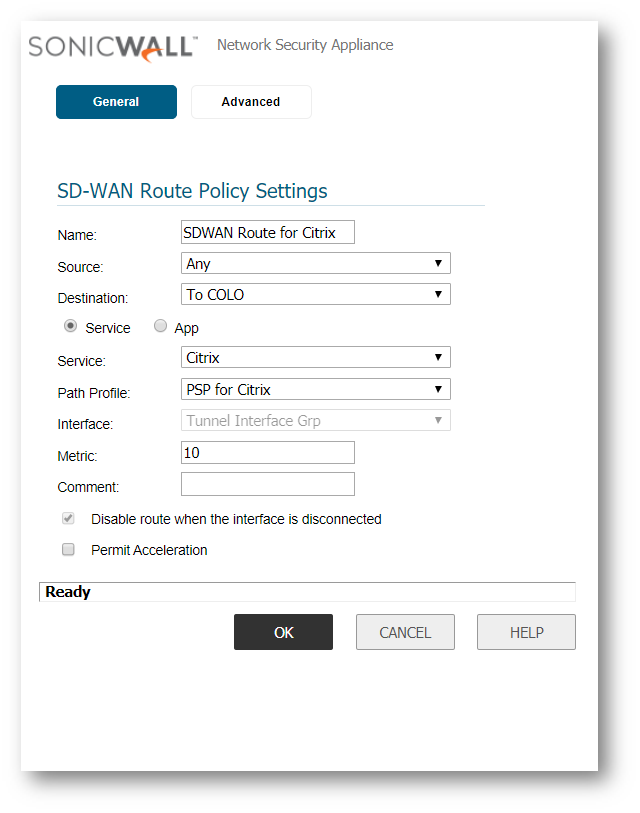
 NOTE: - The Interface and the Disable route when the interface is disconnected options are grayed out. These options cannot be edited in SD-WAN route policies.
- The Interface option is populated with the SD-WAN group associated with the Path Selection Profile and cannot be changed.
- SD-WAN routes can also be created from MANAGE | Network | Routing section. TIP: Complete these steps on the other SonicWall.
Related Articles
- Error:"Invalid API Argument" when modifying the access rules
- Cysurance Partner FAQ
- Configure probe monitoring for WAN Failover and Loadbalancing - SonicWall UTM


 YES
YES NO
NO