-
Products
-
SonicPlatform
SonicPlatform is the cybersecurity platform purpose-built for MSPs, making managing complex security environments among multiple tenants easy and streamlined.
Discover More
-
-
Solutions
-
Federal
Protect Federal Agencies and Networks with scalable, purpose-built cybersecurity solutions
Learn MoreFederalProtect Federal Agencies and Networks with scalable, purpose-built cybersecurity solutions
Learn More - Industries
- Use Cases
-
-
Partners
-
Partner Portal
Access to deal registration, MDF, sales and marketing tools, training and more
Learn MorePartner PortalAccess to deal registration, MDF, sales and marketing tools, training and more
Learn More - SonicWall Partners
- Partner Resources
-
-
Support
-
Support Portal
Find answers to your questions by searching across our knowledge base, community, technical documentation and video tutorials
Learn MoreSupport PortalFind answers to your questions by searching across our knowledge base, community, technical documentation and video tutorials
Learn More - Support
- Resources
- Capture Labs
-
- Company
- Contact Us
How can I swap the roles of Primary and Backup Units in a High Availability configuration?


Description
High Availability allows two SonicWall security appliances of the same model to be configured to provide a reliable, continuous connection to the Internet and to your internal network. One SonicWall device is configured as the Primary unit, and the other is configured as the Backup/Secondary unit. In the event of the failure of the Primary SonicWall, the Backup/Secondary SonicWall takes over to secure a reliable connection between the protected network and the Internet. Two appliances configured in this way are also known as a High Availability Pair (HA Pair).
This article describes how to swap the roles of the Primary and Backup/Secondary SonicWall appliances in a HA configuration.
Why would I want to do this?
- If the HA Pair was setup with the wrong devices as the Primary and Secondary Roles.
- If a former Primary device is being repurposed as a Secondary device.
To troubleshoot certain issues with HA Settings and Roles.
Current Setup
- Primary - SonicWall A (Serial Number XXXXXX).
- Secondary - SonicWall B ( Serial Number YYYYYY).
How we want it to be: Desired Setup (As per the MySonicWall)
- Primary – SonicWall B (YYYYYY).
- Secondary - SonicWall A (XXXXXX).
 NOTE: Here XXXXXX and YYYYYY are representing the Serial numbers of SonicWall A and SonicWall B respectively.
Resolution
Resolution for SonicOS 7.X
This release includes significant user interface changes and many new features that are different from the SonicOS 6.5 and earlier firmware. The below resolution is for customers using SonicOS 7.X firmware.
- Login to SonicWall B first.
- Navigate to Device| High Availability|Settings,Under HA Devices, you see the Primary device Serial Number as (XXXXXX) and Secondary device Serial Number as (YYYYYY).
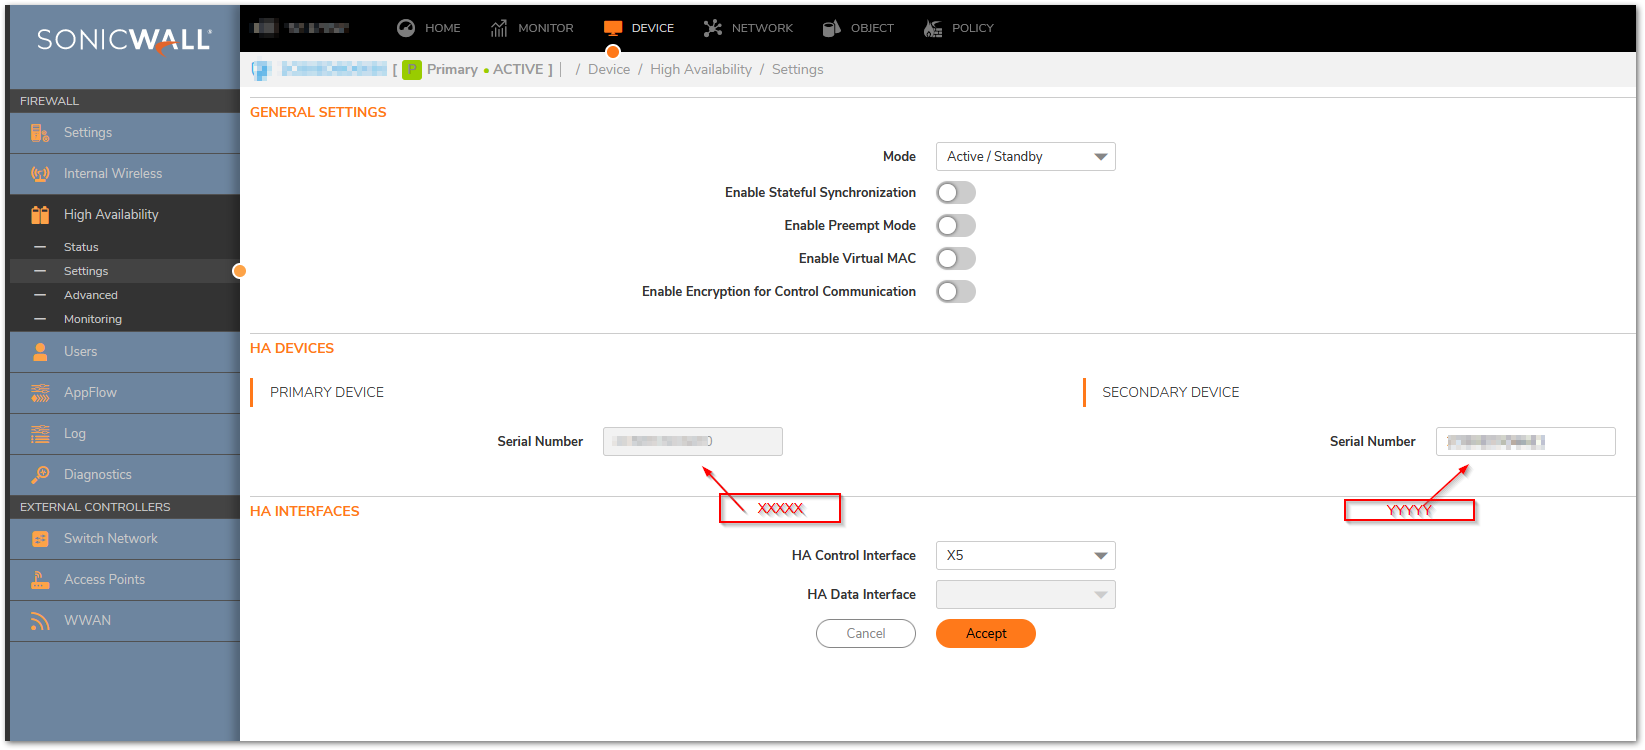
- So Primary Serial Number is greyed out, but change the secondary serial number to some dummy number 222222222222.

- Under General Settings tab and change the mode from Active/Standby to None.

- Click ACCEPT.
- Navigate to Device |Settings | Firmware & Settings , select Export Configuration under Import/Export Configuration drop down, after disabling the HA on this device(say abc.exp).
- Now Hard Reset the two Units to Factory Defaults.
- Then log in to SonicWall B (YYYYYY) again, and now import the settings (abc.exp) which was exported in step 6.
- Navigate to Device| High Availability|Settings,Under General settings tab, enable the HA (set it to Active/Standby).

- Click on HA Devices, now the Primary device Serial Number Should say (YYYYYY), and Secondary you can go ahead edit and put as (XXXXXX).
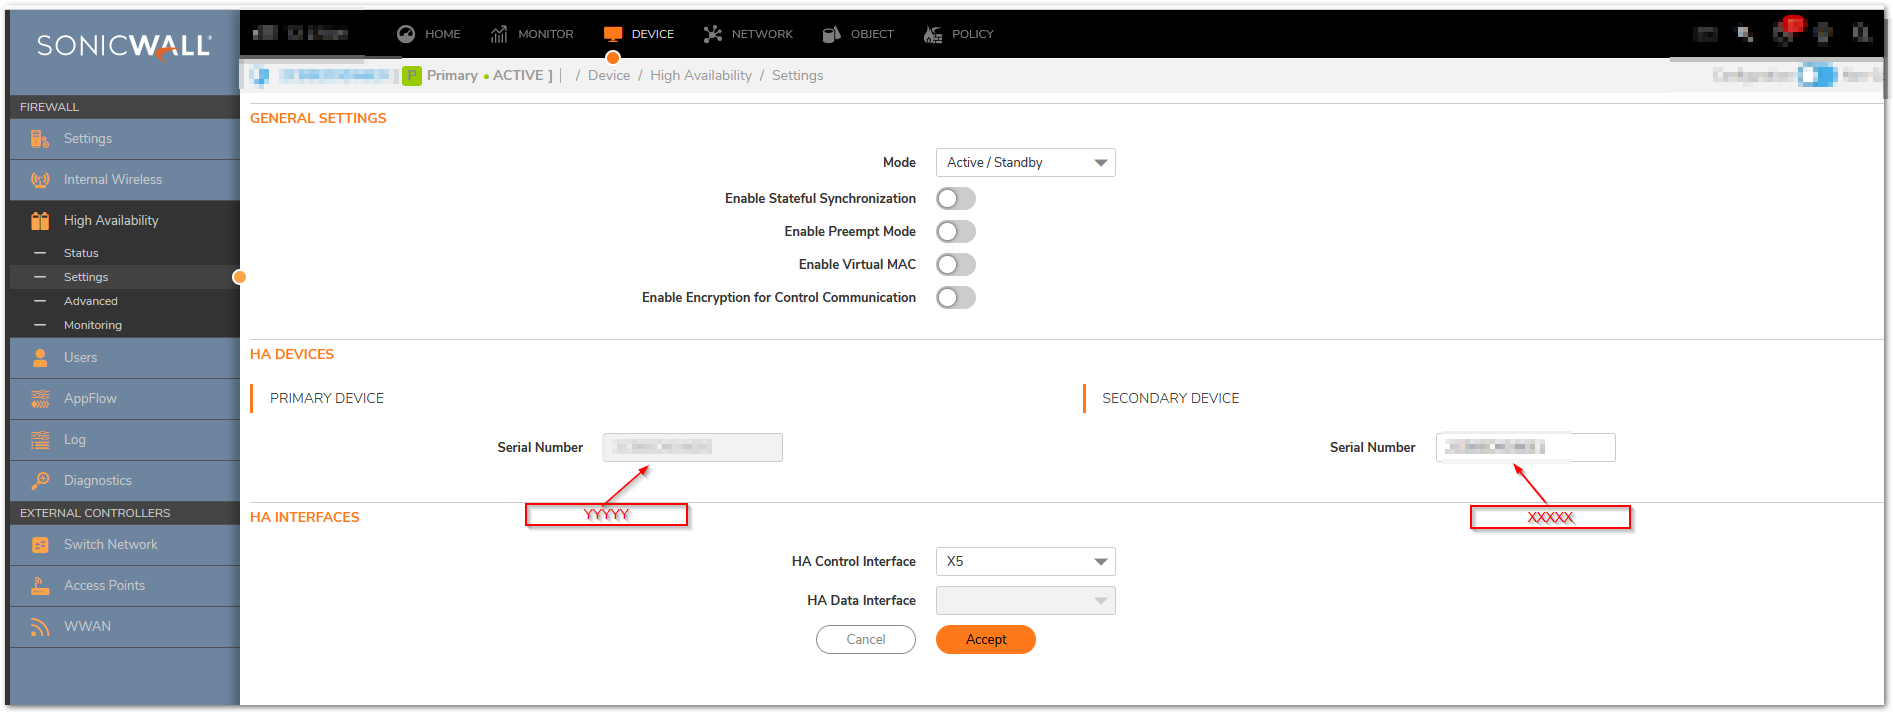
- Click ACCEPT.
- Connect the SonicWall A (which was hard reset and booted with factory default settings earlier) to the SonicWall B in a HA setup.
- Then Synchronize the Settings.
Resolution for SonicOS 6.5
This release includes significant user interface changes and many new features that are different from the SonicOS 6.2 and earlier firmware. The below resolution is for customers using SonicOS 6.5 firmware.
Login to SonicWall B first.- Navigate to MANAGE| High Availability| Base Settings,click HA Devices, you see the Primary device Serial Number as (XXXXXX) and Secondary device Serial Number as (YYYYYY).
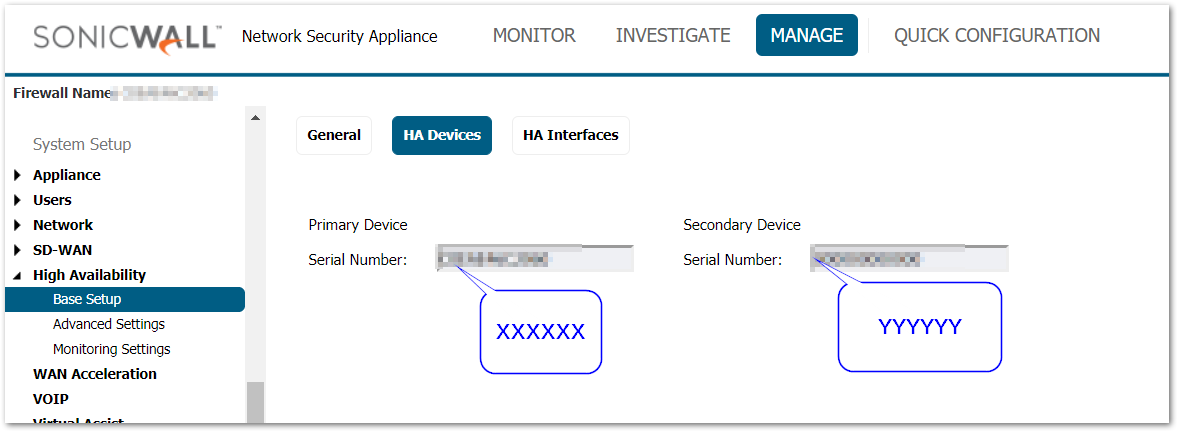
- So Primary Serial Number is greyed out, but change the secondary serial number to some dummy number 222222222222.

- Click General tab and change the mode from Active/Standby to None.
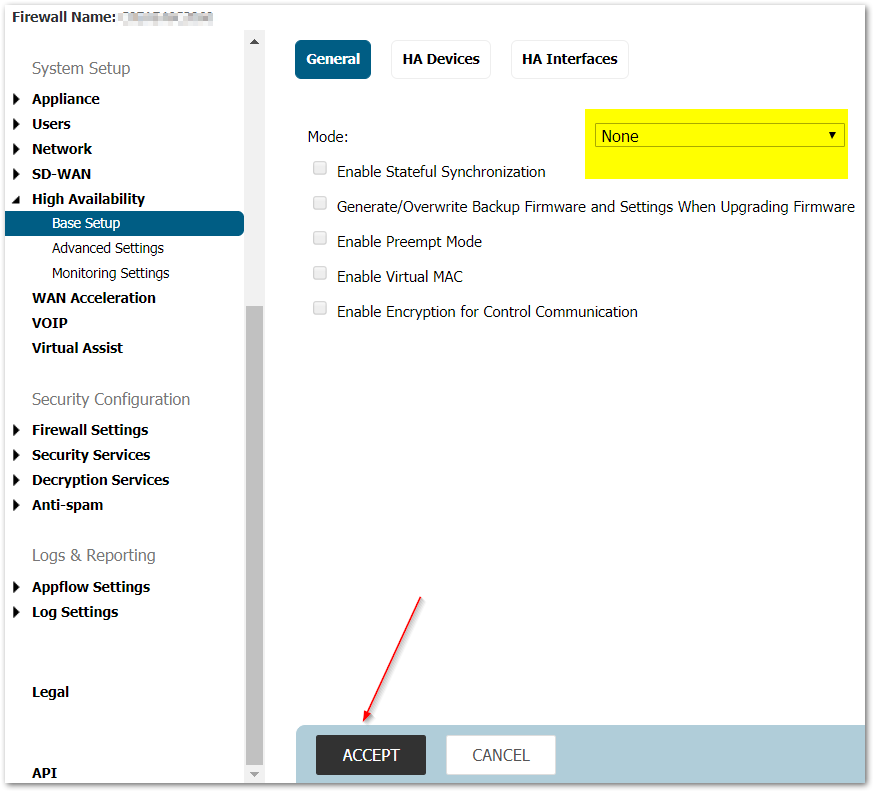
- Click ACCEPT.
- Navigate to MANAGE | Firmware & Backups, select Export Configuration under Import/Export Configuration drop down, after disabling the HA on this device(say abc.exp).
- Now Hard Reset the two Units to Factory Defaults.
- Then log in to SonicWall B (YYYYYY) again, and now import the settings (abc.exp) which was exported in step 6.
- Navigate to MANAGE| High Availability| Base Settings, click on General tab, enable the HA (set it to Active/Standby).
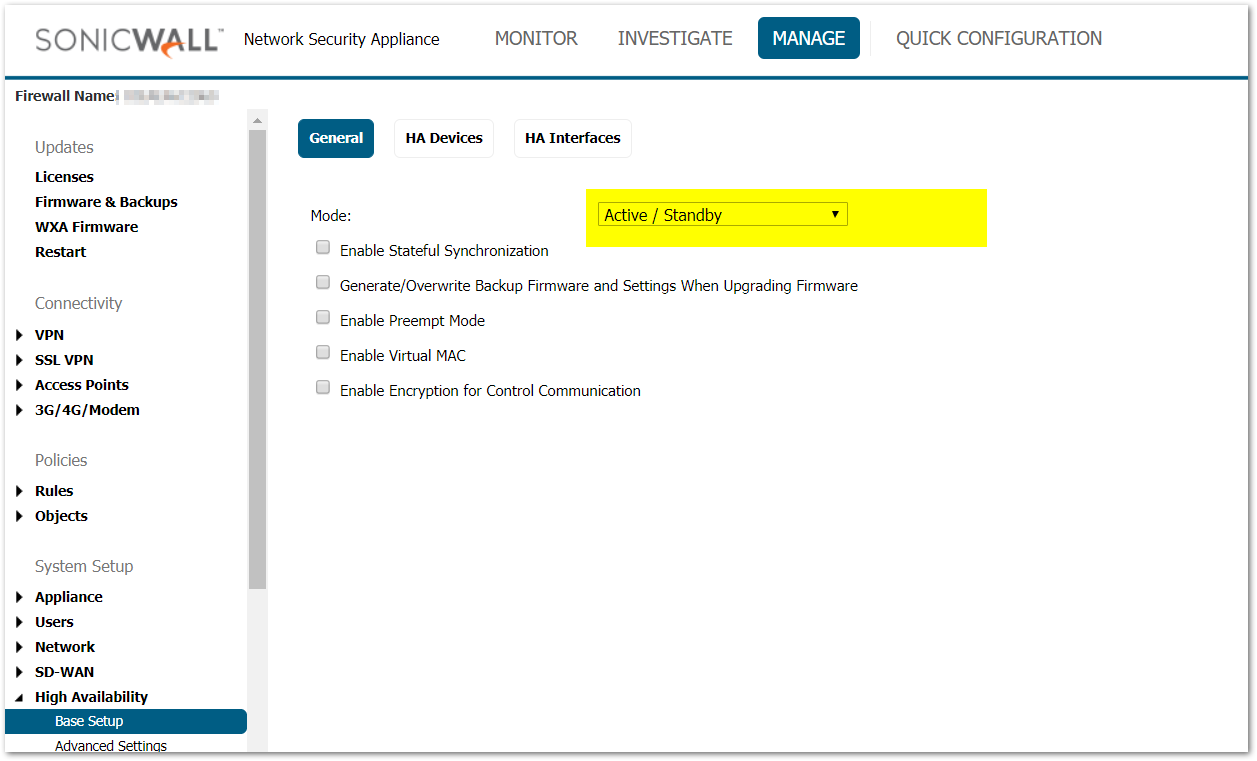
- Click on HA Devices, now the Primary device Serial Number Should say (YYYYYY), and Secondary you can go ahead edit and put as (XXXXXX).
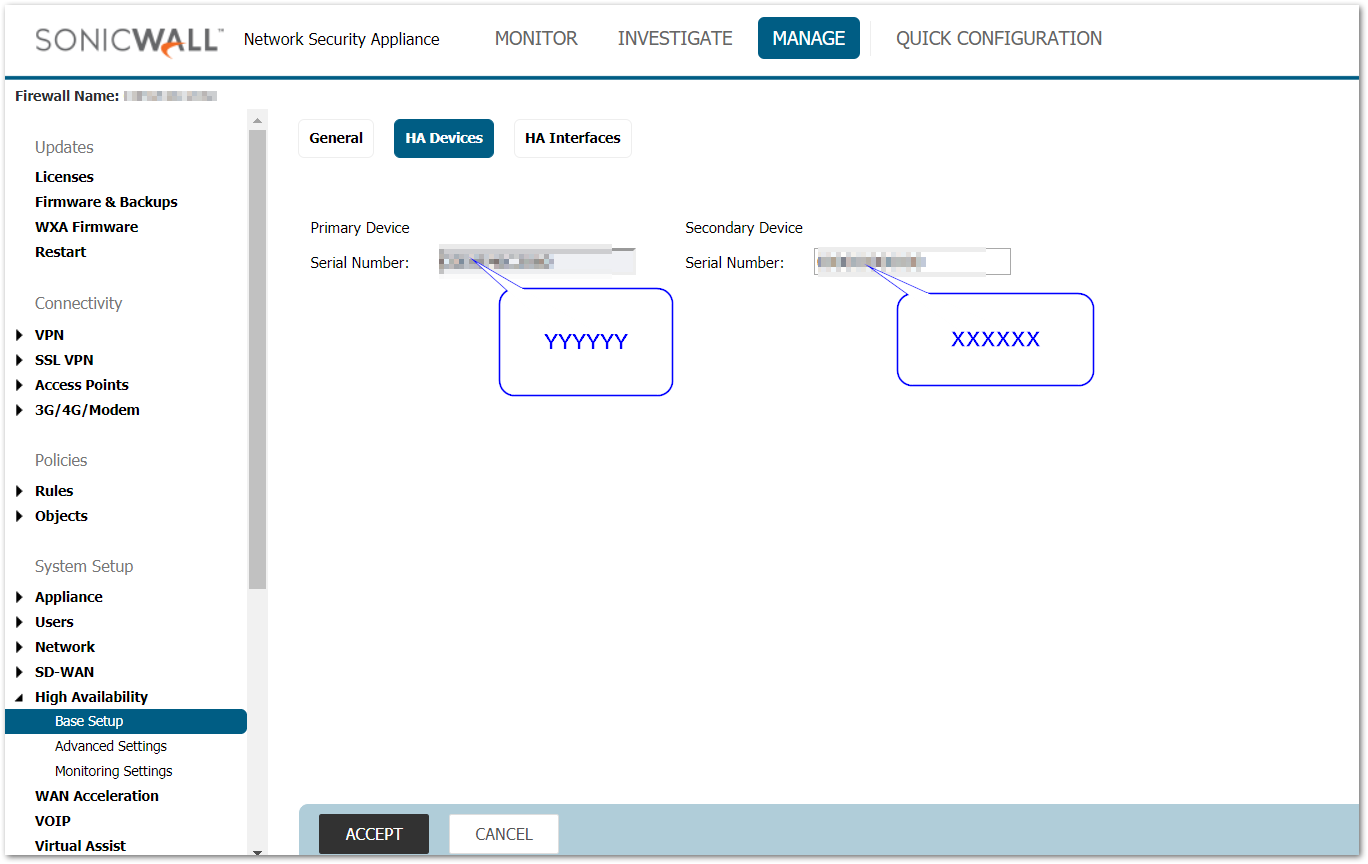
- Click ACCEPT.
- Connect the SonicWall A (which was hard reset and booted with factory default settings earlier) to the SonicWall B in a HA setup.
- Then Synchronize the Settings.
Related Articles
- Error:"Invalid API Argument" when modifying the access rules
- Cysurance Partner FAQ
- Configure probe monitoring for WAN Failover and Loadbalancing - SonicWall UTM
Categories
- Firewalls > SonicWall SuperMassive 9000 Series > High Availability
- Firewalls > SonicWall SuperMassive E10000 Series > High Availability
- Firewalls > TZ Series > High Availability
- Firewalls > NSa Series > High Availability


 YES
YES NO
NO