-
Products
-
SonicPlatform
SonicPlatform is the cybersecurity platform purpose-built for MSPs, making managing complex security environments among multiple tenants easy and streamlined.
Discover More
-
-
Solutions
-
Federal
Protect Federal Agencies and Networks with scalable, purpose-built cybersecurity solutions
Learn MoreFederalProtect Federal Agencies and Networks with scalable, purpose-built cybersecurity solutions
Learn More - Industries
- Use Cases
-
-
Partners
-
Partner Portal
Access to deal registration, MDF, sales and marketing tools, training and more
Learn MorePartner PortalAccess to deal registration, MDF, sales and marketing tools, training and more
Learn More - SonicWall Partners
- Partner Resources
-
-
Support
-
Support Portal
Find answers to your questions by searching across our knowledge base, community, technical documentation and video tutorials
Learn MoreSupport PortalFind answers to your questions by searching across our knowledge base, community, technical documentation and video tutorials
Learn More - Support
- Resources
- Capture Labs
-
- Company
- Contact Us
How can I setup SSL-VPN?


Description
This article provides information on how to configure the SSL VPN features on the SonicWall security appliance. SonicWall's SSL VPN features provide secure remote access to the network using the NetExtender client.
NetExtender is an SSL VPN client for Windows or Linux users that is downloaded transparently and that allows you to run any application securely on the company's network. It uses Point-to-Point Protocol (PPP). NetExtender allows remote clients seamless access to resources on your local network. Users can access NetExtender two ways:
- Logging in to the Virtual Office web portal provided by the SonicWall security appliance and clicking on the NetExtender button.
- Launching the standalone NetExtender client.
The NetExtender standalone client is installed the first time you launch NetExtender. Thereafter, it can be accessed directly from the Start menu on Windows systems, or by the path name or from the shortcut bar on Linux systems.
Don't want to read? Watch instead!
Resolution
Resolution for SonicOS 7.X
This release includes significant user interface changes and many new features that are different from the SonicOS 6.5 and earlier firmware. The below resolution is for customers using SonicOS 7.X firmware.
- Navigate to the Network |SSL VPN | Server Settings.
- Navigate to SSL VPN STATUS ON ZONES which represents SSL VPN Access status on each Zone.
- Enable or disable SSL-VPN access by toggling the zone below. The Green indicates active SSL VPN status.
- Navigate to SSL VPN SERVER SETTINGS, Select the SSL VPN Port, and Domain as desired.
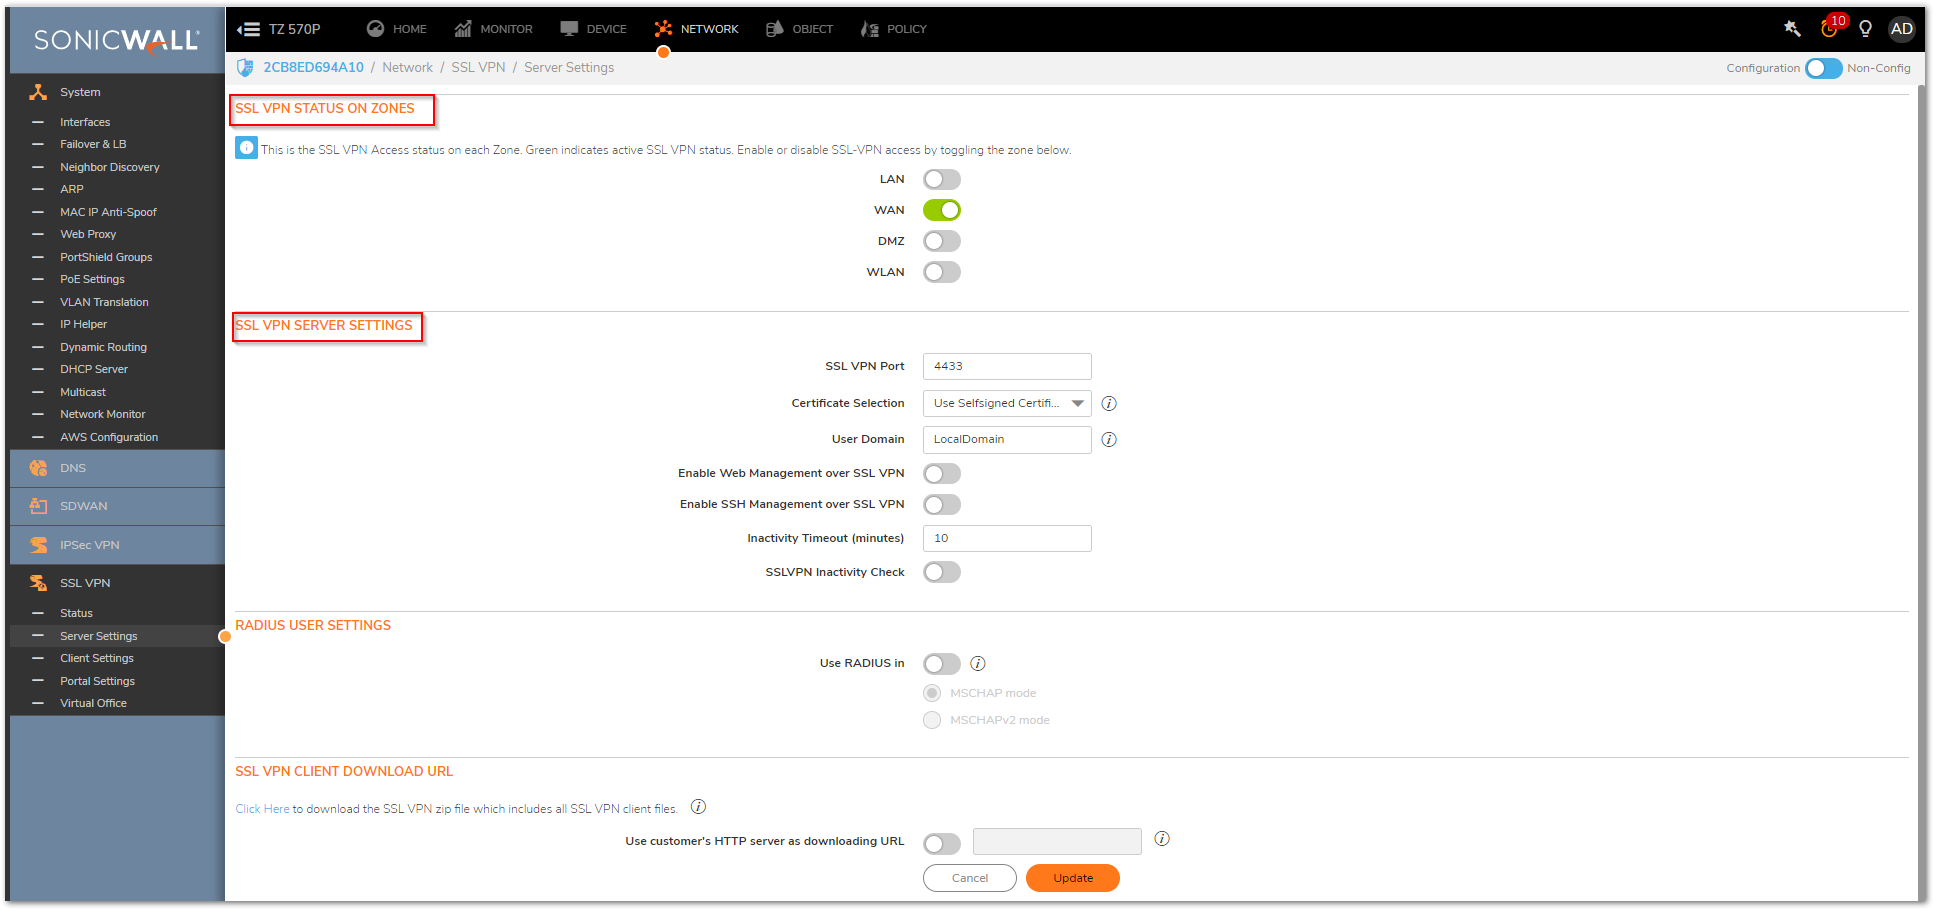
Configure the Network|SSL VPN | Client Settings - The SSL VPN | Client Settings page allows the administrator to configure the client address range information and NetExtender client settings.The most important being where the SSL-VPN will terminate (eg on the LAN in this case) and which IPs will be given to connecting clients. Finally, select from where users should be able to login (probably, this will be the WAN, so just click on the WAN entry).
 NOTE: NetExtender cannot be terminated on an interface that is paired to another interface using L2 Bridge Mode. This includes interfaces bridged with a WLAN interface. Interfaces that are configured with L2 Bridge Mode are not listed in the "SSLVPN Client Address Range" Interface drop-down menu. For NetExtender termination, an interface should be configured with as a LAN, DMZ, WLAN, or a custom Trusted, Public, or Wireless zone, and also configured with the IP Assignment of "Static".
 - Click on Configure icon for Default Device profile.

- Set the Zone IP V4 as SSL VPN and Network Address IP V4 as the Address Object you created earlier.
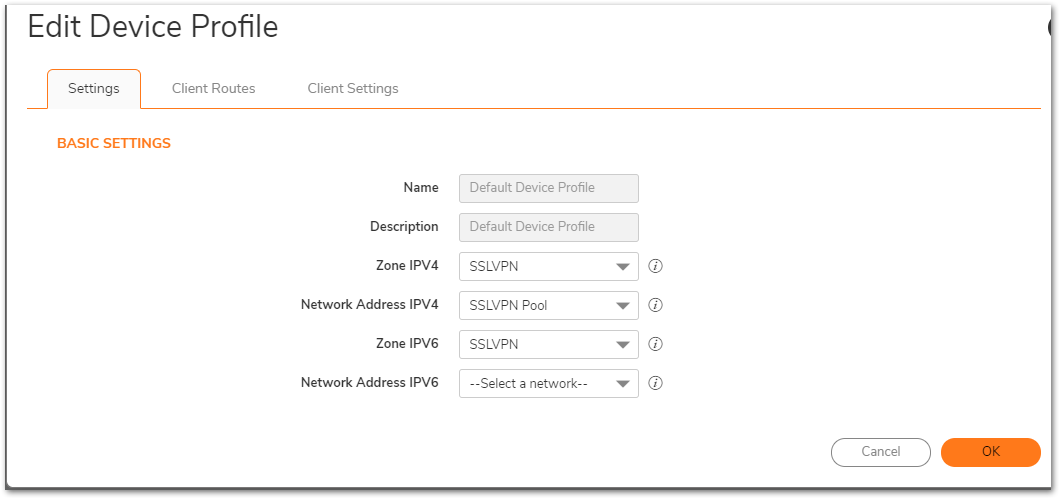
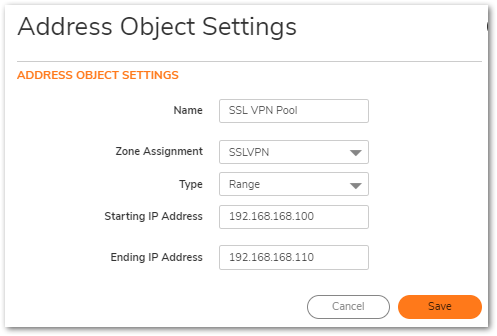
- Client Routes page allows the administrator to control the network access allowed for SSL VPN users. The NetExtender client routes are passed to all NetExtender clients and are used to govern which private networks and resources remote user can access via the SSL VPN connection.
 NOTE: All clients can see these routes. Also, here you may enable/disable "Tunnel All Mode" (this is the equivalent of "This gateway only" option while configuring.
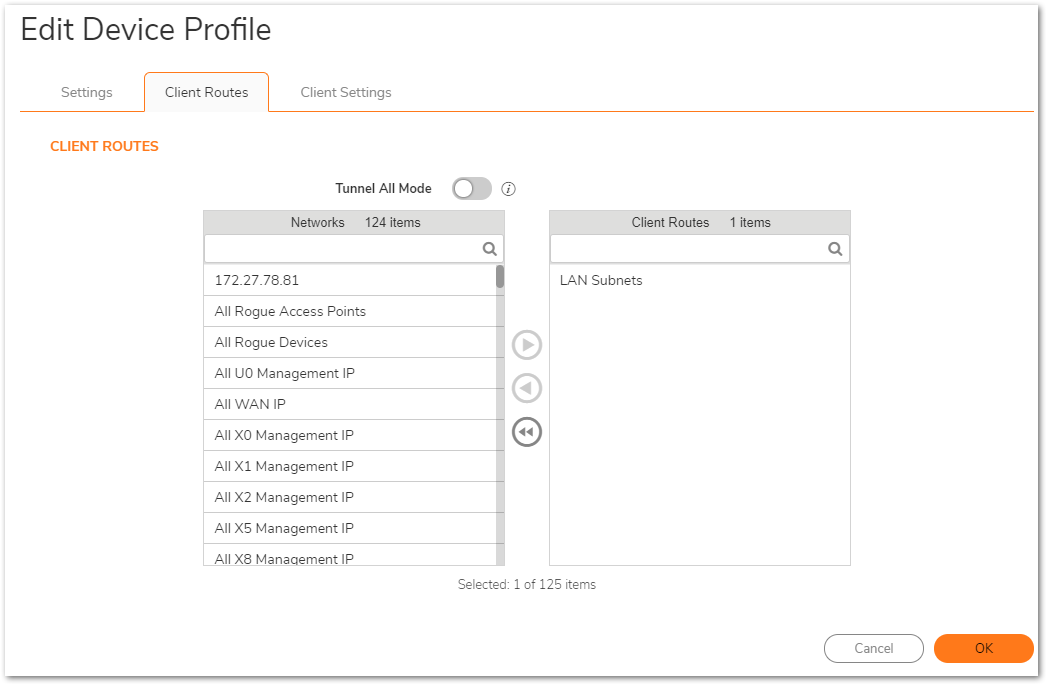
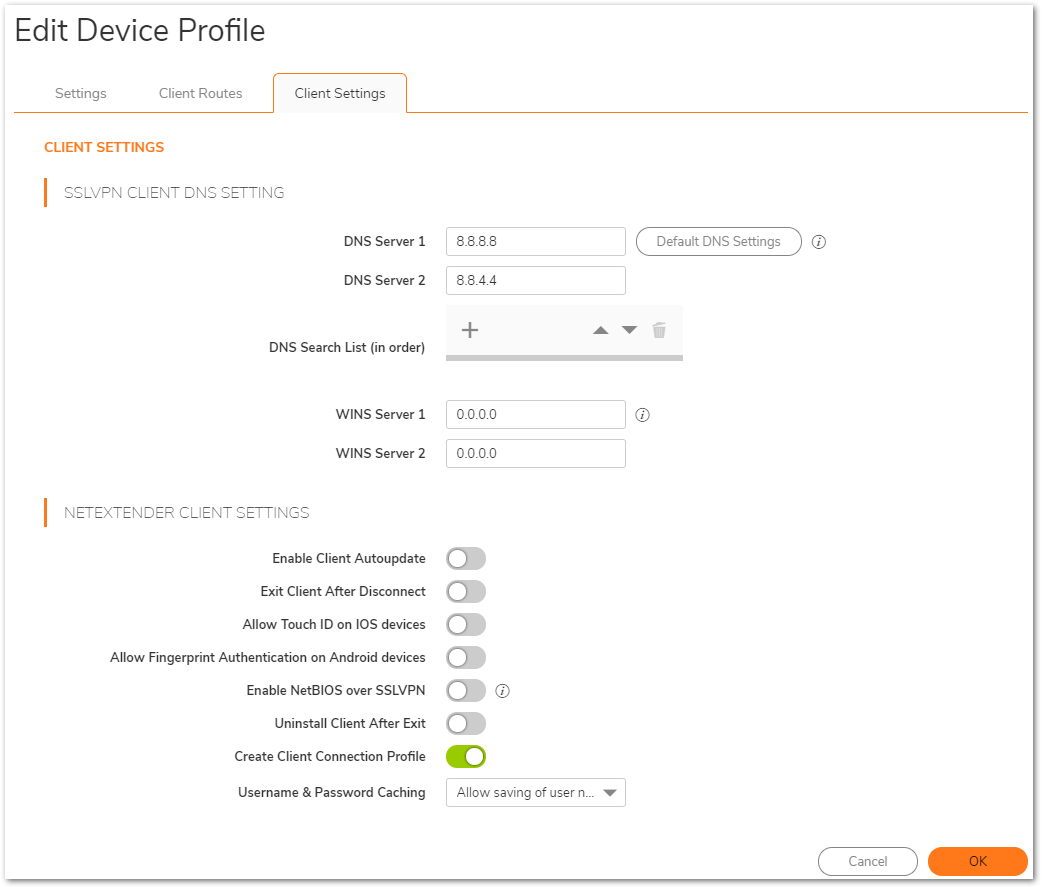
- The Client Settings tab allows the administrator to input DNS, WINS, and Suffix information while also controlling the caching of passwords, user names, and the behavior of the NetExtender Client to access domain resources by name.
- Enable Create Client Connection Profile - The NetExtender client will create a connection profile recording the SSL VPN Server name, the Domain name and optionally the username and password.
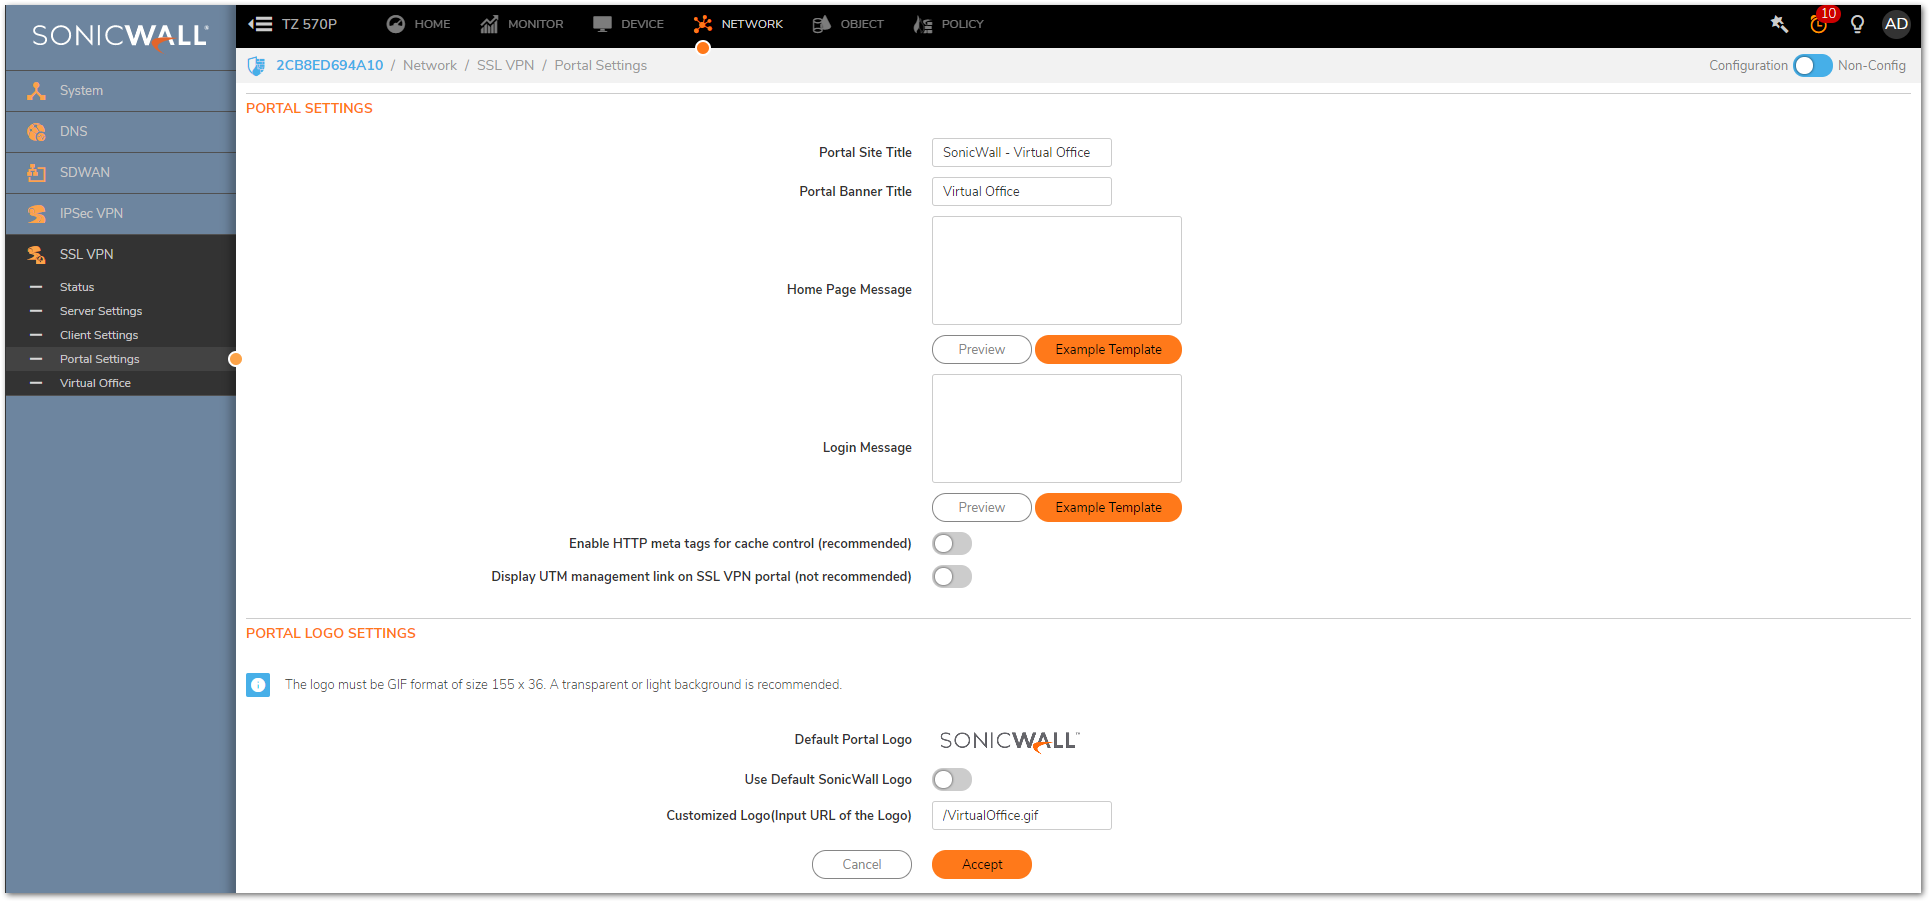
- The SSL VPN | Portal Settings page is used to configure the appearance and functionality of the SSL VPN Virtual Office web portal. The Virtual Office portal is the website.
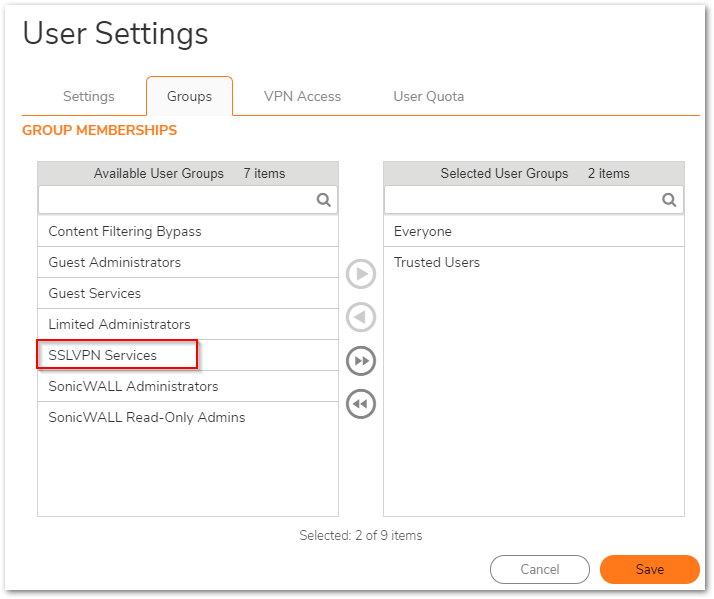
- Under Device|Users | Local users & Groups, ensure that the relevant user or user group is a member of the "SSLVPN Services" group.
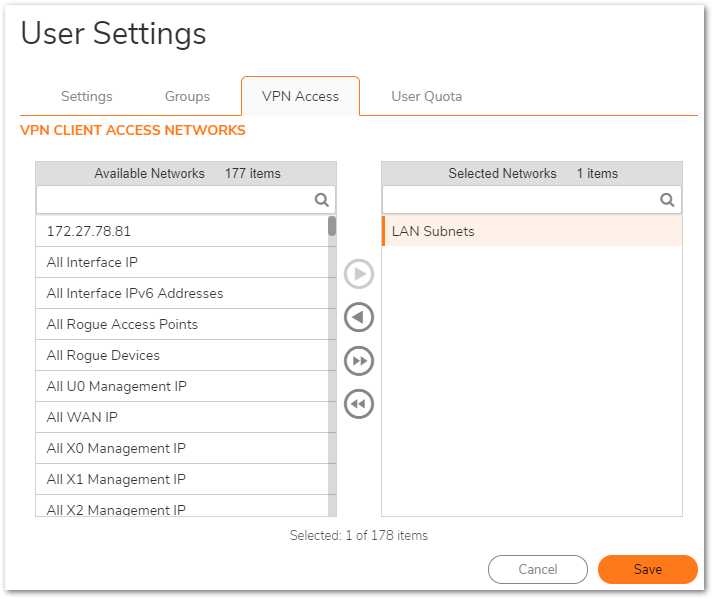
- On the VPN Access Tab allows users to access networks using a VPN tunnel, select one or more networks from the Networks list and click the arrow button | to move them to the Access List. To remove the user's access to a network, select the network from the Access List, and click the left arrow button.
- Navigate to Policy | Select the
Resolution for SonicOS 6.5
This release includes significant user interface changes and many new features that are different from the SonicOS 6.2 and earlier firmware. The below resolution is for customers using SonicOS 6.5 firmware.
Login to the SonicWall Appliance , Click MANAGE , navigate to SSL-VPN | Server Settings page.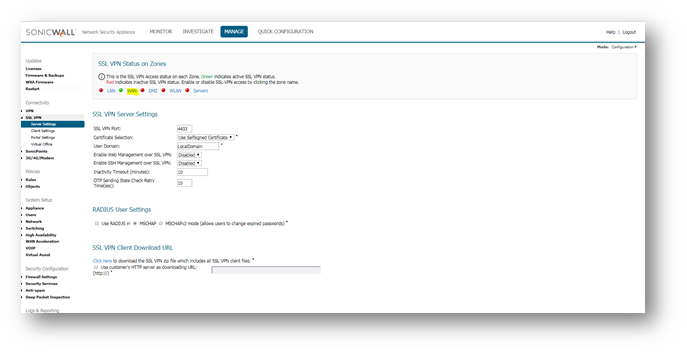
- Configure the SSL VPN | Client Settings.
The SSL VPN | Client Settings page allows the administrator to configure the client address range information and NetExtender client settings.
The most important being where the SSL-VPN will terminate (eg on the LAN in this case) and which IPs will be given to connecting clients. Finally, select from where users should be able to login (probably, this will be the WAN, so just click on the WAN entry). NOTE: NetExtender cannot be terminated on an interface that is paired to another interface using L2 Bridge Mode. This includes interfaces bridged with a WLAN interface. Interfaces that are configured with L2 Bridge Mode are not listed in the "SSLVPN Client Address Range" Interface drop-down menu. For NetExtender termination, an interface should be configured with as a LAN, DMZ, WLAN, or a custom Trusted, Public, or Wireless zone, and also configured with the IP Assignment of "Static".
Click on Configure icon for Default Device profile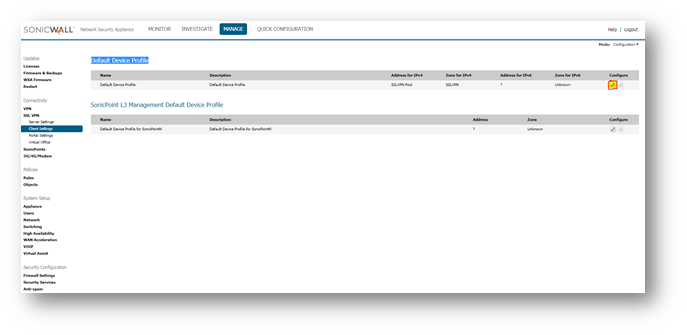
After this on the Settings Tab , we need to select Zone IP v4 (SSLVPN) and the address object for Network Address IPV4 (SSLVPN Pool).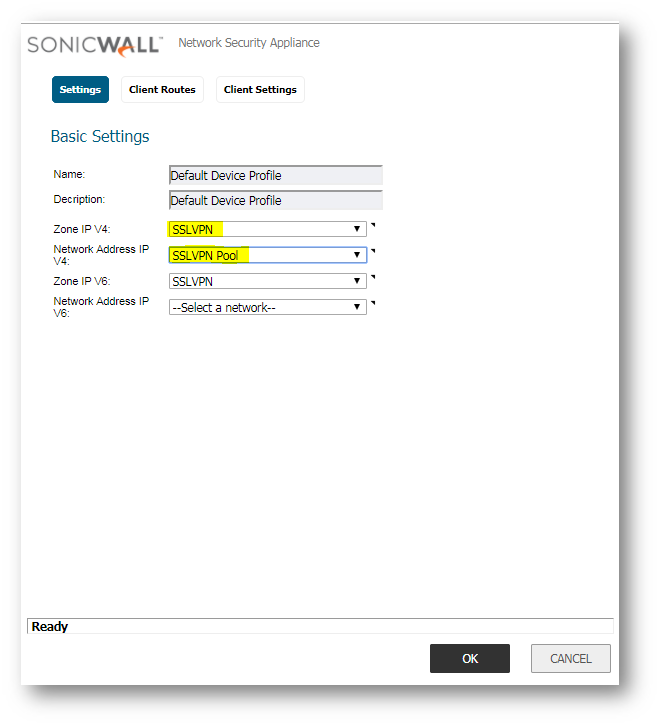
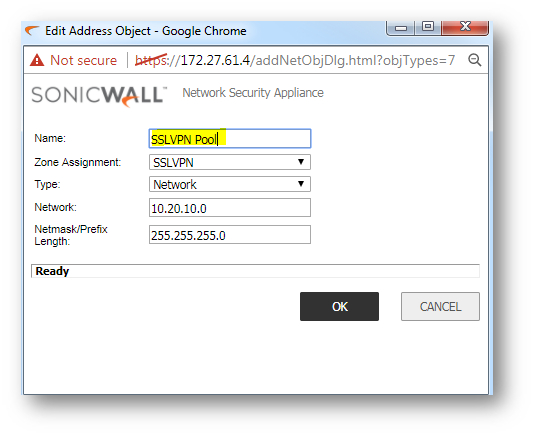
- The SSL VPN | Client Routes page allows the administrator to control the network access allowed for SSL VPN users. The NetExtender client routes are passed to all NetExtender clients and are used to govern which private networks and resources remote user can access via the SSL VPN connection.
 NOTE: All clients can see these routes. Also, here you may enable/disable "Tunnel All Mode" (this is the equivalent of "This gateway only" option while configuring GroupVPN).
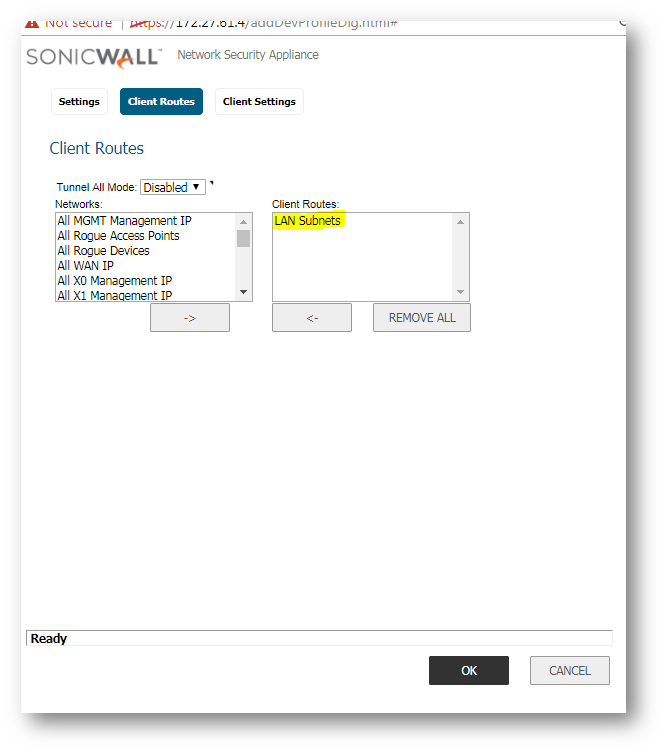
- Configuring NetExtender Client Settings:
Enable the option Create Client Connection Profile - The NetExtender client will create a connection profile recording the SSL VPN Server name, the Domain name and optionally the username and password.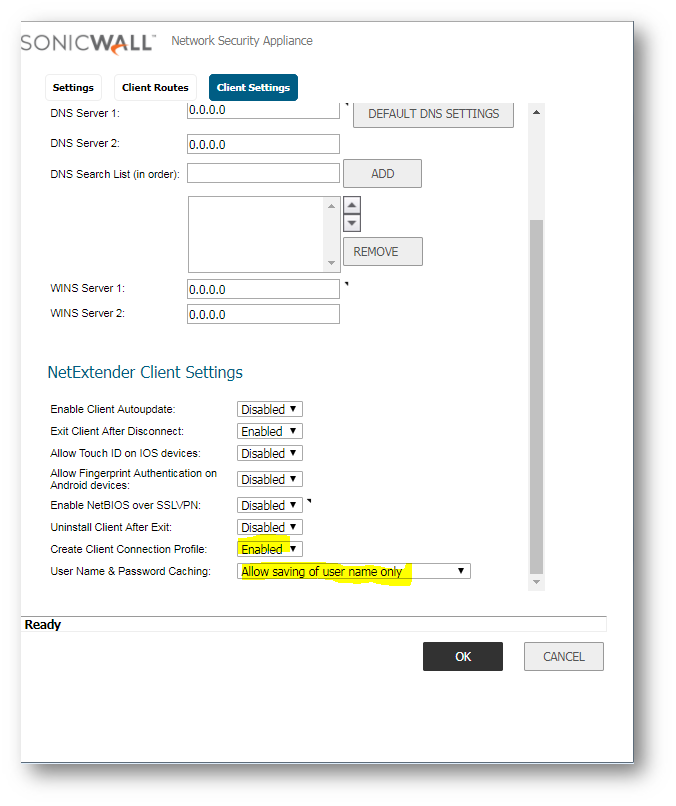
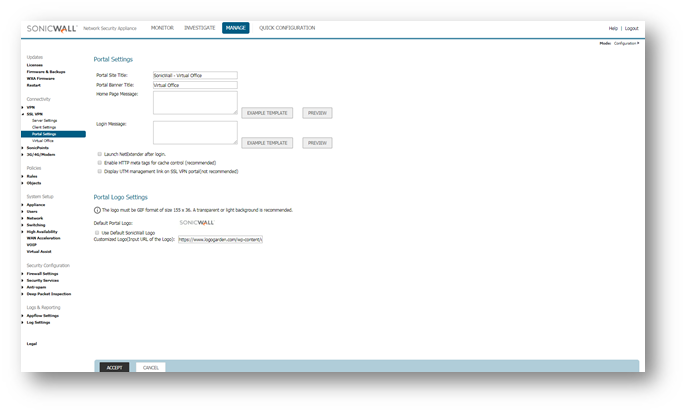
- The SSL VPN | Portal Settings page is used to configure the appearance and functionality of the SSL VPN Virtual Office web portal. The Virtual Office portal is the website that uses log in to launch NetExtender.
- Under Users | Local users, ensure that the relevant user or user group is a member of the "SSLVPN Services" group:
For Local users , Click on MANAGE and navigate to System Setup | Users | Local Users and Groups
Click Configure icon for the user and navigate to groups , add SSLVPN Services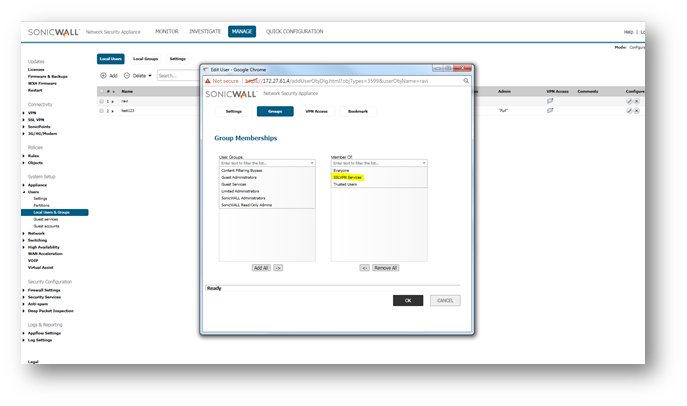
To setup membership for local or LDAP user group, edit the SSLVPN Services user group and add the user group under the Members tab.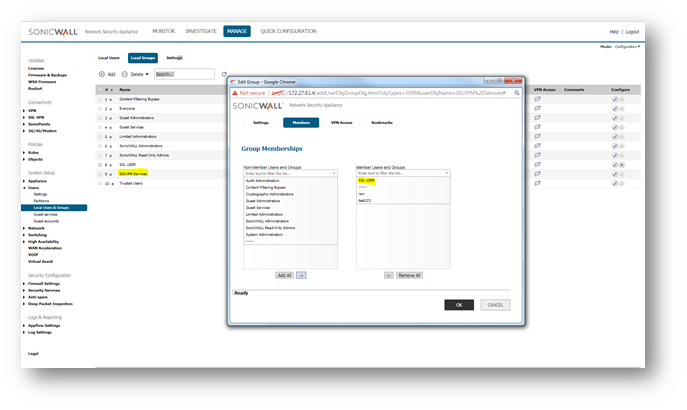
On the VPN Access Tab allows users to access networks using a VPN tunnel, select one or more networks from the Networks list and click the arrow button | to move them to the Access List. To remove the user's access to a network, select the network from the Access List, and click the left arrow button.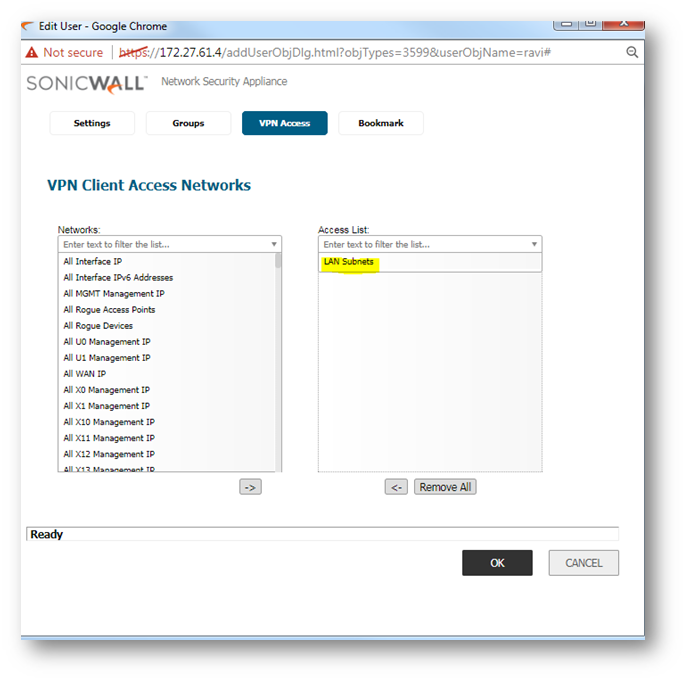
- Under Firewall | Access Rules, note the new SSLVPN zone.
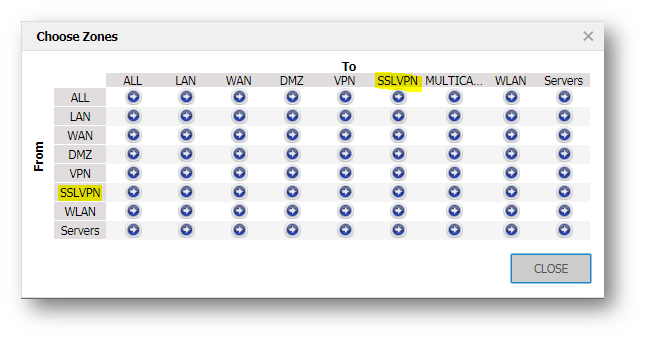
- Firewall access rules are auto-created from and to SSLVPN zone from other zones. Optionally you could modify the auto-created SSLVPN to LAN rule to allow access only to those users that are configured (recommended to use single rule with groups rather than multiple rules with individual users). Ignore any warning that login needs to be enabled from SSLVPN zone.
Go to WAN interface and ensure HTTPS user login is enabled (For the same click on MANAGE and navigate to Network | Interfaces , click on configure icon for X1 (Default WAN).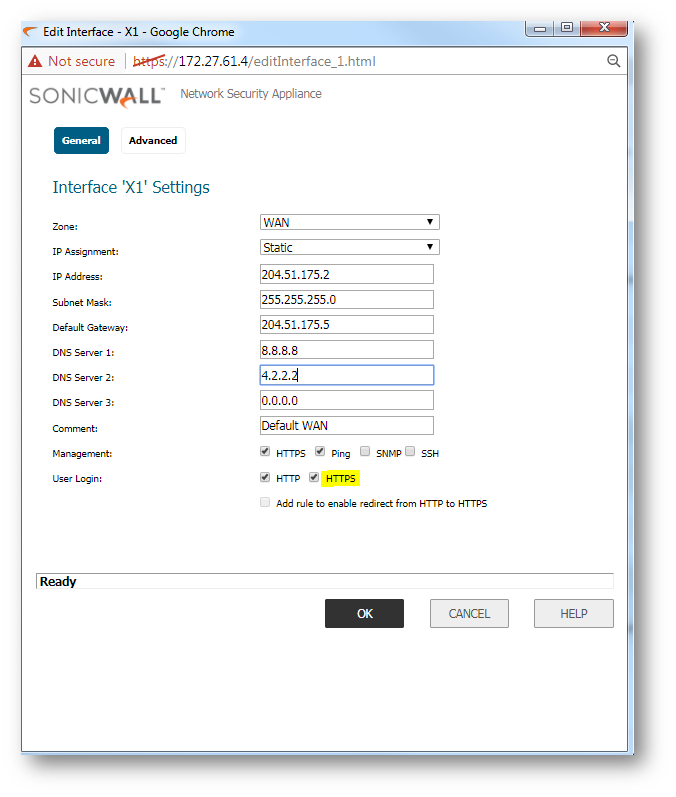
How to test this scenario:
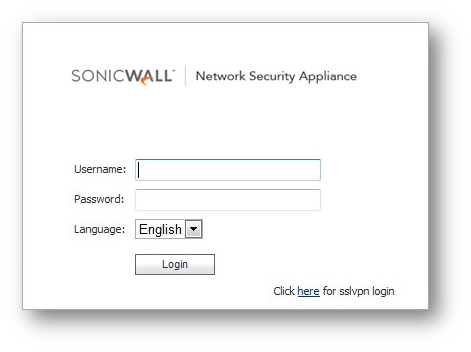
- Users can now go to the public IP of the sonicwall. Notice the new "click here for SSL login" hyper link:
- Users can then login and start NetExtender:
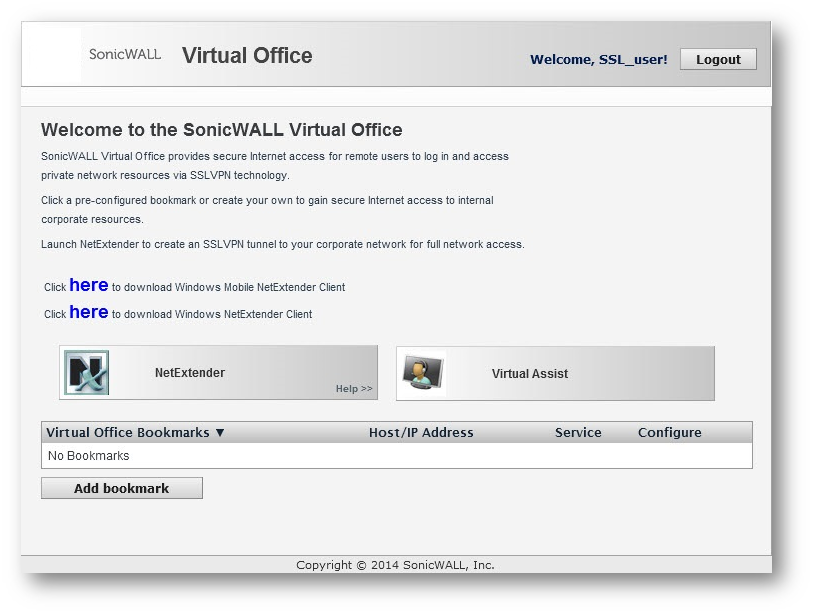
NetExtender provides remote users with full access to your protected internal network. The experience is virtually identical to that of using a traditional IPSec VPN client, but NetExtender does not require any manual client installation. Instead, the NetExtender Windows client is automatically installed on a remote user's PC by an ActiveX control when using the Internet Explorer browser, or with the XPCOM plugin when using Firefox.
Linux systems can also install and use the NetExtender client.
After installation, NetExtender automatically launches and connects a virtual adapter for secure SSL-VPN point-to-point access to permitted hosts and subnets on the internal network.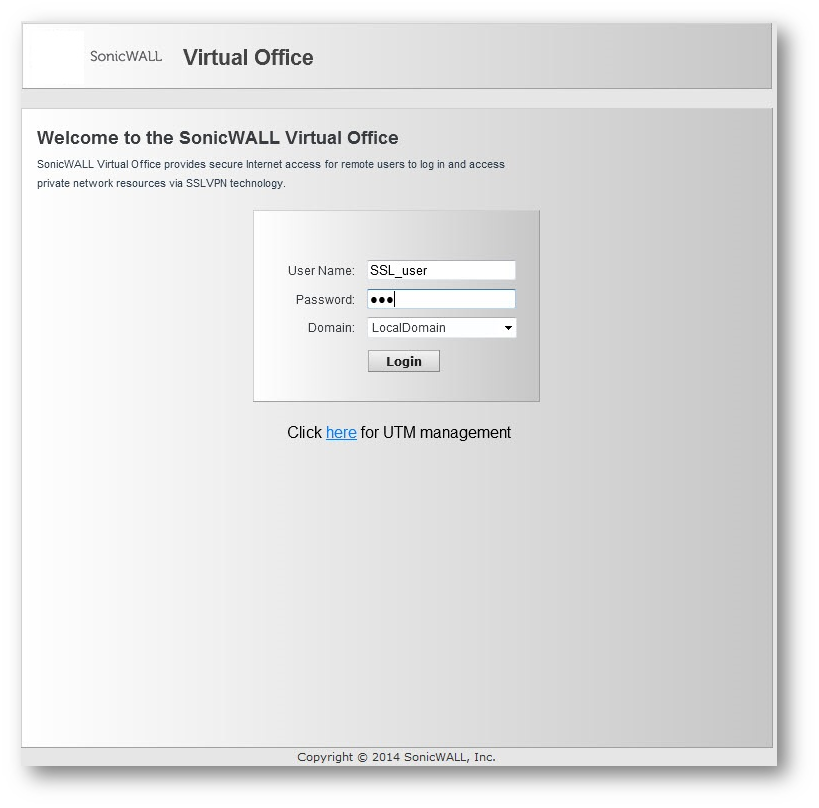
Using the IPv6 address and the service port of the remote server to login.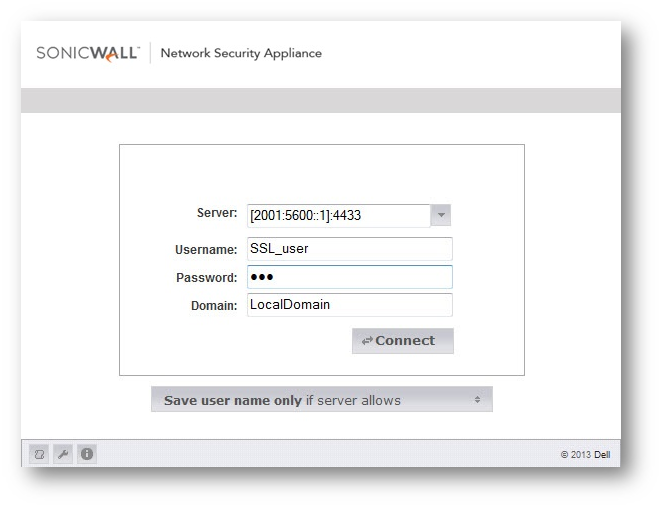
Both IPv4 and IPv6 addresses should be distributed on the client.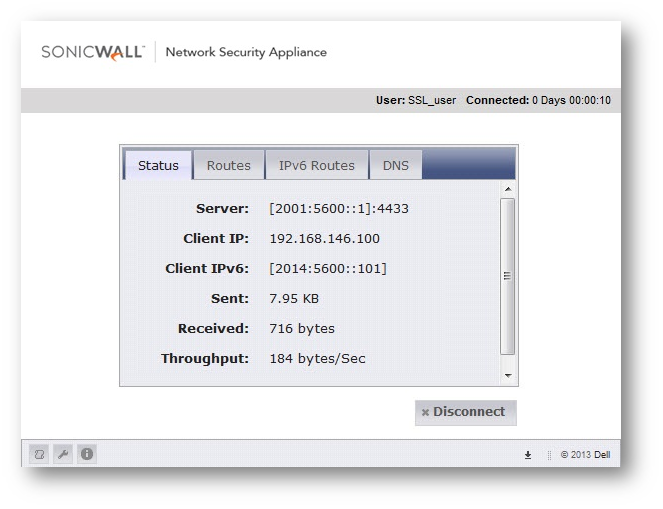
And ping can be used to verify the connectivity and functionality as well.
 NOTE: For Mac, the supported client is Mobile Connect :How Can I Install Mobile Connect On MacOS?
Related Articles
- Error:"Invalid API Argument" when modifying the access rules
- Cysurance Partner FAQ
- Configure probe monitoring for WAN Failover and Loadbalancing - SonicWall UTM
Categories
- Firewalls > NSa Series > SSLVPN
- Firewalls > NSv Series > SSLVPN
- Firewalls > TZ Series > SSLVPN


 YES
YES NO
NO