-
Products
-
SonicPlatform
SonicPlatform is the cybersecurity platform purpose-built for MSPs, making managing complex security environments among multiple tenants easy and streamlined.
Discover More
-
-
Solutions
-
Federal
Protect Federal Agencies and Networks with scalable, purpose-built cybersecurity solutions
Learn MoreFederalProtect Federal Agencies and Networks with scalable, purpose-built cybersecurity solutions
Learn More - Industries
- Use Cases
-
-
Partners
-
Partner Portal
Access to deal registration, MDF, sales and marketing tools, training and more
Learn MorePartner PortalAccess to deal registration, MDF, sales and marketing tools, training and more
Learn More - SonicWall Partners
- Partner Resources
-
-
Support
-
Support Portal
Find answers to your questions by searching across our knowledge base, community, technical documentation and video tutorials
Learn MoreSupport PortalFind answers to your questions by searching across our knowledge base, community, technical documentation and video tutorials
Learn More - Support
- Resources
- Capture Labs
-
- Company
- Contact Us
How can I Install Single Sign On (SSO) software and configure the SSO feature?


Description
This article details how to install and setup the SSO Feature in conjunction with a SonicWall UTM appliance. The SSO Feature is used for transparent accounting and management of LDAP or RADIUS Users which in turn allows Users to have Content Filtering, Firewall Access Rules, Security Services, and other SonicWall features applied to them as desired. SSO obtains this information by polling local devices as needed and passing that information to the SonicWall for verification against LDAP or RADIUS.
Pre-Installation
To use the SonicWall SSO Feature, it is required that the SonicWall SSO Agent (Directory Connector) be installed on a Windows Server within your Domain that can reach the necessary Clients and can be reached from the SonicWall, either directly or through a VPN. The following requirements must be met in order to run the SSO Agent:
- Port 2258 or a designated Custom Port must be open and in Listening Status.
- The designated Port cannot be used for any other traffic.
- One of the following Operating Systems.
Windows Server 2012, 64-bit
Windows Server 2012 R2, 64-bit
Windows Server 2008 R2, 64-bit
Windows Server 2008, 32-bit and 64-bit - A minimum of .NET Framework 4.0 or 4.5 on the server.
Installing and Configuring Directory Connector
- Locate the SonicWall Directory Connector executable file and double click it. It may take several seconds for the InstallShield to prepare for the installation.
- On the Welcome page, click Next.
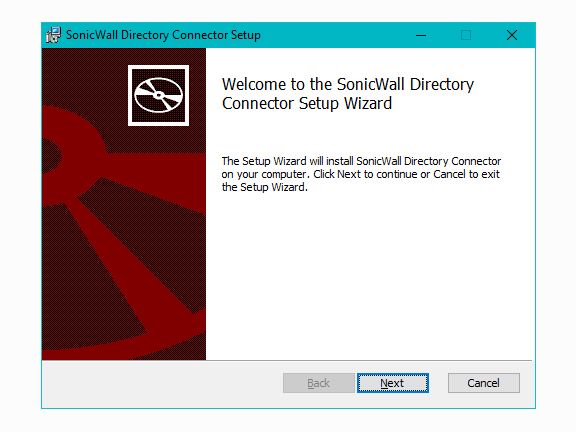
- The License Agreement displays. Select I accept the terms in the License Agreement and click Next.
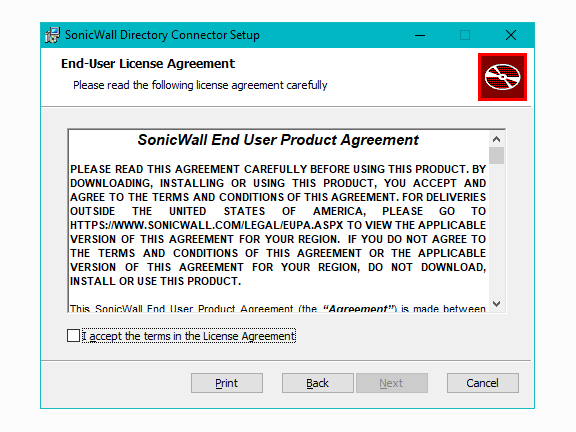
- Select the destination folder. To use the default Folder/Path click Next. To specify a custom location, click Change, select the folder, and click Next.
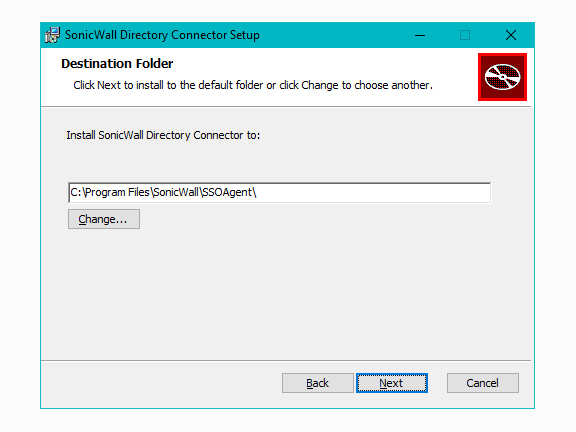
- To configure a common service account that the SSO Agent will use to log into a specified Windows Domain, enter the Username of an account with administrative privileges in the Username field, the Password for the account in the Password field, and the Domain Name of the account in the Domain Name field. Click Next.
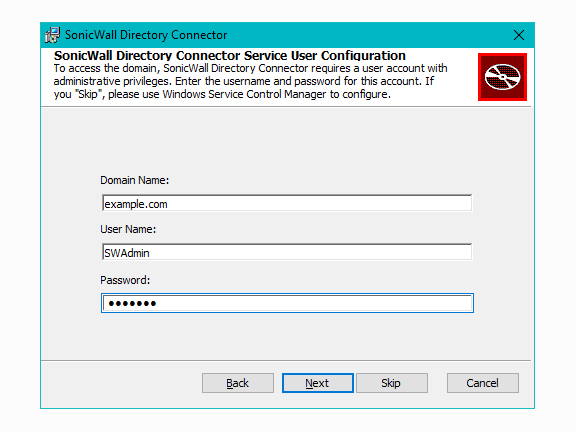
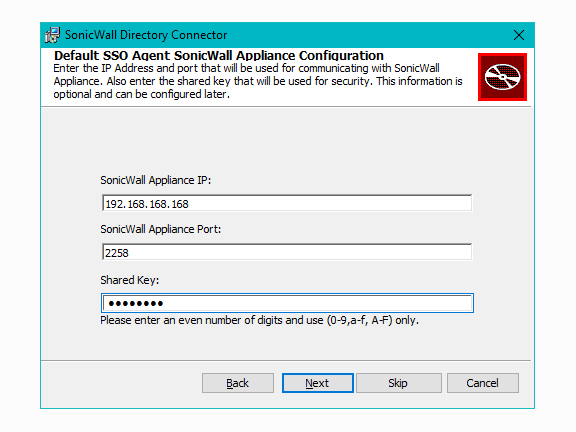
- Enter the Private IP Address of your SonicWall in the SonicWall Appliance IP field. Type the Port Number for appliance in the SonicWall Appliance Port field. The default Port Number is 2258. Enter a Shared Key in the Shared Key field. Click Next.
 NOTE:The Shared Secret must be an even number of Characters from 0-9, a-f, and/or A-F. No other Characters will be accepted.
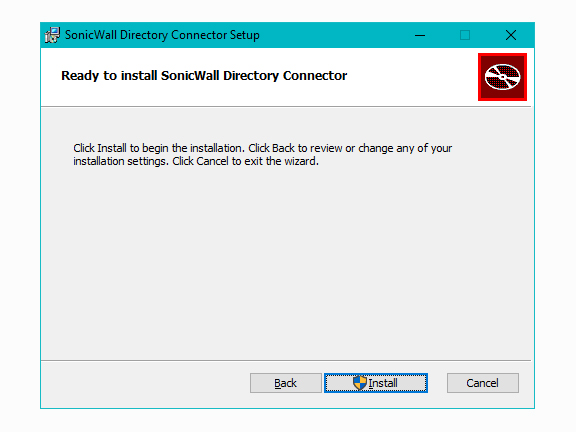
- Click Install and the SonicWall SSO Agent installs. The status bar displays.
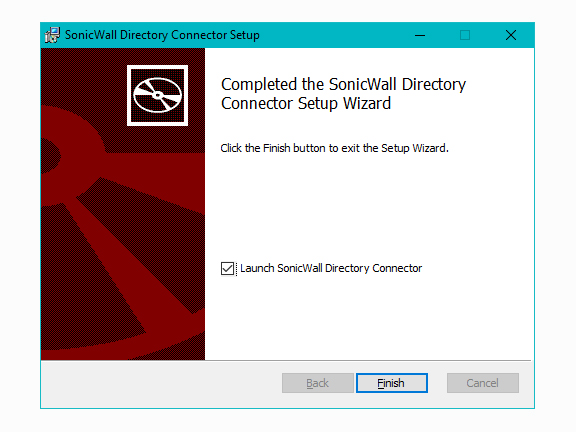
- When installation is complete check the Launch SonicWall Directory Connector box to launch the SonicWall Directory Connector, and click Finish.
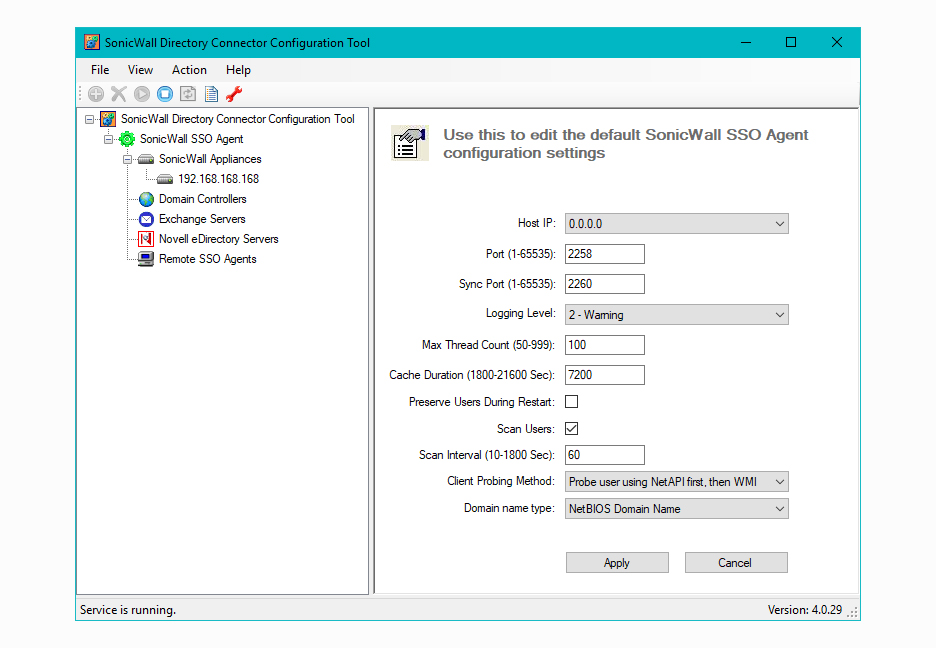
- The SonicWall Directory Connector GUI will display. From here you can configure the Directory Connector.
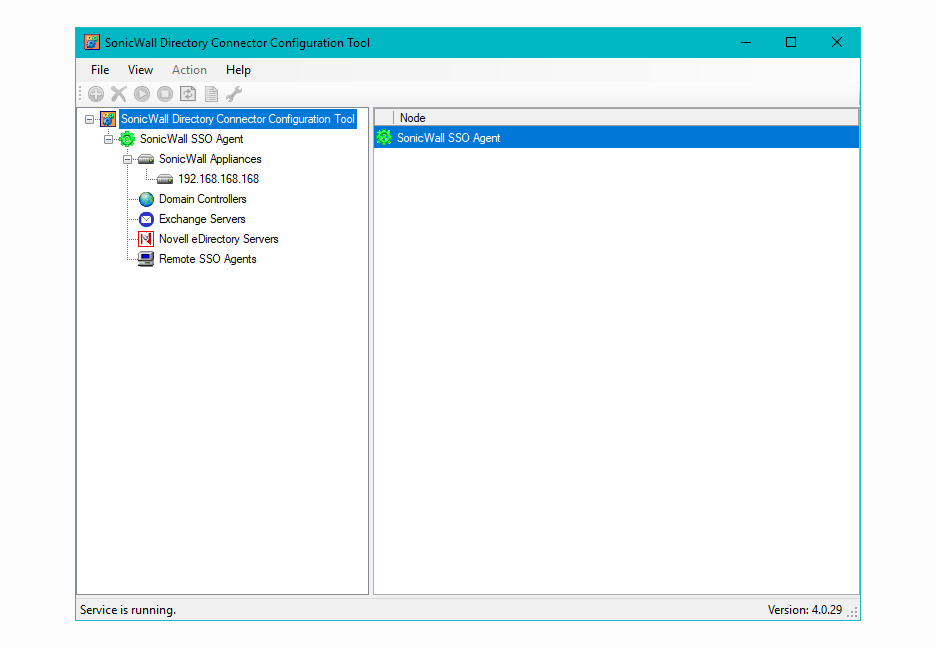
- Right click on SonicWall SSO Agent and select Properties. Verify all the Settings on here are setup according to your environment.
 NOTE: There are no Best Practices for setting up this information and it will depend on your environment. If you're unsure what to use, utilize the default configuration.
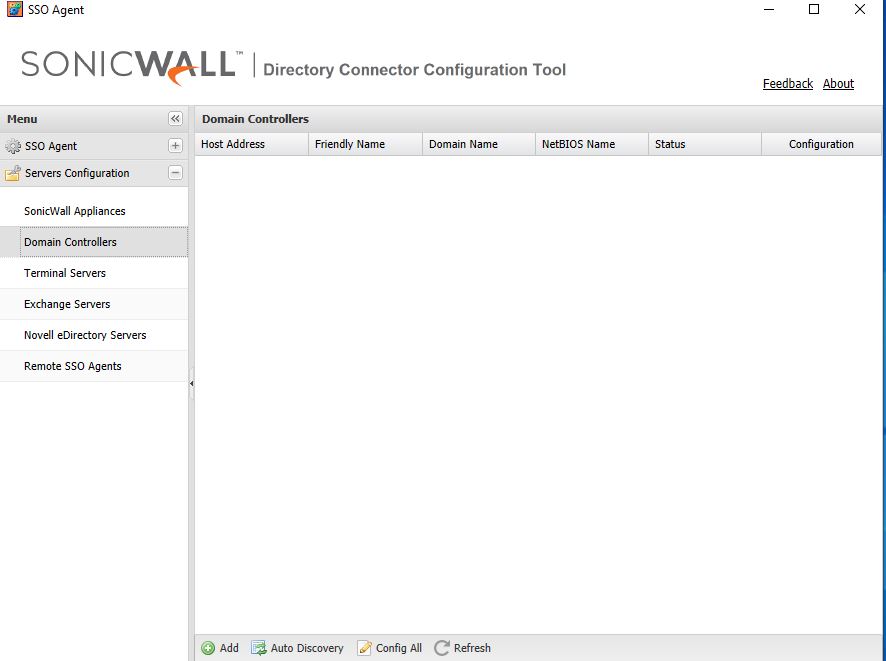
- Go to Domain Controllers and click Auto Discovery
Resolution
Resolution for SonicOS 7.X
This release includes significant user interface changes and many new features that are different from the SonicOS 6.5 and earlier firmware. The below resolution is for customers using SonicOS 7.X firmware.
 NOTE: Please follow the Pre-Installation steps under description before configuring the SSO.
Configuring Single-Sign on in the SonicWall
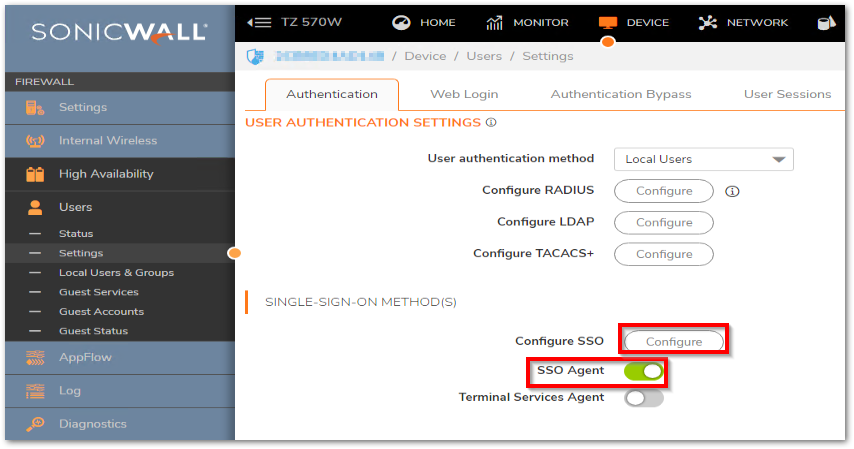
- Login to your SonicWall management page and click Device tab on top of the page.
- Navigate to Users | Settings page. On right side, click Authentication tab.
- In Single-sign-on method(S): Enable SSO by click '
 ' button near SSO Agent and click Configure.
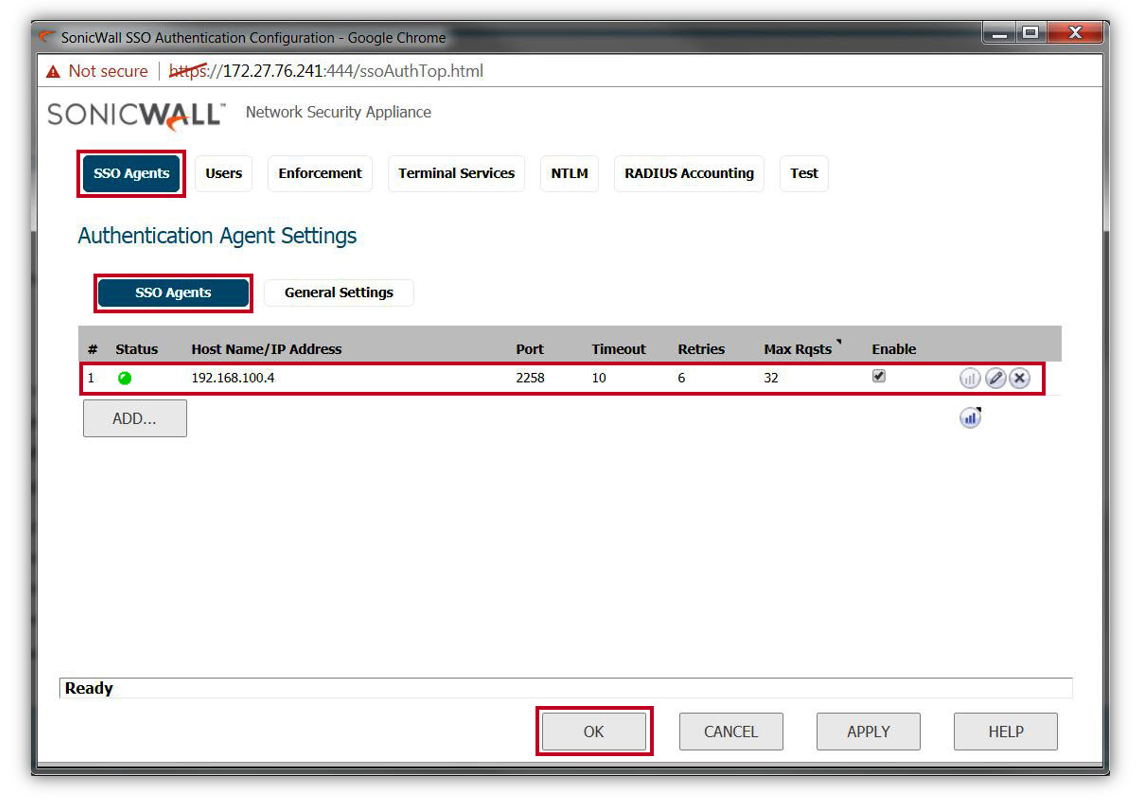
- In SonicWall SSO Authentication Configuration Window, Under SSO Agents tab below Authentication Agent Settings click Add.
- In Add agent window, Under Settings configure below information.
- Host Name or IP Address
- Port
- Shared Key & Confirm Shared Key
- You will also be asked to set the Timeout and amount of Retries before a query fails. These have default values and can be edited as needed.
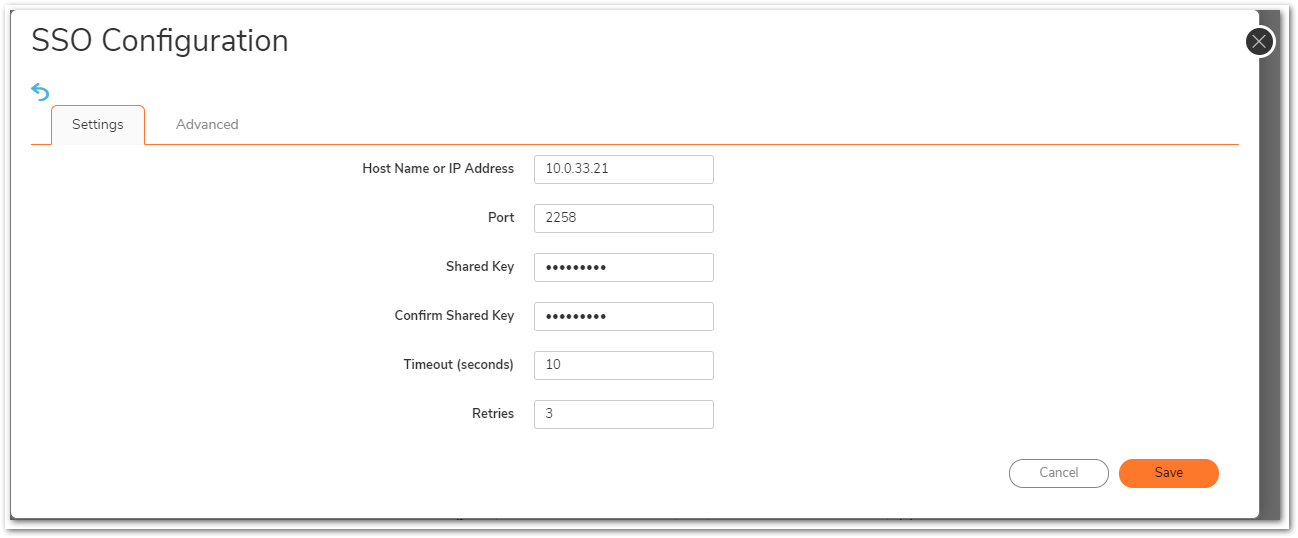
- Click SAVE button and you should see the Bubble associated with the SSO Agent turn Green, indicating the SonicWall can reach the SSO Agent.
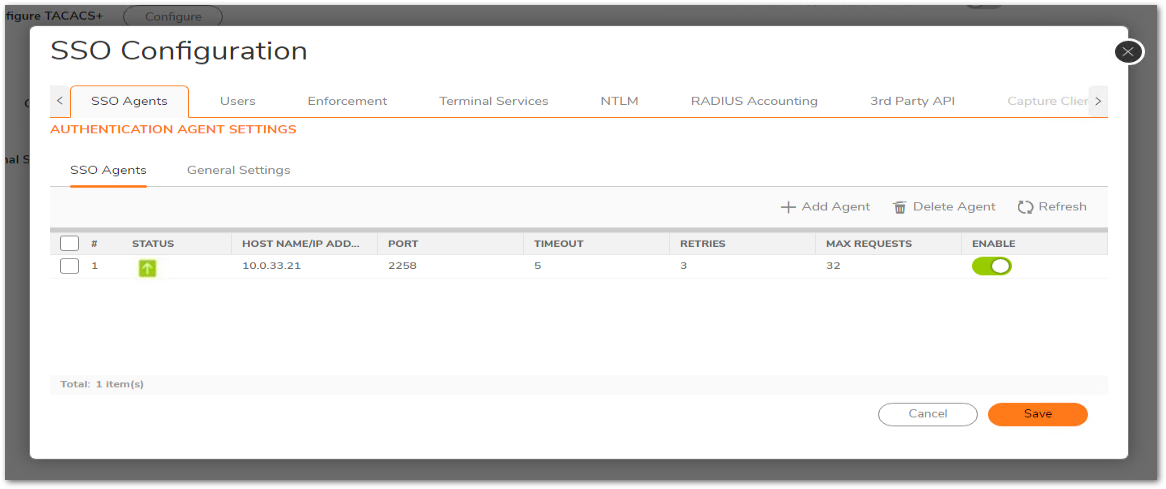
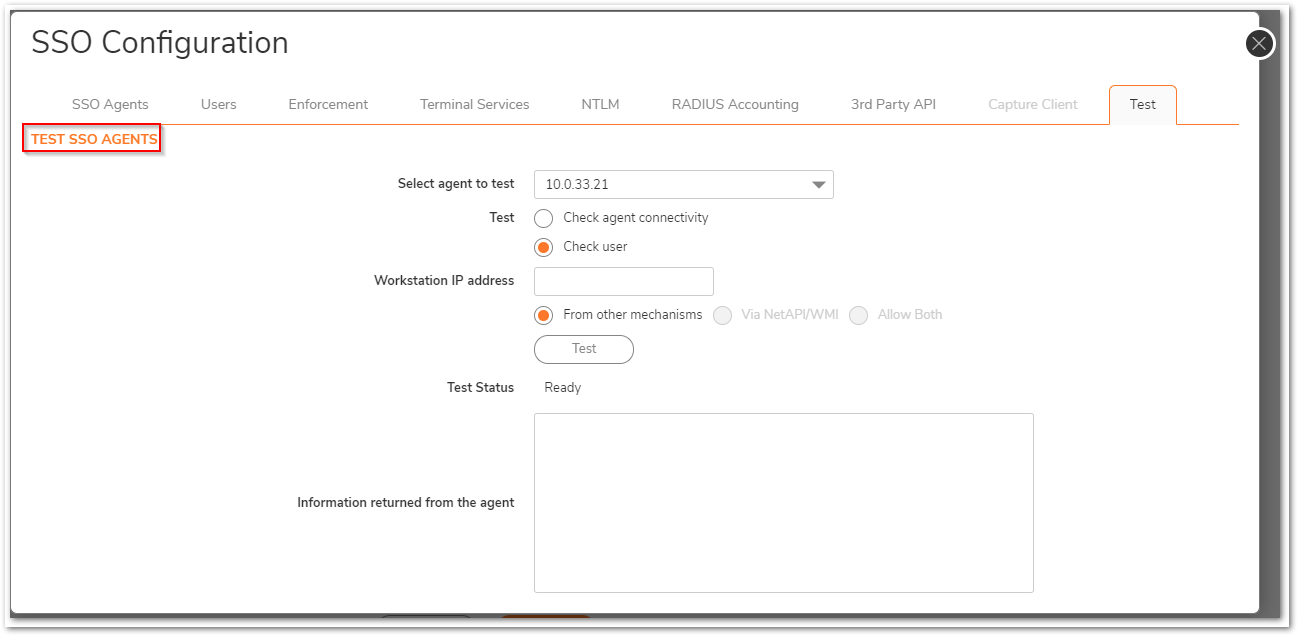
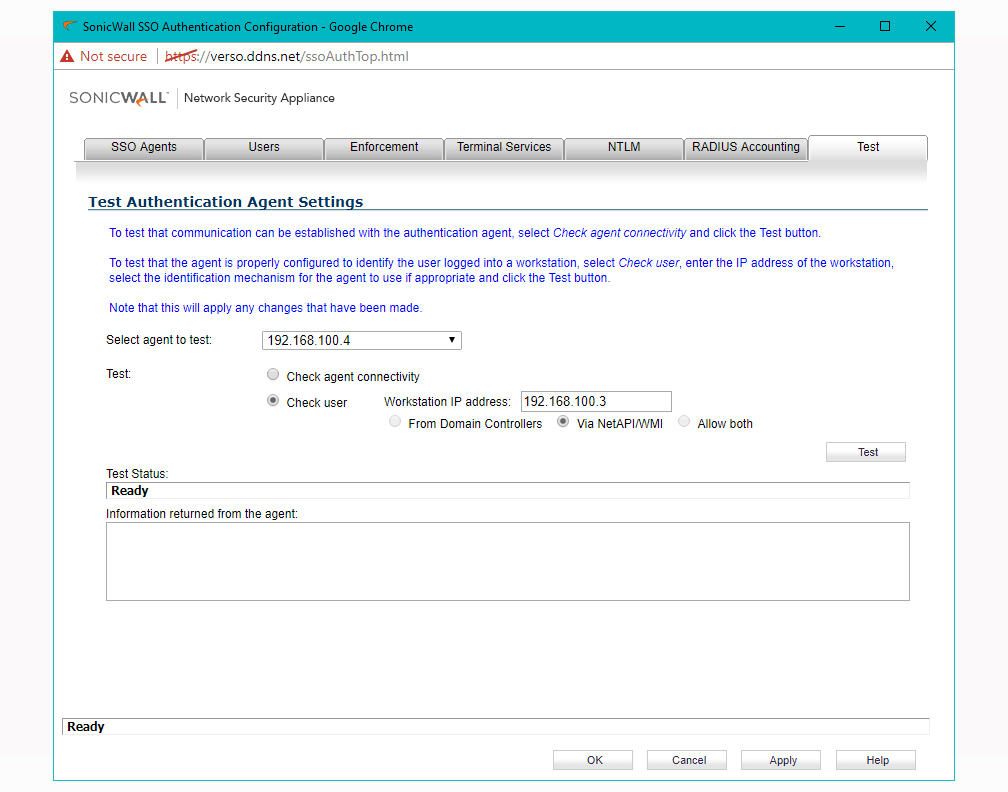
- Navigate to the Test tab on the SSO Popup window and select the new Agent as the Select agent to test option. Set the radio option to Check agent connectivity and then input an IP Address into Workstation IP address that you know a User is logged into. Finally select Test, you should show the correct User and information returned.
Resolution for SonicOS 6.5
This release includes significant user interface changes and many new features that are different from the SonicOS 6.2 and earlier firmware. The below resolution is for customers using SonicOS 6.5 firmware.
 NOTE: Please follow the Pre-Installation steps under description before configuring the SSO.
Configuring Single-Sign on in the SonicWall
- Login to your SonicWall management page and click Manage tab on top of the page.
- Navigate to Users | Settings page. On right side, click Authentication tab.
- In Single-sign-on method(S): Enable SSO by click 'X' button near SSO Agent and click Configure.
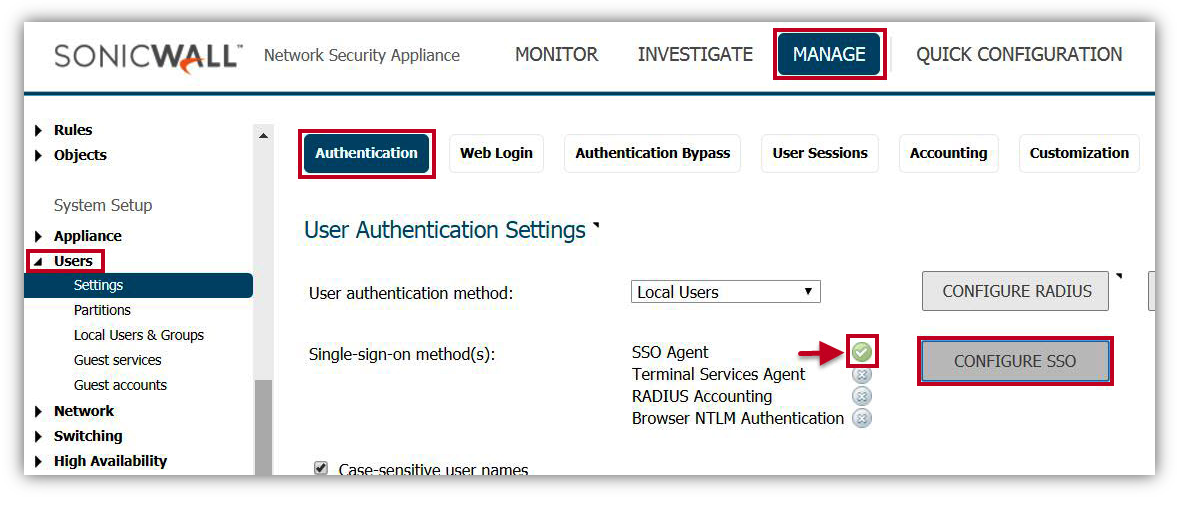
- In SonicWall SSO Authentication Configuration Window, Under SSO Agents tab below Authentication Agent Settings click Add.
- In Add agent window, Under Settings configure below information.
- Host Name or IP Address
- Port
- Shared Key & Confirm Shared Key
- You will also be asked to set the Timeout and amount of Retries before a query fails. These have default values and can be edited as needed.
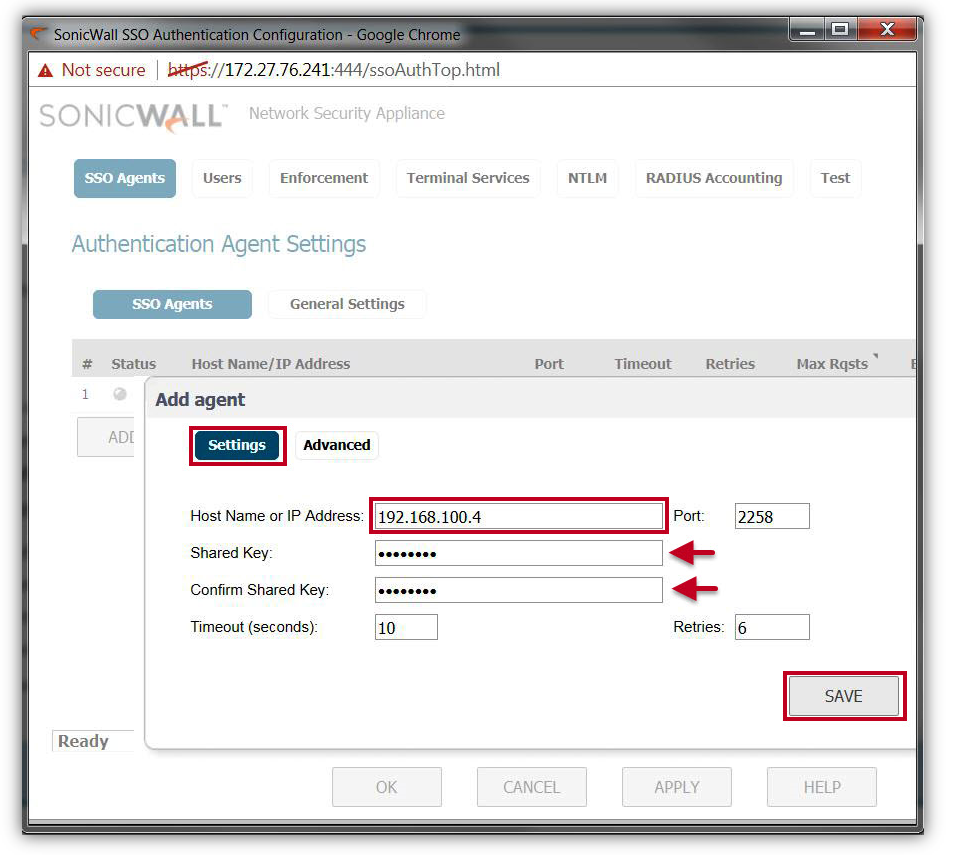
- Click SAVE button and you should see the Bubble associated with the SSO Agent turn Green, indicating the SonicWall can reach the SSO Agent.
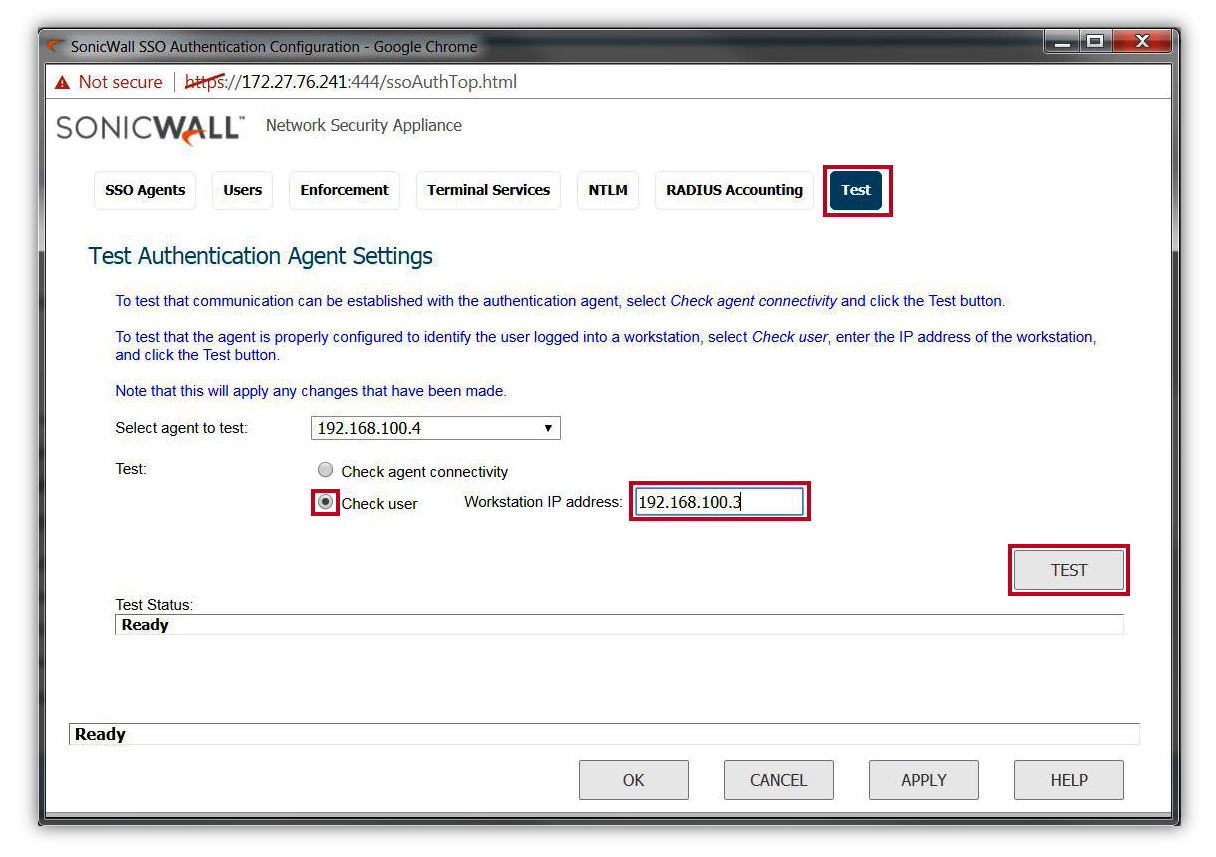
- Navigate to the Test tab on the SSO Popup window and select the new Agent as the Select agent to test option. Set the radio option to Check agent connectivity and then input an IP Address into Workstation IP address that you know a User is logged into. Finally select Test, you should show the correct User and information returned.
Resolution for SonicOS 6.2 and Below
The below resolution is for customers using SonicOS 6.2 and earlier firmware. For firewalls that are generation 6 and newer we suggest to upgrade to the latest general release of SonicOS 6.5 firmware.
 NOTE: Please follow the Pre-Installation steps under description before configuring the SSO.
Configuring Single-Sign on in the SonicWall
- Login to the SonicWall Management GUI and navigate to Users | Settings | Configure SSO.
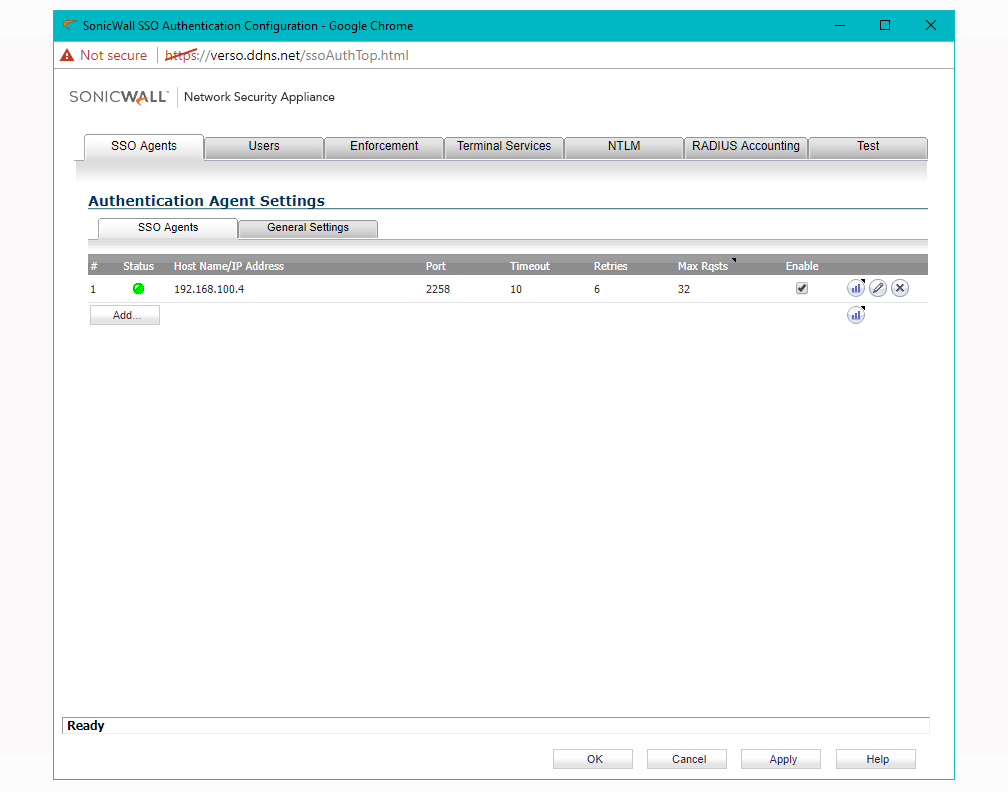
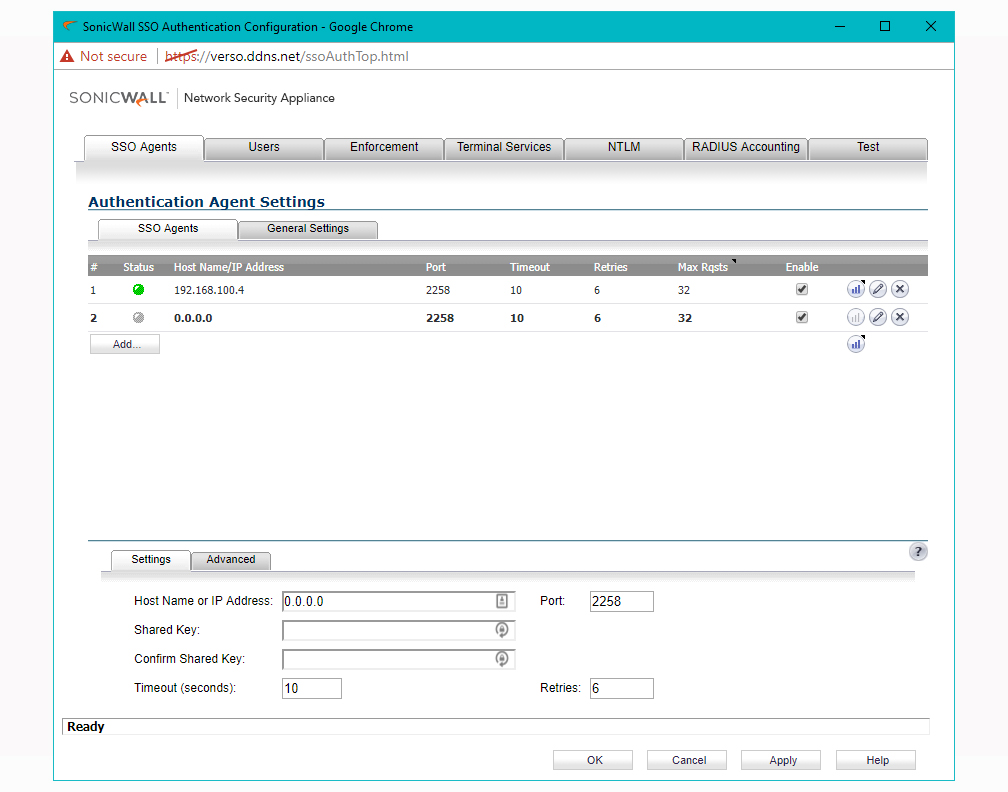
- Select Add... and input the following information that you created when installing Director Connector.
- Host IP Address
- Shared Key
- Port
You will also be asked to set the Timeout and amount of Retries before a query fails. These have default values and can be edited as needed.
- Click Apply and you should see the Bubble associated with the SSO Agent turn Green, indicating the SonicWall can reach the SSO Agent.
- Navigate to the Test tab on the SSO Popup window and select the new Agent as the "Select agent to test" option. Set the radio option to "Check agent connectivity" and then input an IP Address into "Workstation IP address" that you know a User is logged into. Finally select Test, you should show the correct User and information returned.
Related Articles
- How to Block Google QUIC Protocol on SonicOSX 7.0?
- How to block certain Keywords on SonicOSX 7.0?
- How internal Interfaces can obtain Global IPv6 Addresses using DHCPv6 Prefix Delegation
Categories
- Firewalls > NSa Series > User Login
- Firewalls > NSv Series > User Login
- Firewalls > TZ Series > User Login


 YES
YES NO
NO