-
Products
-
SonicPlatform
SonicPlatform is the cybersecurity platform purpose-built for MSPs, making managing complex security environments among multiple tenants easy and streamlined.
Discover More
-
-
Solutions
-
Federal
Protect Federal Agencies and Networks with scalable, purpose-built cybersecurity solutions
Learn MoreFederalProtect Federal Agencies and Networks with scalable, purpose-built cybersecurity solutions
Learn More - Industries
- Use Cases
-
-
Partners
-
Partner Portal
Access to deal registration, MDF, sales and marketing tools, training and more
Learn MorePartner PortalAccess to deal registration, MDF, sales and marketing tools, training and more
Learn More - SonicWall Partners
- Partner Resources
-
-
Support
-
Support Portal
Find answers to your questions by searching across our knowledge base, community, technical documentation and video tutorials
Learn MoreSupport PortalFind answers to your questions by searching across our knowledge base, community, technical documentation and video tutorials
Learn More - Support
- Resources
- Capture Labs
-
- Company
- Contact Us
How can I exclude hosts behind SonicWall from Geo-IP Filter using firewall access rules?


Description
Geo-IP Filter allows administrators to block connections coming to or from a geographic location. However, in certain circumstances administrators may want to exclude some hosts behind the SonicWall from Geo-IP Filter. SonicWall Geo-IP Filter can be set to All or Firewall Rule-Based. Setting the option to All will block all hosts behind the SonicWall access to locations blocked in the Geo-IP Filter main page. The Firewall Rule-based option introduces more granularity in allowing or blocking via access rules.
This article illustrates how to exclude IP addresses from Geo-IP Filter using access rules.
Resolution
Resolution for SonicOS 7.X
This release includes significant user interface changes and many new features that are different from the SonicOS 6.5 and earlier firmware. The below resolution is for customers using SonicOS 7.X firmware.
Geo-IP configuration
- Login to your SonicWall management page and click Policy tab on top of the page.
- Navigate to Security Services -| GEO-IP Filter page. Click Settings tab.
- Enable Block Connection to/from countries selected in the Countries tab checkbox.
- Select the Firewall Rule-based Connections radio button.
- Enable log by selecting Enable Logging checkbox.
- Click Accept
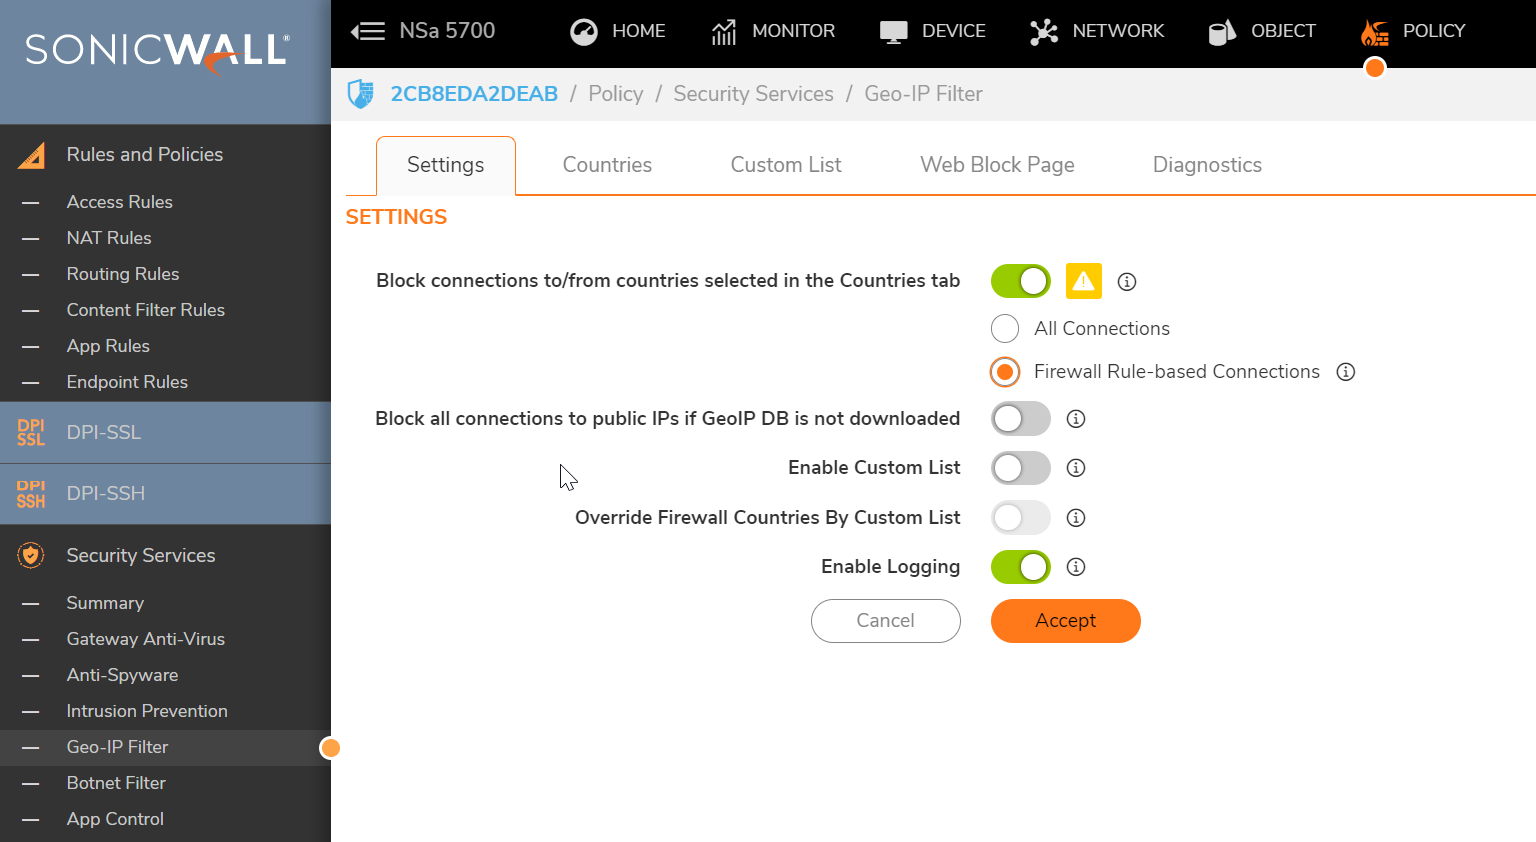
If you wish to exclude IP globally from Geo-IP. Then follow below steps
- Navigate to Policies |- Security Services -| GEO-IP Filter page. On right Side, Click on Countries tab.
- Under Geo-IP Exclusion Object, select Address Object or Groups of IP addresses on the WAN to be excluded from Geo-IP Filter.
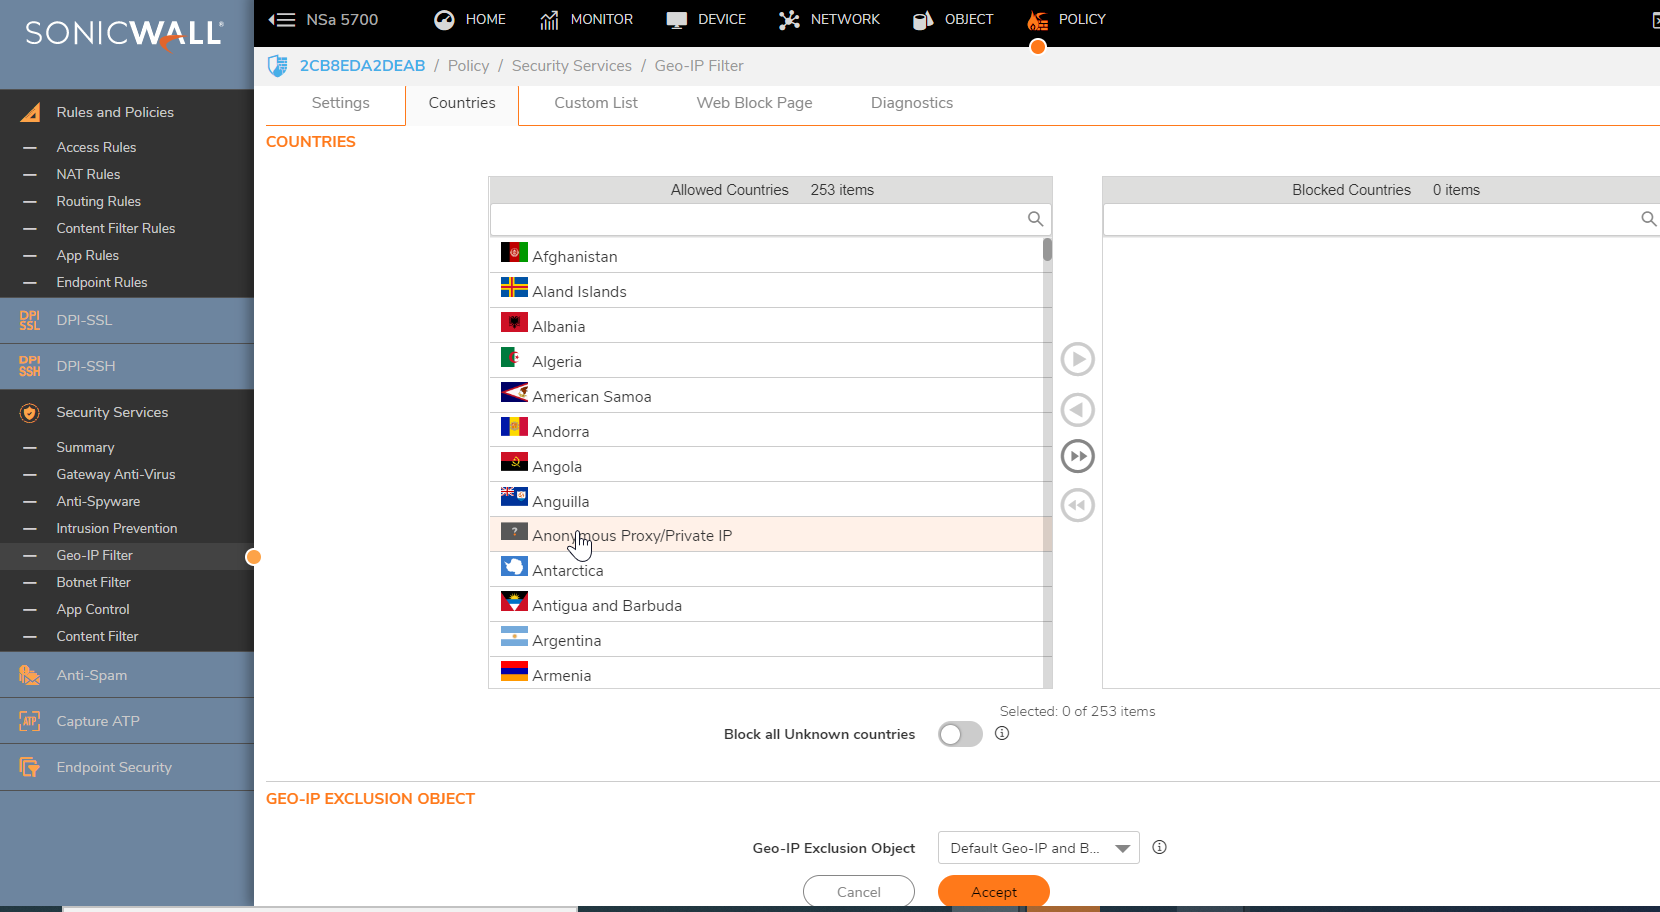
Create Access Rule
- To enforce Geo-IP Filter, it has to be enabled on access rules. The following LAN to WAN rule will effectively block access to those locations checked under Block connections to/from the following countries.
- Click on the top Policy tab
- Navigate to Rules and Policies -| Access Rules. On right side, select From LAN To WAN zone from matrix.

- Edit Default LAN to WAN access rule
- Under the Security profiles tab, Geo-IP filter "Enable Geo-IP filter" with Global radio button.
- Click Save to save the settings.
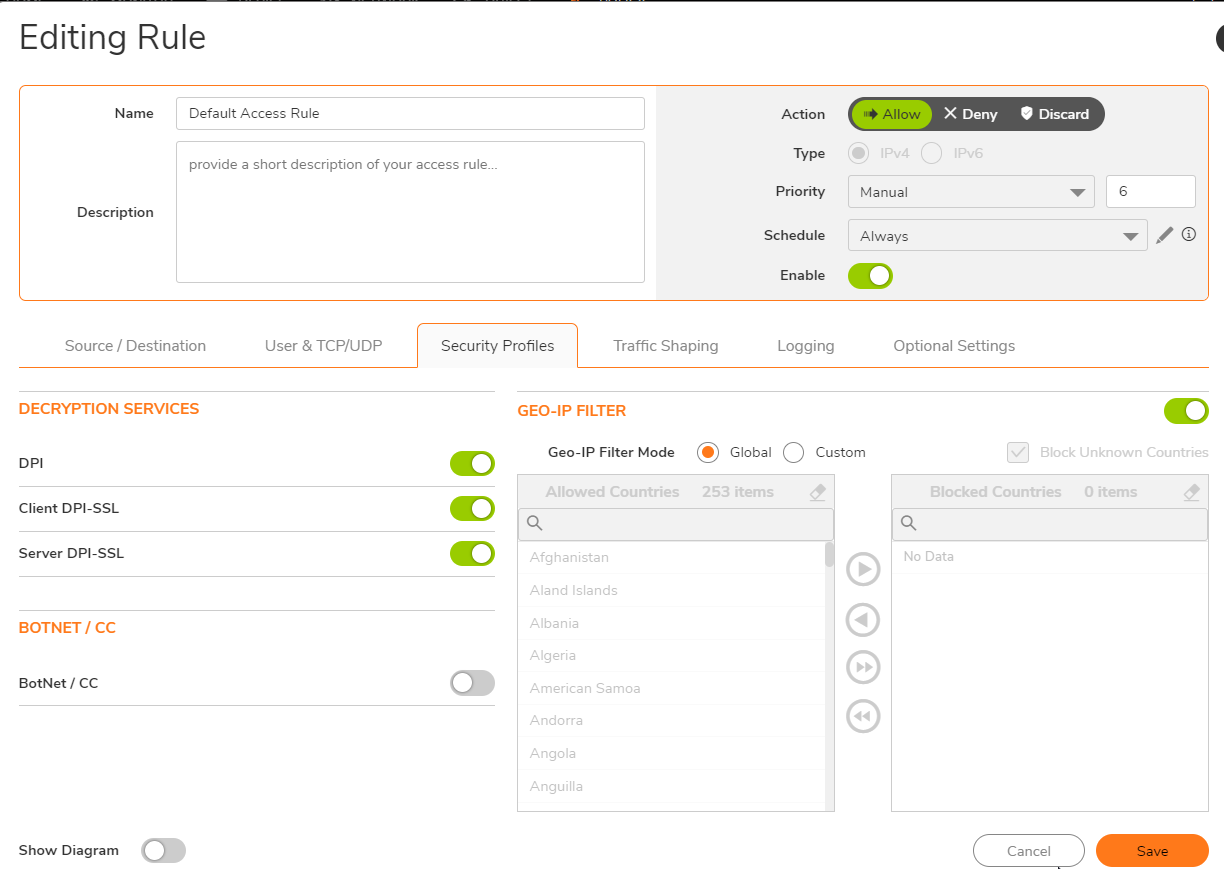
To allow hosts on the LAN (or DMZ) to bypass Geo-IP Filter, a rule superseding the above default rule requires to be created. Set the source of the rule as IP addresses excluded from Geo-IP and without enabling Geo-IP Filter. Multiple objects must be grouped into one Address Group.
- Login to your SonicWall management page and click on Policy tab on top of the page
- Navigate to Rules and Policies -| Access Rules. On right side, select From LAN To WAN zone from the matrix
- Click on Add button to get Add Rule Window, Under Source/Destination tab configure as below
- From Zone: LAN (or DMZ)
- To Zone: WAN
- Service: Any
- Source: Address Object created earlier.
- Destination: Any
- Under the Security profiles tab Geo-IP, DO NOT enable the check-box "Enable Geo-IP Filter" with Global radio button.
- Click Save button to save settings.
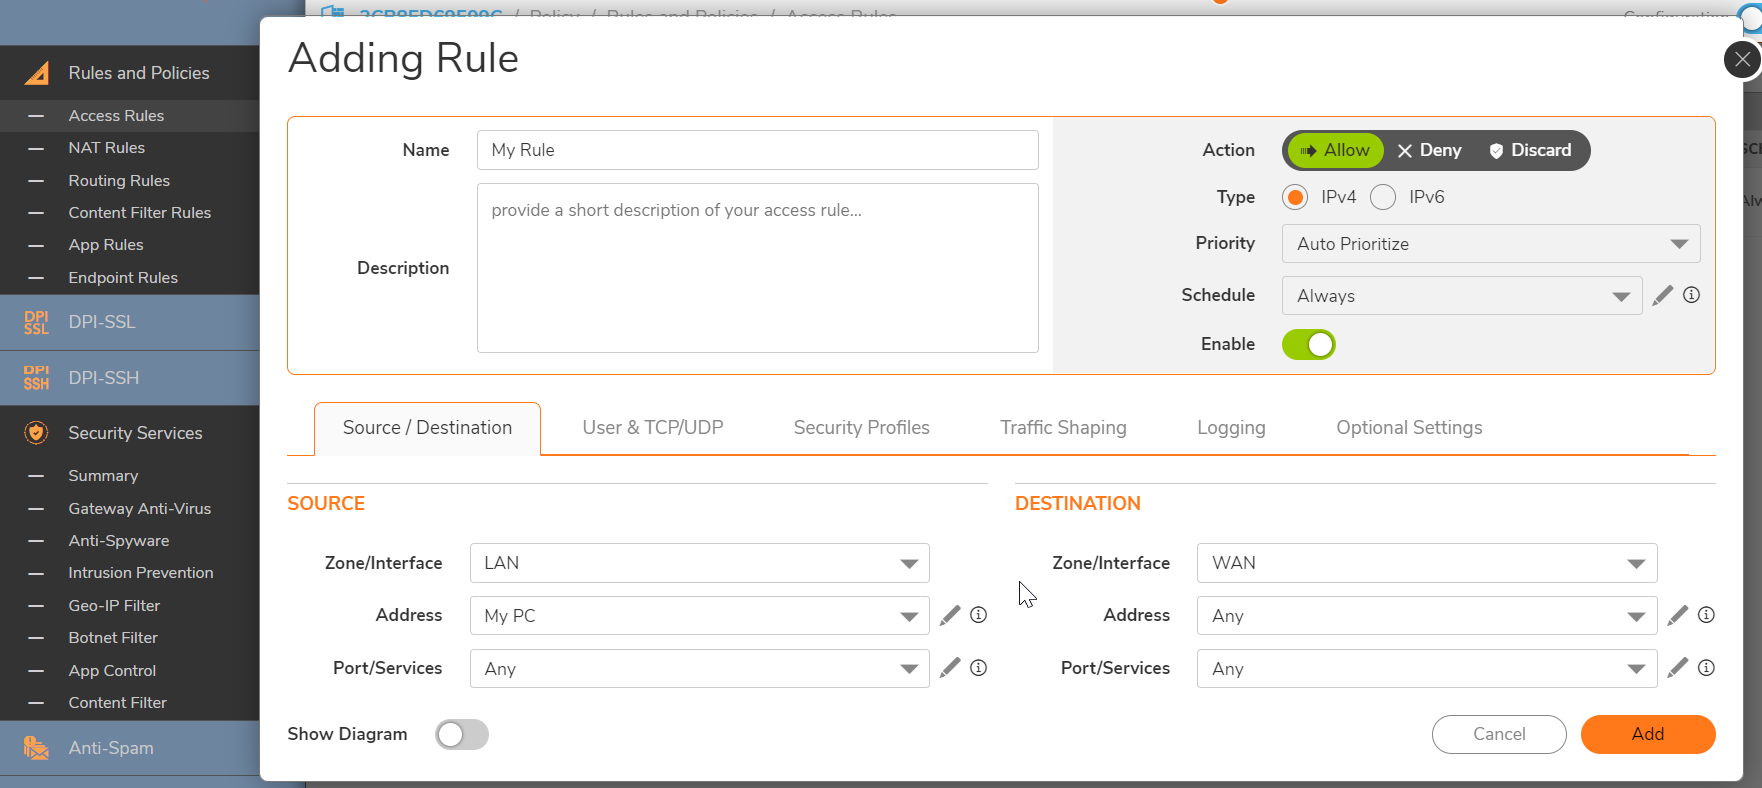
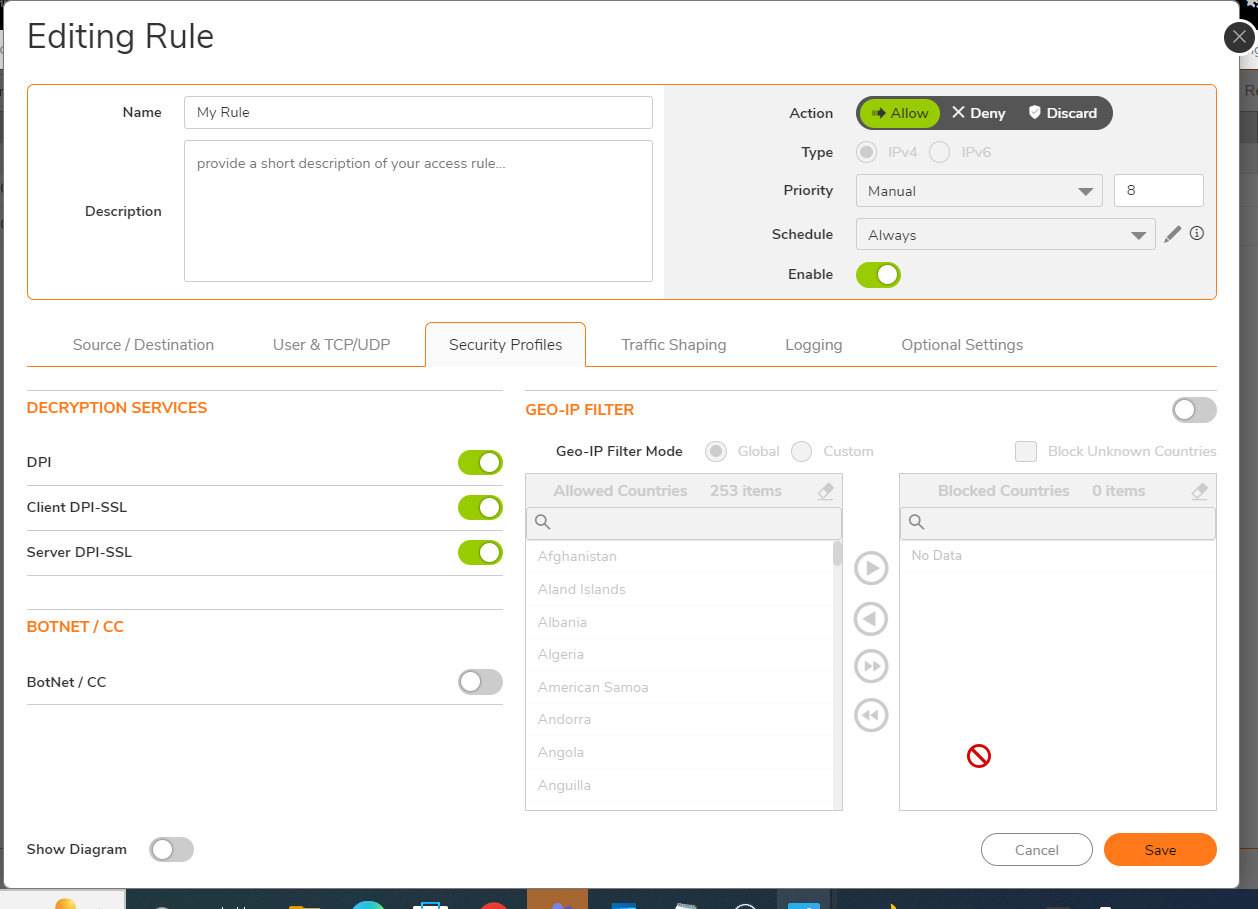

 NOTE: With the above rules in place all hosts except MY PC will be blocked access to website locations blocked by Geo-IP Filterr. The first rule can be further tweaked by setting specific destination or schedule. Similar rules can be created from other zones to the WAN.
Resolution for SonicOS 6.5
This release includes significant user interface changes and many new features that are different from the SonicOS 6.2 and earlier firmware. The below resolution is for customers using SonicOS 6.5 firmware.
Geo-IP configuration
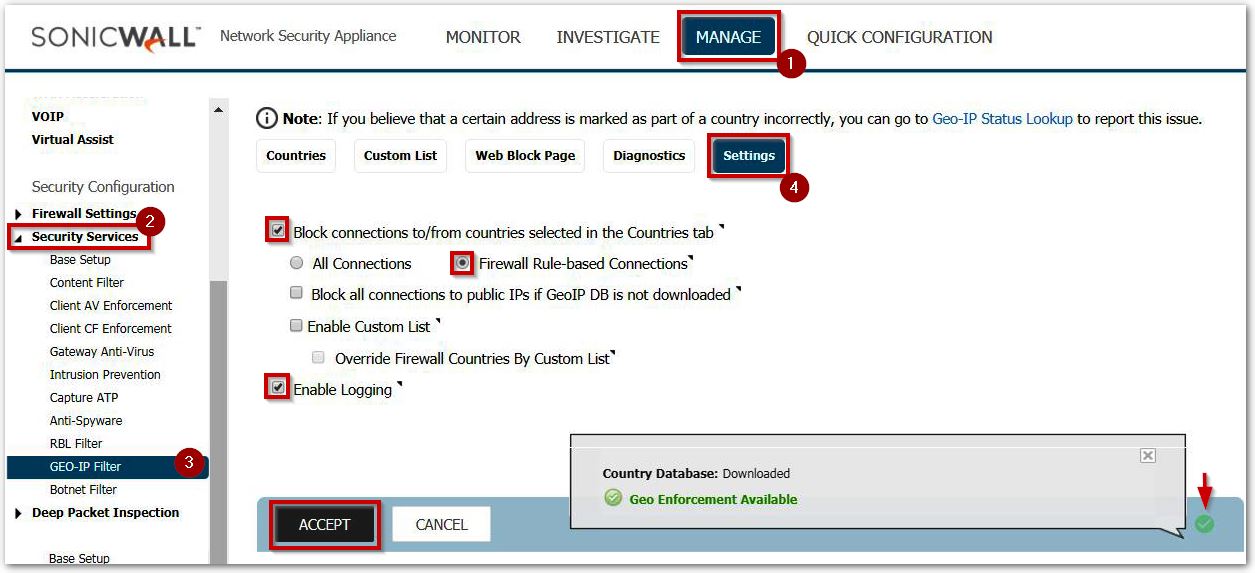
- Login to your SonicWall management page and click Manage tab on top of the page.
- Navigate to Security Services -| GEO-IP Filter page. On right Side, Click Settings tab.
- Enable Block Connection to/from countries selected in the Countries tab checkbox.
- Select Firewall Rule-based Connections radio button.
- Enable log by selection Enable Logging checkbox.
- Click Accept
 NOTE: Once the Database downloaded, it will show Green tick mark as below.
If you wish to exclude IP globally from Geo-IP. Then follow below steps
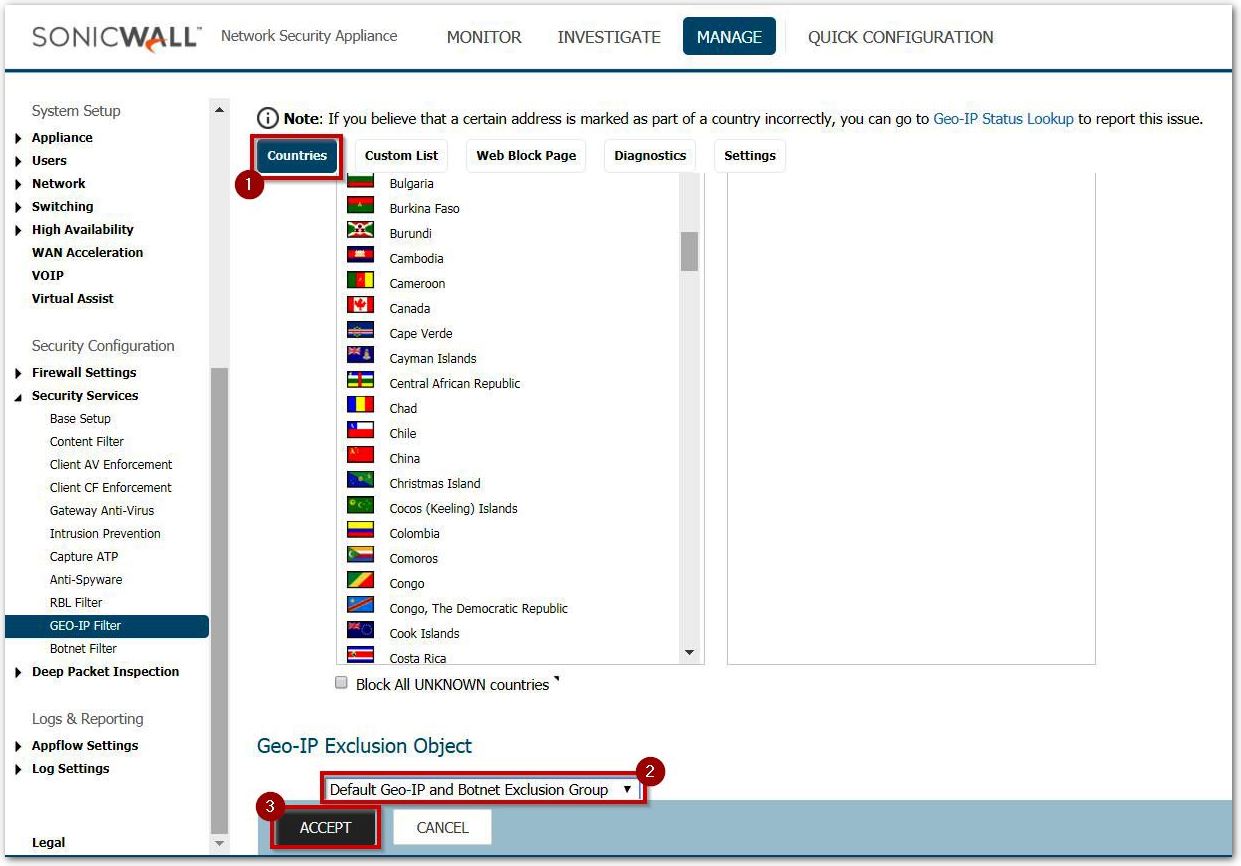
- Navigate to Security Services -| GEO-IP Filter page. On right Side, Click on Countries tab.
- Under Geo-IP Exclusion Object, select Address Object or Groups of IP addresses on the WAN to be excluded from Geo-IP Filter.
Create Access Rule
- To enforce Geo-IP Filter, it has to be enabled on access rules. The following LAN to WAN rule will effectively block access to those locations checked under Block connections to/from following countries.

|
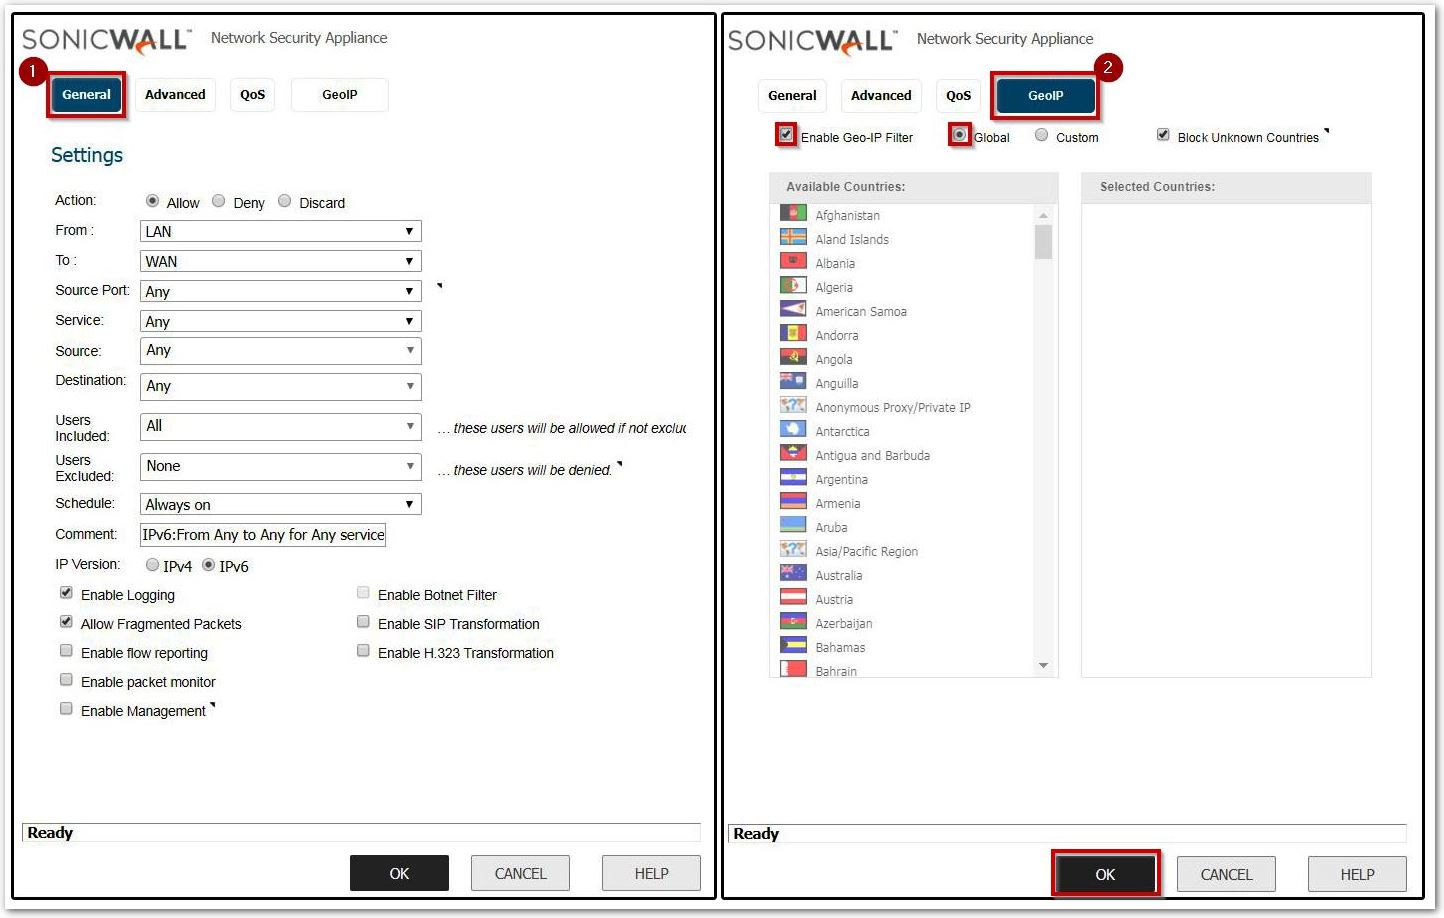 |
To allow hosts on the LAN (or DMZ) to bypass Geo-IP Filter, a rule superseding the above default rule requires to be created. Set the source of the rule as IP addresses excluded from Geo-IP and without enabling Geo-IP Filter. Multiple objects must be grouped into one Address Group.
|
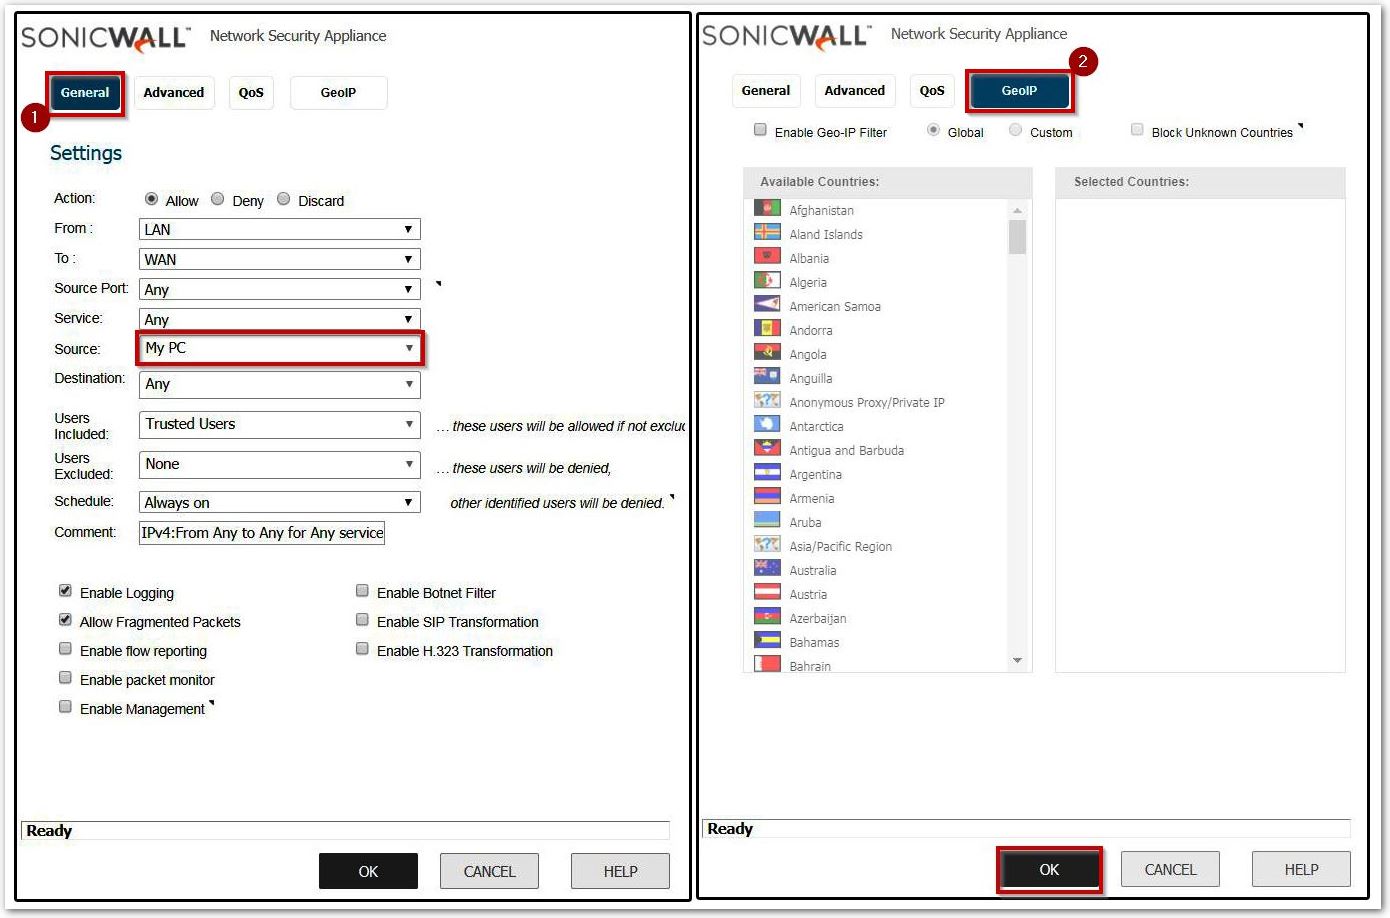 |

 NOTE: With the above rules in place all hosts except MY PC will be blocked access to website locations blocked by Geo-IP Filterr. The first rule can be further tweaked by setting specific destination or schedule. Similar rules can be created from other zones to the WAN.
Resolution for SonicOS 6.2 and Below
The below resolution is for customers using SonicOS 6.2 and earlier firmware. For firewalls that are generation 6 and newer we suggest to upgrade to the latest general release of SonicOS 6.5 firmware.
Geo-IP configuration
- Login to the SonicWall management GUI.
- Navigate to the Security Services | Geo-IP Filter page.
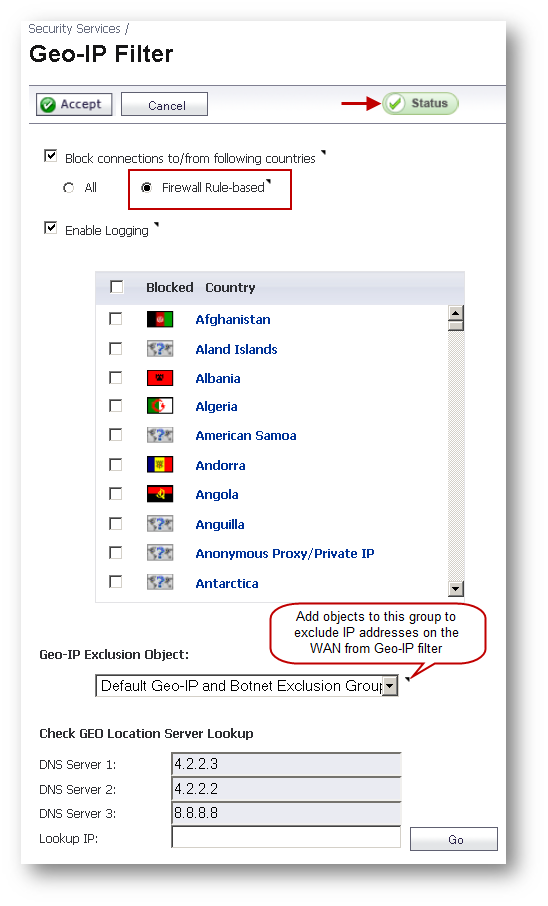
- Enable check-box under Block connections to/from following countries.
- Enable radio-button Firewall Rule-based. This will switch the filtering from All to based on access rules.
- Enable check-box under Logging.
- Under Geo-IP Exclusion Object select Address Object or Groups of IP addresses on the WAN to be excluded from Geo-IP Filter.
- Click Accept .
Create Access Rule
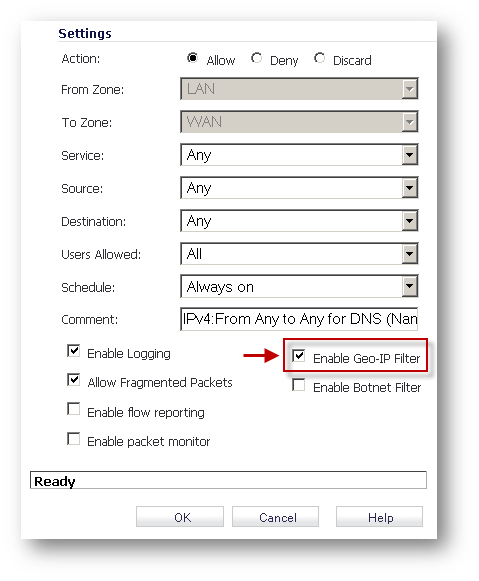
- To enforce Geo-IP Filter, it has to be enabled on access rules. The following LAN to WAN rule will effectively block access to those locations checked under Block connections to/from following countries.
- Navigate to the Firewall | Access Rules page.
- Select From LAN (or DMZ) to WAN
- Edit the default LAN to WAN access rule.
- Enable check-box under Enable Geo-IP Filter. This will enforce Geo-IP Filter on all traffic triggering this rule.
- Click on OK to save.
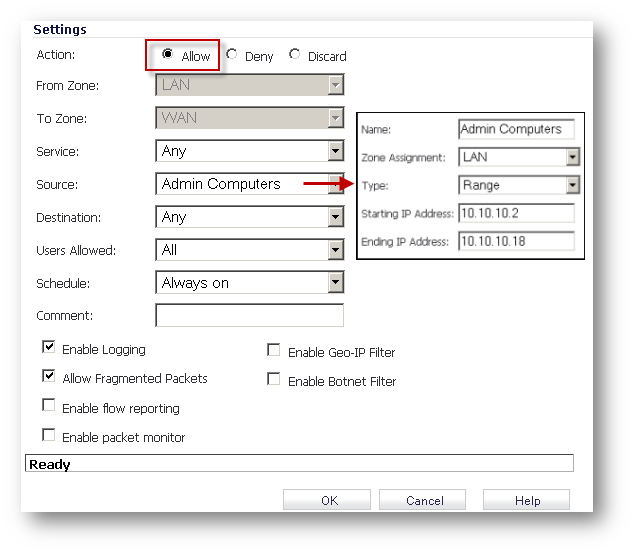
- To allow hosts on the LAN (or DMZ) to bypass Geo-IP Filter, a rule superseding the above default rule requires to be created. Set the source of the rule as IP addresses excluded from Geo-IP and without enabling Geo-IP Filter. Multiple objects must be grouped into one Address Group.
- Navigate to the Firewall | Access Rules page.
- Select From LAN (or DMZ) to WAN
- Click on the Add button to create the following new rule.
- From Zone: LAN (or DMZ)
- To Zone: WAN
- Service: Any
- Source: Address Object created earlier.
- Destination: Any
- DO NOT enable the check-box under Enable Geo-IP Filter
- Click on OK to save.
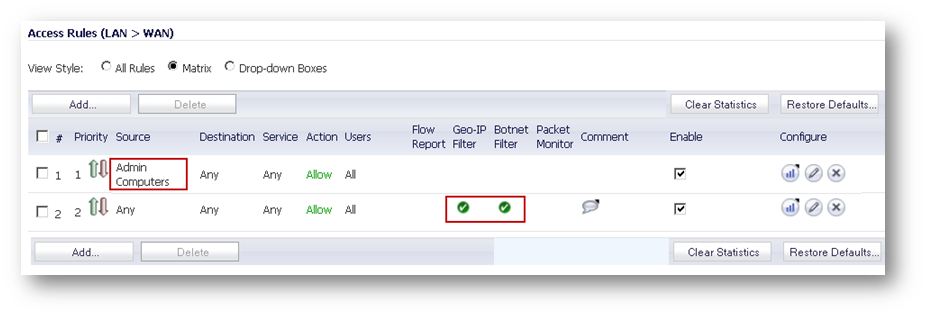
- With the above rules in place all hosts except the Admin Group will be blocked access to website locations blocked by Geo-IP Filterr. The first rule can be further tweaked by setting specific destination or schedule. Similar rules can be created from other zones to the WAN.
Related Articles
- How to Block Google QUIC Protocol on SonicOSX 7.0?
- How to block certain Keywords on SonicOSX 7.0?
- How internal Interfaces can obtain Global IPv6 Addresses using DHCPv6 Prefix Delegation
Categories
- Firewalls > NSa Series > Geo-IP & Botnet Filter
- Firewalls > NSv Series > Geo-IP & Botnet Filter
- Firewalls > TZ Series > Geo-IP & Botnet Filter


 YES
YES NO
NO