-
Products
-
SonicPlatform
SonicPlatform is the cybersecurity platform purpose-built for MSPs, making managing complex security environments among multiple tenants easy and streamlined.
Discover More
-
-
Solutions
-
Federal
Protect Federal Agencies and Networks with scalable, purpose-built cybersecurity solutions
Learn MoreFederalProtect Federal Agencies and Networks with scalable, purpose-built cybersecurity solutions
Learn More - Industries
- Use Cases
-
-
Partners
-
Partner Portal
Access to deal registration, MDF, sales and marketing tools, training and more
Learn MorePartner PortalAccess to deal registration, MDF, sales and marketing tools, training and more
Learn More - SonicWall Partners
- Partner Resources
-
-
Support
-
Support Portal
Find answers to your questions by searching across our knowledge base, community, technical documentation and video tutorials
Learn MoreSupport PortalFind answers to your questions by searching across our knowledge base, community, technical documentation and video tutorials
Learn More - Support
- Resources
- Capture Labs
-
- Company
- Contact Us
How can I configure Wireless on a SonicWall NSA appliance with WPA Encryption?


Description
WPA2 supports two protocols for storing and generating keys
- Extensible Authentication Protocol (EAP): EAP allows WPA to synchronize keys with an external RADIUS server. The keys are updated periodically based on time or number of packets. Use EAP in larger, enterprise-like deployments where you have an existing RADIUS framework.
- Pre-Shared Key (PSK): PSK allows WPA to generate keys from a pre-shared passphrase that you configure. The keys are updated periodically based on time or number of packets. Use PSK in smaller deployments where you do not have a RADIUS server.
Resolution
Resolution for SonicOS 7.X
This release includes significant user interface changes and many new features that are different from the SonicOS 6.5 and earlier firmware. The below resolution is for customers using SonicOS 7.X firmware.
Configuring the WLAN Zone
- Log into the SonicWall management GUI, navigate to Object | Match Objects| Zones; Click the Edit icon for the WLAN zone. The Edit Zone window is displayed.
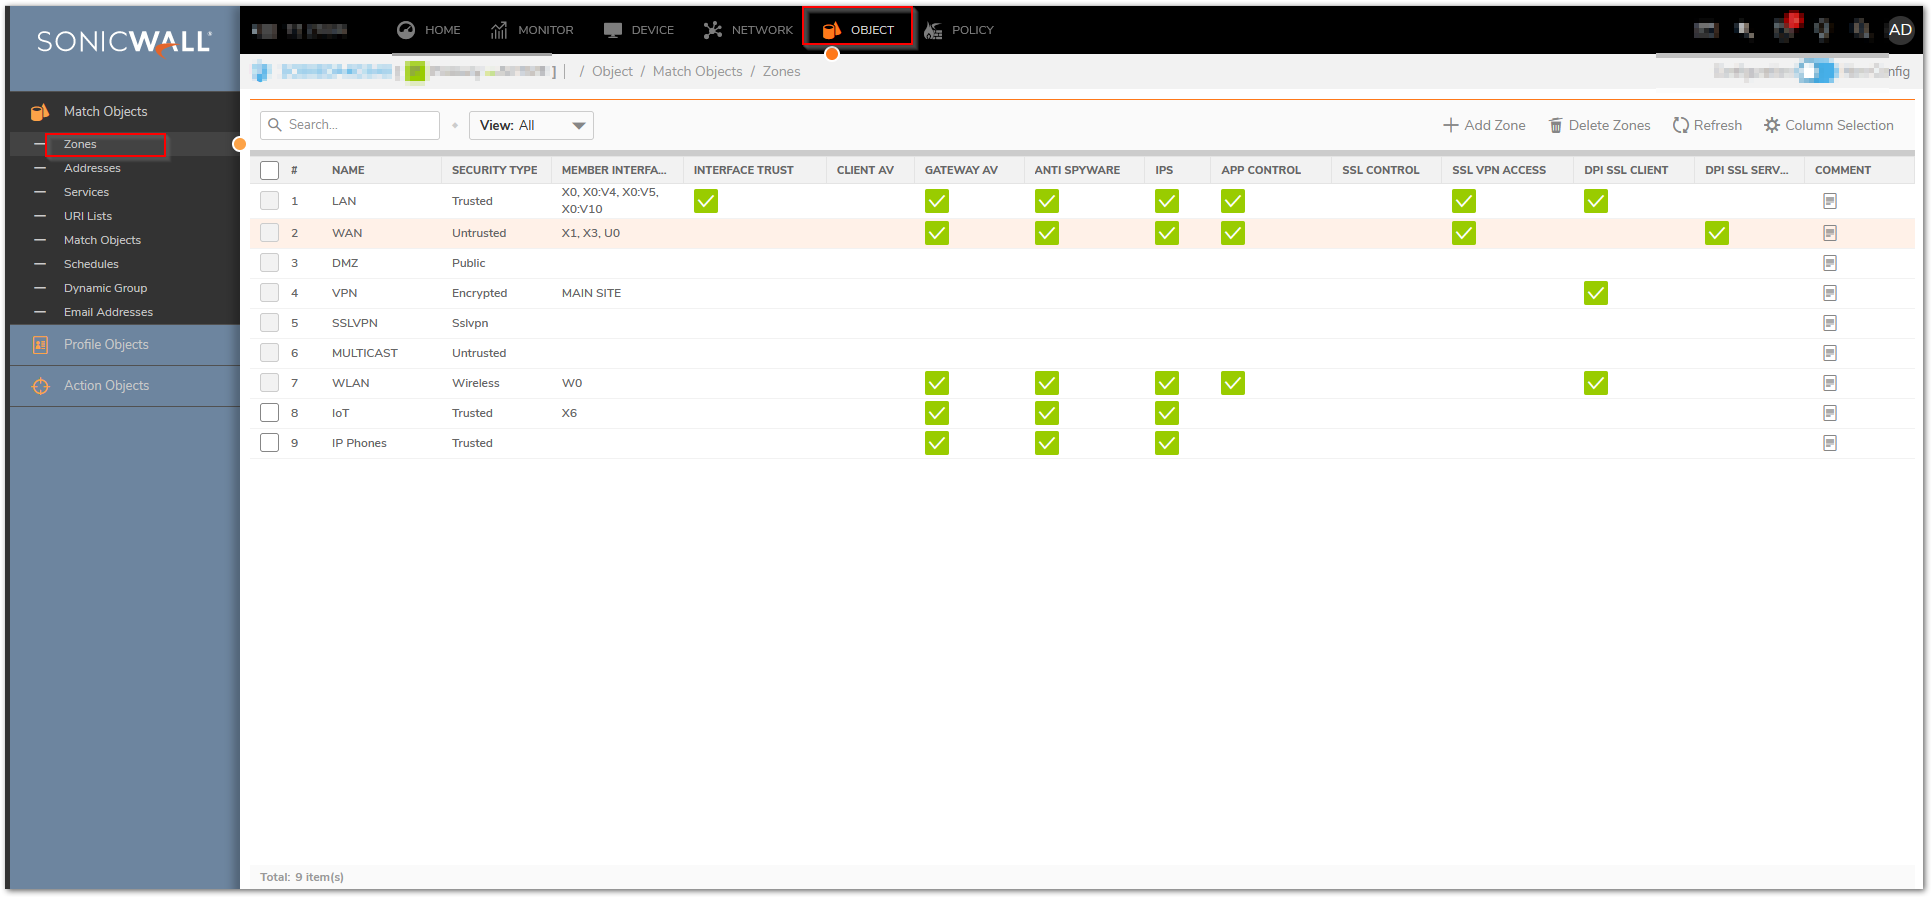
- In the General tab, Uncheck Allow Interface Trust. Select any of the following settings to enable the SonicWall Security Services on the WLAN Zone.
- Enforce Content Filtering Service - Enforces content filtering on multiple interfaces in the same Trusted, Public and WLAN zones.
- Enforce Client AV Enforcement Service - Enforces managed anti-virus protection on multiple interfaces in the same Trusted, Public or WLAN zones. SonicWall Client Anti-Virus manages an anti-virus client application on all clients on the zone.
- Enforce Client CF Service - Enforces Client Content Filtering on the Zone
- Enable Gateway Anti-Virus - Enforces gateway anti-virus protection on multiple interfaces in the same Trusted, Public or WLAN zones. SonicWall Gateway Anti-Virus manages the anti-virus service on the SonicWall appliance.
- Enable IPS - Enforces intrusion detection and prevention on multiple interfaces in the same Trusted, Public or WLAN zones.
- Enable Anti-Spyware Service - Enforces anti-spyware detection and prevention on multiple interfaces in the same Trusted, Public or WLAN zones.
- Enable App Control Service - Enforces Application Control on the Zone.

- Under the Wireless Settings heading, select the SonicPoint Provisioning Profile you want to apply to all SonicPoints connected to this zone. Whenever a SonicPoint connects to this zone, it will automatically be provisioned by the settings in the SonicPoint Provisioning Profile, unless you have individually configured it with different settings.

- Click OK.
Assigning an available Interface to the WLAN Zone
A Wireless interface is an interface that has been assigned to a Wireless zone and is used to support SonicWall SonicPoint secure access points.
- Navigate to Network | System | Interfaces.
- Click Configure icon in the Configure column for the Interface you want to modify. The Edit Interface window is displayed. You can configure any of the interfaces.
- In the Zone list, select WLAN or a custom Wireless zone.
- Enter the IP address (172.16.31.1) and subnet mask (255.255.255.0) of the Zone in the IP Address and Subnet Mask fields.
- In the SonicPoint Limit field, select the maximum number of SonicPoints allowed on this interface. (you can accept the default value)
- Enter any optional comment text in the Comment field. This text is displayed in the Comment column of the Interface table.
- Uncheck all supported management protocol(s): HTTP, HTTPS, SSH, Ping, SNMP, and/or SSH. (In this scenario, we are not allowing wireless clients to manage the SonicWall to ensure complete security).
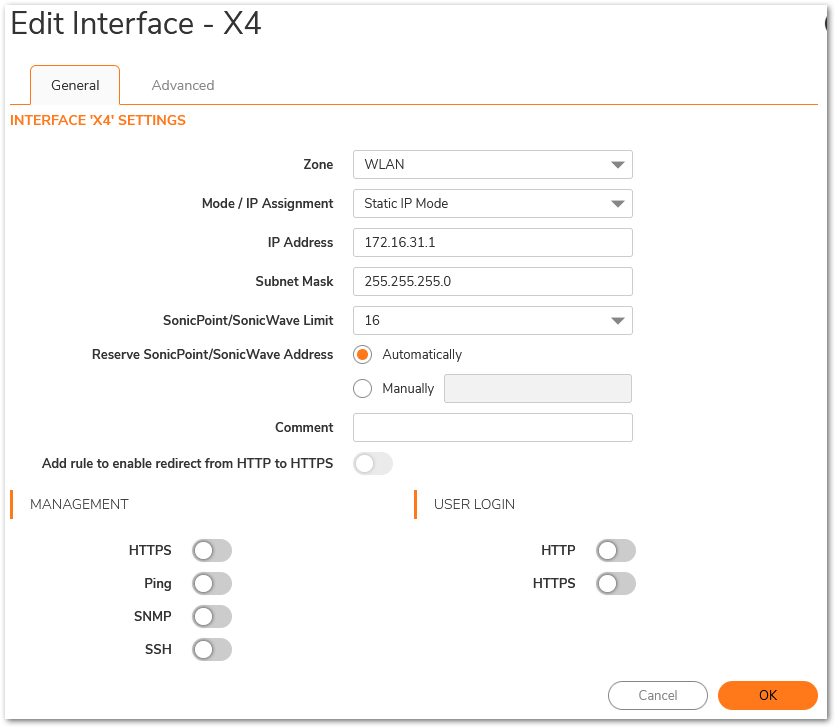
- Click Ok.
Configuring SonicPoint Profiles (Wireless settings – enabling WPA-PSK encryption)
SonicPoint Provisioning Profiles provide a scalable and highly automated method of configuring and provisioning multiple SonicPoints across a Distributed Wireless Architecture. SonicPoint Profile definitions include all of the settings that can be configured on a SonicPoint, such as radio settings for the 2.4GHz and 5GHz radios, SSID’s, and channels of operation. Once you have defined a SonicPoint profile, you can apply it to a Wireless zone.
- Navigate to Device | Access Points | Settings.
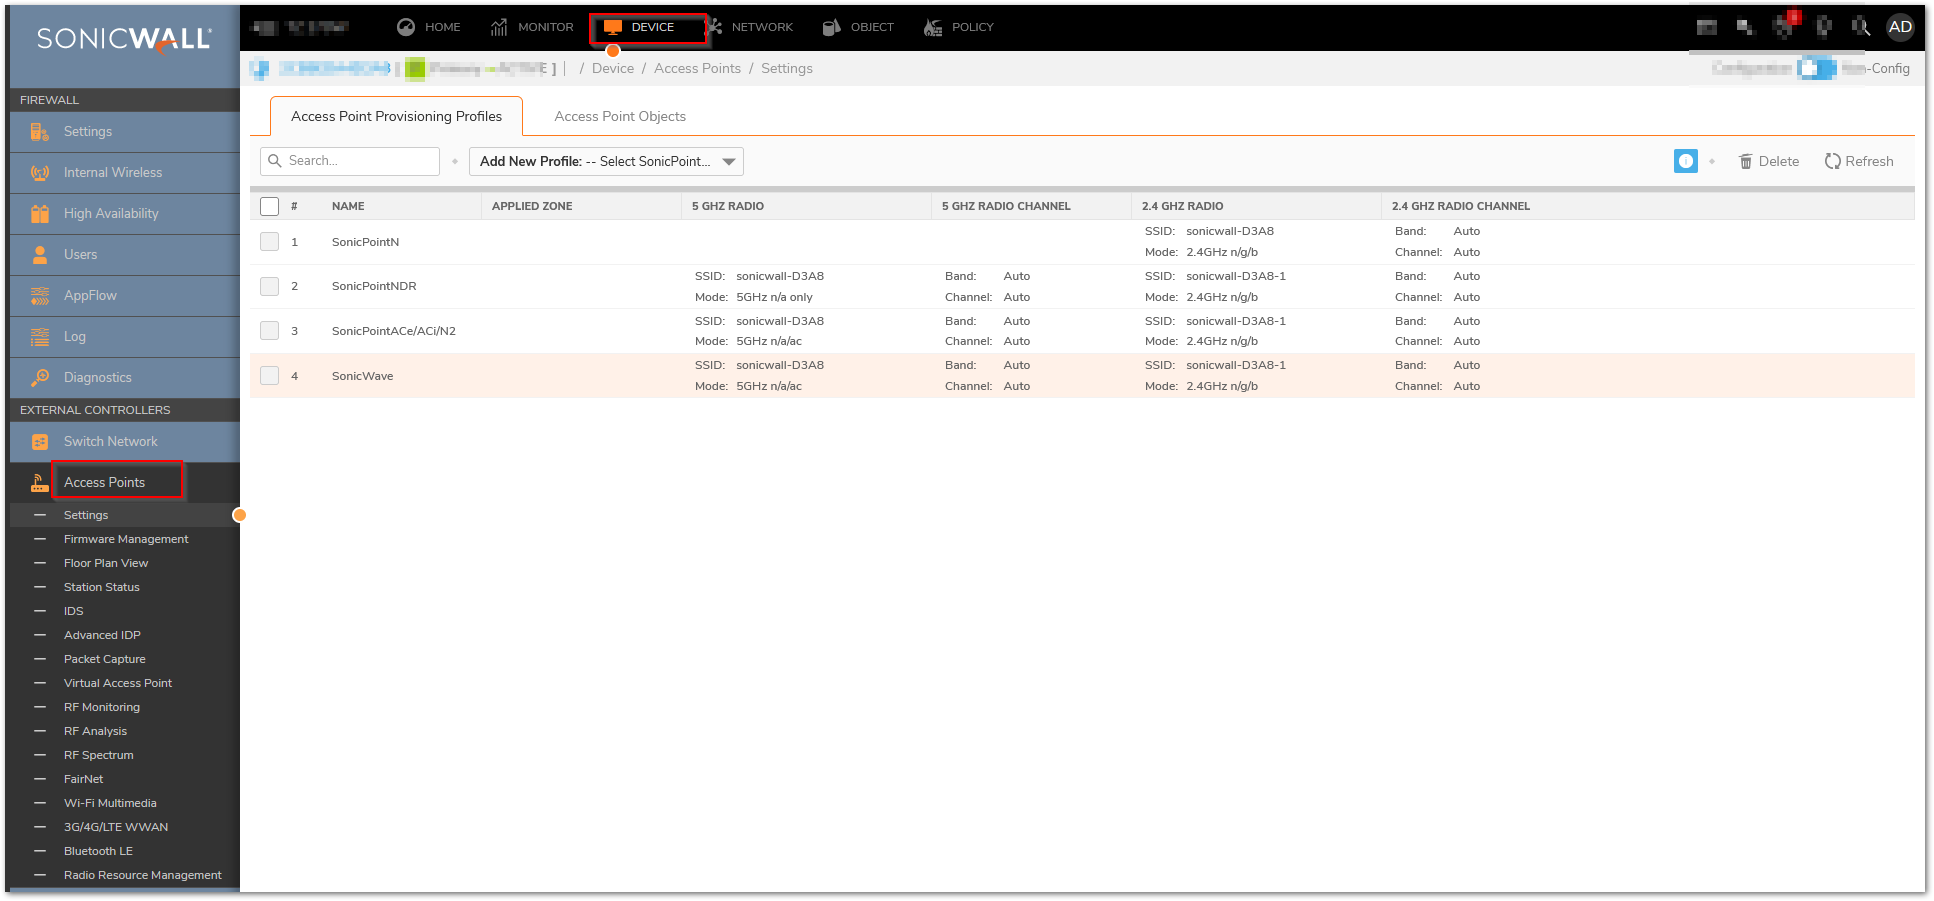
- To add a new profile click Add below the list of SonicPoint provisioning profiles. To edit an existing profile, select the profile and click the edit icon in the same line as the profile you are editing. We will edit the SonicPointACe/ACi/N2 profile in this example
- In the General tab of the Edit Profile window, specify
- Select Enable SonicPoint.
- Name Prefix: Enter a prefix for the names of all SonicPoints connected to this zone. When each SonicPoint is provisioned, it is given a name that consists of the name prefix and a unique number, for example: SonicPoint 126008.
- Country Code: Select the country where you are operating the SonicPoints. The country code determines which regulatory domain the radio operation falls under.
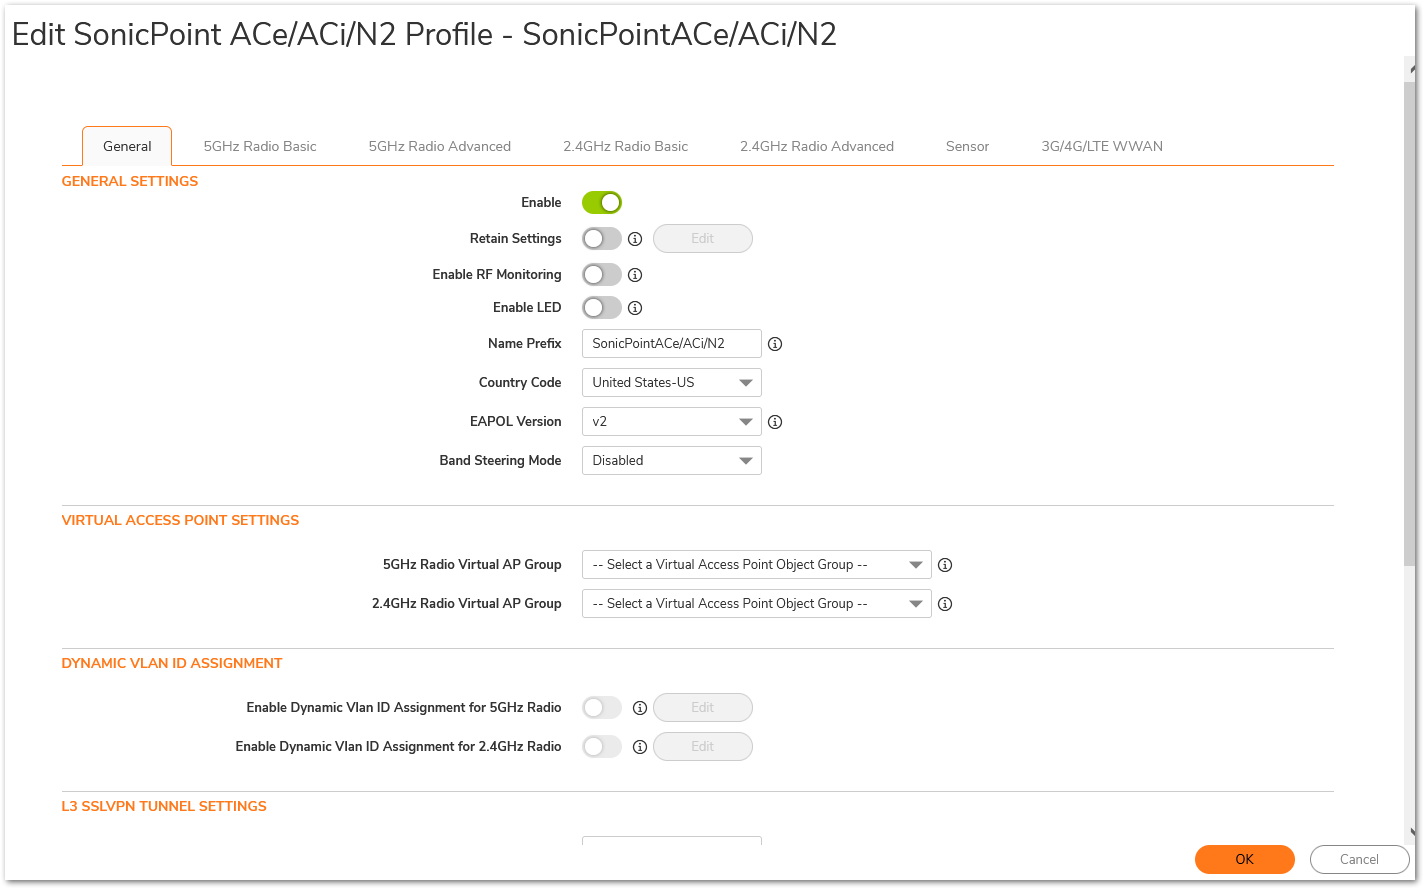
- On the 5GHz Radio Basic Tab, Configure the radio settings for the 5GHz radio
- Select Enable Radio (You can select a schedule on which the radio operates as well).
- SSID: Enter a recognizable string for the SSID of each SonicPoint using this profile. This is the name that will appear in clients’ lists of available wireless connections. (For example: SonicLAB).
 TIP: If all SonicPoints in your organization share the same SSID, it is easier for users to maintain their wireless connection when roaming from one SonicPoint to another.
 - Authentication Type: Select WPA2–PSK.
- Cipher Type: Select AES.
- Passphrase: enter a Passphrase (Min 8 - Max 63 characters).
- ACL Enforcement: Select this to enforce Access Control by allowing or denying traffic from specific devices. Select a MAC address group from the Allow List to automatically allow traffic from all devices with MAC addresses in the group. Select a MAC address group from the Deny List to automatically deny traffic from all devices with MAC addresses in the group. The deny list is enforced before the Allow list.

- In the 5GHz Radio Advanced tab, configure the performance settings for the 802.11g radio. For most the advanced options, the default settings give optimum performance.
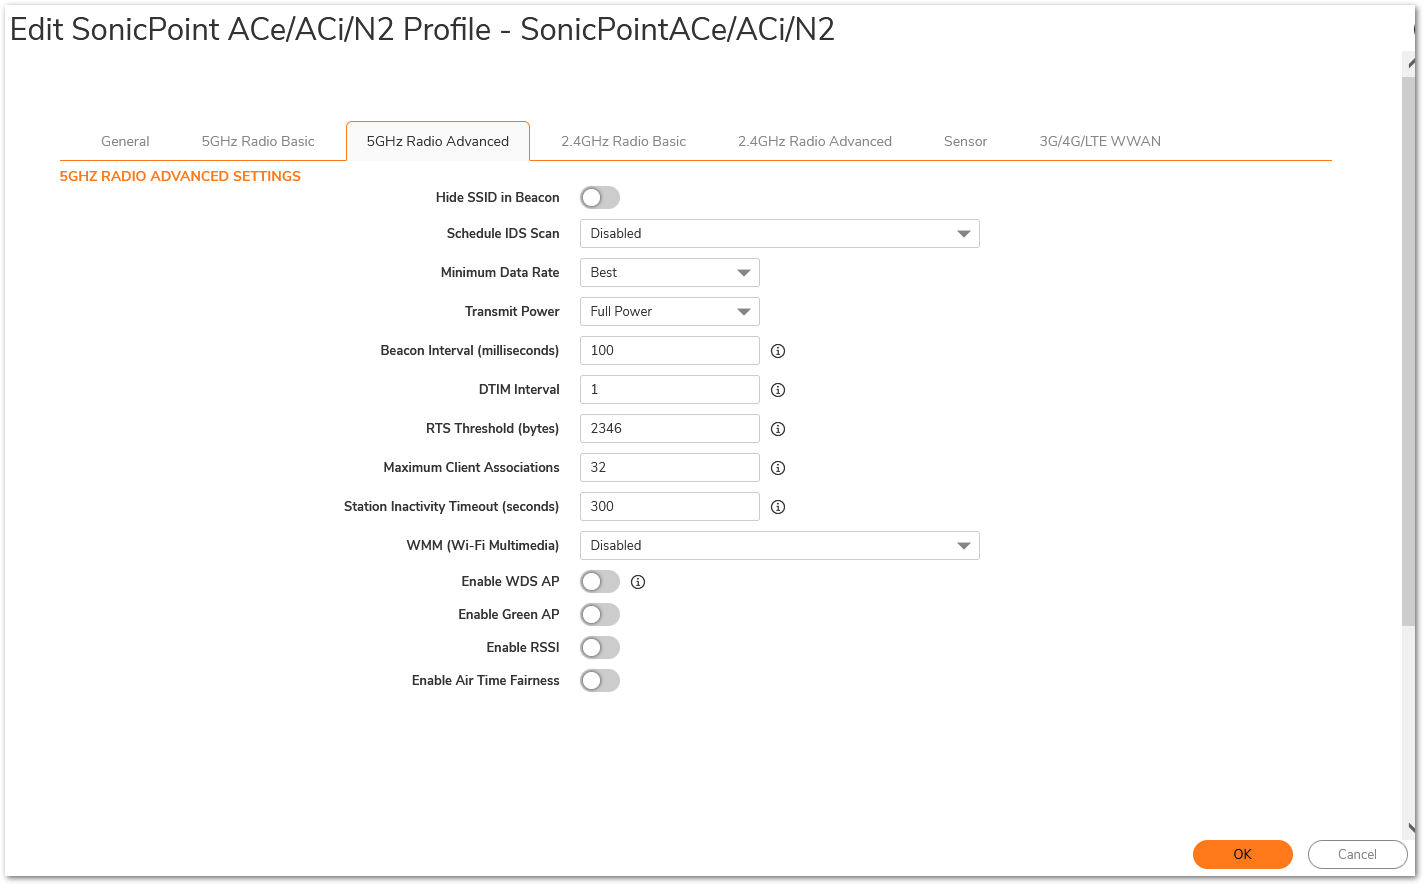
- The settings in the 5GHz Radio Basic and 5GHz Radio Advanced tabs are similar to the settings in the 2.4GHz Radio Basic and 2.4GHz Radio Advanced tabs and the settings should match unless you want different settings for the 2.4Ghz network.
Connecting a SonicPoint Device to the SonicWall Appliance
- Now go ahead and physically connect the SonicPoint LAN port to the WLAN Interface port on the SonicWall Appliance.
 TIP: If you had already connected the SonicPoint; unplug and plug-in the cable from the port, this will ensure that the SonicPoint provisioning profile is accurately synchronized.
 - Once it has synchronized it will show operational under SonicPoint | Base Settings.
Testing the Connection
- You should now see the SSID you created in Step 3 listed on your wireless client.
- When you connect it will prompt you for the passphrase created earlier as well.
- Once you have entered this it should be connected to the SonicPoint.
- By default the WLAN does not have access the LAN. If you want the WLAN to be able to access LAN resources you will need to create access rules from WLAN to LAN
Resolution for SonicOS 6.5
This release includes significant user interface changes and many new features that are different from the SonicOS 6.2 and earlier firmware. The below resolution is for customers using SonicOS 6.5 firmware.
Configuring the WLAN Zone
- Log into the SonicWall management GUI, navigate to Manage | Network | Zones; Click the Edit icon for the WLAN zone. The Edit Zone window is displayed.

- In the General tab, Uncheck Allow Interface Trust. Select any of the following settings to enable the SonicWall Security Services on the WLAN Zone.
- Enforce Content Filtering Service - Enforces content filtering on multiple interfaces in the same Trusted, Public and WLAN zones.
- Enforce Client AV Enforcement Service - Enforces managed anti-virus protection on multiple interfaces in the same Trusted, Public or WLAN zones. SonicWall Client Anti-Virus manages an anti-virus client application on all clients on the zone.
- Enforce Client CF Service - Enforces Client Content Filtering on the Zone
- Enable Gateway Anti-Virus - Enforces gateway anti-virus protection on multiple interfaces in the same Trusted, Public or WLAN zones. SonicWall Gateway Anti-Virus manages the anti-virus service on the SonicWall appliance.
- Enable IPS - Enforces intrusion detection and prevention on multiple interfaces in the same Trusted, Public or WLAN zones.
- Enable Anti-Spyware Service - Enforces anti-spyware detection and prevention on multiple interfaces in the same Trusted, Public or WLAN zones.
- Enable App Control Service - Enforces Application Control on the Zone.
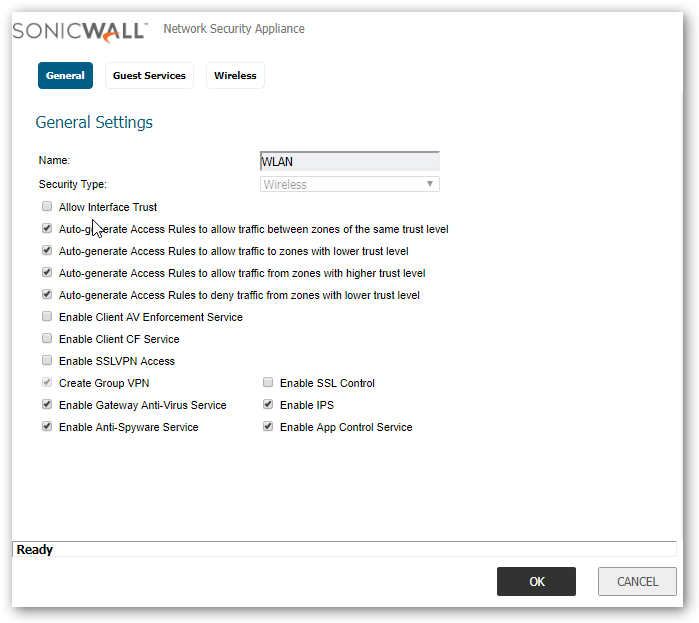
- Under the Wireless Settings heading, select the SonicPoint Provisioning Profile you want to apply to all SonicPoints connected to this zone. Whenever a SonicPoint connects to this zone, it will automatically be provisioned by the settings in the SonicPoint Provisioning Profile, unless you have individually configured it with different settings.
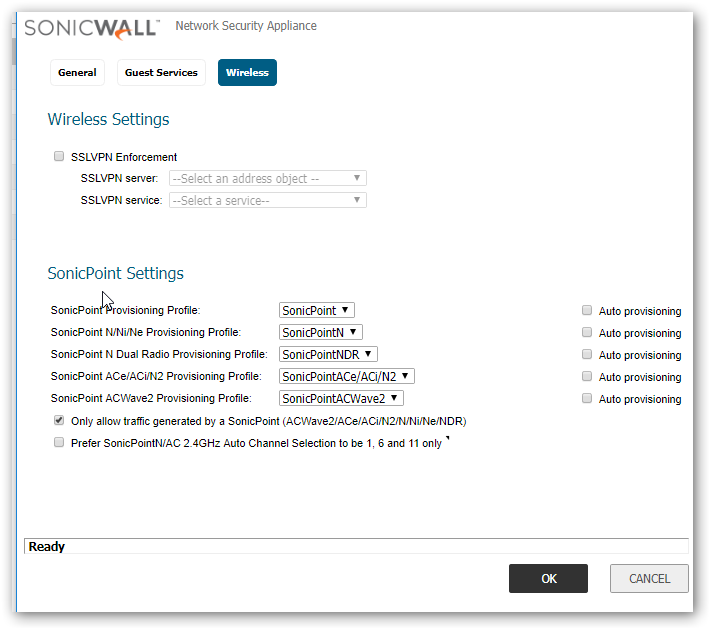
- Click OK.
Assigning an available Interface to the WLAN Zone
A Wireless interface is an interface that has been assigned to a Wireless zone and is used to support SonicWall SonicPoint secure access points.
- Navigate to Manage | Network | Interfaces.
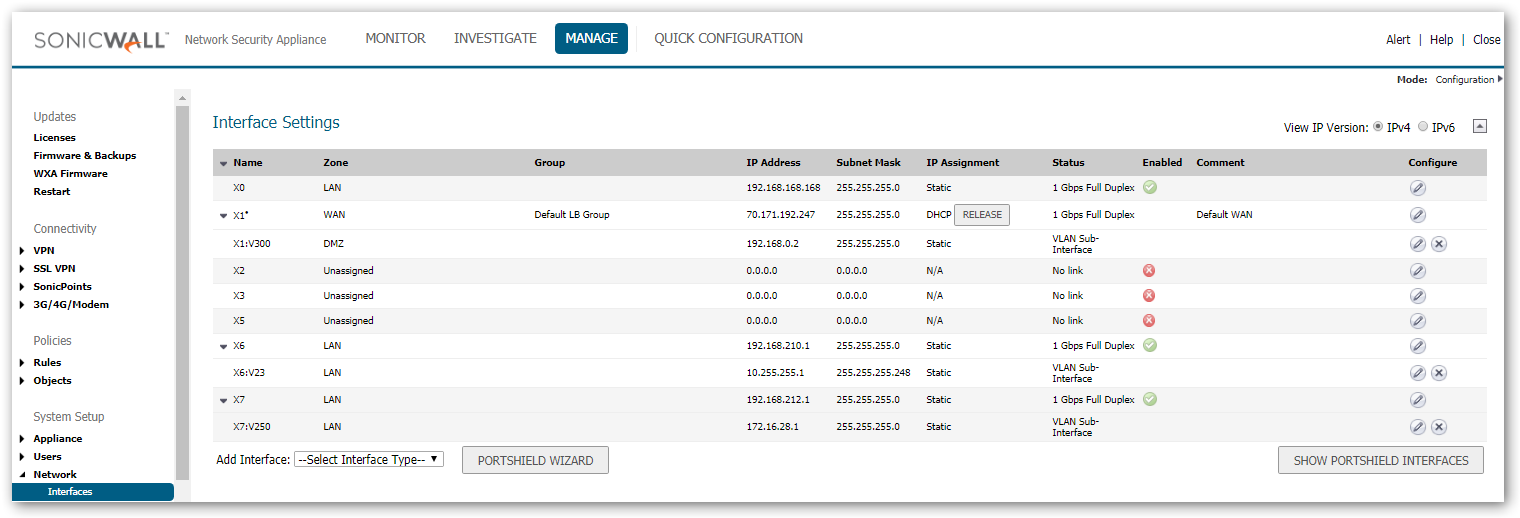
- Click Configure icon in the Configure column for the Interface you want to modify. The Edit Interface window is displayed. You can configure any of the interfaces.
- In the Zone list, select WLAN or a custom Wireless zone.
- Enter the IP address (172.16.31.1) and subnet mask (255.255.255.0) of the Zone in the IP Address and Subnet Mask fields.
- In the SonicPoint Limit field, select the maximum number of SonicPoints allowed on this interface. (you can accept the default value)
- Enter any optional comment text in the Comment field. This text is displayed in the Comment column of the Interface table.
- Uncheck all supported management protocol(s): HTTP, HTTPS, SSH, Ping, SNMP, and/or SSH. (In this scenario, we are not allowing wireless clients to manage the SonicWall to ensure complete security).
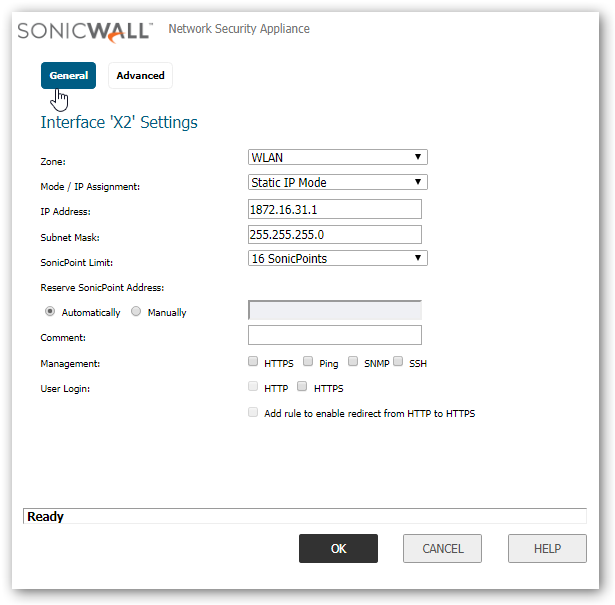
- Click OK.
Configuring SonicPoint Profiles (Wireless settings – enabling WPA-PSK encryption)
SonicPoint Provisioning Profiles provide a scalable and highly automated method of configuring and provisioning multiple SonicPoints across a Distributed Wireless Architecture. SonicPoint Profile definitions include all of the settings that can be configured on a SonicPoint, such as radio settings for the 2.4GHz and 5GHz radios, SSID’s, and channels of operation. Once you have defined a SonicPoint profile, you can apply it to a Wireless zone.
- Navigate to Manage | SonicPoint | Base Settings.
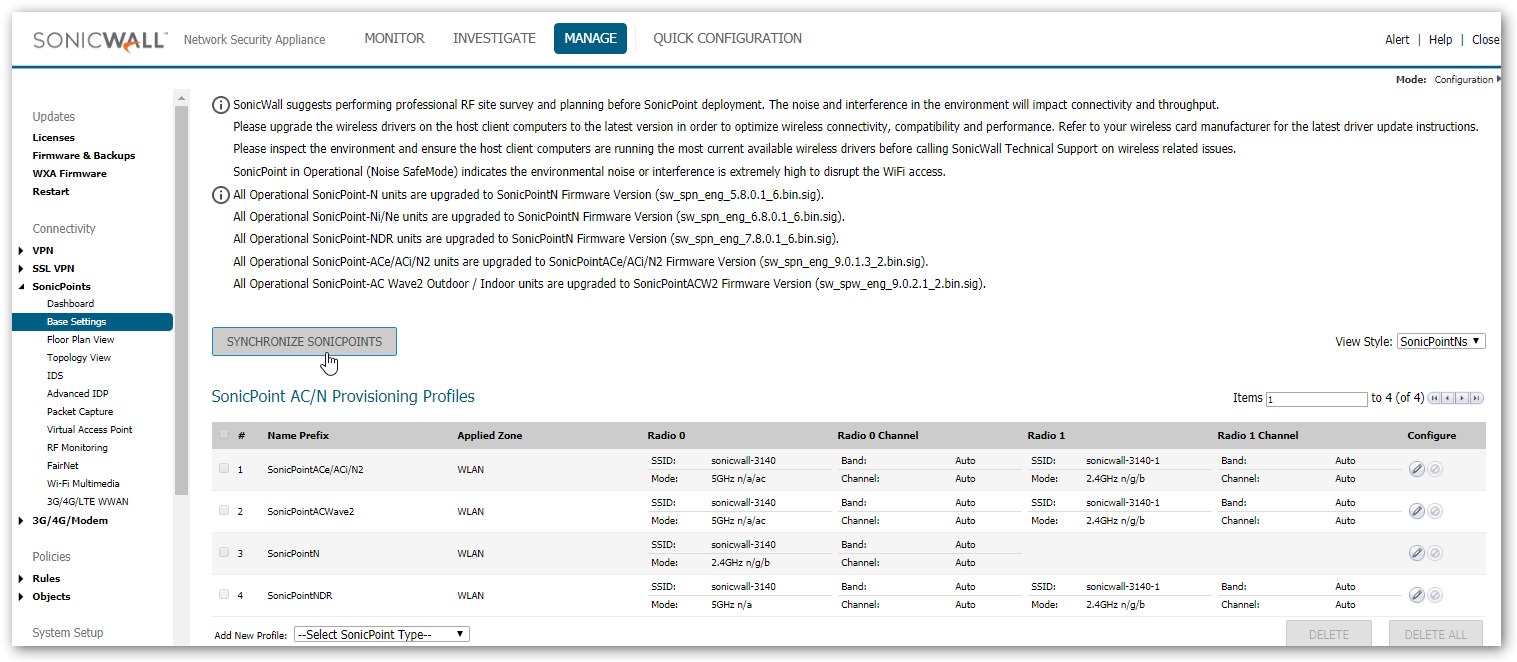
- To add a new profile click Add below the list of SonicPoint provisioning profiles. To edit an existing profile, select the profile and click the edit icon in the same line as the profile you are editing. We will edit the SonicPointACe/ACi/N2 profile in this example
- In the General tab of the Edit Profile window, specify
- Select Enable SonicPoint.
- Name Prefix: Enter a prefix for the names of all SonicPoints connected to this zone. When each SonicPoint is provisioned, it is given a name that consists of the name prefix and a unique number, for example: SonicPoint 126008.
- Country Code: Select the country where you are operating the SonicPoints. The country code determines which regulatory domain the radio operation falls under.

- On the Radio 0 Basic Tab, Configure the radio settings for the 5Ghz radio
- Select Enable Radio (You can select a schedule on which the radio operates as well).
- SSID: Enter a recognizable string for the SSID of each SonicPoint using this profile. This is the name that will appear in clients’ lists of available wireless connections. (For example: SonicLAB).
 TIP: If all SonicPoints in your organization share the same SSID, it is easier for users to maintain their wireless connection when roaming from one SonicPoint to another.
 - Authentication Type: Select WPA2–PSK.
- Cipher Type: Select AES.
- Passphrase: enter a Passphrase (Min 8 - Max 63 characters).
- ACL Enforcement: Select this to enforce Access Control by allowing or denying traffic from specific devices. Select a MAC address group from the Allow List to automatically allow traffic from all devices with MAC addresses in the group. Select a MAC address group from the Deny List to automatically deny traffic from all devices with MAC addresses in the group. The deny list is enforced before the Allow list.

- In the Radio 0 Advanced tab, configure the performance settings for the 802.11g radio. For most the advanced options, the default settings give optimum performance.
- The settings in the Radio 1 Basic and Radio 1 Advanced tabs are similar to the settings in the Radio 0 Basic and Radio 0 Advanced tabs and the settings should match unless you want different settings for the 2.4Ghz network.
- On the Radio 0 Basic Tab, Configure the radio settings for the 5Ghz radio
Connecting a SonicPoint Device to the SonicWall Appliance
- Now go ahead and physically connect the SonicPoint LAN port to the WLAN Interface port on the SonicWall Appliance.
 TIP: If you had already connected the SonicPoint; unplug and plug-in the cable from the port, this will ensure that the SonicPoint provisioning profile is accurately synchronized.
 - Once it has synchronized it will show operational under SonicPoint | Base Settings.
Testing the Connection
- You should now see the SSID you created in Step 3 listed on your wireless client.
- When you connect it will prompt you for the passphrase created earlier as well.
- Once you have entered this it should be connected to the SonicPoint.
- By default the WLAN does not have access the LAN. If you want the WLAN to be able to access LAN resources you will need to create access rules from WLAN to LAN
Related Articles
- Wireless: SNR, RSSI and Noise basics of wireless troubleshooting
- What happens when a SonicWave's license expires?
- SonicWall deprecates support for WEP and TKIP encryption on SonicOS 8.0.0


 YES
YES NO
NO