-
Products
-
SonicPlatform
SonicPlatform is the cybersecurity platform purpose-built for MSPs, making managing complex security environments among multiple tenants easy and streamlined.
Discover More
-
-
Solutions
-
Federal
Protect Federal Agencies and Networks with scalable, purpose-built cybersecurity solutions
Learn MoreFederalProtect Federal Agencies and Networks with scalable, purpose-built cybersecurity solutions
Learn More - Industries
- Use Cases
-
-
Partners
-
Partner Portal
Access to deal registration, MDF, sales and marketing tools, training and more
Learn MorePartner PortalAccess to deal registration, MDF, sales and marketing tools, training and more
Learn More - SonicWall Partners
- Partner Resources
-
-
Support
-
Support Portal
Find answers to your questions by searching across our knowledge base, community, technical documentation and video tutorials
Learn MoreSupport PortalFind answers to your questions by searching across our knowledge base, community, technical documentation and video tutorials
Learn More - Support
- Resources
- Capture Labs
-
- Company
- Contact Us
How can I configure VLAN trunks for extending networks to PortShield groups?


Description
SonicOS provides Layer 2 (Data Link Layer) switching functionality with its PortShield architecture. Layer 2 switching features enhance the deployment and interoperability of SonicWall devices within existing layer-2 networks with the following benefits:
- Increased security across multiple switch ports. The PortShield architecture provides the flexibility to configure all switch ports into separate security zones such as LANs, WLANs, and DMZs, providing protection not only from the Public facing Zones but also between devices inside the LAN. Effectively each security zone has its own wire-speed mini-switch that benefits from the protection of a dedicated deep packet inspection firewall.
- PortShield VLAN Trunks are different from defining physical interfaces as 802.1Q Trunks (Parent Interfaces) with sub-Interfaces. In the case of a parent interface with sub-interfaces, it is limited to a single port, whereas PortShield groups can span multiple ports. PortShield groups can participate in a VLAN architecture which allows PortShield groups to span into extended networks.
 CAUTION: Unlike a traditional L2 Switch VLAN trunk, you cannot change Port VLAN membership in an ad-hoc manner. VLAN Membership is only allowed from PortShield Groups.
 CAUTION: PortShield cannot be enabled if SonicWall is in High Availability (HA) mode. If you have a SonicWall appliance in stand-alone mode with PortShield enabled, PortShield must be disabled before the device can be used in HA.
Resolution
Resolution for SonicOS 7.X
This release includes significant user interface changes and many new features that are different from the SonicOS 6.5 and earlier firmware. The below resolution is for customers using SonicOS 7.X firmware.

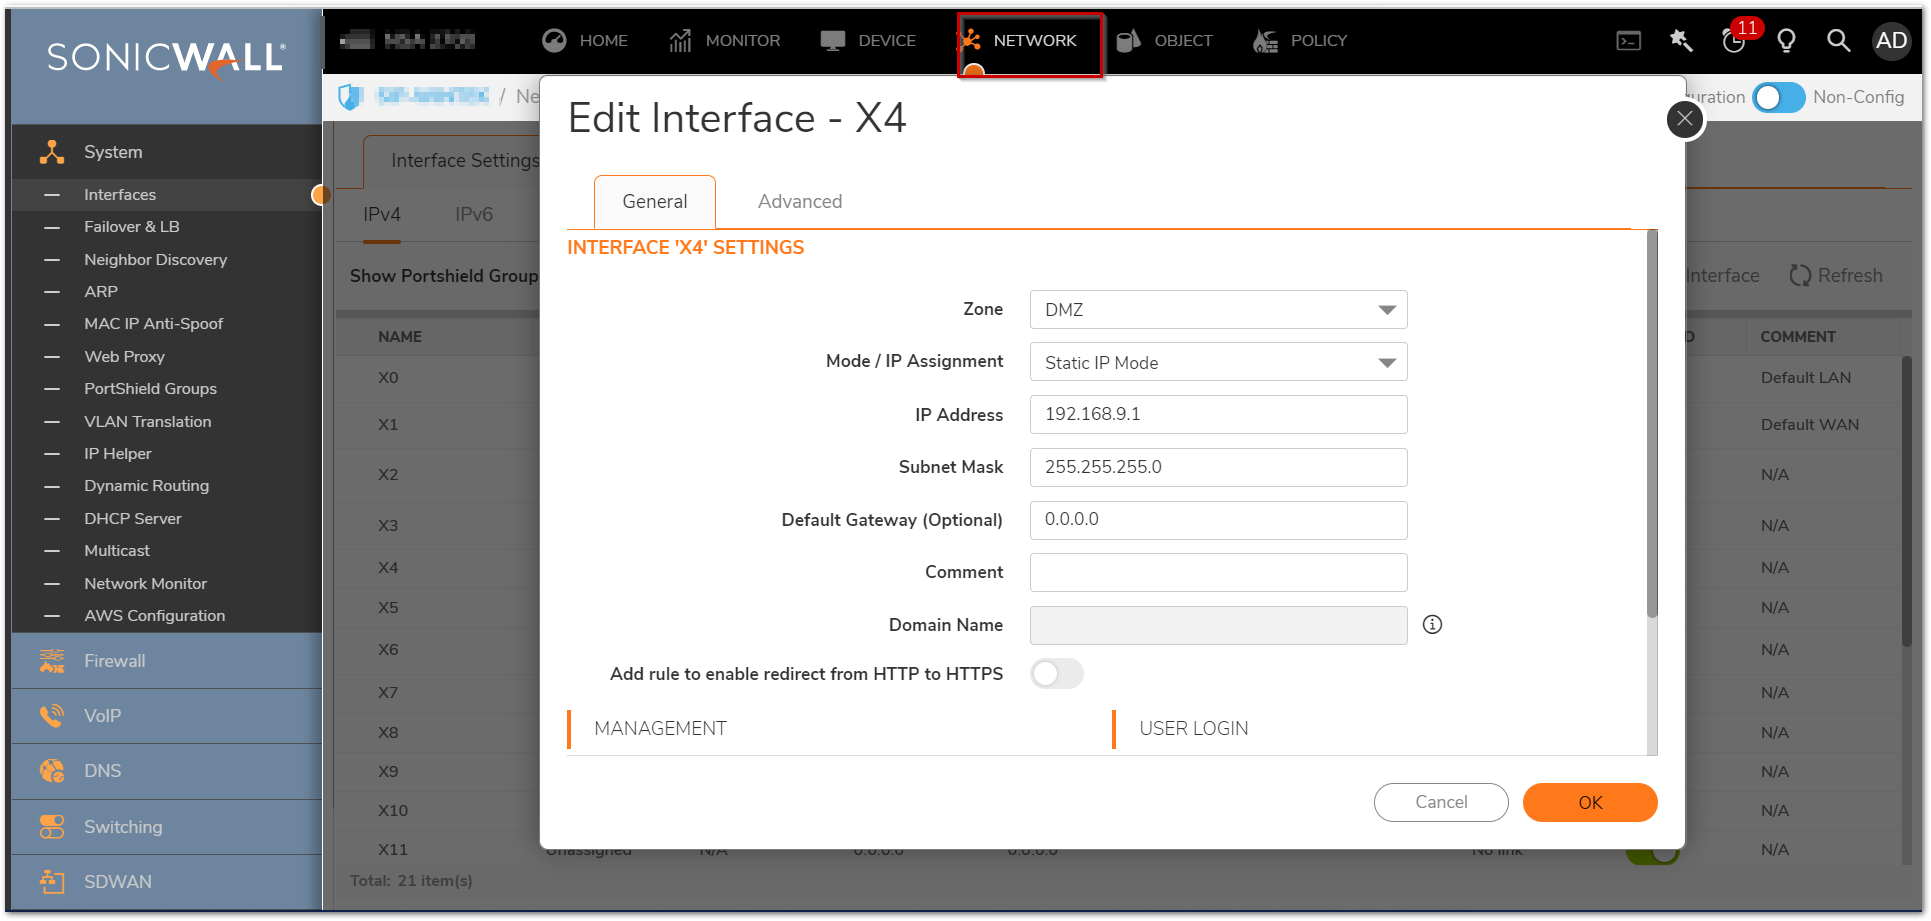
 NOTE: You may associate multiple Unassigned Interfaces to a PortShield interface.
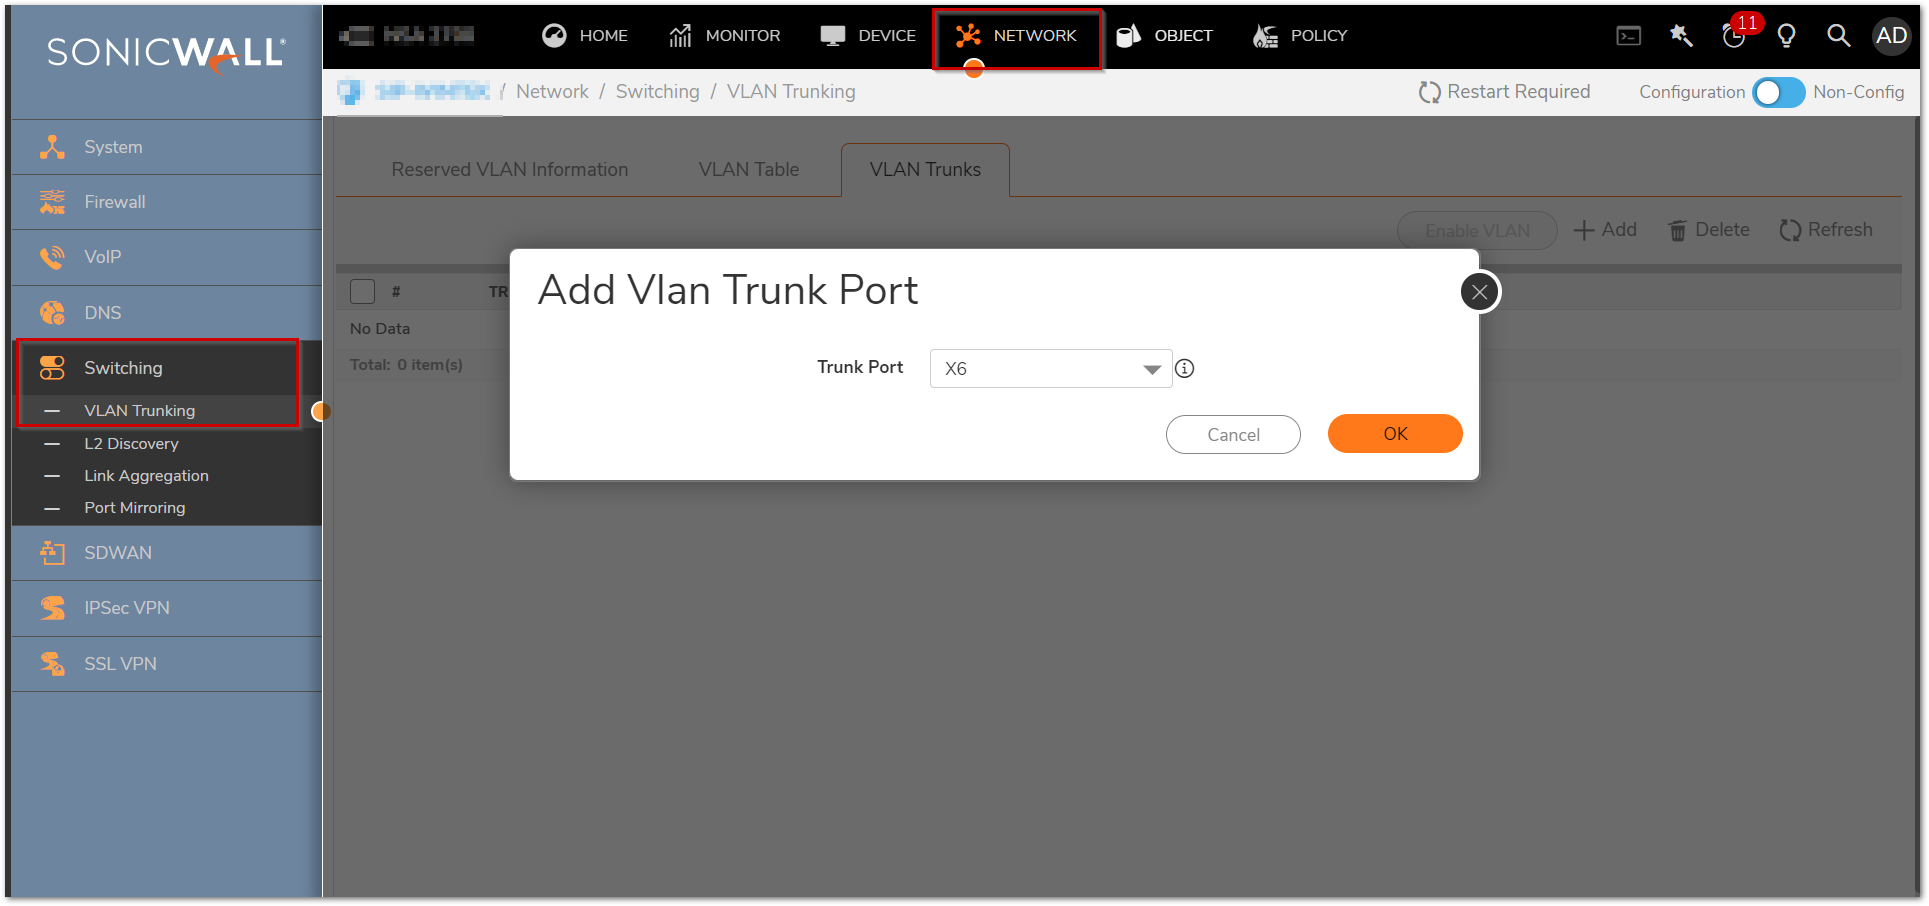
 NOTE: Interface X6 is added to VLAN Trunks but no VLAN IDs has been assigned to it.
Assign VLAN IDs to the Trunk Ports
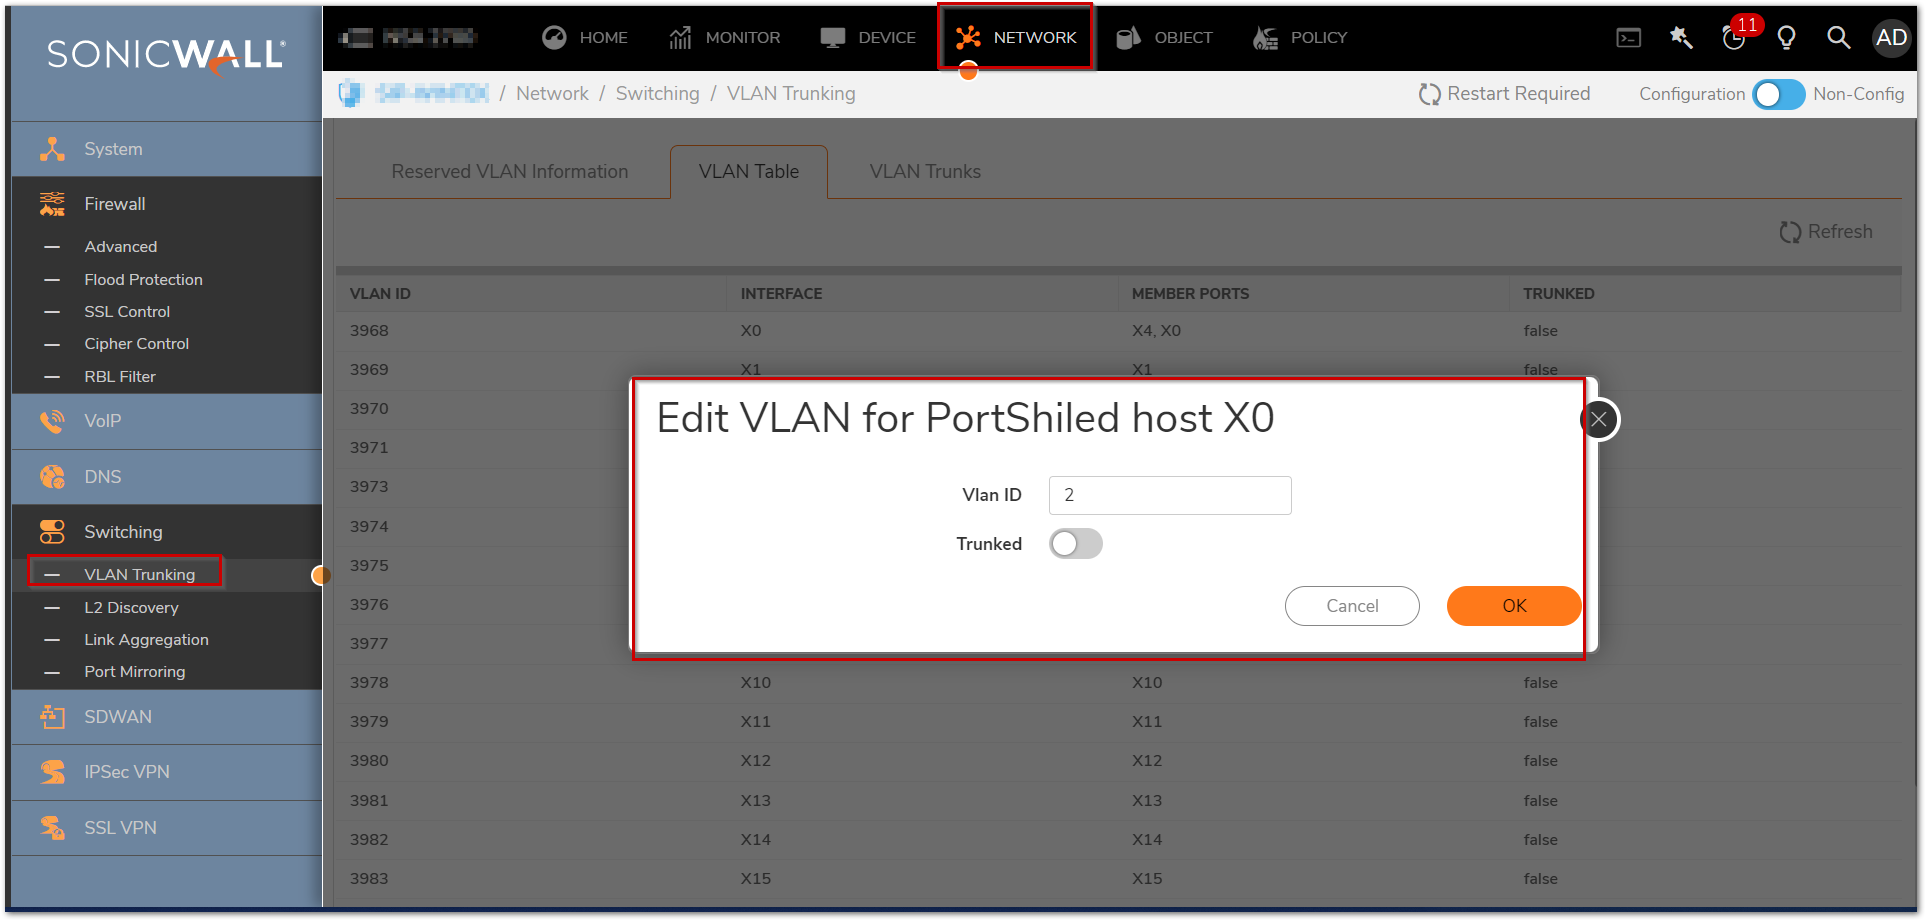
- In the VLAN table, click Configure button of a PortShield Interface and assign its VLAN ID to a VLAN Trunk. You will notice that only Interfaces associated with a PortShield Group are configurable and Interfaces that are not associated with a PortShield Group are grayed out. In this example PortShield X0 has member X4.The other Interfaces are not a associated with a PortShield.

2.In the Edit VLAN for PortShield Host window accept the default VLAN ID or choose a new VLAN ID (outside of the Reserved VLAN Range). The valid VLAN ID range is 1-4094. Please remember that some VLAN IDs are reserved, such as VLAN IDs belonging to Virtual Interfaces.
 CAUTION: The reserved VLAN Information is not enforced by the SonicWall and the Edit Vlan for PortShield Host window does not check to see if a VLAN Tag is in use.
3. If you select the Trunked option, it will add this VLAN ID to all Trunk ports, otherwise leave it blank. In this example the default VLAN ID 2 is accepted.
Resolution for SonicOS 6.5
This release includes significant user interface changes and many new features that are different from the SonicOS 6.2 and earlier firmware. The below resolution is for customers using SonicOS 6.5 firmware.
Configuring Interfaces
- Login to the SonicWall UTM management GUI.
- Navigate to Manage | Network | Interfaces.
- By default X0 will be a LAN zone and X1 will be a WAN zone, similar to the screenshot below. In order to demonstrate PortShielding we'll add another Interface.

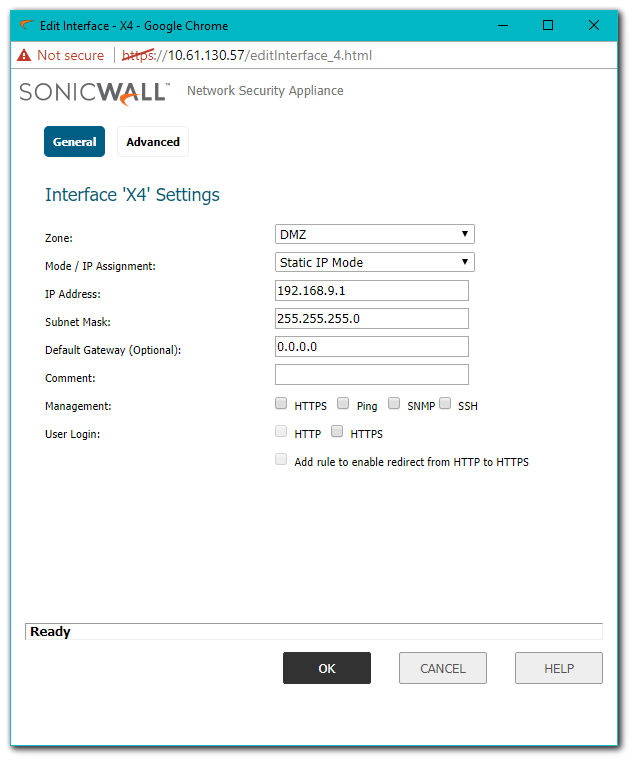
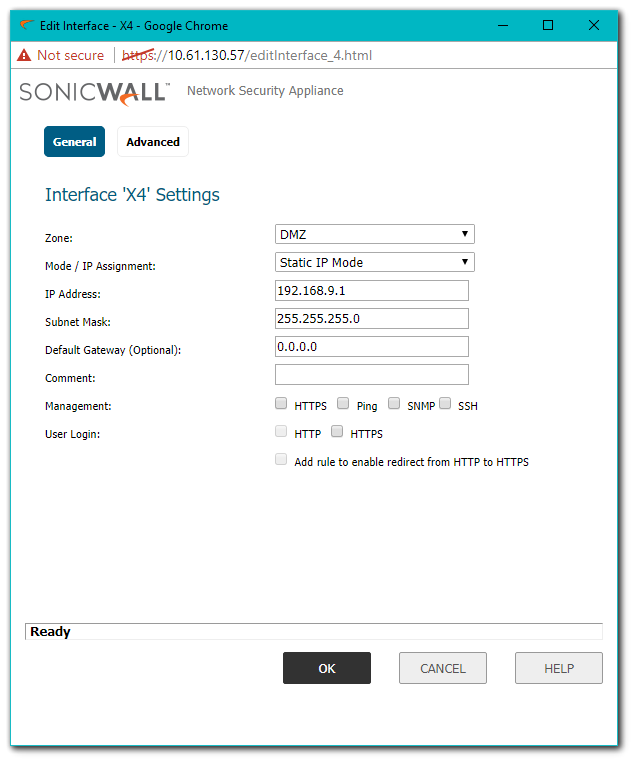
 EXAMPLE: We'll configure X4 to by a statically IP'd DMZ as in the screenshot below.
Configuring Port Shield Group
- Navigate to Manage | Network | PortShield Groups and click Unassigned Interface, then click Configure.
- In the Switch Port Settings window select an unassigned Interface to associate with a PortShield Interface. In this example the unassigned interface X3 is associated with PortShield Interface X0. In addition Port Enable is set to Enabled and link speed is set to Auto Negotiate.
NOTE: You may associate multiple Unassigned Interfaces to a PortShield interface.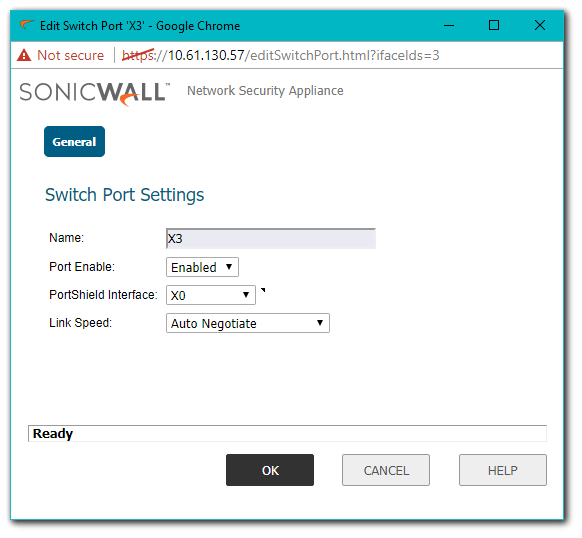
- PortShield assignments is viewable under Manage | Network | PortShield Groups, in this example the X2 Interface is assigned to PortShield X0 and the X3 Interface is assigned to PortShield X4.
Adding VLAN Trunk Ports
- Navigate to Manage | Switching | VLAN Trunking page. This will list attributes of each Interface such as the assigned VLAN ID, associated member Ports, and Trunked status. At the top of the page is the list of reserved VLAN IDs used by SonicOS.
- Click Add VLAN Trunks to add an Interface from a list of available ports.
 EXAMPLE: Interface X6 is selected to be a Trunk Port and will show up under VLAN Trunks.
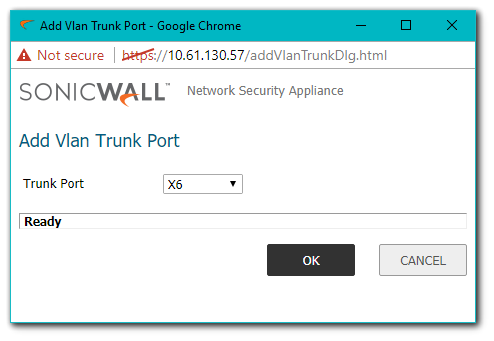
 NOTE: Interface X6 is added to VLAN Trunks but no VLAN IDs has been assigned to it.
Assign VLAN IDs to the Trunk Ports
- In the VLAN table, click Configure button of a PortShield Interface and assign its VLAN ID to a VLAN Trunk. You will notice that only Interfaces associated with a PortShield Group are configurable and Interfaces that are not associated with a PortShield Group are grayed out. In this example PortShield X0 has member X3 and PortShield X2 has member X4. The other Interfaces are not a associated with a PortShield.
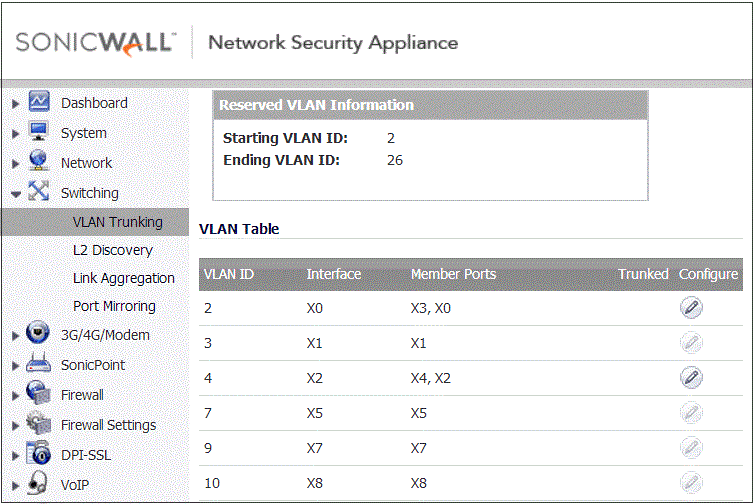
- In the Edit VLAN for PortShield Host window accept the default VLAN ID or choose a new VLAN ID (outside of the Reserved VLAN Range). The valid VLAN ID range is 1-4094. Please remember that some VLAN IDs are reserved, such as VLAN IDs belonging to Virtual Interfaces.
 CAUTION: The reserved VLAN Information is not enforced by the SonicWall and the Edit Vlan for PortShield Host window does not check to see if a VLAN Tag is in use.
 - If you select the Trunked option, it will add this VLAN ID to all Trunk ports, otherwise leave it blank. In this example the default VLAN ID 2 is accepted.
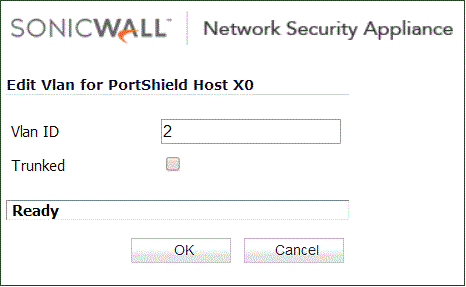
Resolution for SonicOS 6.2 and Below
The below resolution is for customers using SonicOS 6.2 and earlier firmware. For firewalls that are generation 6 and newer we suggest to upgrade to the latest general release of SonicOS 6.5 firmware.
Configuring Interfaces
- Login to the SonicWall UTM management GUI.
- Navigate to Network | Interfaces.
- By default X0 will be a LAN zone and X1 will be a WAN zone, similar to the screenshot below. In order to demonstrate PortShielding we'll add another Interface.

 EXAMPLE: We'll configure X4 to by a statically IP'd DMZ as in the screenshot below.
Configuring Port Shield Group
- Navigate to Network | PortShield Groups and click Unassigned Interface, then click Configure.
- In the Switch Port Settings window select an unassigned Interface to associate with a PortShield Interface. In this example the unassigned interface X3 is associated with PortShield Interface X0. In addition Port Enable is set to Enabled and Link Speed is set to Auto Negotiate.
NOTE: You may associate multiple Unassigned Interfaces to a PortShield interface.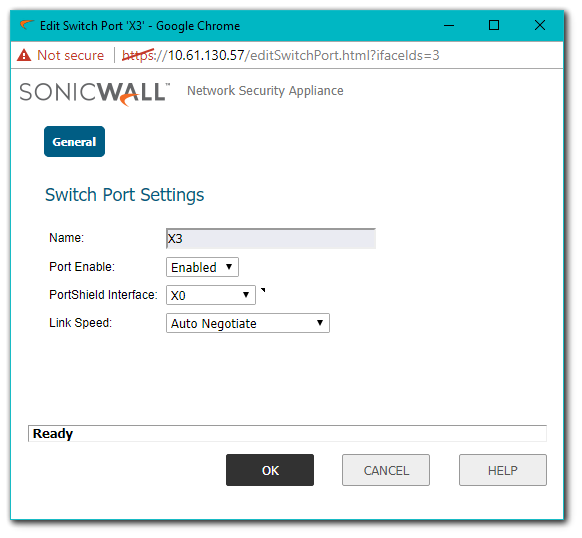
- PortShield assignments is view in Network | Interfaces, in this example the X2 Interface is assigned to PortShield X0 and the X3 Interface is assigned to PortShield X4.
Adding VLAN Trunk Ports
- Navigate to the Switching | VLAN Trunking page. This will list attributes of each Interface such as the assigned VLAN ID, associated Member Ports, and Trunked Status. At the top of the page is the list of reserved VLAN IDs used by SonicOS.
- Click Add VLAN Trunks to add an Interface from a list of available Ports.
 EXAMPLE:Interface X6 is selected to be a Trunk Port and will show up under VLAN Trunks.
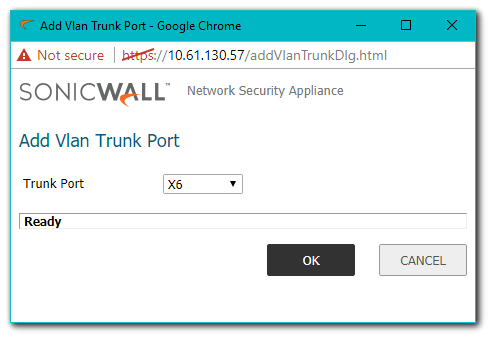
 NOTE: In this example, Interface X6 is added to VLAN Trunks but no VLAN IDs has been assigned to it.
Assign VLAN IDs to the Trunk Ports
- In the VLAN table, click the Configure button of a PortShield Interface and assign its VLAN ID to a VLAN Trunk. You will notice that only Interfaces associated with a PortShield Group are configurable and Interfaces that are not associated with a PortShield Group are grayed out.
 NOTE: In this example PortShield X0 has member X3 and PortShield X2 has member X4. The other Interfaces are not a associated with a PortShield.
- In the Edit VLAN for PortShield Host window accept the default VLAN ID or choose a new VLAN ID (outside of the Reserved VLAN Range). The valid VLAN ID range is 1-4094. Please remember that some VLAN IDs are reserved, such as VLAN IDs belonging to virtual Interfaces.
 CAUTION: The reserved VLAN Information is not enforced by the SonicWall and the Edit Vlan for PortShield Host window does not check to see if a VLAN tag is in use.
 - If you select the Trunked option, it will add this VLAN ID to all Trunk Ports, otherwise leave it blank. In this example the default VLAN ID 2 is accepted.

Related Articles
- Error:"Invalid API Argument" when modifying the access rules
- Cysurance Partner FAQ
- Configure probe monitoring for WAN Failover and Loadbalancing - SonicWall UTM


 YES
YES NO
NO