


-
Products
-
SonicPlatform
SonicPlatform is the cybersecurity platform purpose-built for MSPs, making managing complex security environments among multiple tenants easy and streamlined.
Discover More
-
-
Solutions
-
Federal
Protect Federal Agencies and Networks with scalable, purpose-built cybersecurity solutions
Learn MoreFederalProtect Federal Agencies and Networks with scalable, purpose-built cybersecurity solutions
Learn More - Industries
- Use Cases
-
-
Partners
-
Partner Portal
Access to deal registration, MDF, sales and marketing tools, training and more
Learn MorePartner PortalAccess to deal registration, MDF, sales and marketing tools, training and more
Learn More - SonicWall Partners
- Partner Resources
-
-
Support
-
Support Portal
Find answers to your questions by searching across our knowledge base, community, technical documentation and video tutorials
Learn MoreSupport PortalFind answers to your questions by searching across our knowledge base, community, technical documentation and video tutorials
Learn More - Support
- Resources
- Capture Labs
-
- Company
- Contact Us
How can I configure the SonicWall WAN / X1 Interface with Static IP address in IPv6?
 12/20/2019
  67 People found this article helpful
 489,315 Views

Description
Configuring the SonicWall WAN interface (X1 by default) with Static IP address in IPV6.
 EXAMPLE: In this article we are using the following IPv6 addresses provided by the ISP.
WAN IP: 2001:250:6001:1::2 Default Gateway: 2001:250:6001:1::1 Prefix Length: 64 DNS Server 1: 2001:250:6001:1::100 DNS Server 2: 2001:250:6001:1::101
Resolution
Static Mode: This mode is used if the ISP has assigned a static IP address. To configure this mode, follow these steps
- Login to the SonicWall management Interface.
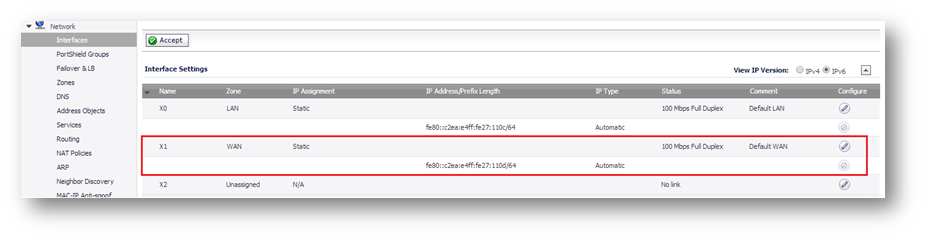
- Navigate to Network | Interfaces tab.
 NOTE: The zone assignment for interfaces must be configured on the IPv4 addressing page. To modify the zone assignment for an IPv6 interface, click the IPv4 button at the top right of the page, modify the zone for the interface, and then return to the IPv6 interface page.
 - Click Configure for the WAN interface (X1 by default.), the Edit Interface window is displayed.
- Under IP address, choose Static from the drop down menu.
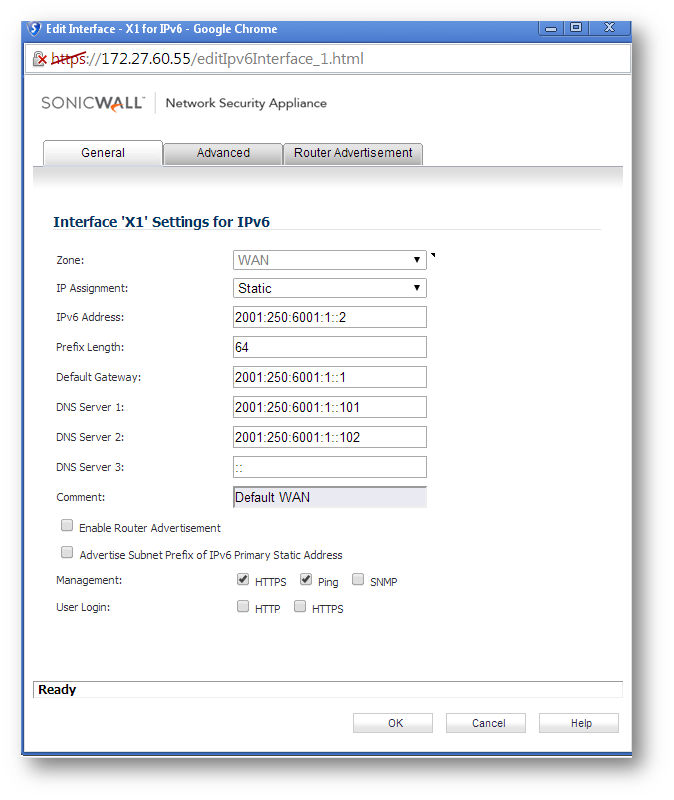
- In the IP Assignment pulldown menu, select Static.
- Enter the IPv6 Address for the interface.
- Enter the Prefix Length for the address.
- If this is the primary WAN interface, enter the IPv6 address of the Default Gateway. If this is not the primary WAN interface, any default gateway entry will be ignored, so you can leave this as ::. (The double colon is the abbreviation for an empty address, or 0:0:0:0:0:0:0:0.).
- If this is the primary WAN interface, enter up to three DNS Server IPv6 addresses.If this is not the primary WAN interface, any DNS Server entries will be ignored.
- If you want to enable remote management of the SonicWall security appliance from this interface, select the supported management protocol(s): HTTP, HTTPS, Ping, SNMP.
- If you want to allow selected users with limited management rights to log in to the security appliance, select HTTP and/or HTTPS in User Login.
- Click OK.
Configuring Advanced IPv6 Interface Options and Multiple IPv6 Addresses
- In the Edit Interface window, click Advanced tab.
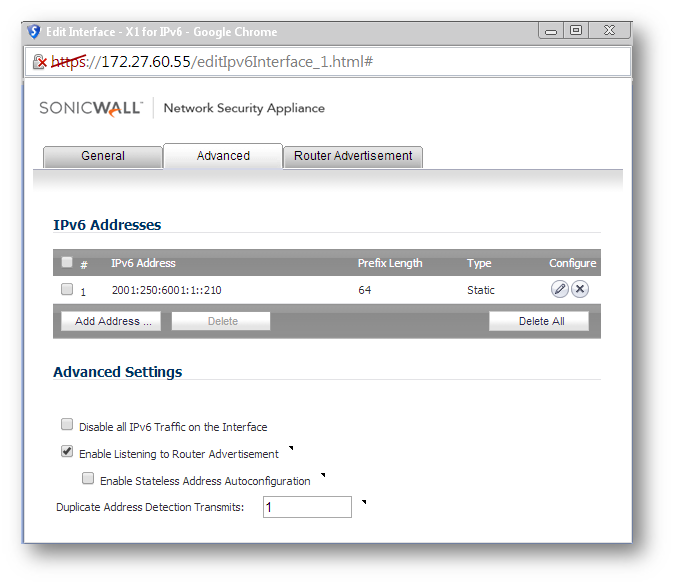
- Click Add Address button to configure multiple static IPv6 addresses for the interface.

- Enter the IPv6 Address for the additional address for the interface.
- Enter the Prefix Length for the address.
- Select Advertise Subnet Prefix of IPv6 Primary Static Address to add a default prefix into the interface advertising prefix list. This prefix is the subnet prefix of interface IPv6 primary static address. This option will help all hosts on the link stay in the same subnet.
- Click OK.
Configuring Router Advertisement Settings
Router Advertisement allows IPv6 routers to advertise DNS recursive server addresses to IPv6 hosts. Router Advertisement-based DNS configuration is a useful, optional alternative in networks where an IPv6 host's address is autoconfigured through IPv6 stateless address autoconfiguration, and where the delays in acquiring server addresses and communicating with the servers are critical. Router Advertisement allows the host to acquire the nearest server addresses on every link. Furthermore, it learns these addresses from the same RA message that provides configuration information for the link, thereby avoiding an additional protocol run. This can be beneficial in some mobile environments, such as with Mobile IPv6. SonicWall s implementation of IPv6 is full conformable with RFC 4861 in Router and Prefix Discovery.
NOTE: Router Advertisement can only be enabled when interface is under Static mode.
- In the Edit Interface window, click Router Advertisement tab.

- Select the Enable Router Advertisement checkbox to have make this an advertising interface that will distribute network and prefix information.
- Optionally, you can modify the following Router Advertisement settings.
Router Adv Interval Range - The time interval allowed between sending unsolicited multicast Router Advertisements from the interface, in seconds.
Link MTU - The recommended MTU for the interface link. A value of 0 means firewall will not advertise link MTU for the link.
Reachable Time - The time that a node assumes a neighbor is reachable after having received a reachability confirmation. A value of 0 means this parameter is unspecified by this firewall.
Retrans Time - The time between retransmitted Neighbor Solicitation messages. A value of 0 means this parameter is unspecified by this firewall.
Current Hop Limit - The default value that should be placed in the Hop Count field of the IP header for outgoing IP packets. A value of 0 means this parameter is unspecified by this firewall.
Router Lifetime - The lifetime when firewall is accepted as a default router. A value of 0 means that the router is not a default router. - Select the Managed checkbox to set the managed address configuration flag in the Router Advertisement message. If set, it indicates that IPv6 addresses are available via Dynamic Host Configuration Protocol.
- Select the Other Configuration checkbox to set the Other configuration flag in Router Advertisement message. If set, it indicates that other configuration information is available via Dynamic Host Configuration Protocol.
Configuring Router Advertisement Prefix Settings:
- Click the Add Prefix button to configure an advertising prefix. Advertising prefixes are used for providing hosts with prefixes for on-link determination and address autoconfiguration.

2. Enter the Prefix that is to be advertised with the Router Advertisement message.
3. Enter the Valid Lifetime to set the length of time (in minutes) that the prefix is valid for the purpose of on-link determination. A value of 71582789 means the lifetime is infinite.
4. Enter the Preferred Lifetime to set the length of time that addresses generated from the prefix via stateless address autoconfiguration remain preferred. A value of 71582789 means the lifetime is infinite.
5. Optionally click the On-link checkbox to enable the on-link flag in Prefix Information option, which indicates that this prefix can be used for on-link determination.
6. Optionally click the Autonomous checkbox to enable the autonomous address-configuration flag in Prefix Information option, which indicates that this prefix can be used for stateless address configuration.
7. Click OK.
Related Articles
- How to Block Google QUIC Protocol on SonicOSX 7.0?
- How to block certain Keywords on SonicOSX 7.0?
- How internal Interfaces can obtain Global IPv6 Addresses using DHCPv6 Prefix Delegation
Categories
- Firewalls > NSa Series > Networking
- Firewalls > NSv Series > Networking
- Firewalls > TZ Series > Networking
 YES
YES NO
NO