-
Products
-
SonicPlatform
SonicPlatform is the cybersecurity platform purpose-built for MSPs, making managing complex security environments among multiple tenants easy and streamlined.
Discover More
-
-
Solutions
-
Federal
Protect Federal Agencies and Networks with scalable, purpose-built cybersecurity solutions
Learn MoreFederalProtect Federal Agencies and Networks with scalable, purpose-built cybersecurity solutions
Learn More - Industries
- Use Cases
-
-
Partners
-
Partner Portal
Access to deal registration, MDF, sales and marketing tools, training and more
Learn MorePartner PortalAccess to deal registration, MDF, sales and marketing tools, training and more
Learn More - SonicWall Partners
- Partner Resources
-
-
Support
-
Support Portal
Find answers to your questions by searching across our knowledge base, community, technical documentation and video tutorials
Learn MoreSupport PortalFind answers to your questions by searching across our knowledge base, community, technical documentation and video tutorials
Learn More - Support
- Resources
- Capture Labs
-
- Company
- Contact Us
How can I configure static routes in SonicOS?


Description
How to Configure Static Routes in SonicOS Enhanced
Resolution
Video Tutorial: Click here for the video tutorial of this topic.
If you have routers on your interfaces and if you want to access the computers attached to the router, you need to configure static routes on the SonicWall security appliance on the Network | Routing page. The static route policies will create static routing entries that make decisions based upon source address, source netmask, destination address, destination netmask, service, interface, gateway and metric.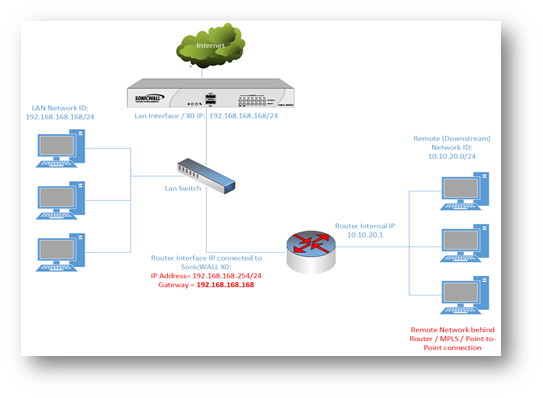
In the above example: a NAT-enabled SonicWall UTM appliance is configured with a LAN IP of 192.168.168.168 / 255.255.255.0 and the computers on the LAN network are on the similar IP range. The IP address of the local router is 192.168.168.254 /24 with the Gateway IP as 192.168.168.168, which connects to another network numbered 10.10.20.x
Configuring Static Routes on SonicOS Enhanced
Resolution for SonicOS 7.X
This release includes significant user interface changes and many new features that are different from the SonicOS 6.5 and earlier firmware. The below resolution is for customers using SonicOS 7.X firmware.
- Navigate to Policy | Rules and Policies | Routing Rules.
- Click Add at the bottom of the screen.
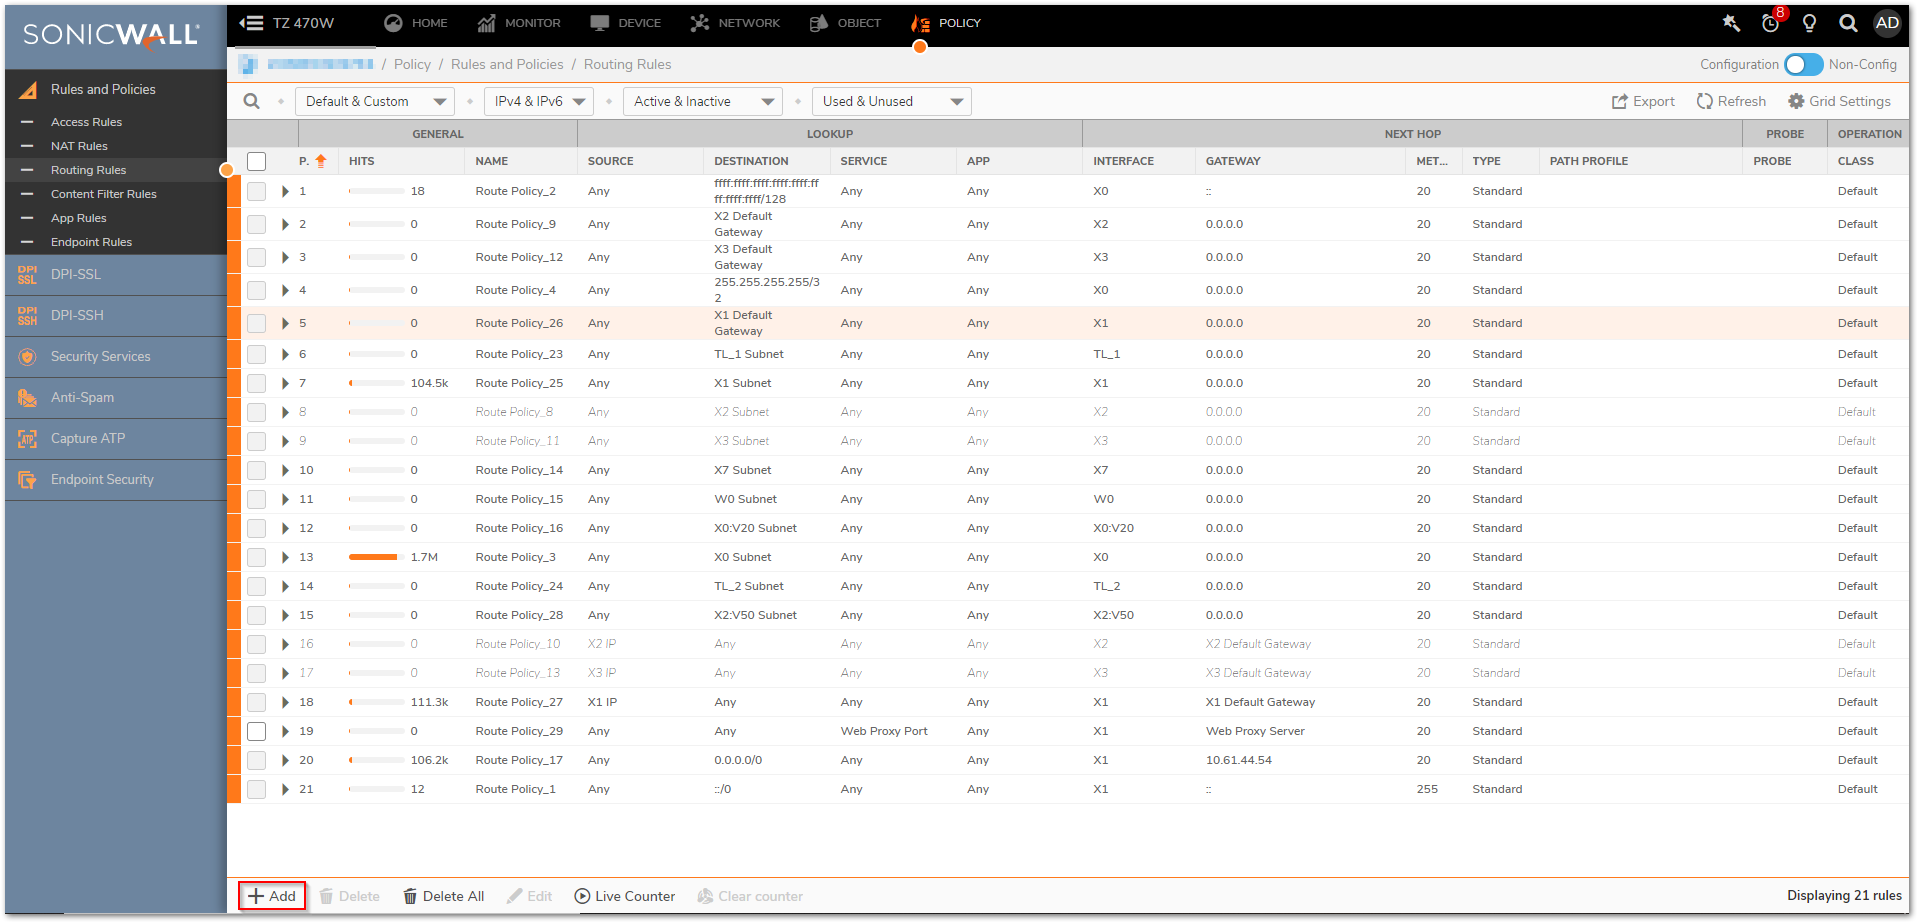
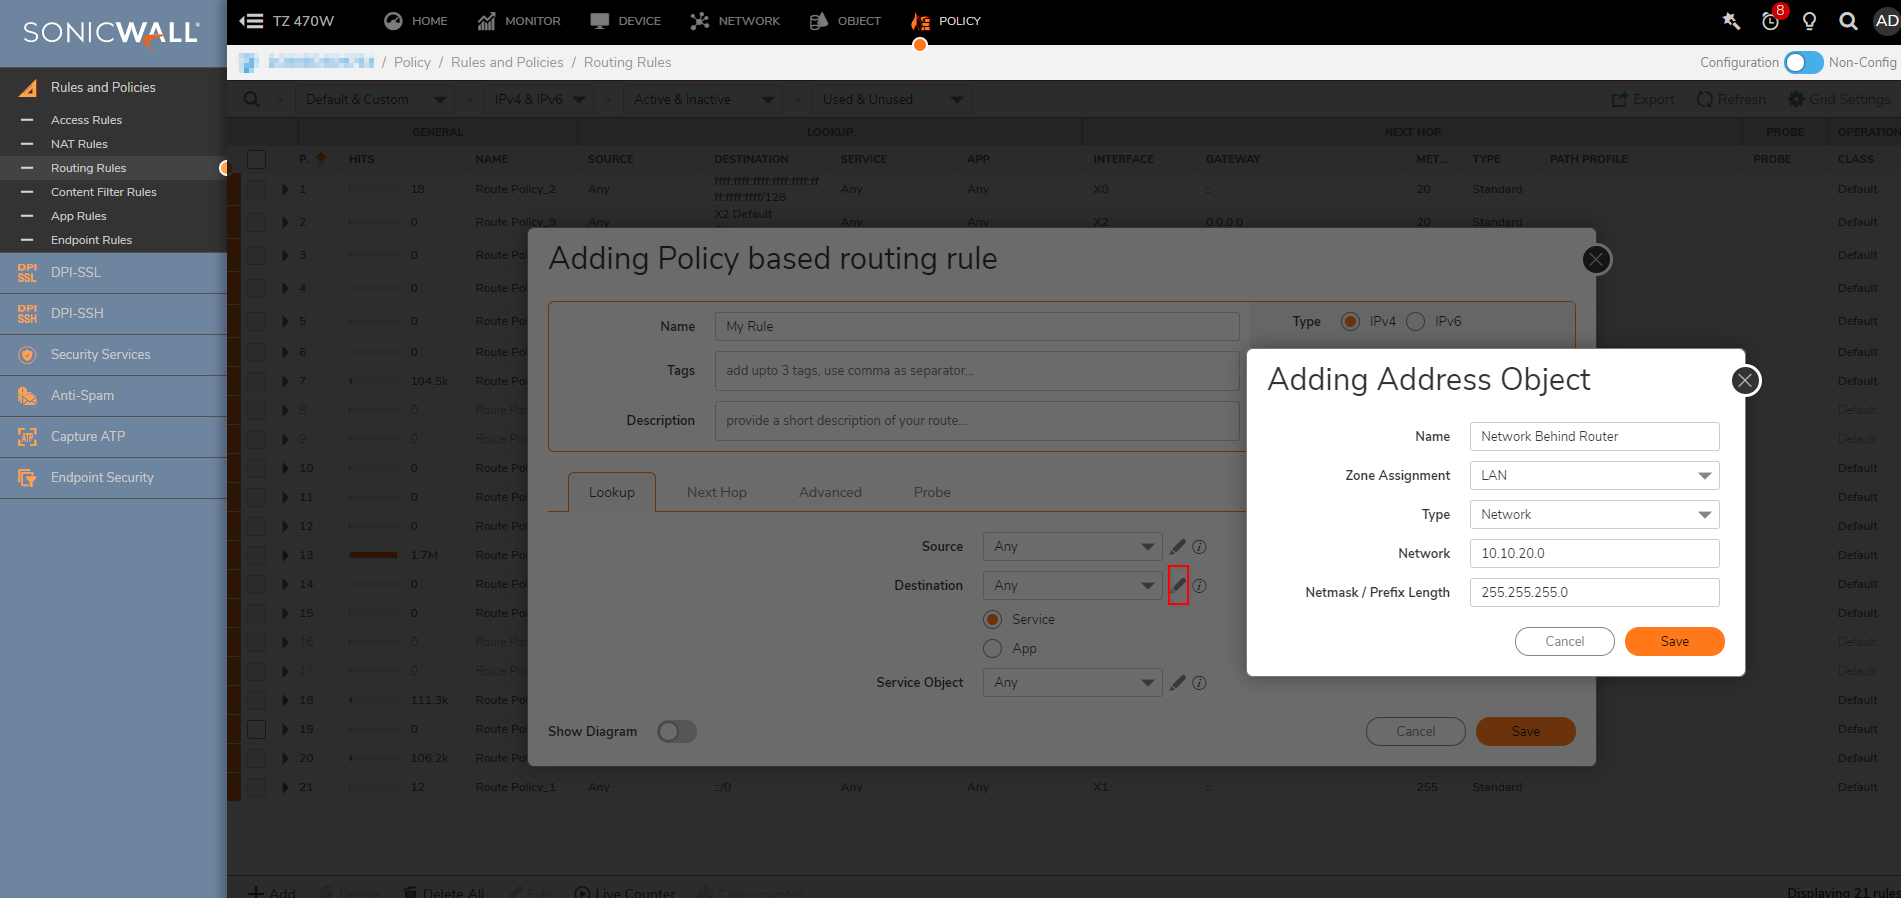
Select the following route policy settings:
Under Lookup tab:- Source = Any.
- Under Destination = Click on EDIT button | New Address Object.
- Enter a name for the address object.
- Specify the Zone Assignment as LAN.
- Specify the Type as Network.
- Specify the IP Address 10.10.20.0.
- Specify the Netmask 255.255.255.0.
- Click OK.
- Service = Any.
Under NextHop:- Interface=X0.
- Under Gateway= Click on EDIT button | New Address Object.
- Enter a name for the address object.
- Specify the Zone Assignment as LAN.
- Specify the Type as Host.
- Specify the IP Address 192.168.168.254.
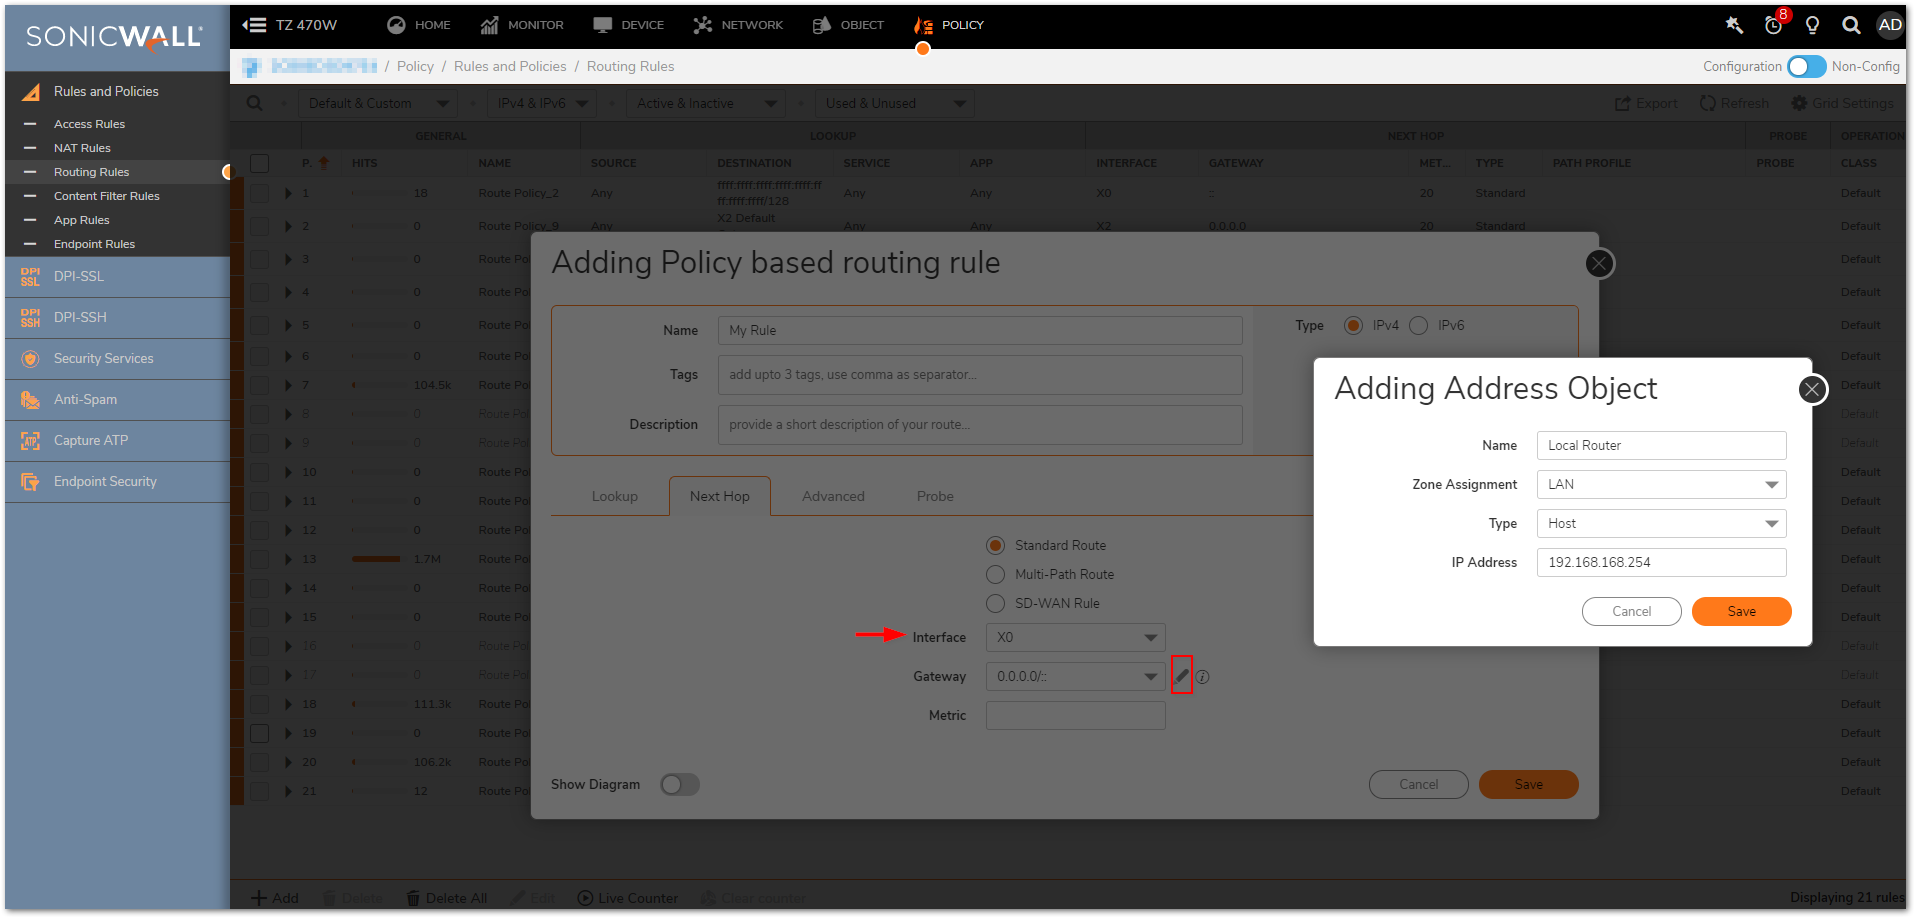
- Metric=1
- Click Save.
Resolution for SonicOS 6.5
This release includes significant user interface changes and many new features that are different from the SonicOS 6.2 and earlier firmware. The below resolution is for customers using SonicOS 6.5 firmware.
- Login to the SonicWall management Interface.
- Click Manage in the top navigation menu.
- Click Network | Routing | Route Policies and click add button.
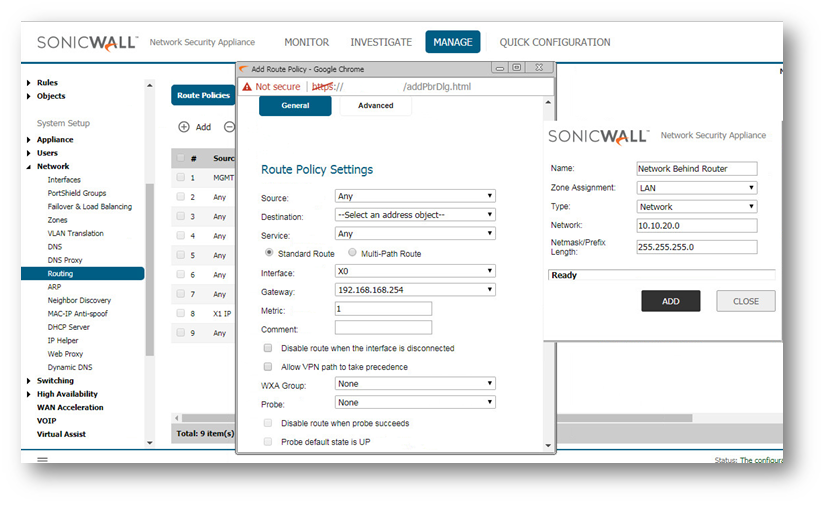
3. Select the following route policy settings:
- Source = Any.
- Under Destination = specify Create New Address Object.
- Enter a name for the static route.
- Specify the Zone Assignment as LAN.
- Specify the Type as Network.
- Specify the IP Address 10.10.20.0.
- Specify the Netmask 255.255.255.0.
- Click OK.
- Service = Any.
- Under Gateway = specify Create New Address Object.
- Enter a name for the local router.
- Specify the Zone Assignment as LAN.
- Specify the Type as Host.
- Specify the IP Address 192.168.168.254. (i.e Route IP on X0).
- Click OK.
- Specify the interface as LAN.
- Specify the metric as 1.
- Click OK.
 NOTE: The destination network and mask must define a logical subnet which doesn't overlap the LAN subnet. The gateway must be local to the LAN.
 NOTE: The router at 192.168.168.254 must have a default route pointing to the firewall's LAN IP address (192.168.168.168) for the secondary subnet to be able to access the Internet through the SonicWall's connection.
 TIP: You can also establish static routes for the WAN, DMZ and additional interfaces as applicable, but only if the gateway router involved is a second router, not the main WAN Gateway router, for which you will not need static routes.
Related Articles
- Error:"Invalid API Argument" when modifying the access rules
- Cysurance Partner FAQ
- Configure probe monitoring for WAN Failover and Loadbalancing - SonicWall UTM
Categories
- Firewalls > SonicWall SuperMassive 9000 Series > Networking
- Firewalls > TZ Series > Networking
- Firewalls > NSa Series > Networking
- Firewalls > NSv Series > Networking


 YES
YES NO
NO