-
Products
-
SonicPlatform
SonicPlatform is the cybersecurity platform purpose-built for MSPs, making managing complex security environments among multiple tenants easy and streamlined.
Discover More
-
-
Solutions
-
Federal
Protect Federal Agencies and Networks with scalable, purpose-built cybersecurity solutions
Learn MoreFederalProtect Federal Agencies and Networks with scalable, purpose-built cybersecurity solutions
Learn More - Industries
- Use Cases
-
-
Partners
-
Partner Portal
Access to deal registration, MDF, sales and marketing tools, training and more
Learn MorePartner PortalAccess to deal registration, MDF, sales and marketing tools, training and more
Learn More - SonicWall Partners
- Partner Resources
-
-
Support
-
Support Portal
Find answers to your questions by searching across our knowledge base, community, technical documentation and video tutorials
Learn MoreSupport PortalFind answers to your questions by searching across our knowledge base, community, technical documentation and video tutorials
Learn More - Support
- Resources
- Capture Labs
-
- Company
- Contact Us
How can I configure NAT over VPN in a Site to Site VPN?


Description
A VPN tunnel cannot be established if both the destination network and the local network have the same subnets. The Apply NAT Policies feature or NAT over VPN is configured when both sides of a proposed site to site VPN configuration have identical, and hence overlapping, subnets.
Network Setup:

In this scenario, a VPN tunnel is created between a SonicWall NSA 2700 and a SonicWall NSA 4600, and NAT over VPN tunnel is configured to translate the networks to a different subnet. Site A subnet, 192.168.1.0/24 is translated to a virtual subnet of 172.16.1.0/24 and Site B subnet, 192.168.1.0/24 is translated to a virtual subnet of 172.16.2.0/24.
- Site A: 192.168.1.0 /24 is mapped to 172.16.1.0 /24
- Site B: 192.168.1.0 /24 is mapped to 172.16.2.0 /24
Resolution
RESOLUTION FOR SONICOS 7.X
This release includes significant user interface changes and many new features that are different from the SonicOS 6.5 and earlier firmware. The below resolution is for customers using SonicOS 7.X firmware.
Configuring Site A (NSA 2700)
Create Address Object for Local & Remote Network
- Login to your SonicWall management page and click Object tab on top of the page.
- Navigate to Match Objects | Addressespage. On right side, click Address objects tab and select View as Custom.
- Click Add button under Address Objects, to get Add Address Object Window.

- Create an Address Object called Local Translated. This is the NAT'ed network for the local subnet.
- Name: Local Translated
- Zone: LAN
- Network: 172.16.1.0
- Netmask: 255.255.255.0 (This is required to be identical to the actual local subnets)
- Create an Address Object called "Remote Translated". This is the NAT'ed network for the remote subnet.
- Name: Remote Translated
- Zone: VPN
- Network: 172.16.2.0
- Netmask: 255.255.255.0 (This is required to be identical to the actual remote subnets)

Create VPN Policy
- Login to your SonicWall management page and click Network tab on top of the page.
- Navigate to IPSec VPN | Rules and Settings page.
- Under VPN Policies, click Add button to get VPN Policy window.

- Create a new Site to Site VPN policy with settings as per the screenshot.

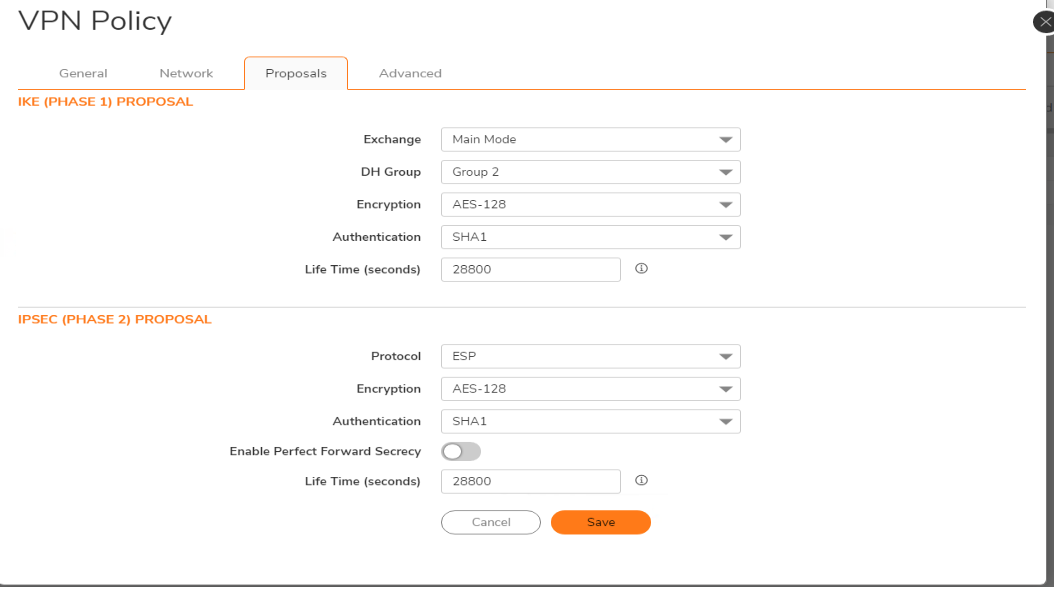
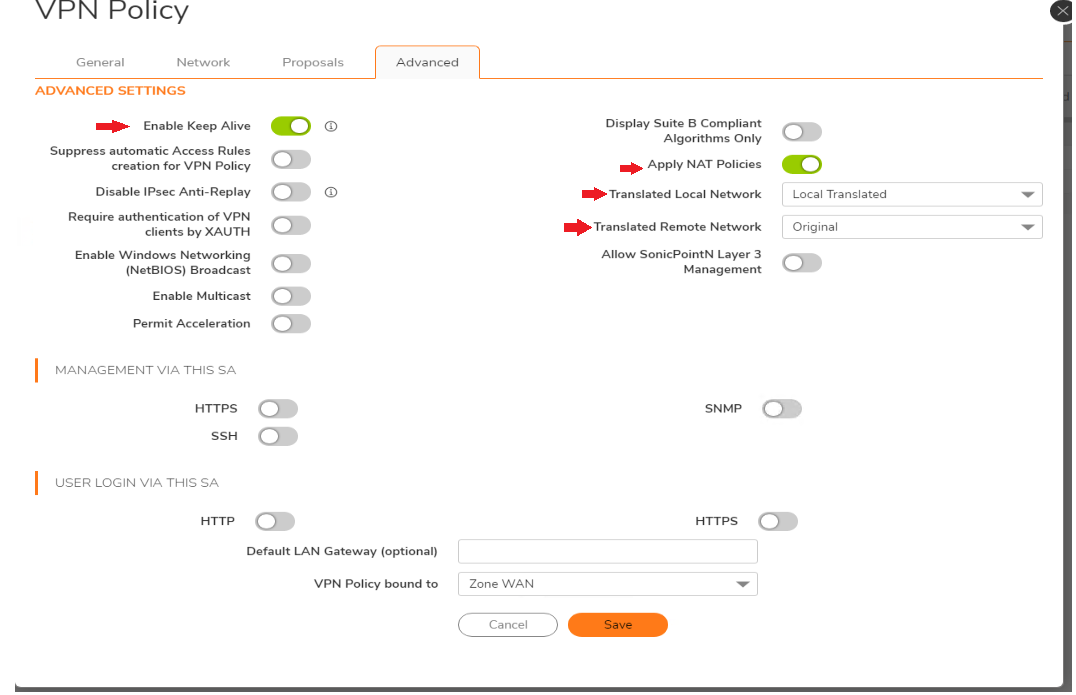
Once both VPN policies are configured with NAT over VPN, the following aaccess rules and NAT Policy would be auto-created
From LAN to VPN

From VPN to LAN

NAT Policy

Configuring Site B (NSA 4600)
Create Address Object for Local & Remote Network
- Login to your SonicWall management page and click Manage tab on top of the page.
- Navigate to Objects | Address Objects page. On right Side, Click Address objects tab and select view as Custom.
- Click Add button under Address Objects, to get Add Address Object window.

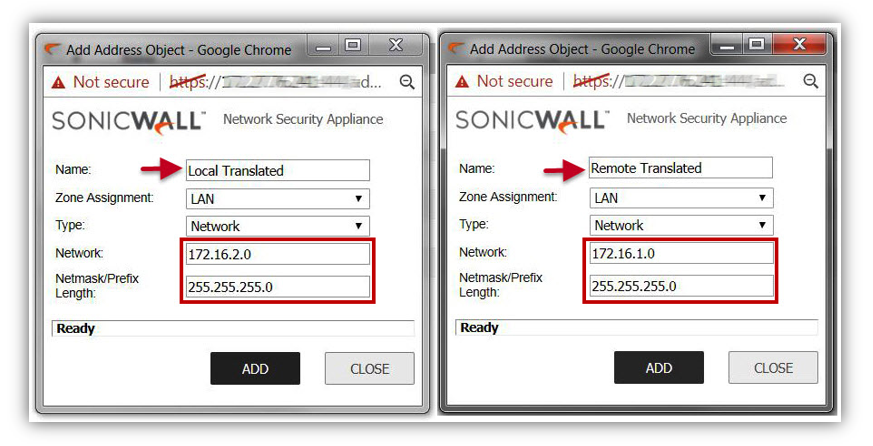
- Create an Address Object called Local Translated. This is the NAT'ed network for the local subnet.
- Name: Local Translated
- Zone: LAN
- Network: 172.16.2.0
- Netmask: 255.255.255.0 (This is required to be identical to the actual local subnets)
- Create an Address Object called "Remote Translated". This is the NAT'ed network for the remote subnet.
- Name: Remote Translated
- Zone: VPN
- Network: 172.16.1.0
- Netmask: 255.255.255.0 (This is required to be identical to the actual remote subnets)
Create VPN Policy
- Login to your SonicWall management page and click Manage tab on top of the page.
- Navigate to VPN | Base Settings page.
- Under VPN Policies, click Add button to get VPN Policy window.
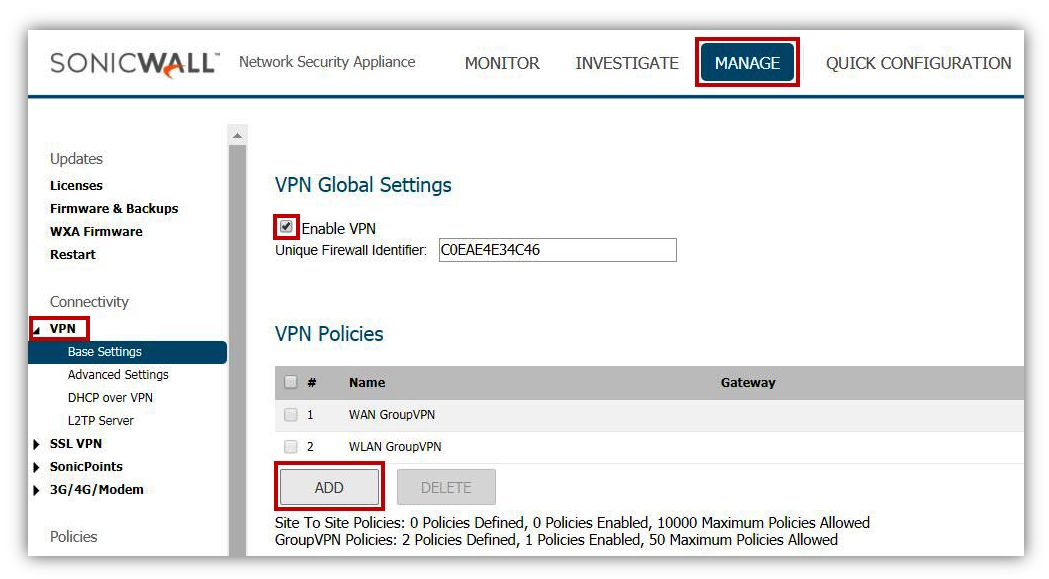
- Create a new Site to Site VPN policy with settings as per the screenshot.

- Once both VPN policies are configured with NAT over VPN, the following access rules and NAT Policy would be auto-created.
From VPN to LAN

From LAN to VPN
NAT Policy
How To Test
- Bring the tunnel up by pinging the NAT'ed (translated) ip in the remote site.
 EXAMPLE: In order to connect to the web server having IP 192.168.1.100 in Site A from Site B, use the NAT'ed IP of 172.16.1.100.
 - Likewise, in order to connect to the host IP 192.168.1.5 in Site B from Site A, use the NAT'ed IP of 172.16.2.5.
RESOLUTION FOR SONICOS 6.5
This release includes significant user interface changes and many new features that are different from the SonicOS 6.2 and earlier firmware. The below resolution is for customers using SonicOS 6.5 firmware.
Network Setup :

In this scenario, a VPN tunnel is created between a SonicWall NSA 2650 and a SonicWall NSA 4600, and NAT over VPN tunnel is configured to translate the networks to a different subnet. Site A subnet, 192.168.1.0/24 is translated to a virtual subnet of 172.16.1.0/24 and Site B subnet, 192.168.1.0/24 is translated to a virtual subnet of 172.16.2.0/24.
- Site A: 192.168.1.0 /24 is mapped to 172.16.1.0 /24
- Site B: 192.168.1.0 /24 is mapped to 172.16.2.0 /24
Configuring Site A (NSA 2650)
Create Address Object for Local & Remote Network
- Login to your SonicWall management page and click Manage tab on top of the page.
- Navigate to Objects | Address Objects page. On right side, click Address objects tab and select View as Custom.
- Click Add button under Address Objects, to get Add Address Object Window

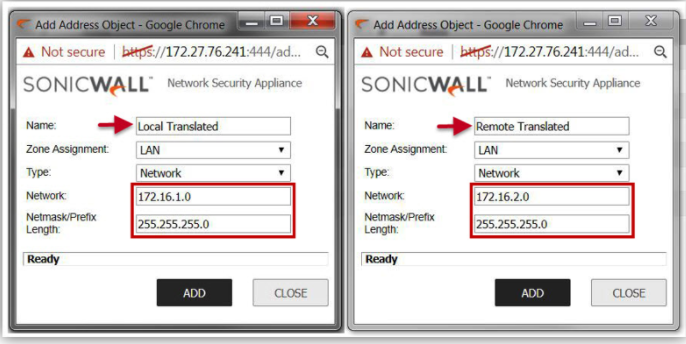
- Create an Address Object called Local Translated. This is the NAT'ed network for the local subnet.
- Name: Local Translated
- Zone: LAN
- Network: 172.16.1.0
- Netmask: 255.255.255.0 (This is required to be identical to the actual local subnets)
5. Create an Address Object called "Remote Translated". This is the NAT'ed network for the remote subnet.
- Name: Remote Translated
- Zone: VPN
- Network: 172.16.2.0
- Netmask: 255.255.255.0 (This is required to be identical to the actual remote subnets)
Create VPN Policy
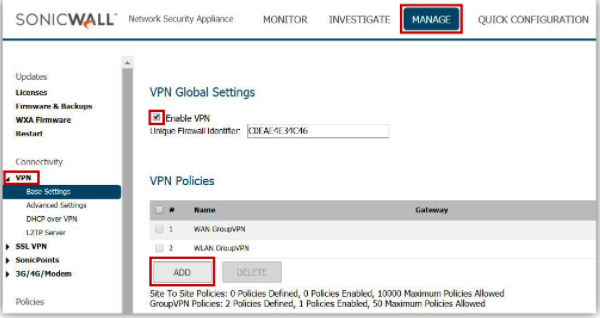
- Login to your SonicWall management page and click Manage tab on top of the page.
- Navigate to VPN | Base Settings page.
- Under VPN Policies, click Add button to get VPN Policy window.
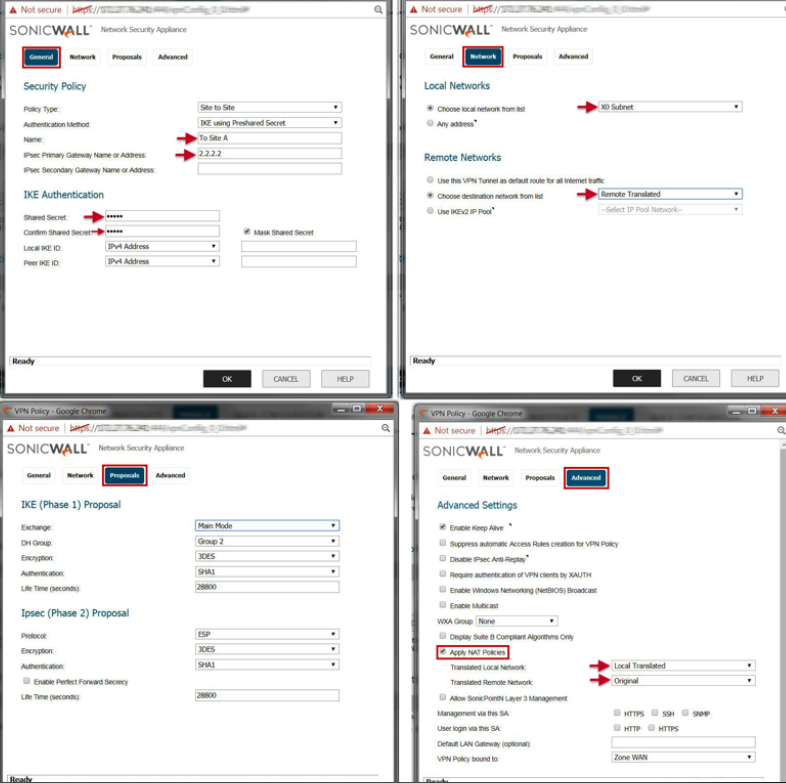
4.Create a new site to site vpn policy with settings as per screenshot :
Configuring Site B (NSA 4600)
Create Address Object for Local & Remote Network
- Login to your SonicWall management page and click Manage tab on top of the page.
- Navigate to Objects | Address Objects page. On right Side, Click Address objects tab and select view as Custom.
- Click Add button under Address Objects, to get Add Address Object window.

- Create an Address Object called Local Translated. This is the NAT'ed network for the local subnet.
- Name: Local Translated
- Zone: LAN
- Network: 172.16.2.0
- Netmask: 255.255.255.0 (This is required to be identical to the actual local subnets)
- Create an Address Object called "Remote Translated". This is the NAT'ed network for the remote subnet.
- Name: Remote Translated
- Zone: VPN
- Network: 172.16.1.0
- Netmask: 255.255.255.0 (This is required to be identical to the actual remote subnets)

Create VPN Policy
- Login to your SonicWall management page and click Manage tab on top of the page.
- Navigate to VPN | Base Settings page.
- Under VPN Policies, click Add button to get VPN Policy window.

- Create a new Site to Site VPN policy with settings as per the screenshot.

- Once both VPN policies are configured with NAT over VPN, the following access rules and NAT Policy would be auto-created.
From VPN to LAN

From LAN to VPN
NAT Policy
How To Test
- Bring the tunnel up by pinging the NAT'ed (translated) ip in the remote site.
 EXAMPLE: In order to connect to the web server having IP 192.168.1.100 in Site A from Site B, use the NAT'ed IP of 172.16.1.100.
 - Likewise, in order to connect to the host IP 192.168.1.5 in Site B from Site A, use the NAT'ed IP of 172.16.2.5.
Related Articles
- Error:"Invalid API Argument" when modifying the access rules
- Cysurance Partner FAQ
- Configure probe monitoring for WAN Failover and Loadbalancing - SonicWall UTM
Categories
- Firewalls > NSa Series > VPN
- Firewalls > TZ Series > VPN
- Firewalls > NSv Series > VPN


 YES
YES NO
NO