-
Products
-
SonicPlatform
SonicPlatform is the cybersecurity platform purpose-built for MSPs, making managing complex security environments among multiple tenants easy and streamlined.
Discover More
-
-
Solutions
-
Federal
Protect Federal Agencies and Networks with scalable, purpose-built cybersecurity solutions
Learn MoreFederalProtect Federal Agencies and Networks with scalable, purpose-built cybersecurity solutions
Learn More - Industries
- Use Cases
-
-
Partners
-
Partner Portal
Access to deal registration, MDF, sales and marketing tools, training and more
Learn MorePartner PortalAccess to deal registration, MDF, sales and marketing tools, training and more
Learn More - SonicWall Partners
- Partner Resources
-
-
Support
-
Support Portal
Find answers to your questions by searching across our knowledge base, community, technical documentation and video tutorials
Learn MoreSupport PortalFind answers to your questions by searching across our knowledge base, community, technical documentation and video tutorials
Learn More - Support
- Resources
- Capture Labs
-
- Company
- Contact Us
How can I configure multiple networks?


Description
The X0 interface on the SonicWall, by default, is configured with the IP 192.168.168.168 with Netmask 255.255.255.0. In this scenario, we will be adding two more networks on X2 and X3 interfaces respectively. X2 network will contain the printers and X3 will contain the Servers. Then access rules will be created to allow access between the default LAN zone and Printer zone but deny access from the LAN zone to the Server zone.
Resolution
Resolution for SonicOS 7.X
This release includes significant user interface changes and many new features that are different from the SonicOS 6.5 and earlier firmware. The below resolution is for customers using SonicOS 7.X firmware.
Creating a Custom Zone for the Servers:
Since the LAN devices need to access printers, we don't need to create a separate zone for X2(on which the printers are located) but we need to create a separate zone for X3 on which the Servers are connected.
- Login to the firewall management page and click on OBJECT on the top bar.
- Navigate to Match Objects | Zones.
- Click Add Zone.
- Name the Zone as per your requirement.
- Select the Security type to Trusted.
- Enable gateway Anti-Virus Service, IPS and Anti-Spyware Service if needed and Click OK.

Configuring X2 and X3 interfaces with appropriate IP addresses and Zones
Once the zone for X3 is created, Navigate to Network |System | Interfaces.
- Click on the configure button for X2 interface.
- Set the Zone to LAN.
- Mode / IP assignment to Static IP mode.
- Give an IP address as per your requirement. Here we are configuring 192.168.100.1 for X2. This IP address will be the gateway for the network.
- Provide the subnet mask.
- Give a friendly comment for the interface.
- Enable the management if needed and click OK.

- Similarly Click on the configure button for the X3 interface.
Set the Zone to Servers
- Mode / IP assignment to Static IP mode.
- Give an IP address as per your requirement. Here X3 is configured as 192.168.200.1 which should be the gateway IP on the servers.
- Provide the subnet mask.
- Give a friendly comment for the interface.
- Enable the management if needed and click OK.
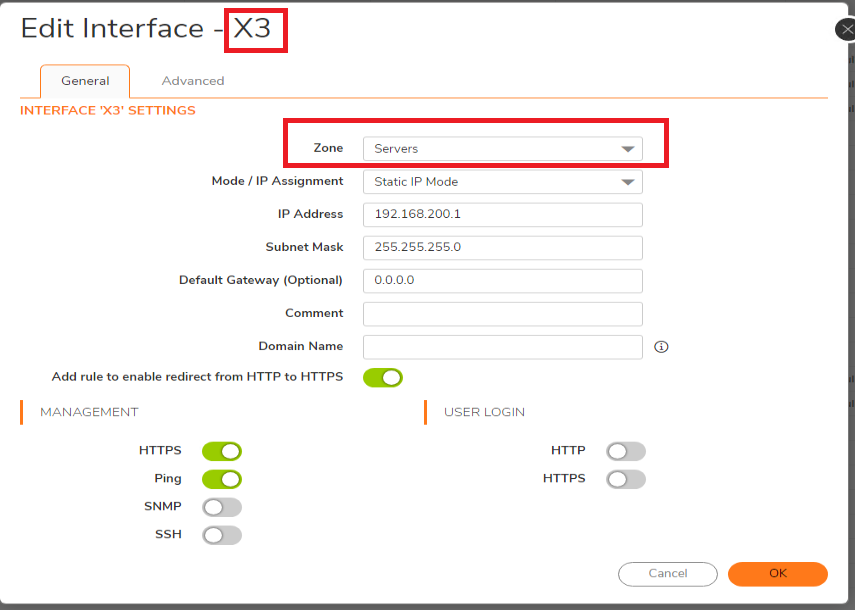
Configuring the Access rule to deny access from LAN to Server zone
By default, the access between the trusted zones is allowed. To deny access from LAN to the server zone, you need to edit the default access rule and set it to deny.
- Navigate to Policy | Rules and Policies | Access Rules.
- Click Matrix Option button on the top as highlighted in the image below.

- Select LAN > Server.
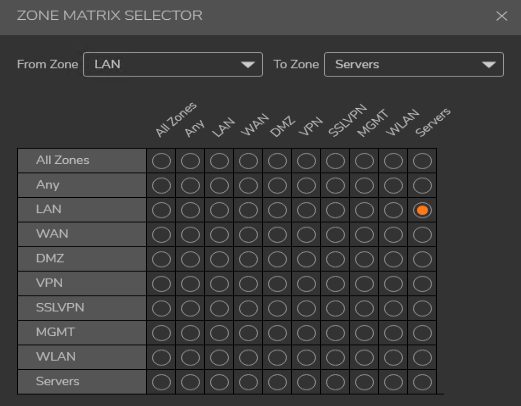
- You will see a default access rule that allows all access from LAN to the server zone. Click on the configure icon to edit the rule. Change the Action to Deny.
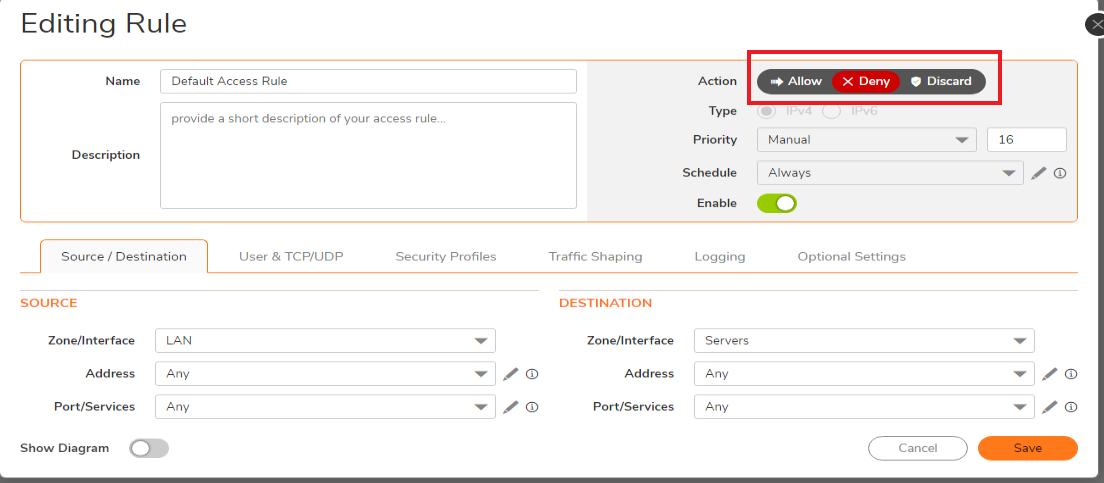
- With this rule in place, the access from the X0 network and the X2 network is denied to the X3 network. Similarly you can modify the rule from Servers to LAN to allow/deny as per your requirement.
Resolution for SonicOS 6.5
This release includes significant user interface changes and many new features that are different from the SonicOS 6.2 and earlier firmware. The below resolution is for customers using SonicOS 6.5 firmware.
Creating a Custom Zone for the Servers:
Since the LAN devices need to access printers, we don't need to create a separate zone for X2(on which the printers are located) but we need to create a separate zone for X3 on which the Servers are connected.
- Click MANAGE on the top bar.
- Navigate to Network | Zones.
- Click Add.
- Name the Zone as per your requirement.
- Select the Security type to Trusted.
- Enable Content Filtering Service enforcement if needed on this zone.
- Enable gateway Anti-Virus Service, IPS and Anti-Spyware Service and Click OK

Configuring X2 and X3 interfaces with appropriate IP addresses and Zones
Once the zone for X3 is created, Navigate to Network |Interfaces. By default in the TZ devices, additional interfaces (X2 and above) are port shielded to X0 and are hidden. At the bottom right corner Click on the  button which will show all the interfaces which are portshielded to X0.
- Click on the
 button for X2 interface.
 - Set the Zone to LAN.
- Mode / IP assignment to Static IP mode.
- Give an IP address as per your requirement. Here we are configuring 192.168.100.1 for X2. This IP address will be the gateway for the network.
- Provide the subnet mask.
- Give a friendly comment for the interface.
- Enable the management if needed and click OK.

- Similarly Click on the
 button for the X3 interface.
Set the Zone to Servers
- Mode / IP assignment to Static IP mode.
- Give an IP address as per your requirement. Here X3 is configured as 192.168.200.1 which should be the gateway IP on the servers.
- Provide the subnet mask.
- Give a friendly comment for the interface.
- Enable the management if needed and click OK.
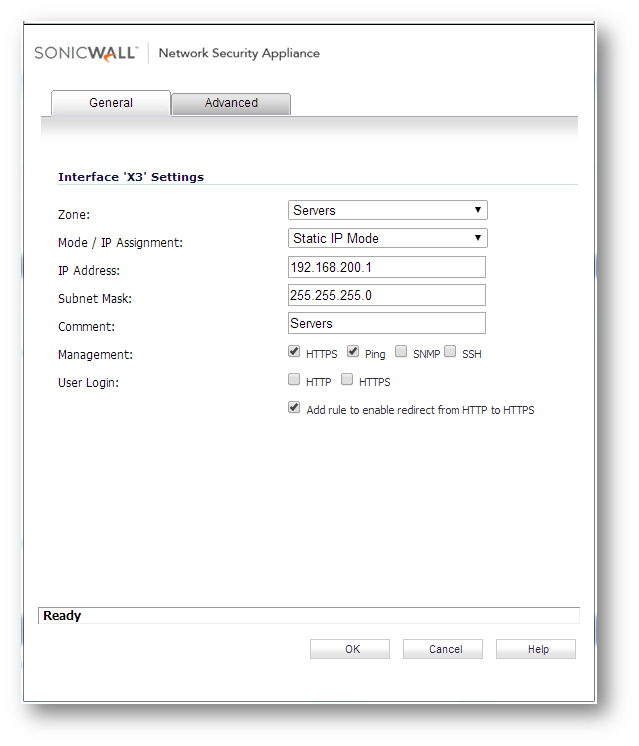
Configuring the Access rule to deny access from LAN to Server zone
By default, the access between the trusted zones is allowed. To deny access from LAN to the server zone, you need to edit the default access rule and set it to deny.
- Navigate to Rules| Access rules.
- Click Matrix Option button on the top rightside as highlighted in the image below.
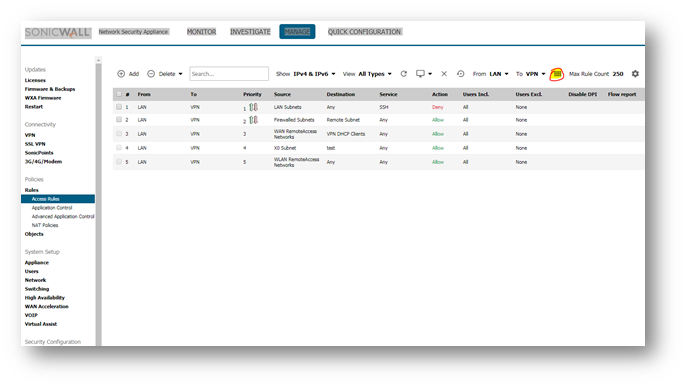
- Select LAN | Server.

- You will see a default access rule that allows all access from LAN to the server zone. Click on the
icon to edit the rule. Change the Action to Deny.

- With this rule in place, the access from the X0 network and the X2 network is denied to the X3 network. Similarly you can modify the rule from Servers to LAN to allow/deny as per your requirement.
Related Articles
- Error:"Invalid API Argument" when modifying the access rules
- Cysurance Partner FAQ
- Configure probe monitoring for WAN Failover and Loadbalancing - SonicWall UTM
Categories
- Firewalls > NSa Series > Networking
- Firewalls > TZ Series > Networking
- Firewalls > NSv Series > Networking


 YES
YES NO
NO