-
Products
-
SonicPlatform
SonicPlatform is the cybersecurity platform purpose-built for MSPs, making managing complex security environments among multiple tenants easy and streamlined.
Discover More
-
-
Solutions
-
Federal
Protect Federal Agencies and Networks with scalable, purpose-built cybersecurity solutions
Learn MoreFederalProtect Federal Agencies and Networks with scalable, purpose-built cybersecurity solutions
Learn More - Industries
- Use Cases
-
-
Partners
-
Partner Portal
Access to deal registration, MDF, sales and marketing tools, training and more
Learn MorePartner PortalAccess to deal registration, MDF, sales and marketing tools, training and more
Learn More - SonicWall Partners
- Partner Resources
-
-
Support
-
Support Portal
Find answers to your questions by searching across our knowledge base, community, technical documentation and video tutorials
Learn MoreSupport PortalFind answers to your questions by searching across our knowledge base, community, technical documentation and video tutorials
Learn More - Support
- Resources
- Capture Labs
-
- Company
- Contact Us
How can I configure an interface as secondary WAN port in SonicWall?


Description
This article covers how to configure an interface as secondary WAN port in SonicWall
Resolution
Resolution for SonicOS 7.X
This release includes significant user interface changes and many new features that are different from the SonicOS 6.5 and earlier firmware. The below resolution is for customers using SonicOS 7.X firmware.
Please click Network option on the top row and navigate to System| Interfaces page, configure the chosen port to be in WAN zone, and enter in the correct address settings provided by the Secondary ISP. Any interface added to the WAN zone by default creates a NAT Policy allowing internal LAN subnets to NAT out this secondary WAN interface
The secondary WAN port can be configured in five different way depending upon the kind of Internet connection.
- Static Mode
- DHCP Mode
- PPPoE Mode
- PPTP Mode
- L2TP Mode
Static Mode: This mode is used if the ISP has assigned a static IP address.
- Click Network |System| Interfaces tab.
- Click Configure for the X3 interface (Secondary WAN interface).
- Under IP assignment, choose static from the drop down menu.
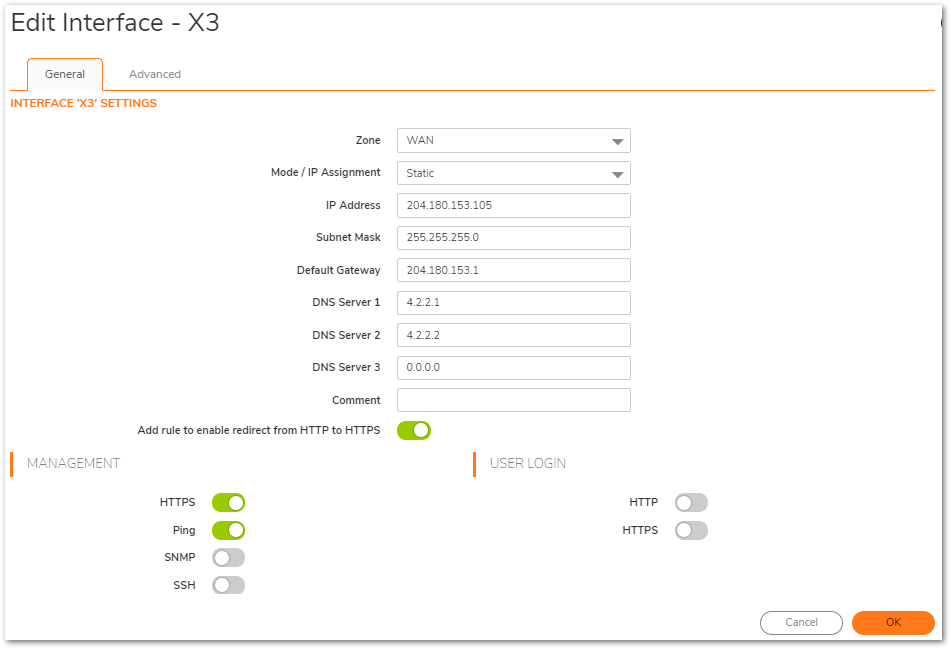
- Under IP address, enter the static IP address given by the ISP with the Subnet mask.
- Enter the Default Gateway given by the ISP.
- Under the DNS server settings, enter the DNS server IP address given by the ISP.
- Click OK.
DHCP mode: Use this mode if the ISP is assigning a Dynamic IP address every time.
- Click Network |System| Interfaces tab.
- Click Configure for the X3 interface (Secondary WAN interface).
- Under IP assignment, choose DHCP from the drop down menu.
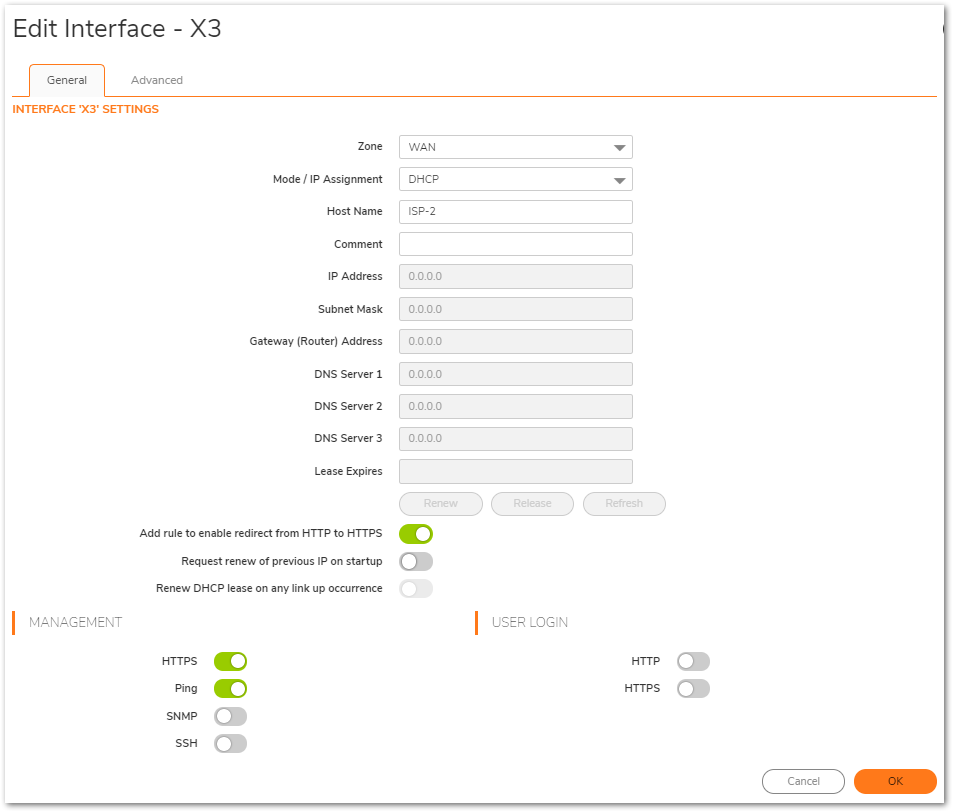
- Click the Release button followed by the Renew button on the bottom of the page.
- Click OK
PPPoE mode: Use this mode if your ISP is using a PPPoE connection. To configure this mode:
- Click Network | System|Interfaces tab.
- Click Configure for the X3 interface (Secondary WAN interface).
- Under IP assignment, choose PPPoE from the drop down menu.
 NOTE: The X3 Interface MTU should be set to 1492.
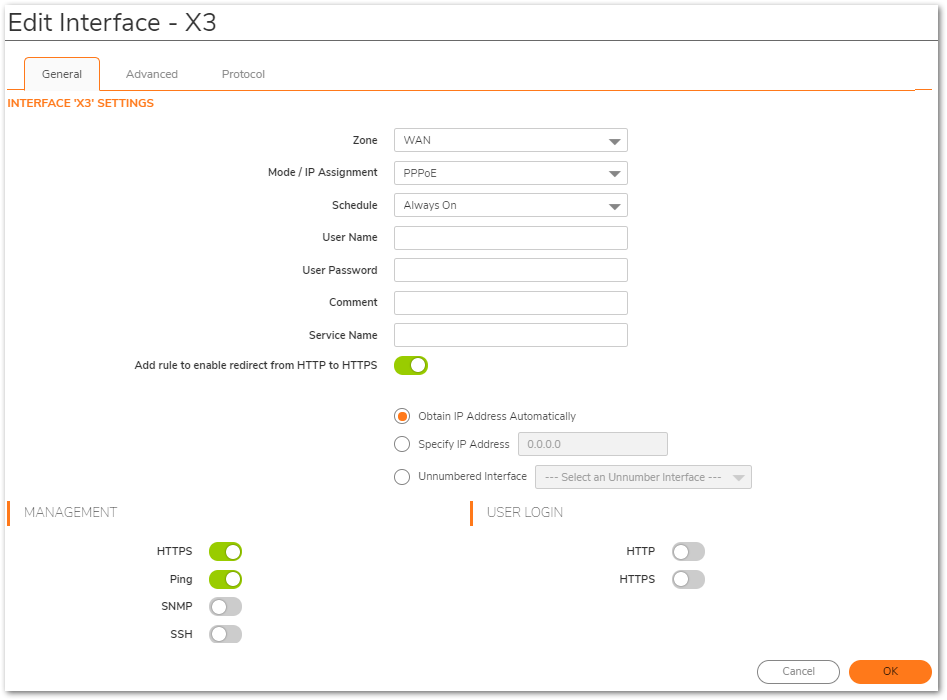
- Enter the User name and User password given by the ISP.
- At the bottom of the page, you can choose Obtain IP address automatically if the ISP is leasing out IP addresses, or you can manually specify the IP address by choosing Specify IP address and entering the IP address given by the ISP.
- Click OK.
PPTP mode: Use this mode if your ISP is using a PPTP connection.
- Click Network | System|Interfaces tab.
- Click Configure for the X3 interface (Secondary WAN interface).
- Under IP assignment, choose PPTP from the drop down menu.
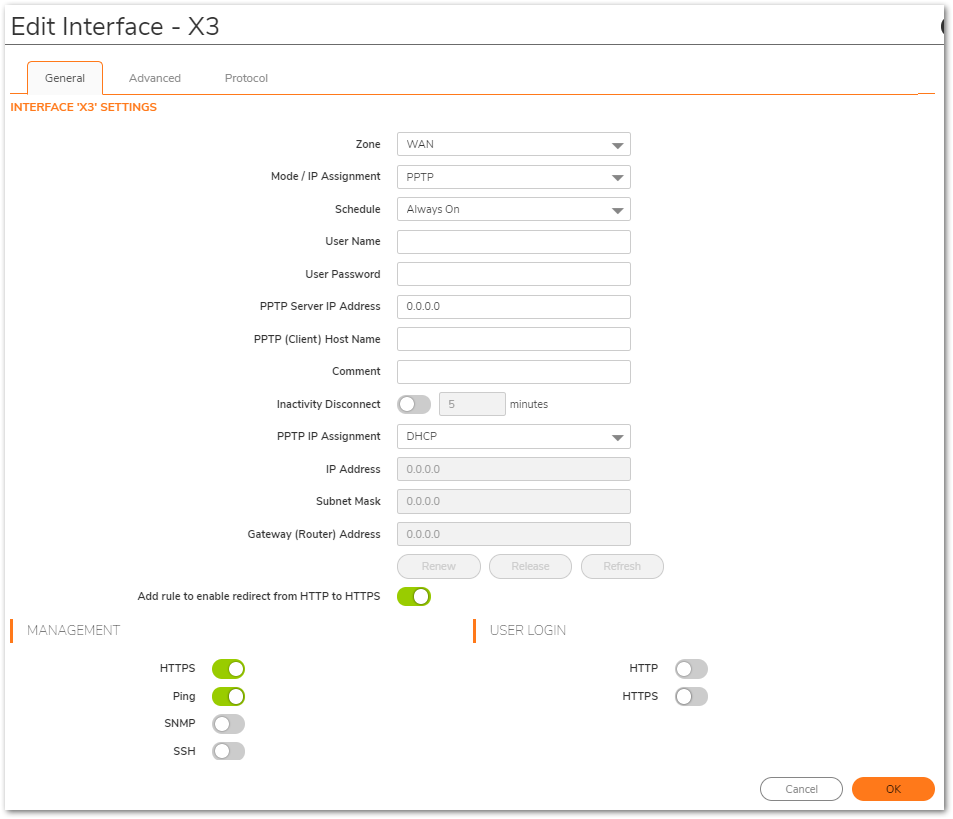
- Enter the User name and User password given by the ISP.
- Specify the PPTP server IP address given by the ISP under PPTP server IP address.
- The PPTP (Client) Host name will be given by the ISP.
- After entering these configurations, click the Release button and then the Renew button.
- Click OK.
L2TP mode: Use this mode if your ISP is using a L2TP connection.
- Click Network | System|Interfaces tab.
- Click Configure for the X3 interface (Secondary WAN interface).
- Under IP assignment, chooseL2PTP from the drop down menu.
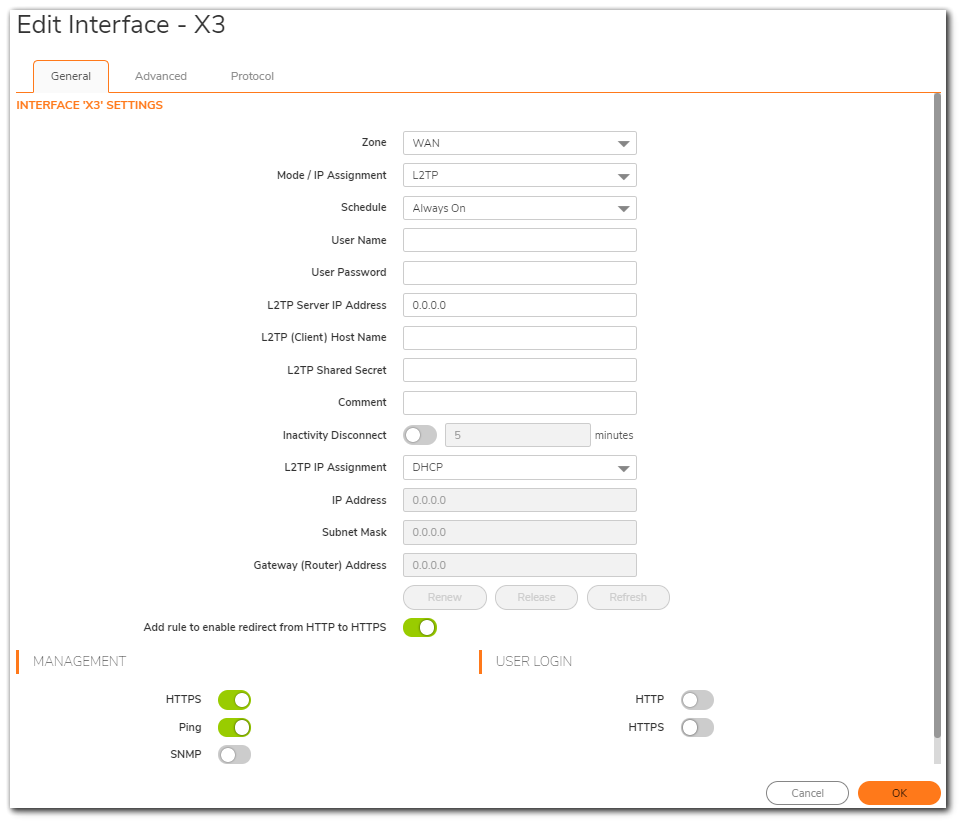
- Enter the User name and User password given by the ISP.
- Specify the L2TP server IP address given by the ISP under L2TP server IP address.
- The L2TP (Client) Host name will be given by the ISP.
- If the ISP assigned a static IP address, choose Static under L2TP IP assignment and manually enter the IP address with the Subnet mask and gateway router IP address given by the ISP.
- If the ISP is giving out a dynamic IP address, choose DHCP from the L2TP IP assignment dropdown menu.
- Click the Release button, followed by the renew button to obtain an IP address from the ISP.
- Click OK.
Resolution for SonicOS 6.5
This release includes significant user interface changes and many new features that are different from the SonicOS 6.2 and earlier firmware. The below resolution is for customers using SonicOS 6.5 firmware.
Please click Manage option on the top row and navigate to Network | Interfaces page, configure the chosen port to be in WAN zone, and enter in the correct address settings provided by the Secondary ISP. Any interface added to the WAN zone by default creates a NAT Policy allowing internal LAN subnets to NAT out this secondary WAN interface
The secondary WAN port can be configured in five different way depending upon the kind of Internet connection.
- Static Mode
- DHCP Mode
- PPPoE Mode
- PPTP Mode
- L2TP Mode
Static Mode: This mode is used if the ISP has assigned a static IP address.
- Click Manage | Network | Interfaces tab.
- Click Configure for the X2 interface (Secondary WAN interface).
- Under IP assignment, choose static from the drop down menu.
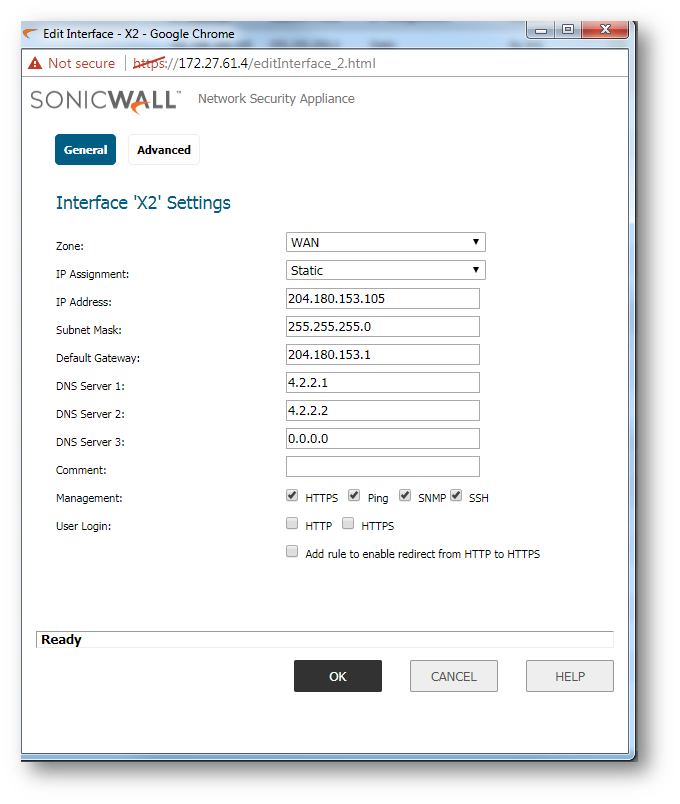
- Under IP address, enter the static IP address given by the ISP with the Subnet mask.
- Enter the Default Gateway given by the ISP.
- Under the DNS server settings, enter the DNS server IP address given by the ISP.
- Click OK.
DHCP mode: Use this mode if the ISP is assigning a Dynamic IP address every time.
- ClickManage | Network | Interfaces tab.
- Click Configure for the X2 interface (Secondary WAN interface).
- Under IP assignment, choose DHCP from the drop down menu.
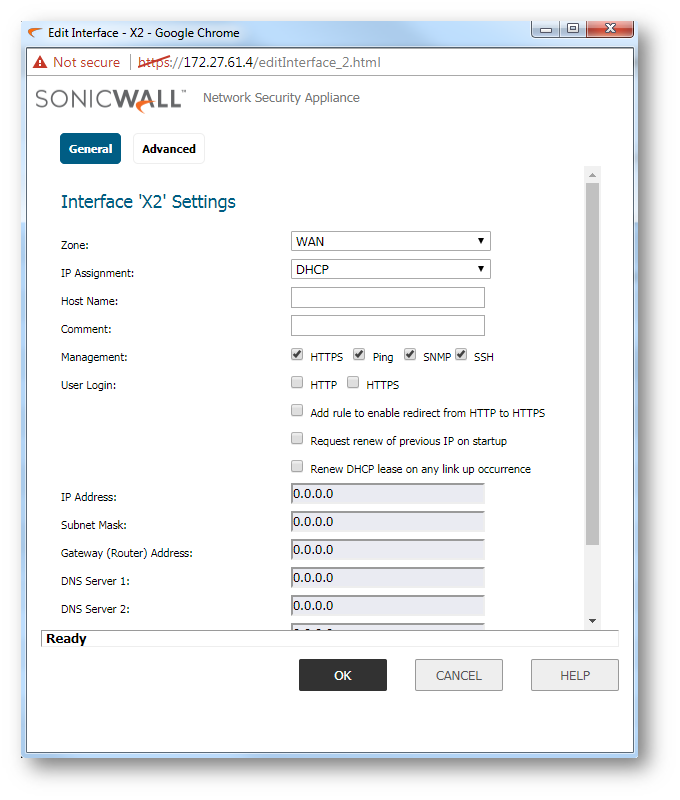
- Click the Release button followed by the Renew button on the bottom of the page.
- Click OK.
PPPoE mode: Use this mode if your ISP is using a PPPoE connection. To configure this mode:
- Click Manage | Network | Interfaces tab.
- Click Configure for the X2 interface (Secondary WAN interface).
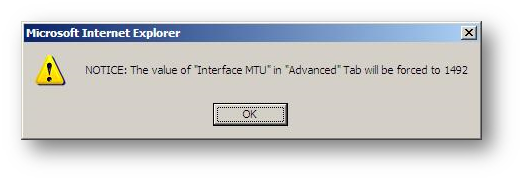
- Under IP assignment, choose PPPoE from the drop down menu.
 NOTE: The X1 Interface MTU will be forced to 1492.
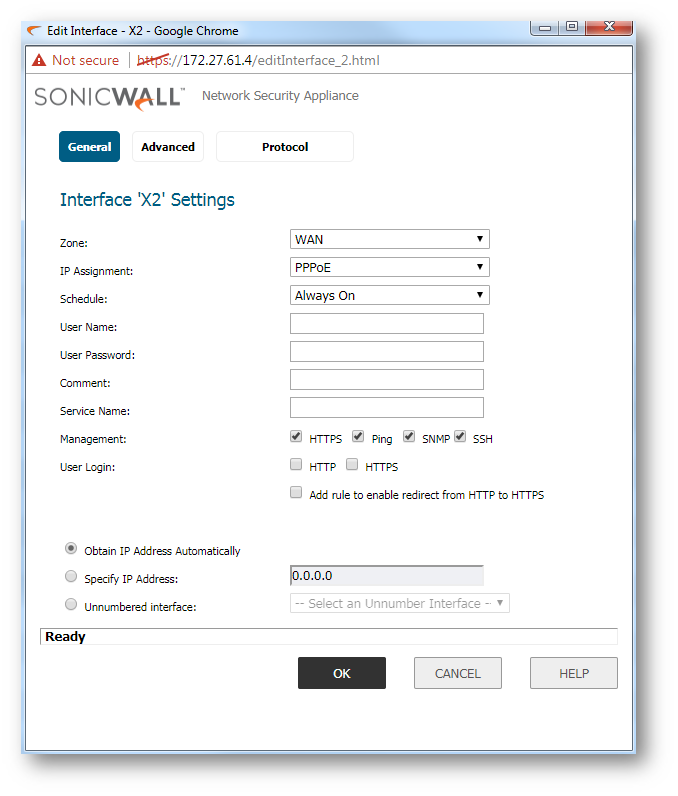
- Enter the User name and User password given by the ISP.
- At the bottom of the page, you can choose Obtain IP address automatically if the ISP is leasing out IP addresses, or you can manually specify the IP address by choosing Specify IP address and entering the IP address given by the ISP.
- Either check Obtain DNS server address automatically or manually specify it by choosing specify DNS servers.
- Click OK .
PPTP mode: Use this mode if your ISP is using a PPTP connection.
- Click Manage | Network | Interfaces tab.
- Click Configure for the X2 interface (Secondary WAN interface).
- Under IP assignment, choose PPTP from the drop down menu.
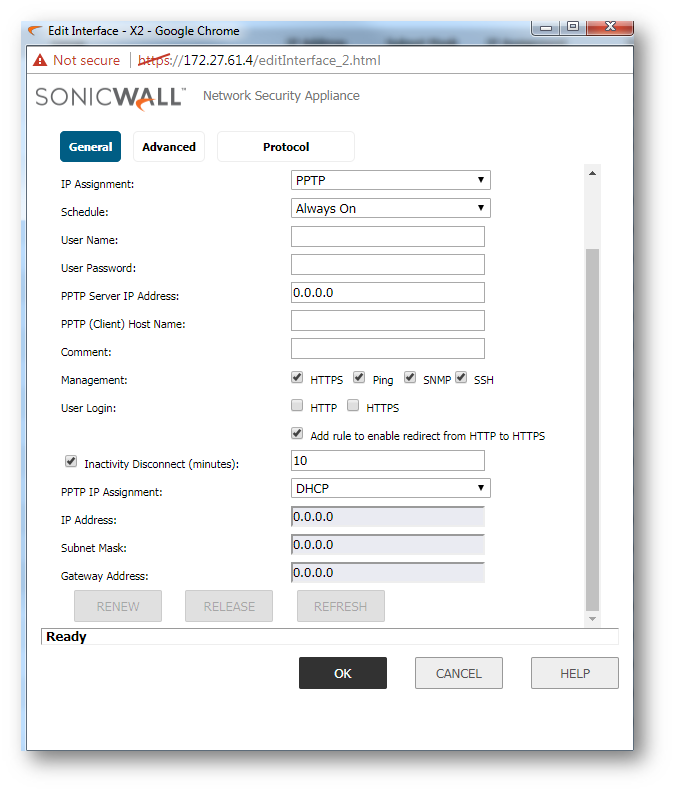
- Enter the User name and User password given by the ISP.
- Specify the PPTP server IP address given by the ISP under PPTP server IP address.
- The PPTP (Client) Host name will be given by the ISP.
- After entering these configurations, click the Release button and then the Renew button.
- Click OK.
L2TP mode: Use this mode if your ISP is using a L2TP connection.
- Click Manage | Network | Interfaces tab.
- Click Configure for the X2 interface (Secondary WAN interface).
- Under IP assignment, chooseL2PTP from the drop down menu.
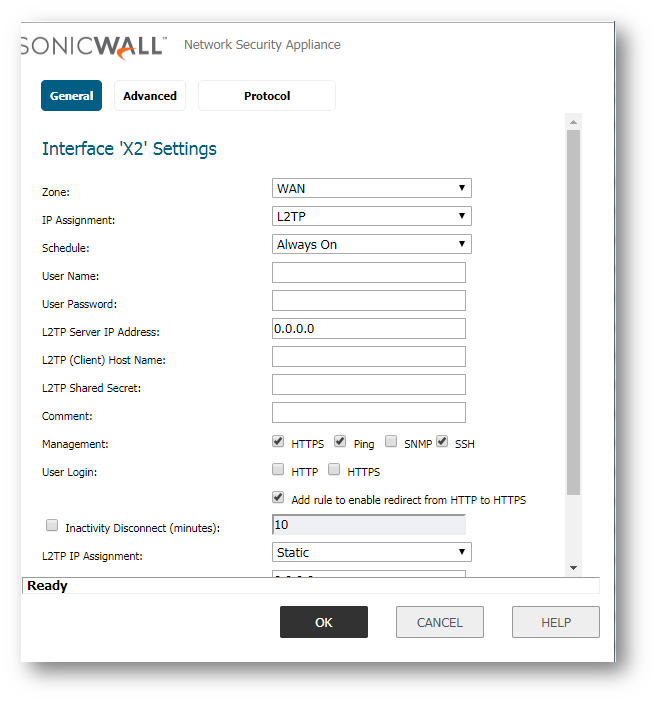
- Enter the User name and User password given by the ISP.
- Specify the L2TP server IP address given by the ISP under L2TP server IP address.
- The L2TP (Client) Host name will be given by the ISP.
- If the ISP assigned a static IP address, choose Static under L2TP IP assignment and manually enter the IP address with the Subnet mask and gateway router IP address given by the ISP.
- If the ISP is giving out a dynamic IP address, choose DHCP from the L2TP IP assignment dropdown menu.
- Click the Release button, followed by the renew button to obtain an IP address from the ISP.
- Click OK.
Related Articles
- How to Block Google QUIC Protocol on SonicOSX 7.0?
- How to block certain Keywords on SonicOSX 7.0?
- How internal Interfaces can obtain Global IPv6 Addresses using DHCPv6 Prefix Delegation
Categories
- Firewalls > NSa Series > Networking
- Firewalls > TZ Series > Networking
- Firewalls > NSv Series > Networking


 YES
YES NO
NO