-
Products
-
SonicPlatform
SonicPlatform is the cybersecurity platform purpose-built for MSPs, making managing complex security environments among multiple tenants easy and streamlined.
Discover More
-
-
Solutions
-
Federal
Protect Federal Agencies and Networks with scalable, purpose-built cybersecurity solutions
Learn MoreFederalProtect Federal Agencies and Networks with scalable, purpose-built cybersecurity solutions
Learn More - Industries
- Use Cases
-
-
Partners
-
Partner Portal
Access to deal registration, MDF, sales and marketing tools, training and more
Learn MorePartner PortalAccess to deal registration, MDF, sales and marketing tools, training and more
Learn More - SonicWall Partners
- Partner Resources
-
-
Support
-
Support Portal
Find answers to your questions by searching across our knowledge base, community, technical documentation and video tutorials
Learn MoreSupport PortalFind answers to your questions by searching across our knowledge base, community, technical documentation and video tutorials
Learn More - Support
- Resources
- Capture Labs
-
- Company
- Contact Us
How Can I Configure A Tunnel Interface VPN (Route-Based VPN) on NSSP 13700 ?


Description
This article describes how to configure Tunnel Interface VPN policies, which provide a route-based VPN solution. Tunnel Interface VPN policies differ from site to site VPN policies, which force the VPN policy configuration to include the network topology configuration. This makes it difficult to configure and maintain the VPN policy with a constantly changing network topology.
With the route-based VPN approach, network topology configuration is removed from the VPN policy configuration. The VPN policy configuration creates an unnumbered Tunnel Interface between two end points. Static or dynamic routes can then be added to the Tunnel Interface. The route-based VPN approach moves network configuration from the VPN policy configuration to static or dynamic route configuration. Route-based VPN makes configuring and maintaining the VPN policy easier, and provides flexibility on how traffic is routed.
Resolution
 NOTE: During the initial release, NSSP 13700 is only available in global mode. In a later release, SonicOSX with Policy mode will be available for selection.
This article explains how to configure route-based vpn on the NSSP 13700 and the required routes for the traffic flow:
Login to Site A (NSSP 13700 )
- Click Network in the top navigation menu.
- Navigate to IPSec VPN | Rules and Settings,click Add. The VPN policy window is displayed.
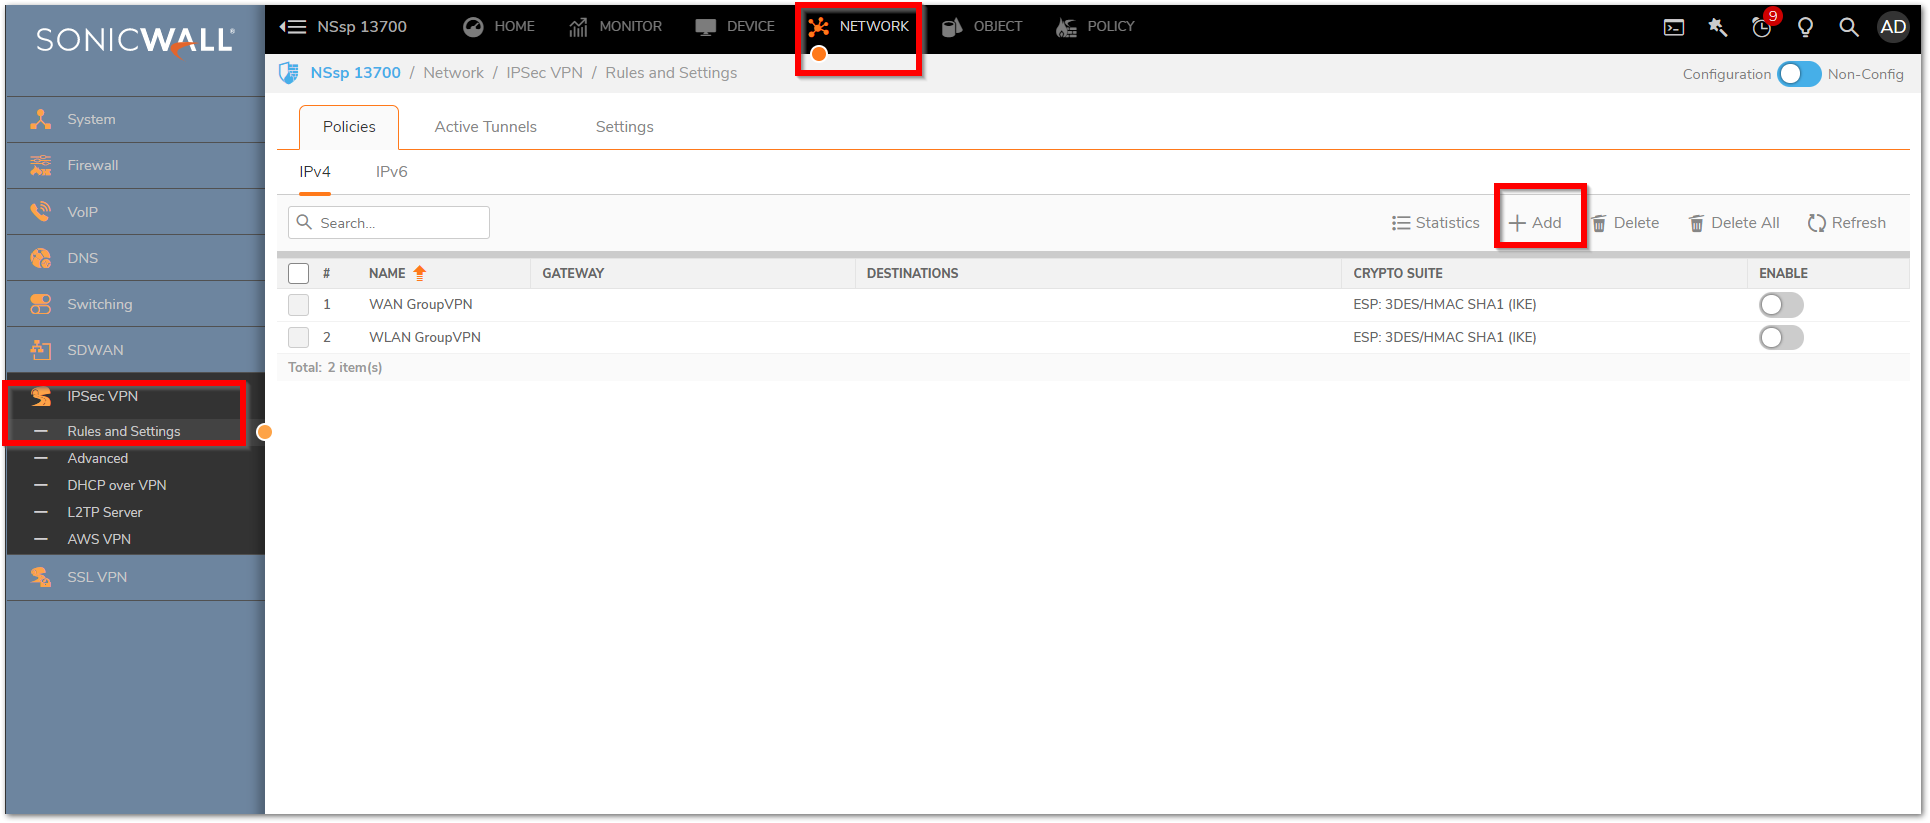
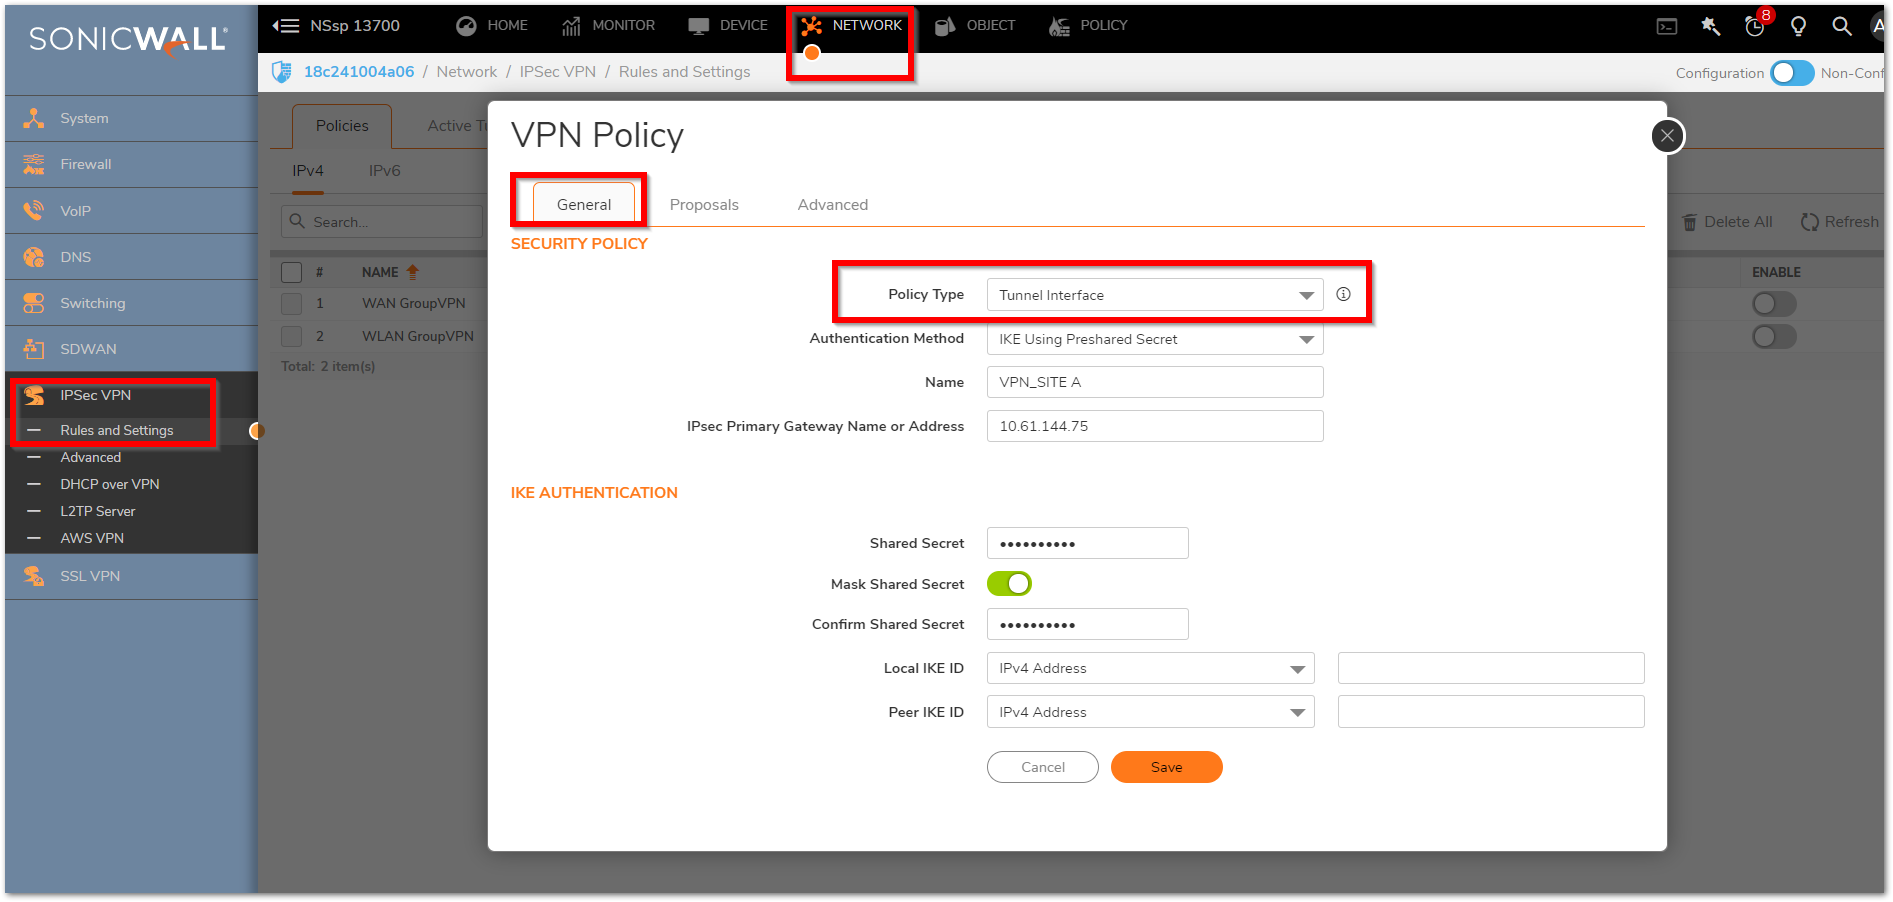
- Click on General Tab
- Select the Policy Type as Tunnel Interface from the drop-down list
- Specify the Name for identifying the VPN tunnels
- Enter the host name or IP address of the remote connection (Public IP of NSSP 13700 in Remote site) in the IPsec Primary Gateway Name or
Address field. - In the IKE Authentication Section, for the Shared Secret and Confirm Shared Secret fields, enter a Shared Secret password. This is used to set up the SA (Security Association). The Shared Secret password must be at least four characters long, and should include both numbers and letters.
- Optionally, you may specify a Local IKE ID (optional) and Peer IKE ID (optional) for this Policy.
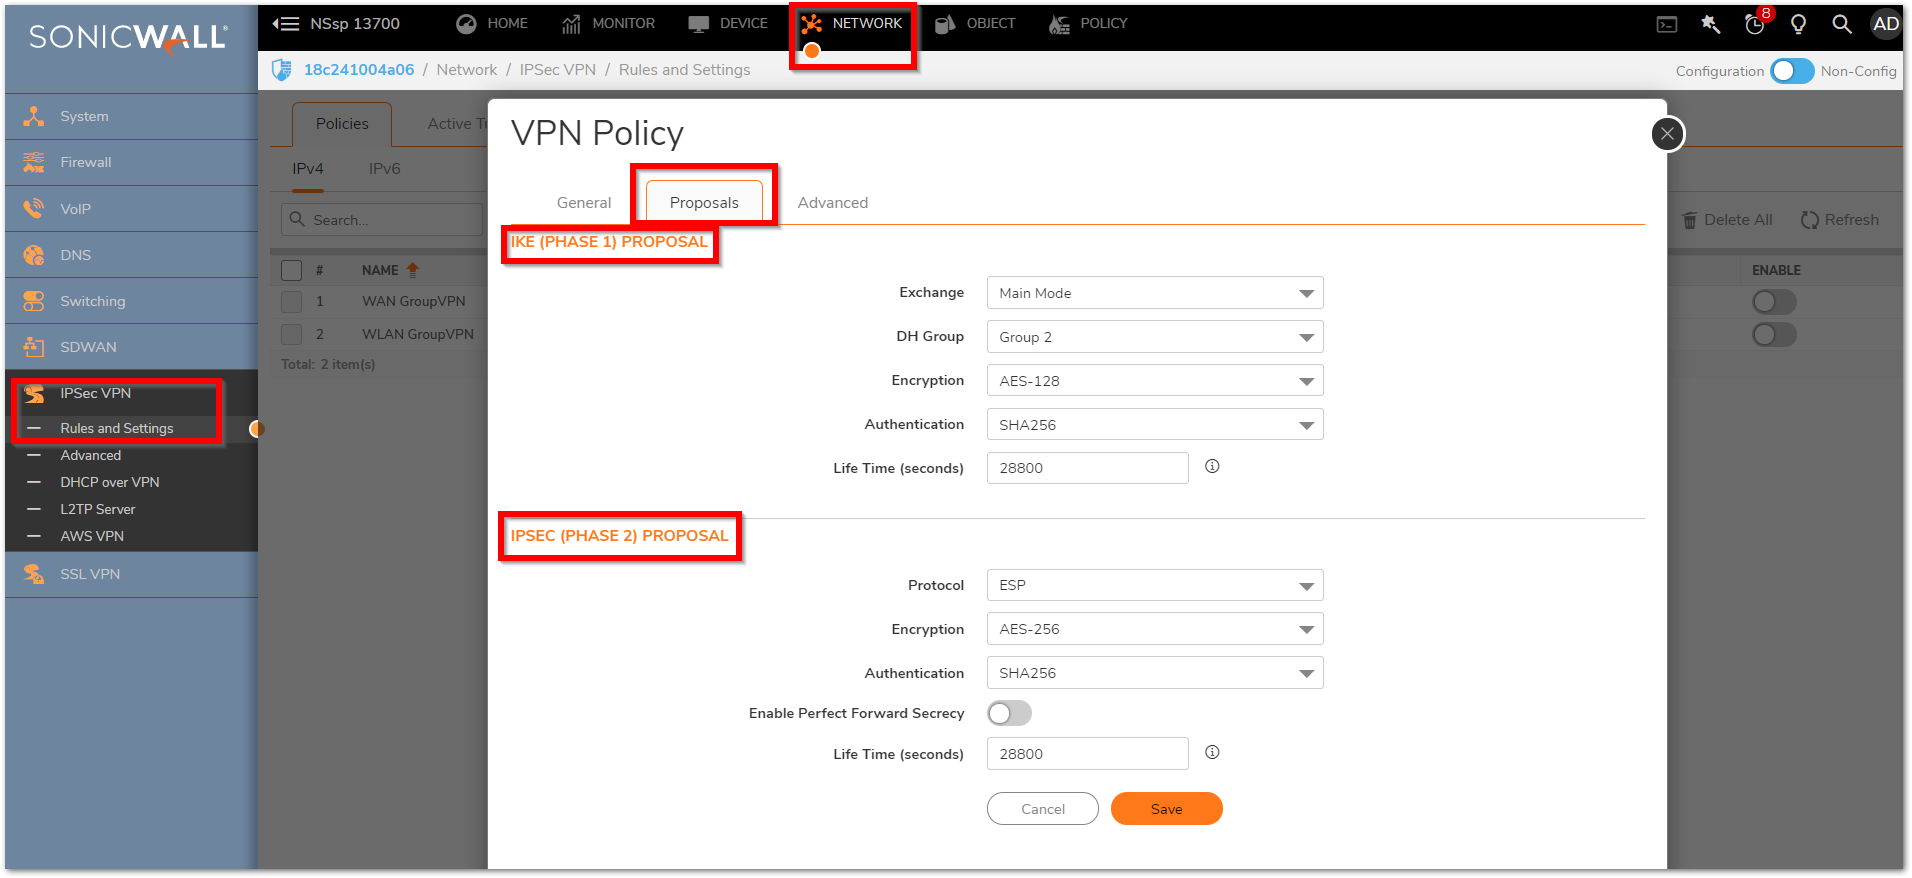
Click the Proposals Tab.
- Under IKE (Phase 1) Proposal, select Main Mode from the Exchange menu.
- Under IKE (Phase 1) Proposal, the default values for DH Group, Encryption, Authentication, and Life Time are acceptable for most VPN configurations. Ensure the Phase 1 values on the opposite side of the tunnel are configured to match.
- Under IPSec (Phase 2) Proposal, the default values for Protocol, Encryption, Authentication, Enable Perfect Forward Secrecy, DH Group, and Lifetime are acceptable for most VPN SA configurations. Be sure the Phase 2 values on the opposite side of the tunnel are configured to match.
Click Advanced tab.
- Select Enable Keep Alive to use heartbeat messages between peers on this VPN tunnel. If one end of the tunnel fails, using Keepalives will allow for the automatic renegotiation of the tunnel once both sides become available again without having to wait for the proposed Life Time to expire.
- Select an interface from the VPN Policy bound to menu. Two different WAN interfaces cannot be selected from the drop-down menu.
Follow the same set of Instructions on the Site B Firewall (NSSP 13700) and specify the public Host name or IP address of the ( NSSP 13700 Site). Please ensure the proposals are set as same on the remote site as specified on the Site A.
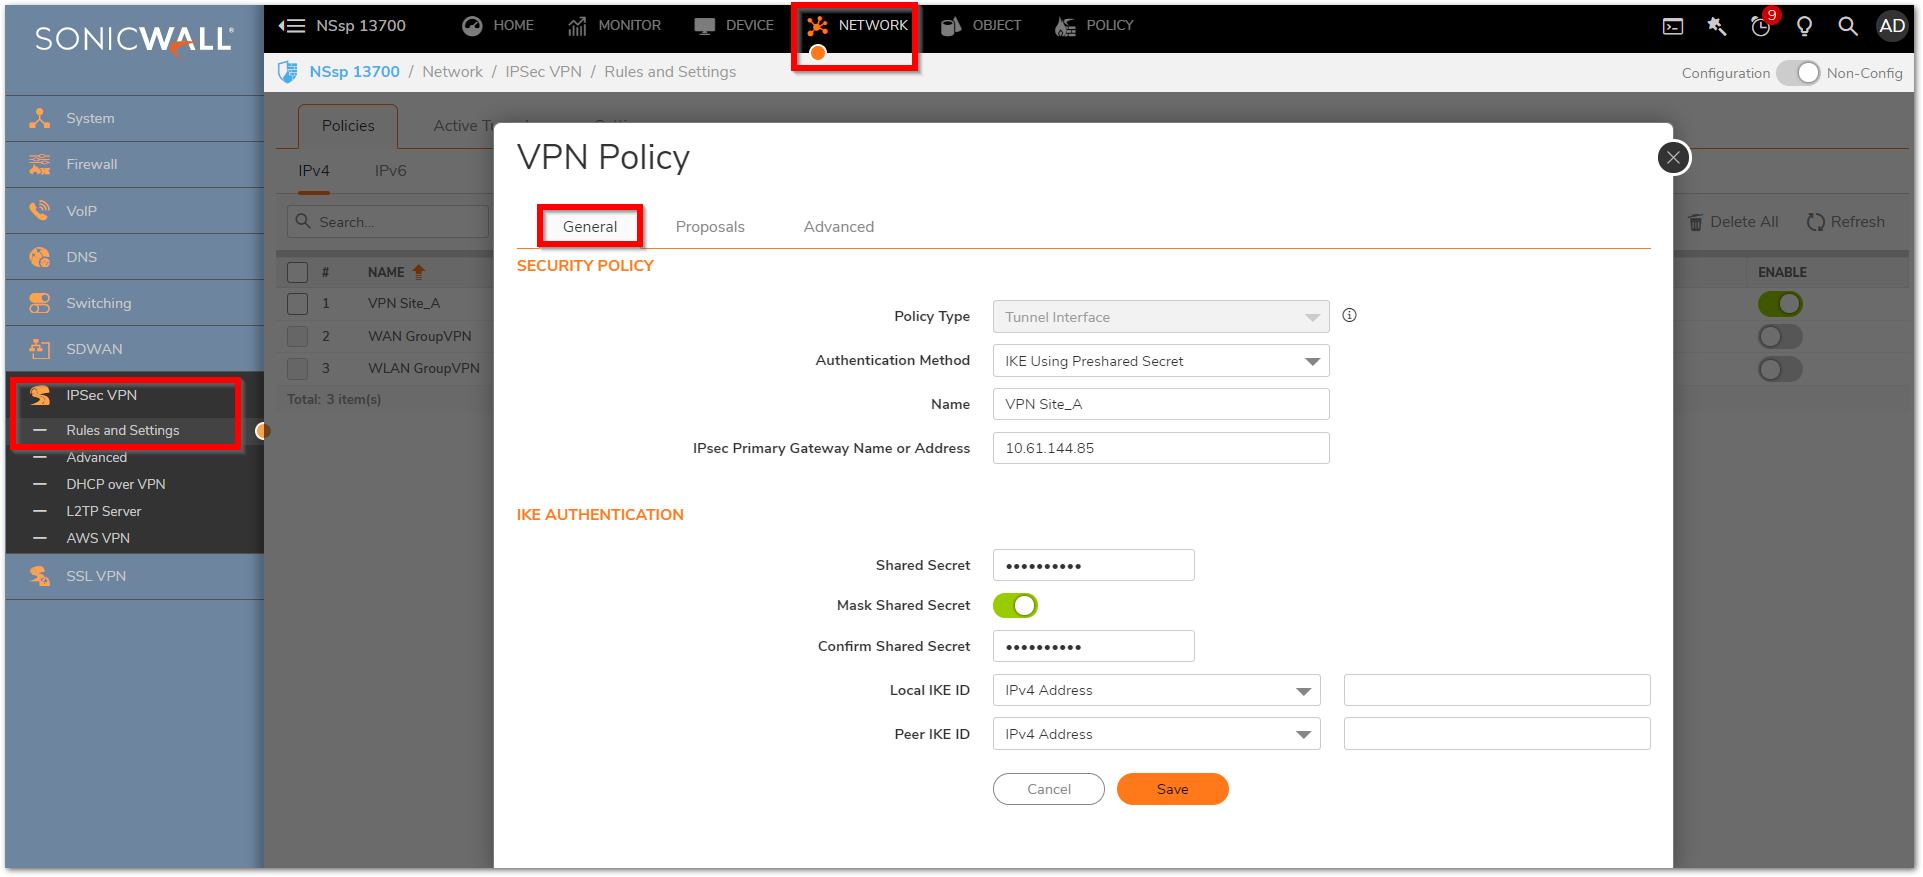
Creating a Static Route for the Tunnel Interface on Site A NSSP 13700
- Navigate to POLICY | Rules and Policies > Routing Rules, Click on Add
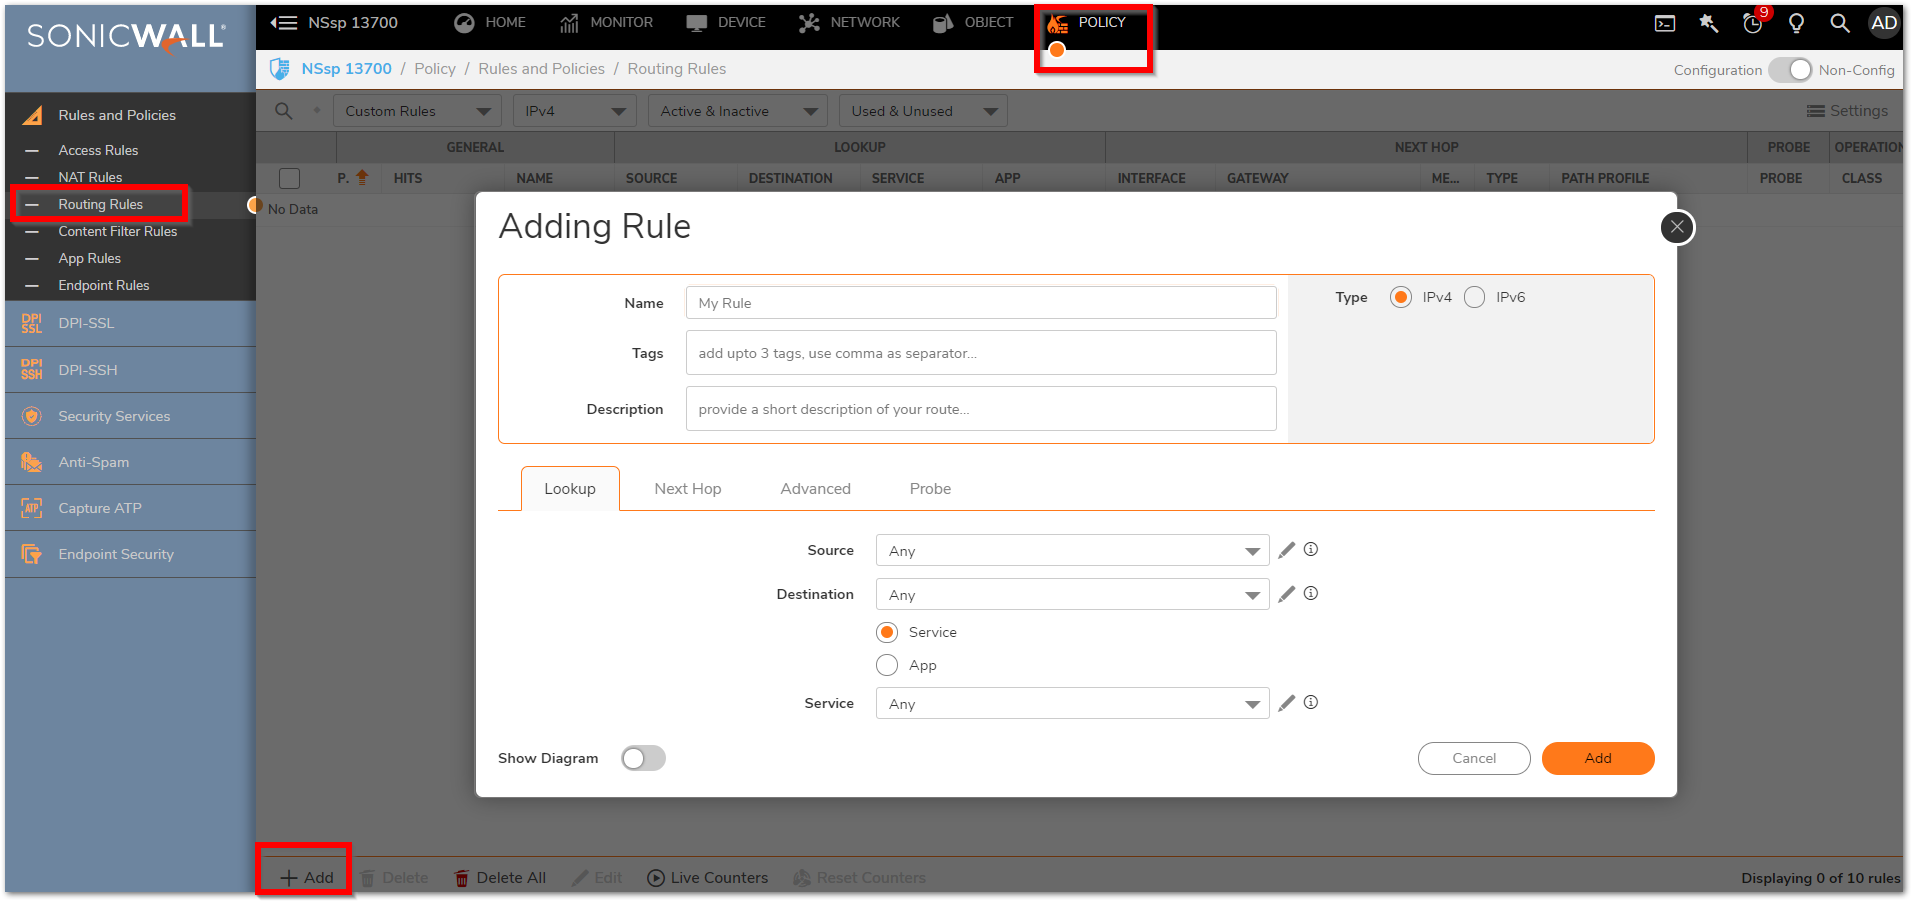
- Specify the Name to identify the route policy
- Under the Lookup, Select the Source and Destination Network from the drop-down menu and the Service.
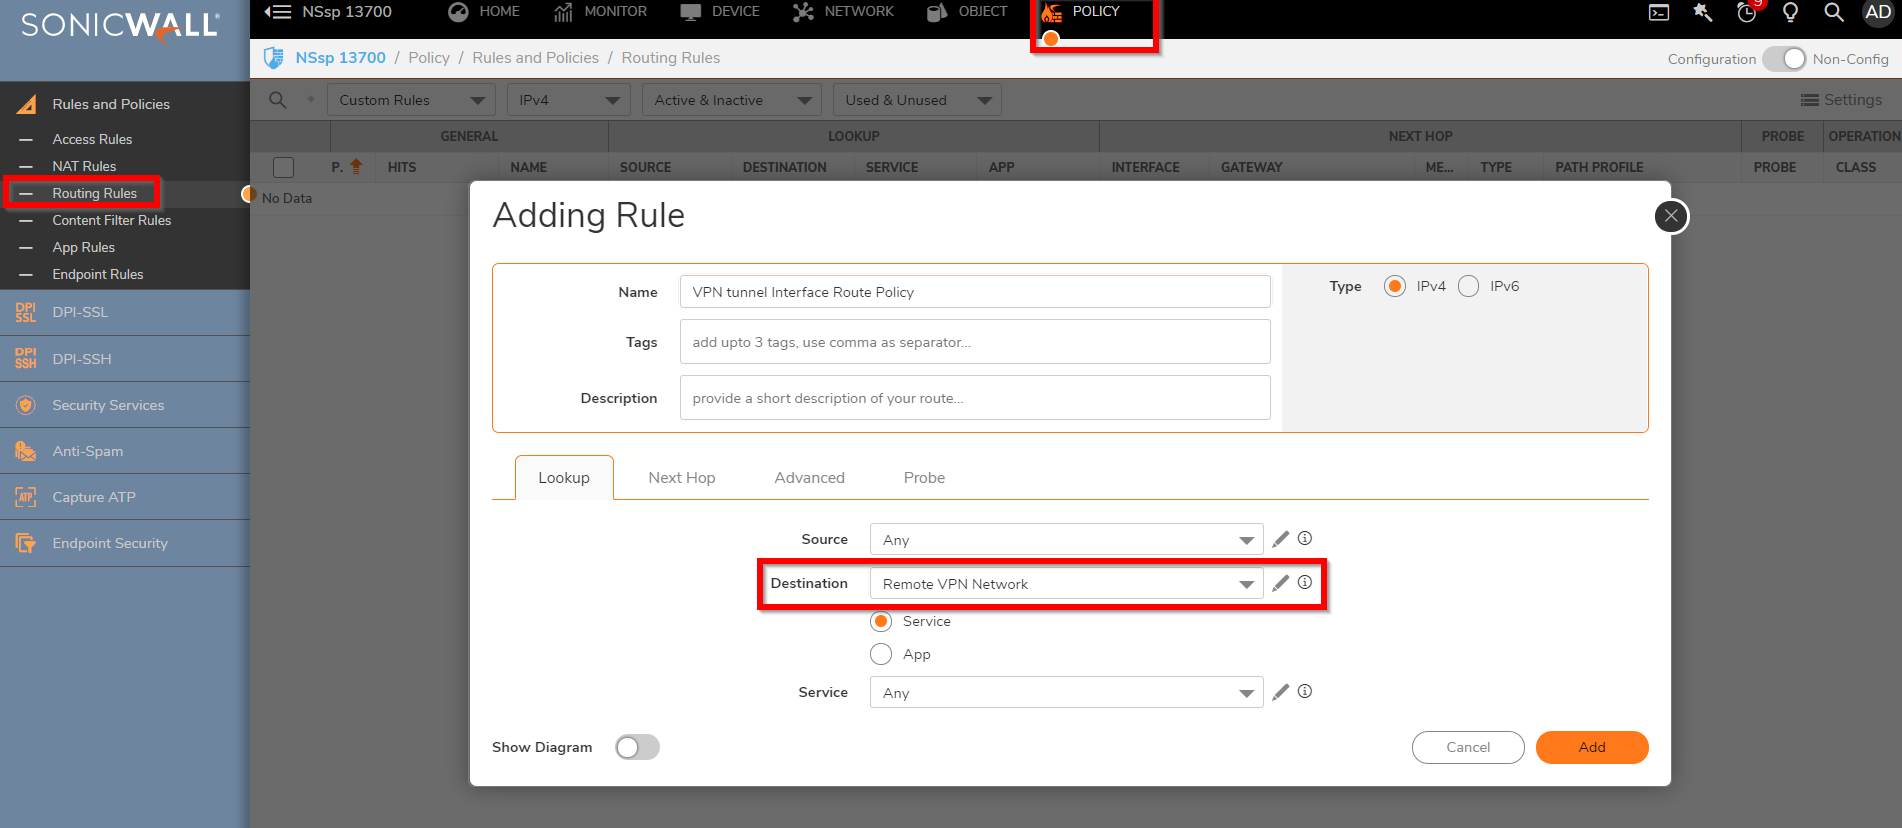
- Select the VPN tunnel (VPN Site_A) for the Interface from the drop-down.
- Specify a Metric value to define the route priority. The lower the metric, Higher will be the priority. Metrics and administrative distance affect network performance, reliability, and circuit selection.

- Disable route when the interface is disconnected
- Auto-add Access Rules option is selected, firewall rules are automatically added and traffic is allowed between the configured networks using the tunnel interface.
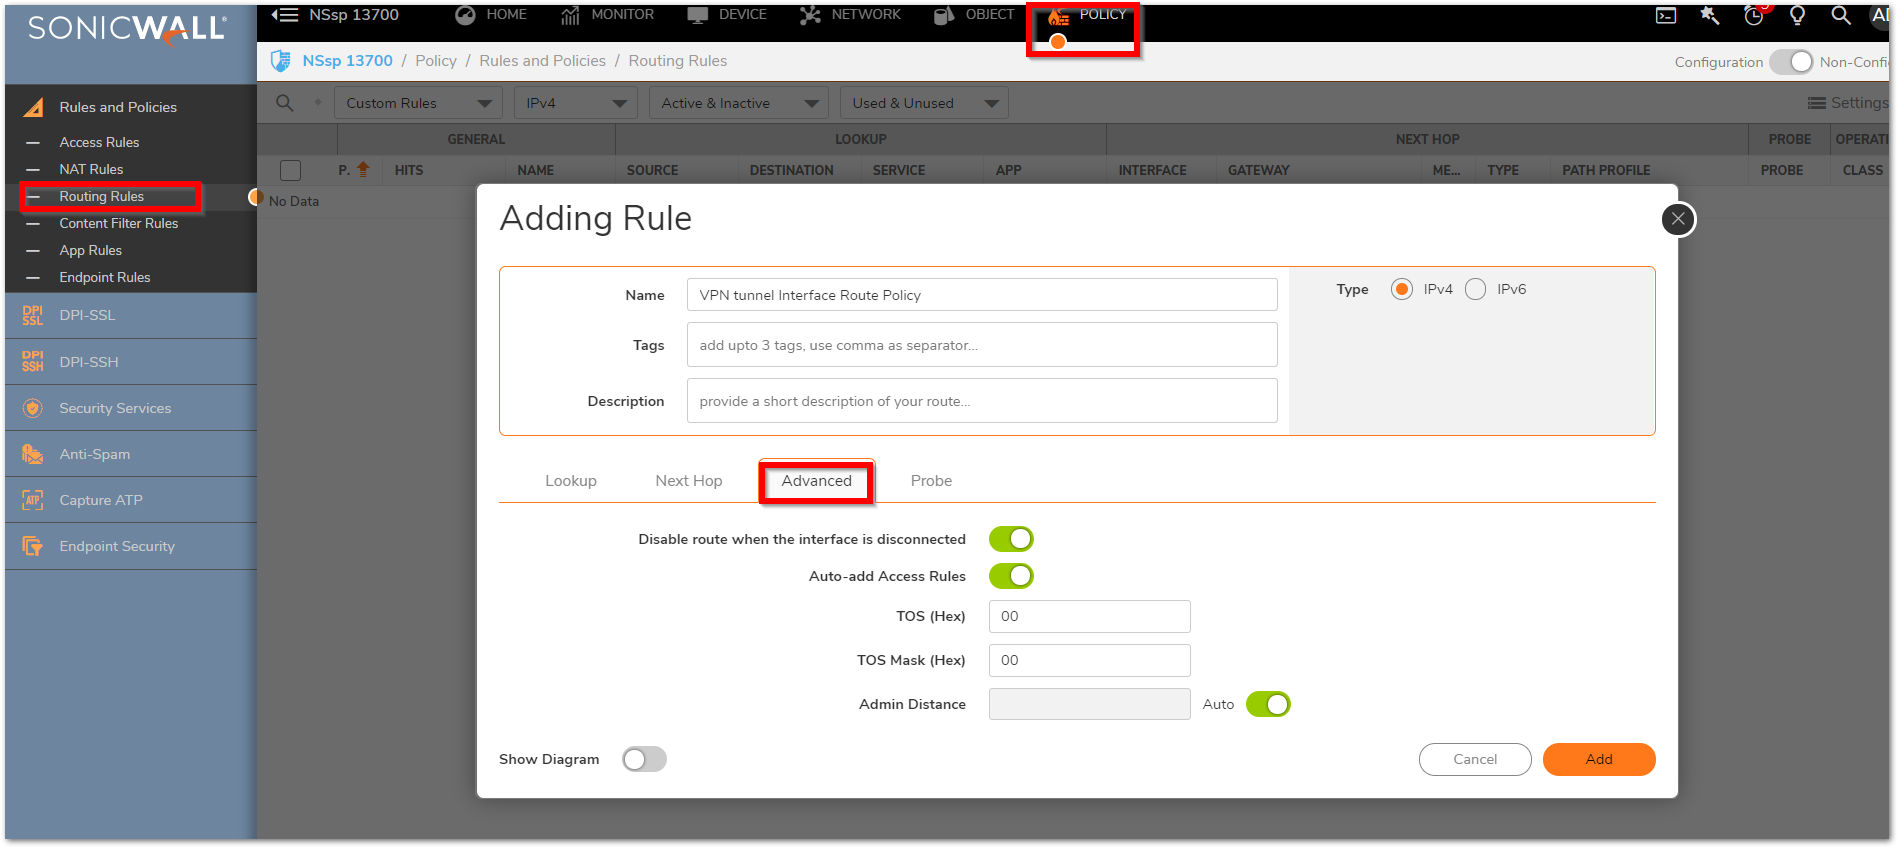
Route Policy will be displayed as shown below:

Configure the similar route policy on the Remote NSSP 13700 following the steps listed before.
Related Articles
- Error:"Invalid API Argument" when modifying the access rules
- Cysurance Partner FAQ
- Configure probe monitoring for WAN Failover and Loadbalancing - SonicWall UTM


 YES
YES NO
NO