-
Products
-
SonicPlatform
SonicPlatform is the cybersecurity platform purpose-built for MSPs, making managing complex security environments among multiple tenants easy and streamlined.
Discover More
-
-
Solutions
-
Federal
Protect Federal Agencies and Networks with scalable, purpose-built cybersecurity solutions
Learn MoreFederalProtect Federal Agencies and Networks with scalable, purpose-built cybersecurity solutions
Learn More - Industries
- Use Cases
-
-
Partners
-
Partner Portal
Access to deal registration, MDF, sales and marketing tools, training and more
Learn MorePartner PortalAccess to deal registration, MDF, sales and marketing tools, training and more
Learn More - SonicWall Partners
- Partner Resources
-
-
Support
-
Support Portal
Find answers to your questions by searching across our knowledge base, community, technical documentation and video tutorials
Learn MoreSupport PortalFind answers to your questions by searching across our knowledge base, community, technical documentation and video tutorials
Learn More - Support
- Resources
- Capture Labs
-
- Company
- Contact Us
How can I configure a Tunnel Interface VPN (Dynamic Routing BGP or OSPF) between two SonicWalls?


Description
How to Configure a Tunnel Interface VPN (Route-based VPN) between two SonicWall UTM appliances running SonicOS 5.9 firmware and above.
The advantages of Tunnel Interface VPN (Route-Based VPN) between two SonicWall UTM appliances include.
- The network topology configuration is removed from the VPN policy configuration.
- More flexibility on how traffic is routed. With this feature, users can now define multiple paths for overlapping networks over a clear or redundant VPN.
 NOTE: Route-based VPN using a tunnel interface is not supported with 3rd party devices.This article applies only to the SonicWall UTM models above TZ 215 running SonicOS 5.9 firmware.
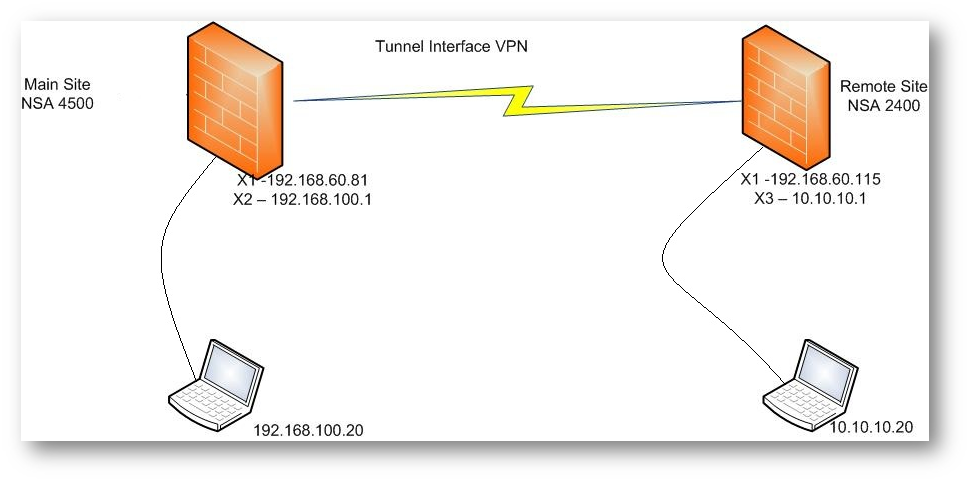
Network Diagram
Resolution
Resolution for SonicOS 7.X
This release includes significant user interface changes and many new features that are different from the SonicOS 6.5 and earlier firmware. The below resolution is for customers using SonicOS 7.X firmware.
- Log into the SonicWall on main site.
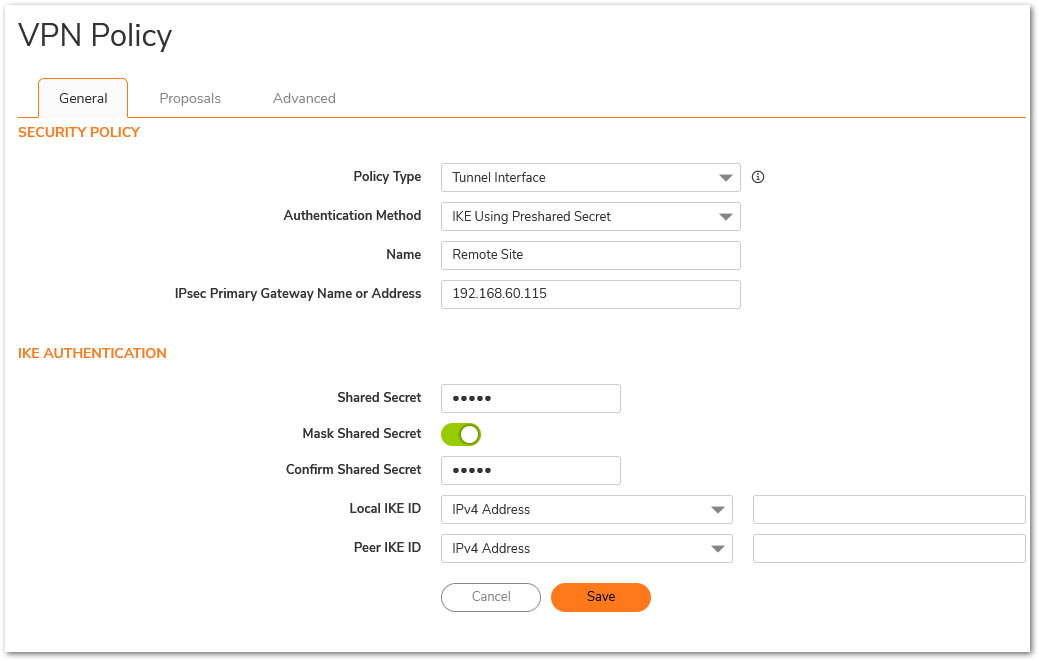
- Navigate to Network| IPsec VPN| Rules and Settings| Policies and click Add. The General tab of Tunnel Interface VPN named Remote Site is shown w/ the IPSec Gateway equal to the other device's X1 IP address, 192.168.60.115.
 NOTE: The settings used on the Proposals tab are not shown, but these must be identical on the Tunnel Interface VPN's done on both appliances.
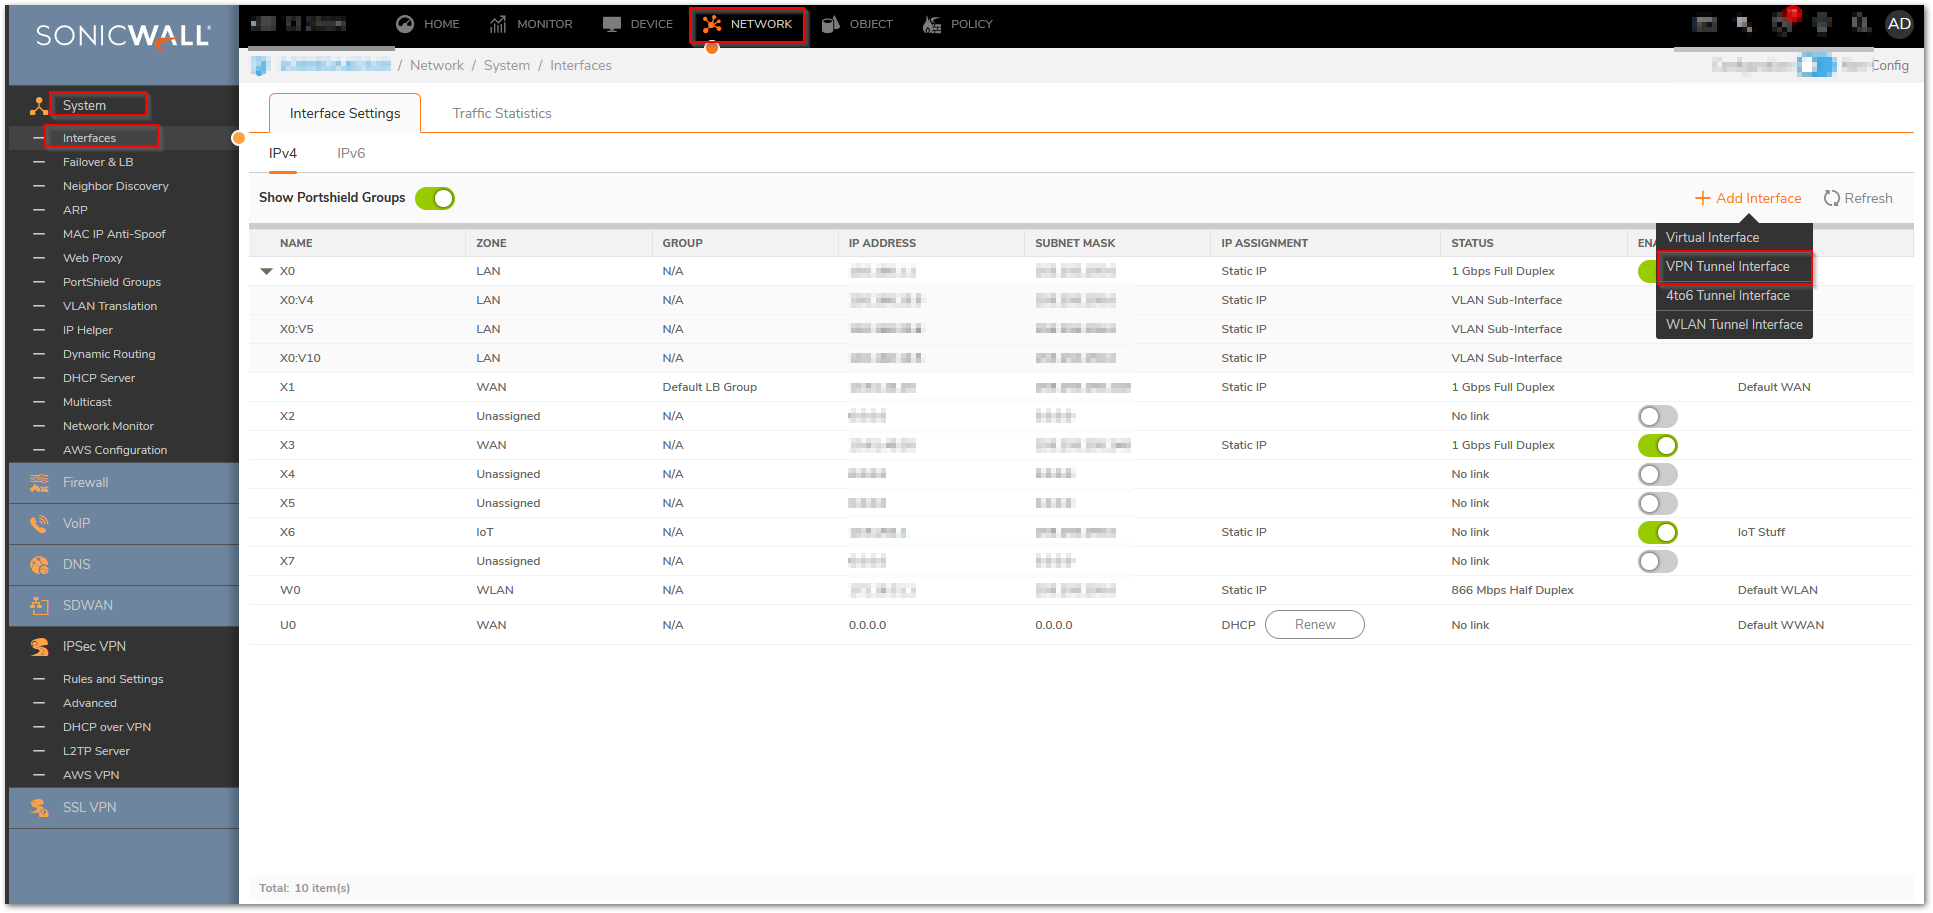
- Navigate to Network | System | Interfaces.
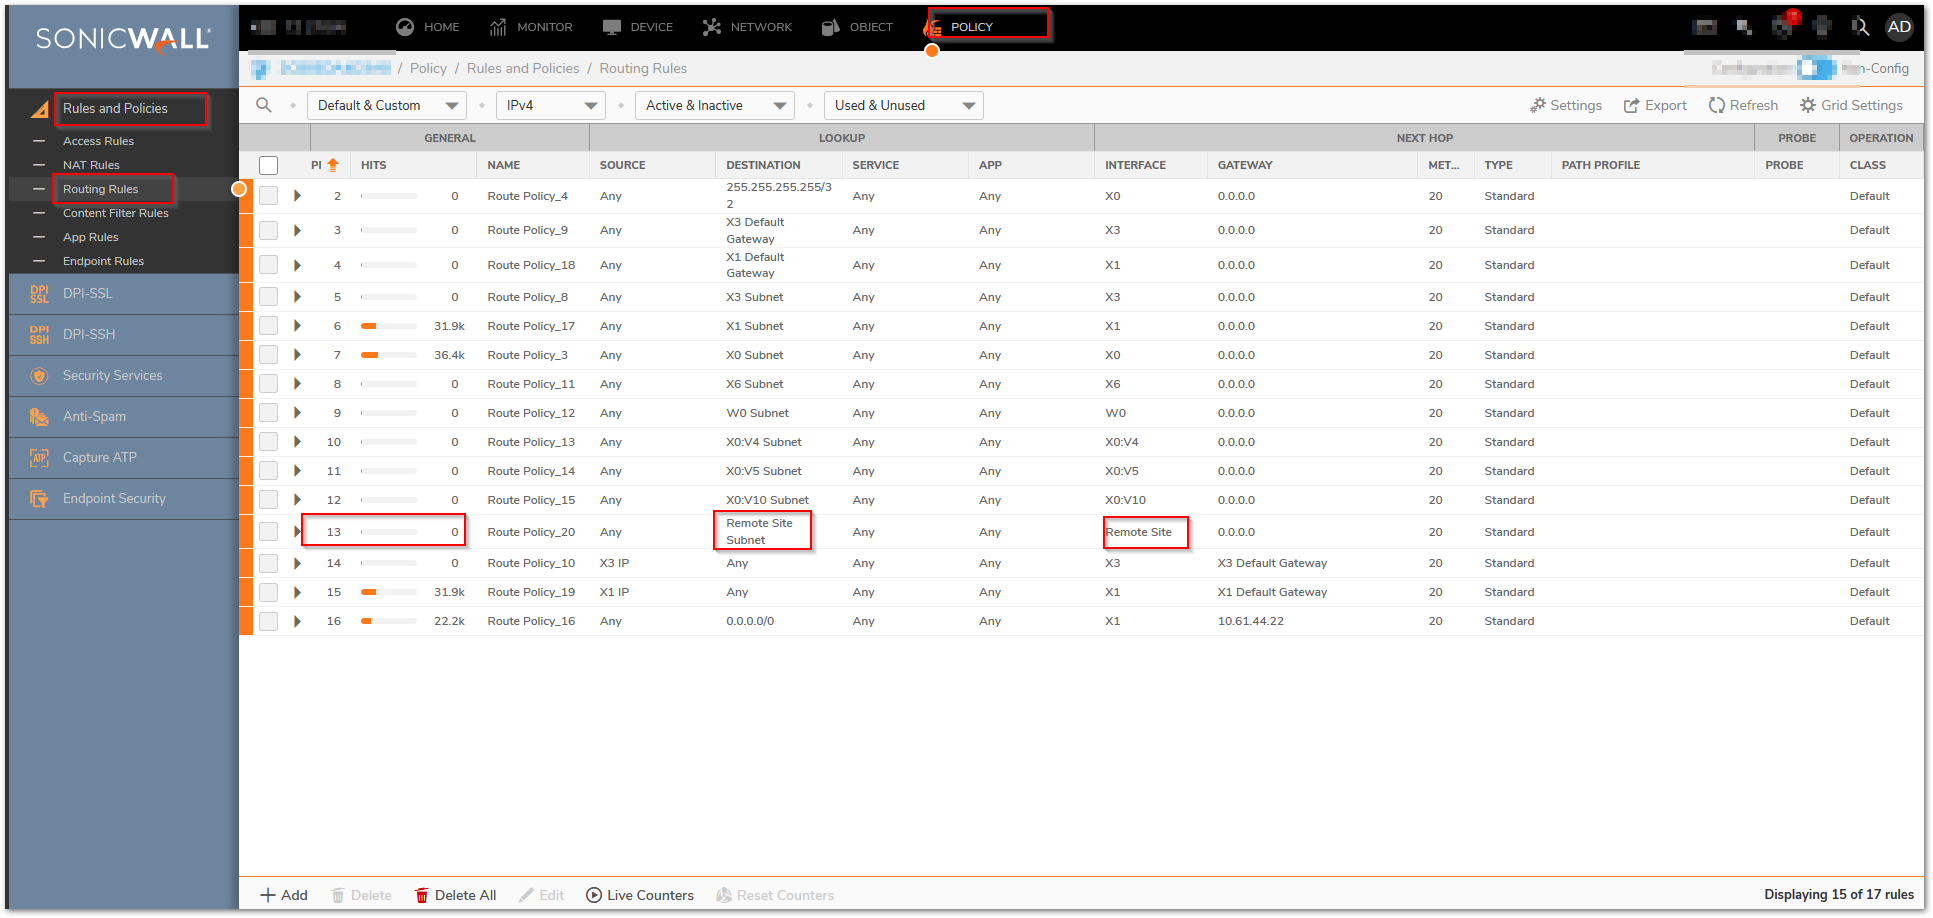
- Configure the tunnel with the local subnet of the remote site which needs to be access through VPN tunnel as shown below.
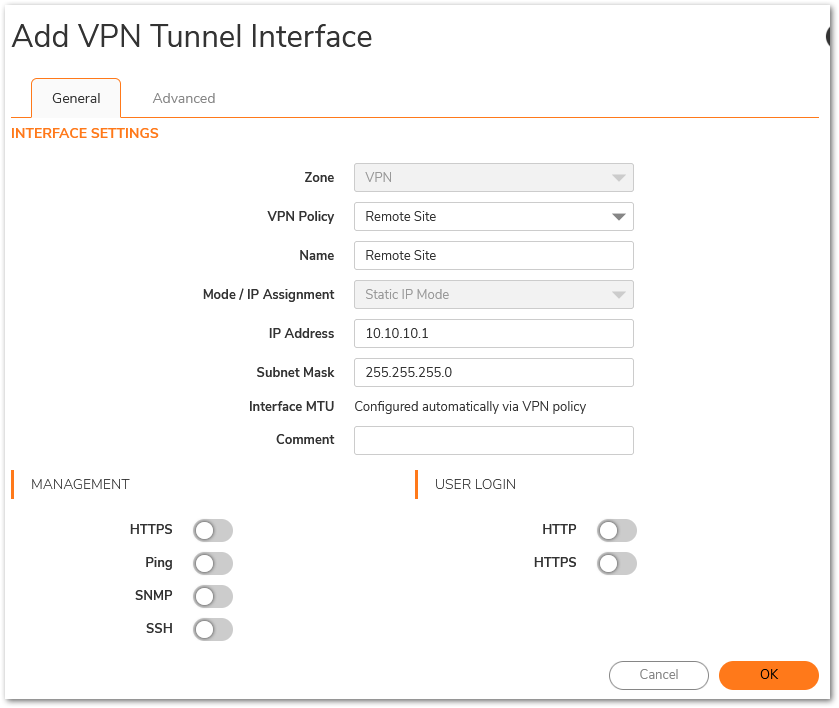
- The default route to reach the remote network gets automatically added as shown.
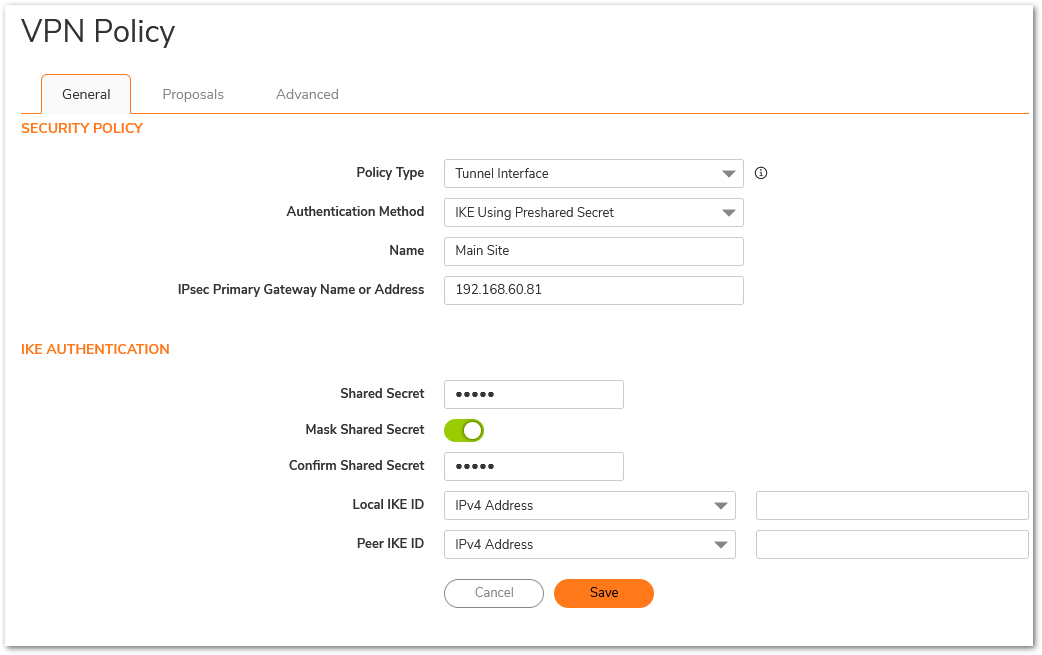
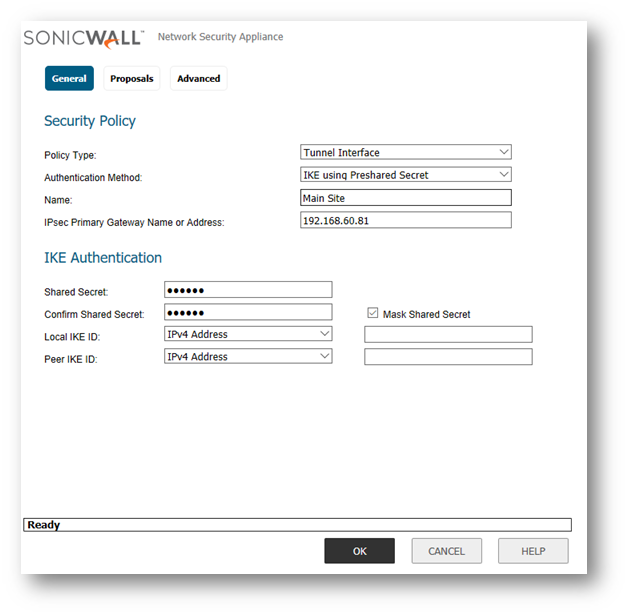
- Log into the remote SonicWall, navigate to CNetwork| IPsec VPN| Rules and Settings| Policies and click Add.. The General tab of Tunnel Interface VPN named Main Site is shown w/ the IPSec Gateway equal to the other device's X1 IP address, 192.168.60.81.
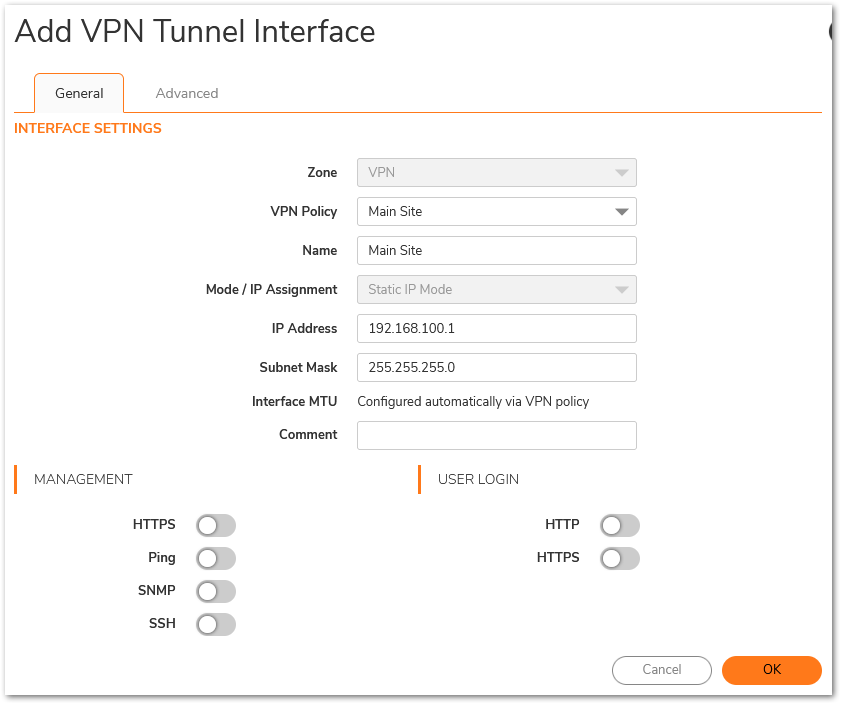
- Navigate to Network | System | Interfaces.
- Configure the tunnel with the local subnet of the remote site which needs to be access through VPN tunnel as shown below.
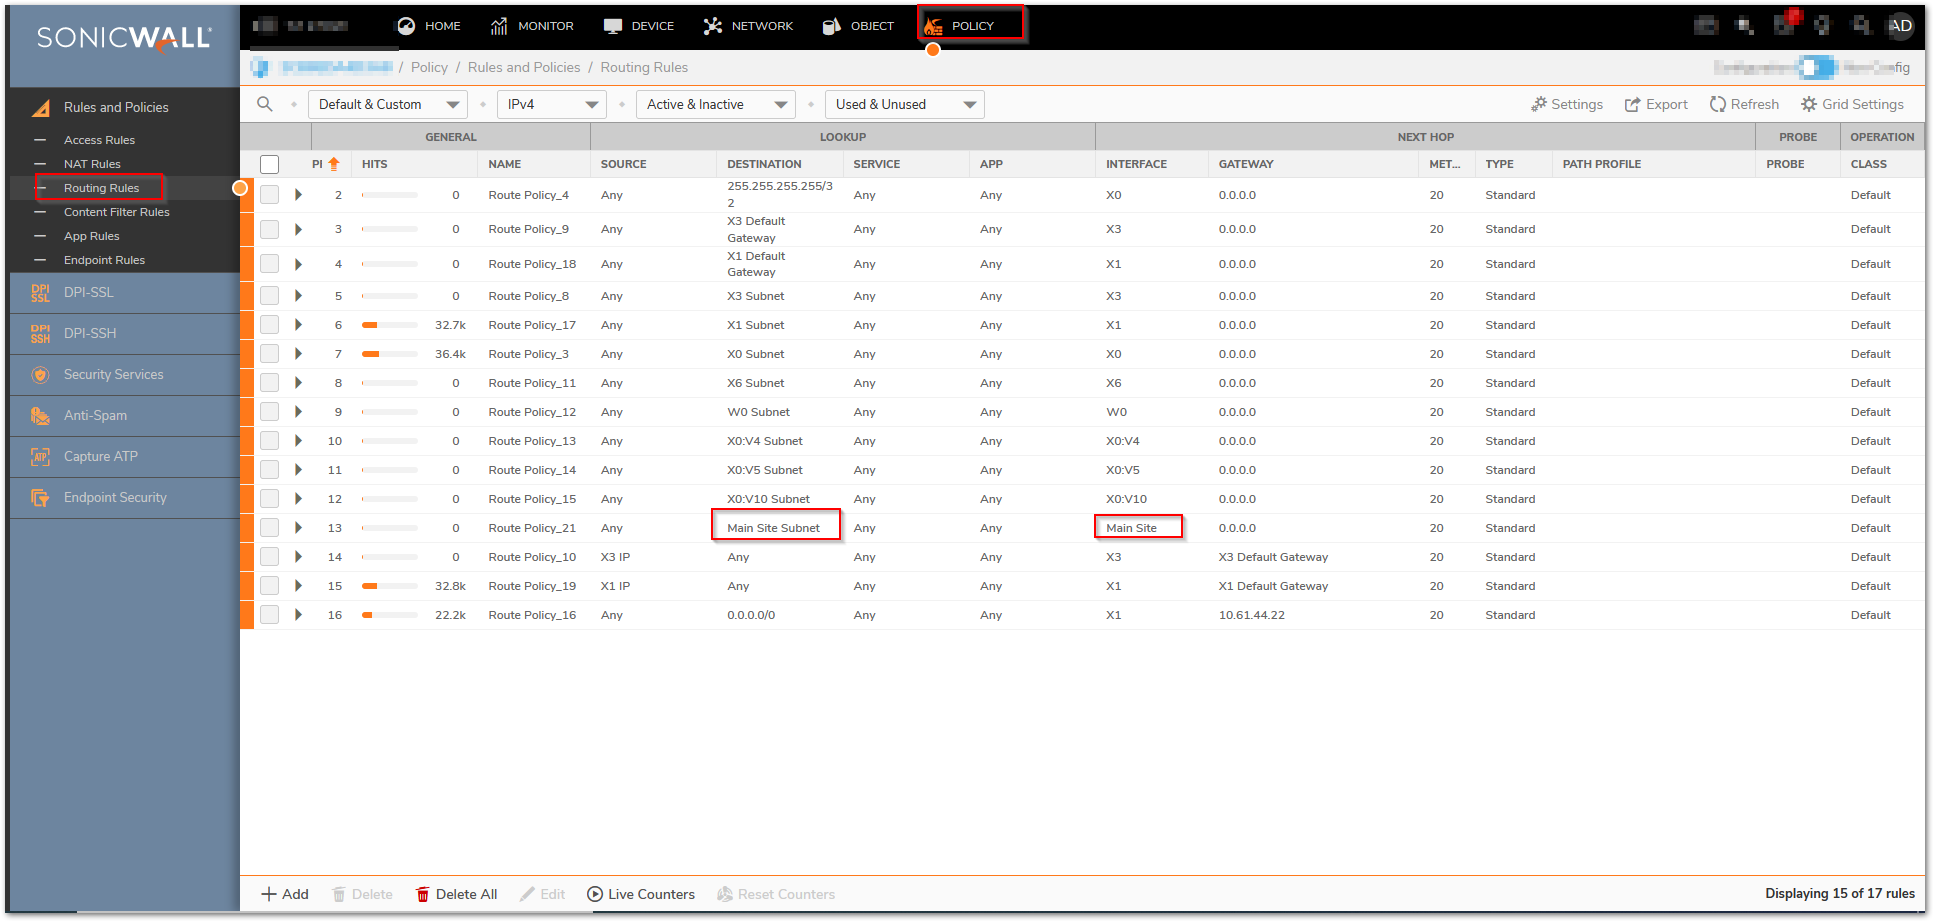
- The default route to reach the remote network gets automatically added as shown.
Resolution for SonicOS 6.5
This release includes significant user interface changes and many new features that are different from the SonicOS 6.2 and earlier firmware. The below resolution is for customers using SonicOS 6.5 firmware.
- Log into the SonicWall on main site.
- Navigate to Manage | Connectivity | VPN | Base Settings and click Add. The General tab of Tunnel Interface VPN named Remote Site is shown w/ the IPSec Gateway equal to the other device's X1 IP address, 192.168.60.115.
 NOTE: The settings used on the Proposals tab are not shown, but these must be identical on the Tunnel Interface VPN's done on both appliances.
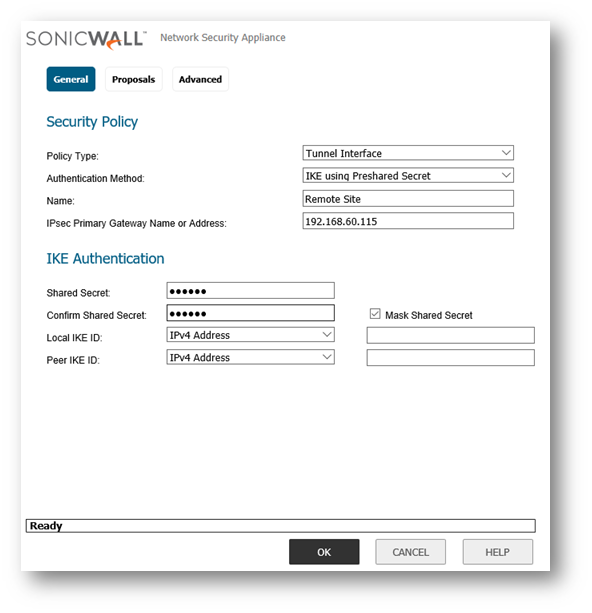
- Navigate to System Setup | Network | Interfaces.
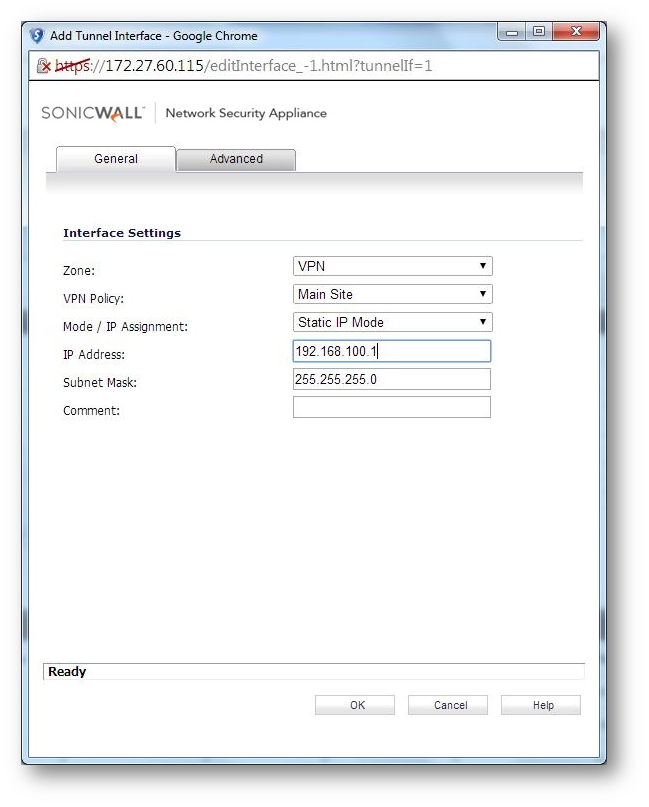
- Configure the tunnel with the local subnet of the remote site which needs to be access through VPN tunnel as shown below.
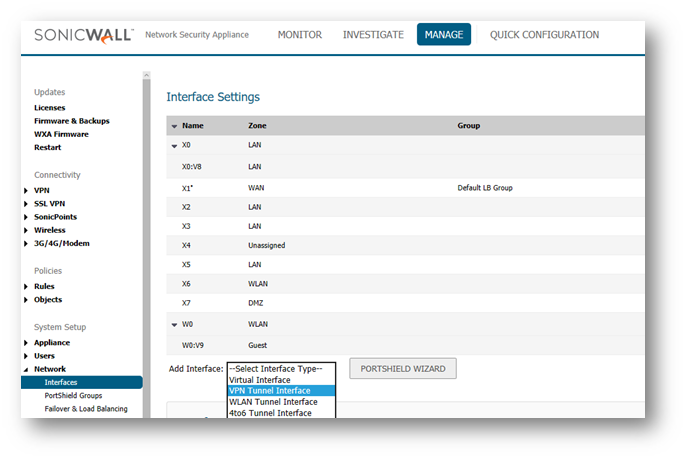
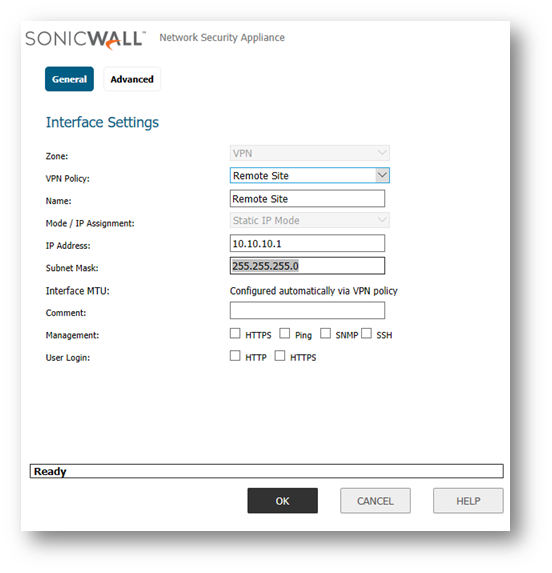
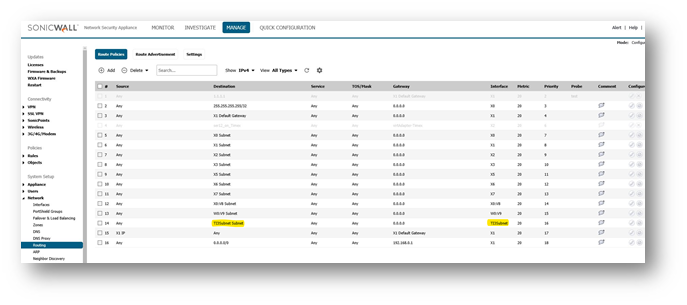
- The default route to reach the remote network gets automatically added as shown.
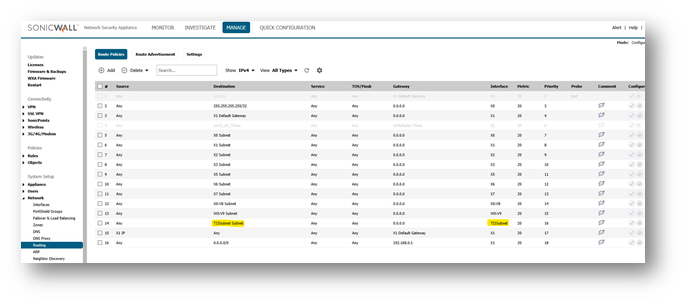
- Log into the remote SonicWall, navigate to Connectivity | VPN | Basic Settings and click Add. The General tab of Tunnel Interface VPN named Main Site is shown w/ the IPSec Gateway equal to the other device's X1 IP address, 192.168.60.81.
 NOTE:The settings used on the Proposals tab are not shown, but these must be identical on the Tunnel Interface VPN's done on both appliances.
- Navigate to Network | Interfaces.
- Configure the tunnel with the local subnet of the remote site which needs to be access through VPN tunnel as shown below.
- The default route to reach the main network gets automatically added as shown.
Resolution for SonicOS 6.2 and Below
The below resolution is for customers using SonicOS 6.2 and earlier firmware. For firewalls that are generation 6 and newer we suggest to upgrade to the latest general release of SonicOS 6.5 firmware.
- Log into the SonicWall on main site.
- Navigate to VPN | Settings and click Add. The General tab of Tunnel Interface VPN named Remote Site is shown w/ the IPSec gateway equal to the other device's X1 IP address, 192.168.60.115.
 NOTE: The settings used on the Proposals tab are not shown, but these must be identical on the Tunnel Interface VPN's done on both appliances.
- Navigate to Network | Interfaces.
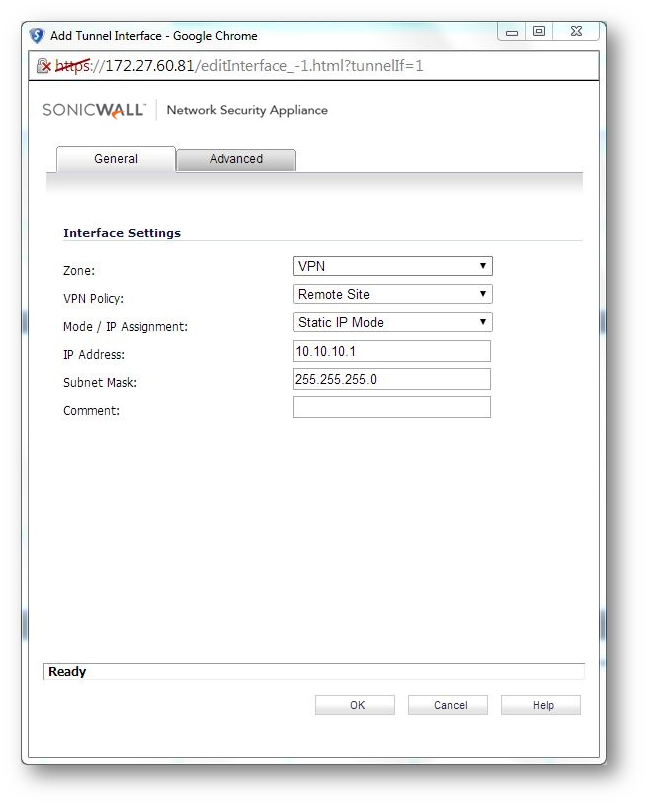
- Configure the tunnel with the local subnet of the remote site which needs to be access through VPN tunnel as shown below,

- The default route to reach the remote network gets automatically added as shown.
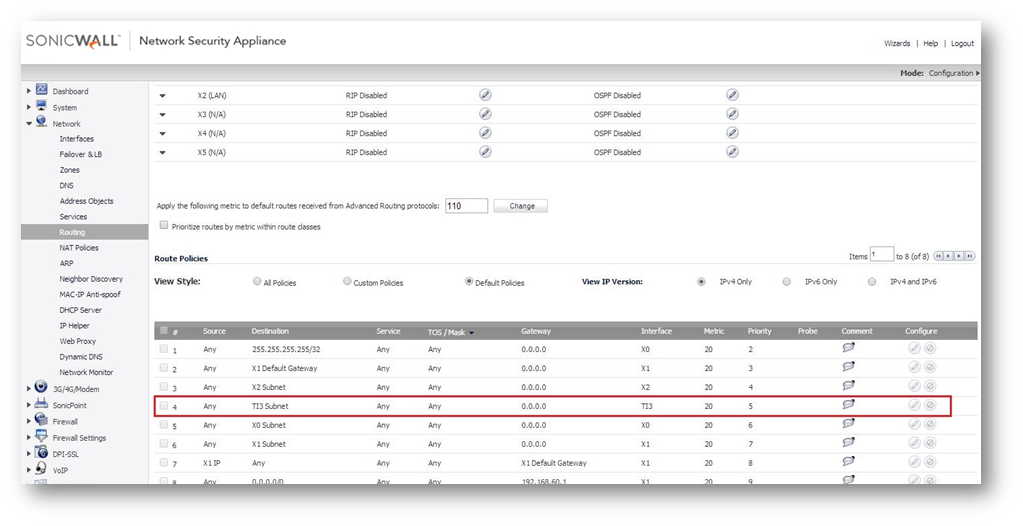
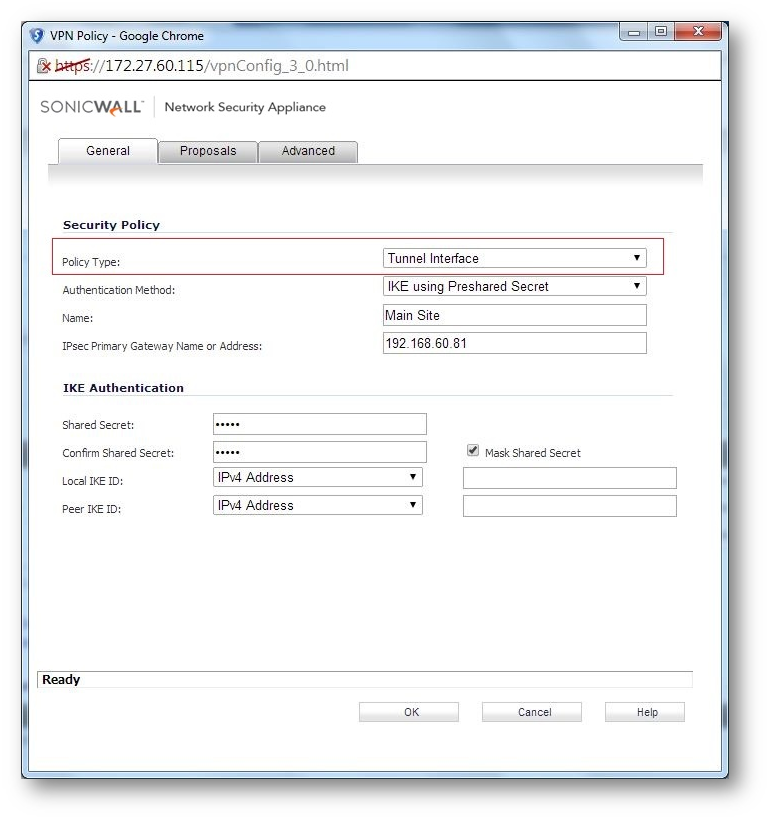
- Log into the remote SonicWall; navigate to VPN |Settings and click Add. The General tab of Tunnel Interface VPN named Main Site is shown w/ the IPSec Gateway equal to the other device's X1 IP address, 192.168.60.81.
 NOTE:The settings used on the Proposals tab are not shown, but these must be identical on the Tunnel Interface VPN's done on both appliances.
- Navigate to Network | Interfaces.
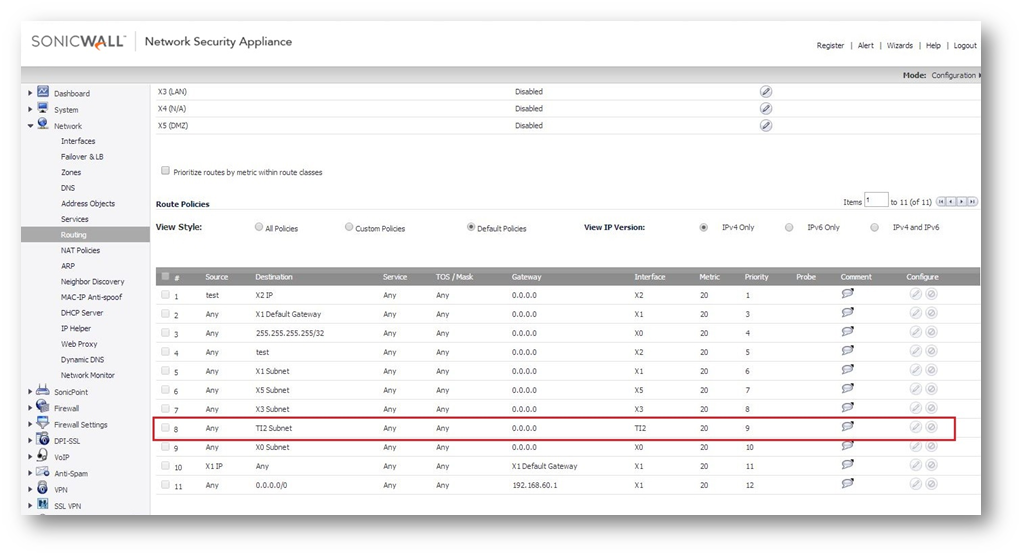
- Configure the tunnel with the local subnet of the remote site which needs to be access through VPN tunnel as shown below.

- The default route to reach the main network gets automatically added as shown.
Related Articles
- Error:"Invalid API Argument" when modifying the access rules
- Cysurance Partner FAQ
- Configure probe monitoring for WAN Failover and Loadbalancing - SonicWall UTM
Categories
- Firewalls > NSa Series > VPN
- Firewalls > TZ Series > VPN
- Firewalls > NSv Series > VPN


 YES
YES NO
NO