


-
Products
-
SonicPlatform
SonicPlatform is the cybersecurity platform purpose-built for MSPs, making managing complex security environments among multiple tenants easy and streamlined.
Discover More
-
-
Solutions
-
Federal
Protect Federal Agencies and Networks with scalable, purpose-built cybersecurity solutions
Learn MoreFederalProtect Federal Agencies and Networks with scalable, purpose-built cybersecurity solutions
Learn More - Industries
- Use Cases
-
-
Partners
-
Partner Portal
Access to deal registration, MDF, sales and marketing tools, training and more
Learn MorePartner PortalAccess to deal registration, MDF, sales and marketing tools, training and more
Learn More - SonicWall Partners
- Partner Resources
-
-
Support
-
Support Portal
Find answers to your questions by searching across our knowledge base, community, technical documentation and video tutorials
Learn MoreSupport PortalFind answers to your questions by searching across our knowledge base, community, technical documentation and video tutorials
Learn More - Support
- Resources
- Capture Labs
-
- Company
- Contact Us
How can I configure a Site to Site VPN policy using Main Mode?
 08/02/2023
  7,483 People found this article helpful
 593,928 Views

Description
This article details how to configure a Site-to-Site VPN using Main Mode, which requires the SonicWall and the Remote VPN Concentrator to both have Static, Public IP Addresses.
Resolution
Resolution for SonicOS 7.X
This release includes significant user interface changes and many new features that are different from the SonicOS 6.5 and earlier firmware. The below resolution is for customers using SonicOS 7.X firmware.
Creating a site-to-site VPN between to SonicWall firewalls site A and site B
On the Site A we have a (TZ 570)
On the Site B we have a (TZ 670)
1. Create an Address Objects on Site A, for VPN subnets of site B.
- Login to the SonicWall management Interface.
- Click on Object in the top navigation menu.
Navigate to Match Objects|Addresses, click Add.
On the TZ 570P (Site A)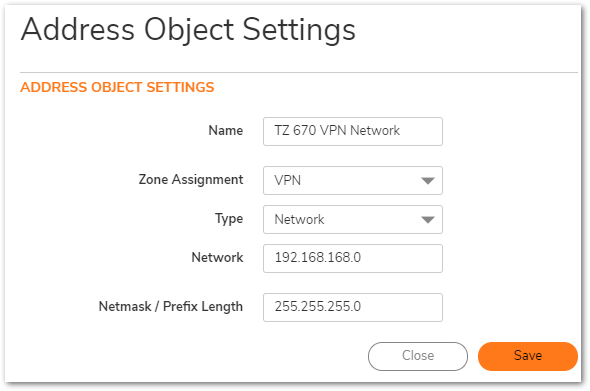
2. Create an Address Objects on Site B, for VPN subnets of site A.
- Login to the SonicWall management Interface.
- Click on Object in the top navigation menu.
- Navigate to Match Objects|Addresses, click Add.
On the TZ 670 (Site B) 
Configuring a VPN policy on Site A SonicWall
- Click Network in the top navigation menu.
- Navigate to IPsec VPN | Rules and Settings,click Add. The VPN policy window is displayed.
- Click General tab.
- Select IKE using Preshared Secret from the Authentication Method menu.
- Enter a name for the policy in the Name field.
- Enter the WAN IP address of the remote connection in the IPsec Primary GatewayName or Address field (Enter TZ 670 WAN IP address).
 TIP: If the Remote VPN device supports more than one endpoint, you may optionally enter a second host name or IP address of the remote connection in the IPsec Secondary Gateway Name or Address field.
 - Enter a Shared Secret password to be used to setup the Security Association the Shared Secret and Confirm Shared Secret fields. The Shared Secret must be at least 4 characters long, and should comprise both numbers and letters.
- Optionally, you may specify a Local IKE ID (optional) and Peer IKE ID (optional) for this Policy. By default, the IP Address (ID_IPv4_ADDR) is used for Main Mode negotiations, and the SonicWall Identifier (ID_USER_FQDN) is used for Aggressive Mode.

- Click Network Tab.
- Under Local Networks, select a local network from Choose local network from list: and select the address object (LAN Subnet).
Under Destination Networks, select Choose destination network from list: and select the address object (TZ -670)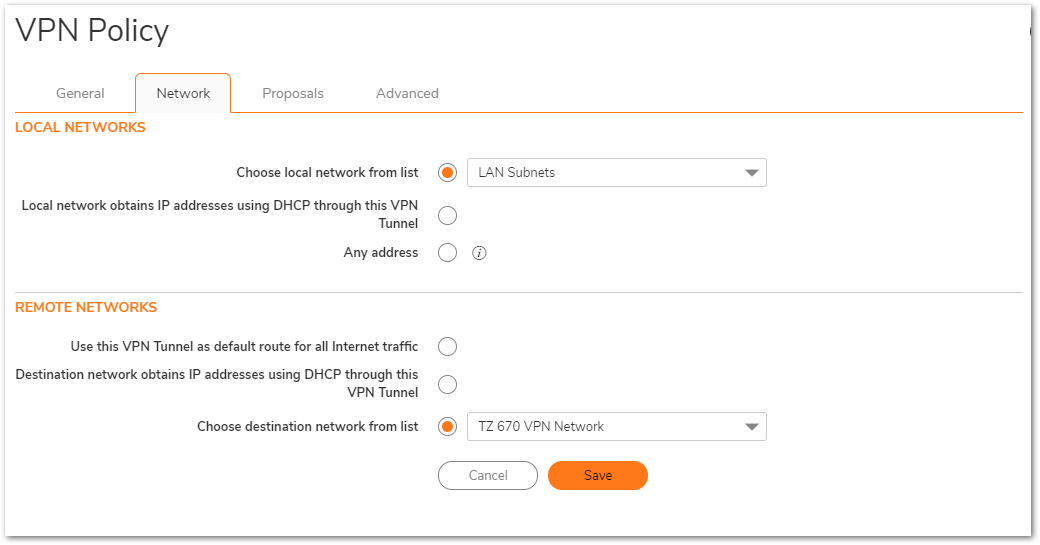
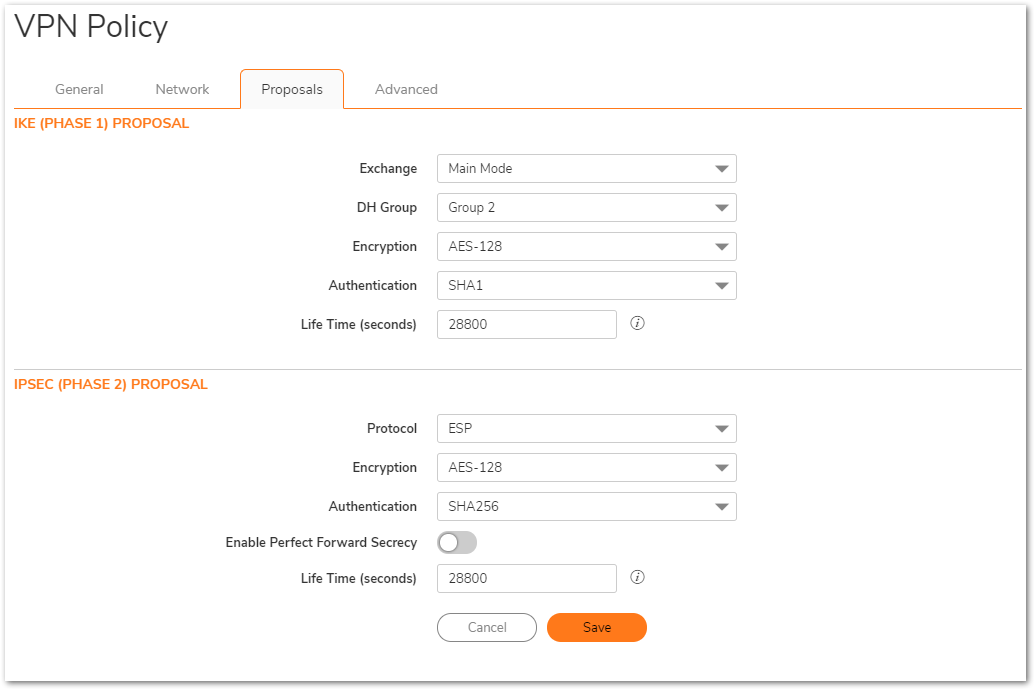
- Click the Proposals Tab.
- Under IKE (Phase 1) Proposal, select Main Mode from the Exchange menu.
- Under IKE (Phase 1) Proposal, the default values for DH Group, Encryption, Authentication, and Life Time are acceptable for most VPN configurations. Be sure the Phase 1 values on the opposite side of the tunnel are configured to match. You can also choose AES-128, AES-192, or AES-256 from the Authentication menu instead of 3DES for enhanced authentication security.
- Under IPsec (Phase 2) Proposal, the default values for Protocol, Encryption, Authentication, Enable Perfect Forward Secrecy, DH Group, and Lifetime are acceptable for most VPN SA configurations. Be sure the Phase 2 values on the opposite side of the tunnel are configured to match.
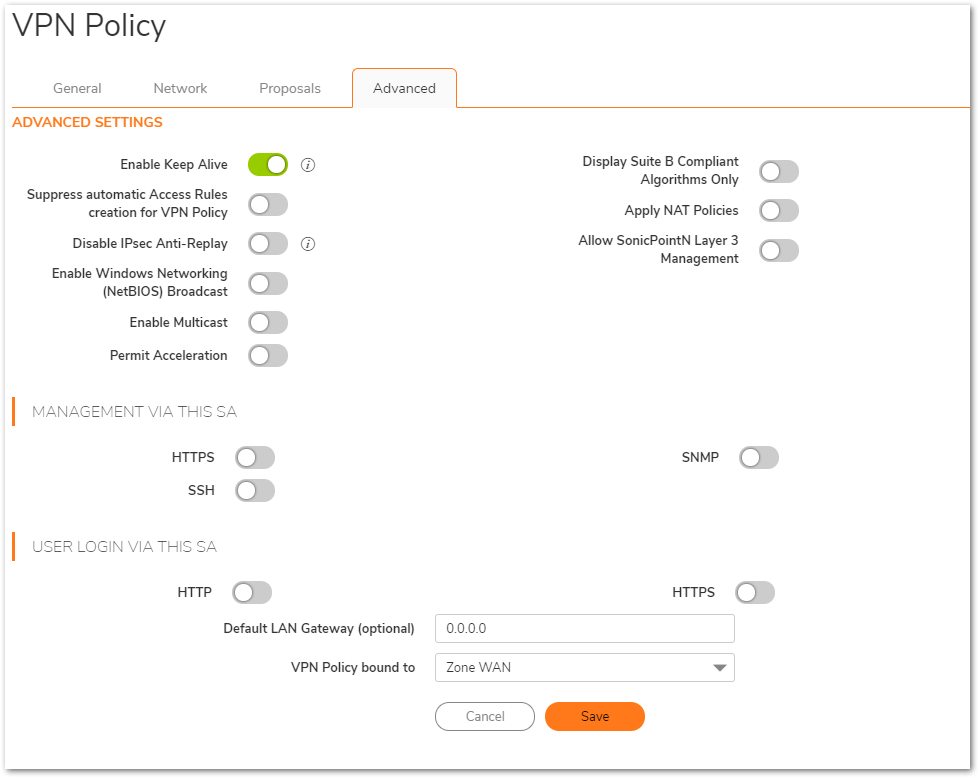
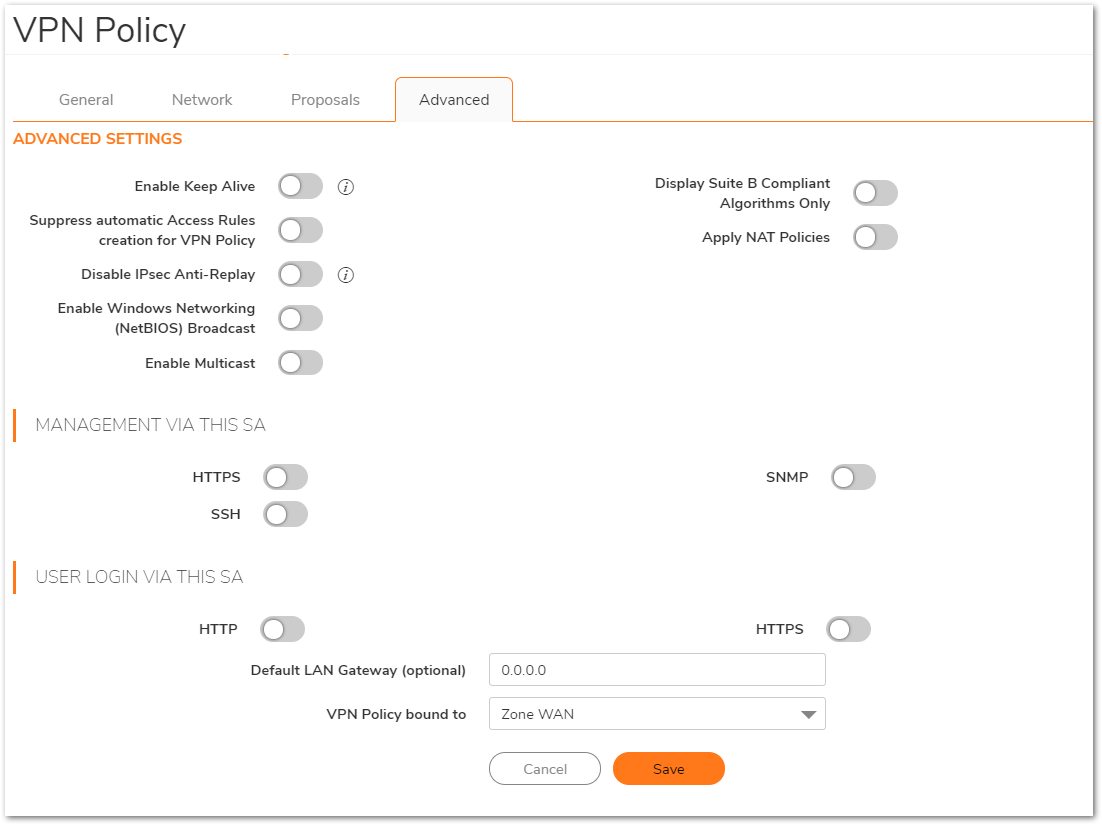
- Click Advanced tab.
- Select Enable Keep Alive to use heartbeat messages between peers on this VPN tunnel. If one end of the tunnel fails, using Keepalives will allow for the automatic
renegotiation of the tunnel once both sides become available again without having to wait for the proposed Life Time to expire. - Select Enable Windows Networking (NetBIOS) Broadcast to allow access to remote network resources by browsing the Windows® Network Neighborhood.
- To manage the local SonicWall through the VPN tunnel, select HTTP, HTTPS, or both from Management via this SA. Select HTTP, HTTPS, or both in the User login via this SA to allow users to login using the SA.
- If you wish to use a router on the LAN for traffic entering this tunnel destined for an unknown subnet, for example, if you configured the other side to Use this VPN Tunnel as default route for all Internet traffic, you should enter the IP address of your router into the Default LAN Gateway (optional) field.
- Select an interface or zone from the VPN Policy bound to menu. A Zone WAN is the preferred selection if you are using WAN Load Balancing and you wish to allow the VPN to use either WAN interface.
- Click Save.
Configuring a VPN policy on Site B SonicWall
- Click Network in the top navigation menu.
- Navigate to IPsec VPN | Rules and Settings,click Add. The VPN policy window is displayed.
- Click General tab.
- Select IKE using Preshared Secret from the Authentication Method menu.
- Enter a name for the policy in the Name field.
- Enter the WAN IP address of the remote connection in the IPsec Primary GatewayName or Address field (Enter TZ 570P WAN IP address). TIP: If the Remote VPN device supports more than one endpoint, you may optionally enter a second host name or IP address of the remote connection in the IPsec Secondary Gateway Name or Address field.
- Enter a Shared Secret password to be used to setup the Security Association the Shared Secret and Confirm Shared Secret fields. The Shared Secret must be at least 4 characters long, and should comprise both numbers and letters.
- Optionally, you may specify a Local IKE ID (optional) and Peer IKE ID (optional) for this Policy. By default, the IP Address (ID_IPv4_ADDR) is used for Main Mode negotiations, and the SonicWall Identifier (ID_USER_FQDN) is used for Aggressive Mode.

- Click Network Tab.
- Under Local Networks, select a local network from Choose local network from list: and select the address object X0 Subnet (LAN Primary Subnet).
Under Destination Networks, select Choose destination network from list: and select the address object (TZ -570P)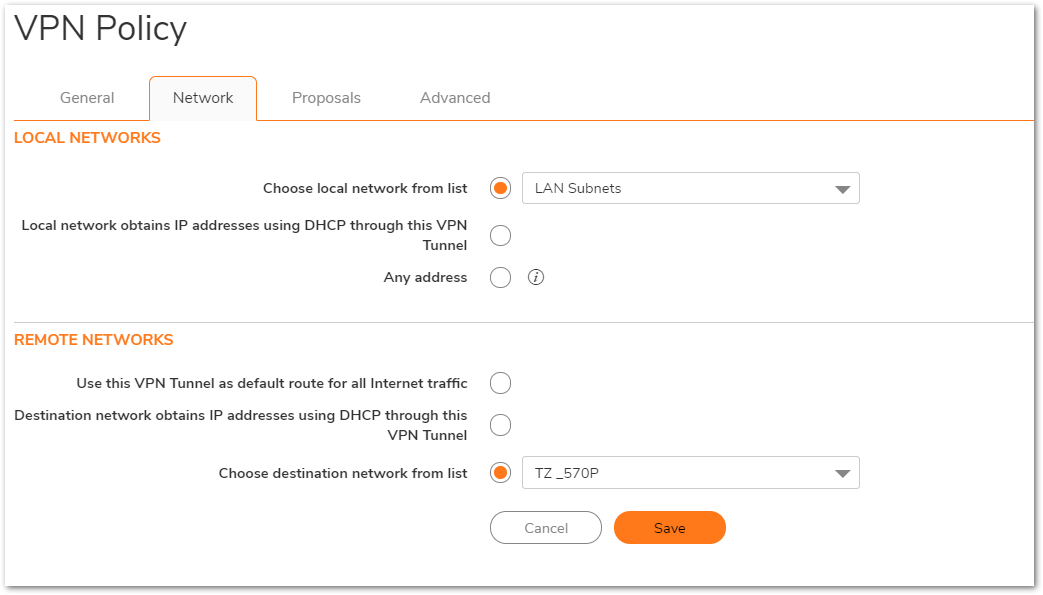
- Click the Proposals tab.
 NOTE: Settings must be same as Site A.
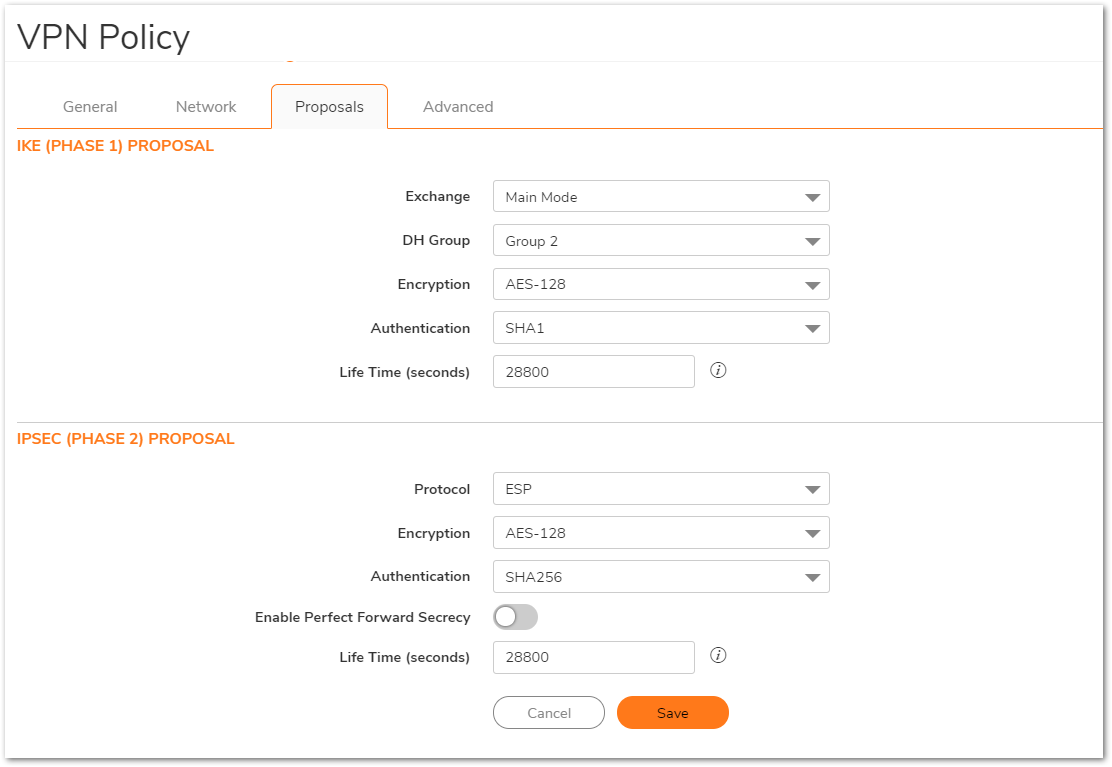
- Click Advanced tab.
- Select Enable Keep Alive to use heartbeat messages between peers on this VPN tunnel. If one end of the tunnel fails, using Keep alives will allow for the automatic
renegotiation of the tunnel once both sides become available again without having to wait for the proposed Life Time to expire. - Select Enable Windows Networking (NetBIOS) Broadcast to allow access to remote network resources by browsing the Windows® Network Neighborhood.
- To manage the local SonicWall through the VPN tunnel, select HTTP, HTTPS, or both from Management via this SA. Select HTTP, HTTPS, or both in the User login via this SA to allow users to login using the SA.
- If you wish to use a router on the LAN for traffic entering this tunnel destined for an unknown subnet, for example, if you configured the other side to Use this VPN Tunnel as default route for all Internet traffic, you should enter the IP address of your router into the Default LAN Gateway (optional) field.
- - Select an interface or zone from the VPN Policy bound to menu. A Zone WAN is the preferred selection if you are using WAN Load Balancing and you wish to allow the VPN to use either WAN interface.
- Click OK .
Resolution for SonicOS 6.5
This release includes significant user interface changes and many new features that are different from the SonicOS 6.2 and earlier firmware. The below resolution is for customers using SonicOS 6.5 firmware.
Creating Address Objects for VPN subnets
- Login to the SonicWall management Interface.
- Click Manage in the top navigation menu.
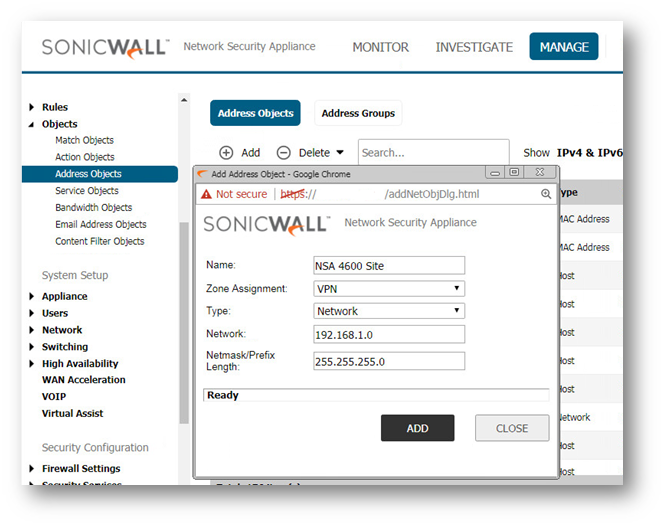
- Navigate to Objects | Address Objects, scroll down to the bottom of the page and click Add.
On the NSA 2650(Site B)

On the NSA 4600 (Site A)
Configuring a VPN policy on Site A SonicWall
- Click Manage in the top navigation menu.
- Navigate to VPN | Base Settings page ,click Add. The VPN policy window is displayed.
- Click General tab.
- Select IKE using Preshared Secret from the Authentication Method menu.
- Enter a name for the policy in the Name field.
- Enter the WAN IP address of the remote connection in the IPsec Primary GatewayName or Address field (Enter NSA 2650's WAN IP address). TIP: If the Remote VPN device supports more than one endpoint, you may optionally enter a second host name or IP address of the remote connection in the IPsec Secondary Gateway Name or Address field.
- Enter a Shared Secret password to be used to setup the Security Association the Shared Secret and Confirm Shared Secret fields. The Shared Secret must be at least 4 characters long, and should comprise both numbers and letters.
- Optionally, you may specify a Local IKE ID (optional) and Peer IKE ID (optional) for this Policy. By default, the IP Address (ID_IPv4_ADDR) is used for Main Mode negotiations, and the SonicWall Identifier (ID_USER_FQDN) is used for Aggressive Mode.

- Click Network Tab.
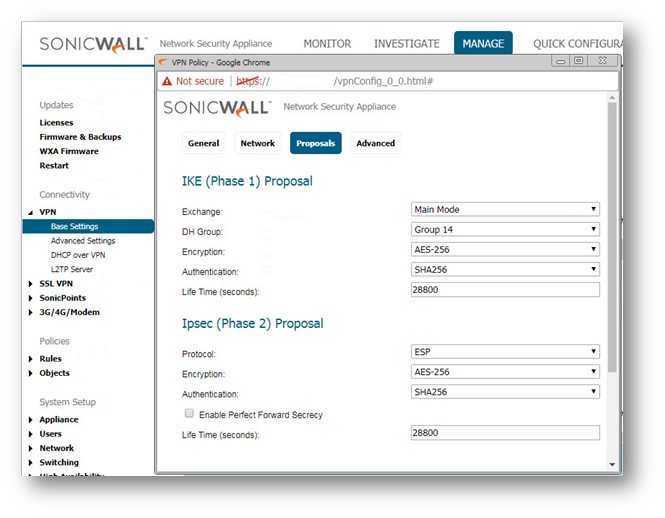
- Click the Proposals Tab.
- Under IKE (Phase 1) Proposal, select Main Mode from the Exchange menu. Aggressive Mode is generally used when WAN addressing is dynamically assigned. IKEv2 causes all the negotiation to happen via IKE v2 protocols, rather than using IKE Phase 1 and Phase 2. If you use IKE v2, both ends of the VPN tunnel must use IKE v2.
- Under IKE (Phase 1) Proposal, the default values for DH Group, Encryption, Authentication, and Life Time are acceptable for most VPN configurations. Be sure the Phase 1 values on the opposite side of the tunnel are configured to match. You can also choose AES-128, AES-192, or AES-256 from the Authentication menu instead of 3DES for enhanced authentication security.
NOTE: The Windows 2000 L2TP client and Windows XP L2TP client can only work with DH Group 2. They are incompatible with DH Groups 1 and 5.- Under IPsec (Phase 2) Proposal, the default values for Protocol, Encryption, Authentication, Enable Perfect Forward Secrecy, DH Group, and Lifetime are acceptable for most VPN SA configurations. Be sure the Phase 2 values on the opposite side of the tunnel are configured to match.
- Click Advanced tab.
- Select Enable Keep Alive to use heartbeat messages between peers on this VPN tunnel. If one end of the tunnel fails, using Keepalives will allow for the automatic
renegotiation of the tunnel once both sides become available again without having to wait for the proposed Life Time to expire. - Select Enable Windows Networking (NetBIOS) Broadcast to allow access to remote network resources by browsing the Windows® Network Neighborhood.
- To manage the local SonicWall through the VPN tunnel, select HTTP, HTTPS, or both from Management via this SA. Select HTTP, HTTPS, or both in the User login via this SA to allow users to login using the SA.
- If you wish to use a router on the LAN for traffic entering this tunnel destined for an unknown subnet, for example, if you configured the other side to Use this VPN Tunnel as default route for all Internet traffic, you should enter the IP address of your router into the Default LAN Gateway (optional) field.
- Select an interface or zone from the VPN Policy bound to menu. A Zone WAN is the preferred selection if you are using WAN Load Balancing and you wish to allow the VPN to use either WAN interface.
- Click OK .

Configuring a VPN policy on Site B SonicWall
- Login to the Site B SonicWall appliance and Click Manage in the top navigation menu. Click VPN | Base Settings page and Click Add button. The VPN Policy window is displayed.
- Click General tab.
- Select IKE using Preshared Secret from the Authentication Method menu.
- Enter a name for the policy in the Name field.
- Enter the WAN IP address of the remote connection in the IPsec Primary Gateway Name or Address field (Enter NSA 4600's WAN IP address).
- If the Remote VPN device supports more than one endpoint, you may optionally enter a second host name or IP address of the remote connection in the IPsec Secondary Gateway Name or Address field. NOTE: Secondary gateways are not supported with IKEv2.
- Enter a Shared Secret password to be used to setup the Security Association the Shared Secret and Confirm Shared Secret fields. The Shared Secret must be at least 4 characters long, and should comprise both numbers and letters.
- Optionally, you may specify a Local IKE ID (optional) and Peer IKE ID (optional) for this Policy. By default, the IP Address (ID_IPv4_ADDR) is used for Main Mode negotiations, and the SonicWall Identifier (ID_USER_FQDN) is used for Aggressive Mode.

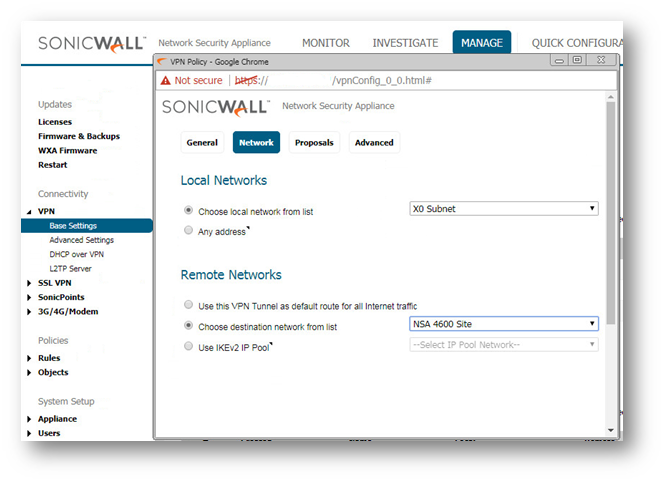
- Click Network tab.
- Under Local Networks, select a local network from Choose local network from list: and select the address object X0 Subnet (LAN Primary Subnet). NOTE: DHCP over VPN is not supported with IKEv2.
- Under Destination Networks, select Choose destination network from list: and select the address object NSA 4600 Site (Site A network).
- Under Local Networks, select a local network from Choose local network from list: and select the address object X0 Subnet (LAN Primary Subnet).
- Click the Proposals tab. NOTE: Settings must be same as Site A.

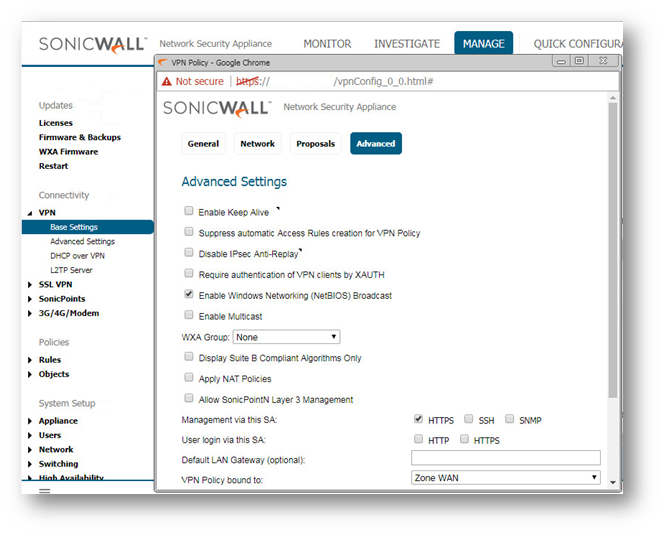
- Click Advanced tab.
- Select Enable Keep Alive to use heartbeat messages between peers on this VPN tunnel. If one end of the tunnel fails, using Keep alives will allow for the automatic
renegotiation of the tunnel once both sides become available again without having to wait for the proposed Life Time to expire. - Select Enable Windows Networking (NetBIOS) Broadcast to allow access to remote network resources by browsing the Windows® Network Neighborhood.
- To manage the local SonicWall through the VPN tunnel, select HTTP, HTTPS, or both from Management via this SA. Select HTTP, HTTPS, or both in the User login via this SA to allow users to login using the SA.
- If you wish to use a router on the LAN for traffic entering this tunnel destined for an unknown subnet, for example, if you configured the other side to Use this VPN Tunnel as default route for all Internet traffic, you should enter the IP address of your router into the Default LAN Gateway (optional) field.
- - Select an interface or zone from the VPN Policy bound to menu. A Zone WAN is the preferred selection if you are using WAN Load Balancing and you wish to allow the VPN to use either WAN interface.
- Click OK .
Related Articles
- Error:"Invalid API Argument" when modifying the access rules
- Cysurance Partner FAQ
- Configure probe monitoring for WAN Failover and Loadbalancing - SonicWall UTM
Categories
- Firewalls > SonicWall SuperMassive 9000 Series > VPN
- Firewalls > TZ Series > VPN
- Firewalls > NSa Series > VPN
- Firewalls > NSv Series > VPN
 YES
YES NO
NO