-
Products
-
SonicPlatform
SonicPlatform is the cybersecurity platform purpose-built for MSPs, making managing complex security environments among multiple tenants easy and streamlined.
Discover More
-
-
Solutions
-
Federal
Protect Federal Agencies and Networks with scalable, purpose-built cybersecurity solutions
Learn MoreFederalProtect Federal Agencies and Networks with scalable, purpose-built cybersecurity solutions
Learn More - Industries
- Use Cases
-
-
Partners
-
Partner Portal
Access to deal registration, MDF, sales and marketing tools, training and more
Learn MorePartner PortalAccess to deal registration, MDF, sales and marketing tools, training and more
Learn More - SonicWall Partners
- Partner Resources
-
-
Support
-
Support Portal
Find answers to your questions by searching across our knowledge base, community, technical documentation and video tutorials
Learn MoreSupport PortalFind answers to your questions by searching across our knowledge base, community, technical documentation and video tutorials
Learn More - Support
- Resources
- Capture Labs
-
- Company
- Contact Us
High Availability Firmware Upgrade did not complete on Primary


Description
When a firmware upgrade is performed on a High Availability pair. The firmware upload was successful on the primary appliance and the boot option was selected for the new firmware. As expected, the new firmware was pushed to the backup HA unit and it rebooted. The backup unit then assumed active status. But the primary unit never rebooted. Using the management IP to check each unit revealed that the backup unit, now Active, had the new firmware. However, the primary unit now showed idle, still with the old firmware. Rebooting the primary unit did not help.
Resolution
Resolution for SonicOS 7.X
This release includes significant user interface changes and many new features that are different from the SonicOS 6.5 and earlier firmware. The below resolution is for customers using SonicOS 7.X firmware.
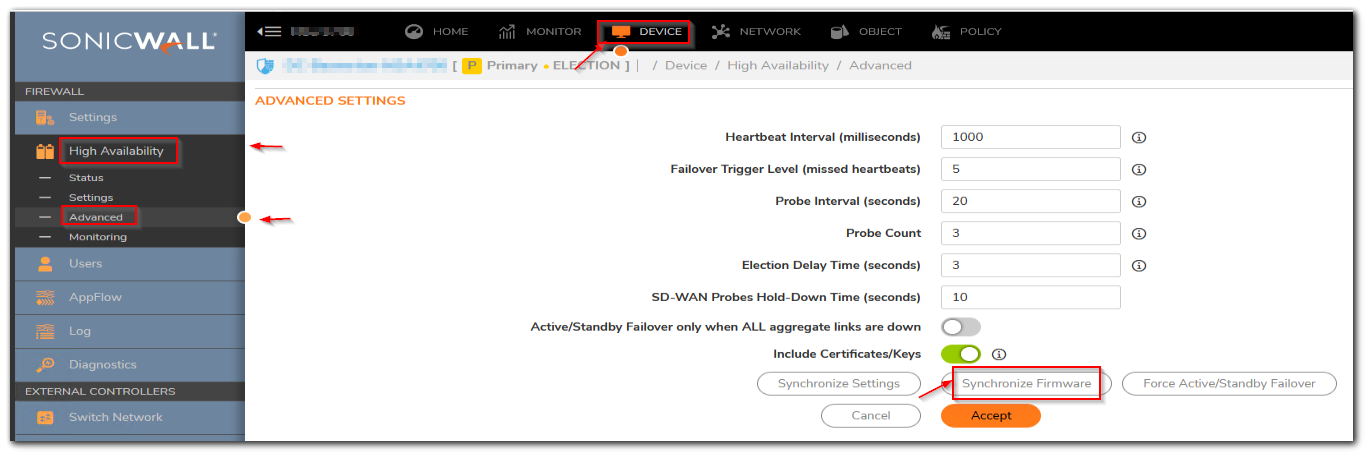
1. Synchronize Firmware
On the current Active appliance (originally the backup unit):
- Go to the High availability | Advanced page.
- Click on the Synchronize Firmware button to push firmware to the backup (idle) unit.
- The firmware will be pushed out to the idle unit; it will reboot and assume Active status again.
- Test the network to ensure all traffic is passing normally.

2. Factory reset the unit
- Make a backup of the secondary unit's config.
- Power off and unplug all cable from primary unit.
- Remove the HA pair in the secondary unit's config.
- Wipe the primary unit's firmware and leave it at factory defaults.
Insert and Hold the paper clip for 90 secondsPower light
Interface light Blinking
Test light was blinking
Using SafeMode to Upgrade Firmware
If you are unable to connect to the SonicOS management interface, you can restart the security appliance in SafeMode. The SafeMode feature allows you to recover quickly from uncertain configuration states with a simplified management interface that includes the same settings available on the System |Settings page. Perform the following steps to use SafeMode to upgrade firmware on the SonicWall security appliance:
- Connect your computer to the MGMT port on the appliance and configure your IP address with an address on the 192.168.1.0/24 subnet, such as 192.168.1.20.
- To force the appliance into SafeMode, use a narrow, straight object, like a straightened paper clip or a toothpick, to press and hold the Reset button on the front of the SonicWall appliance for at least twenty seconds, until the Test light begins blinking.
- The Test light begins to blink when the SonicWall security appliance has rebooted into SafeMode.
- Enter 192.168.1.254 into your computer’s Web browser to access the SafeMode management interface.
- Connect ISP in X1 Interface or connect to SonicOS through the LAN or WAN interface of the appliance, disconnect your computer from the MGMT port, and reconfigure it to automatically obtain an IP address and DNS server address, or reset it to its normal static values.
- Connect your computer to the local network and point your browser to the LAN or WAN IP address of the SonicWall appliance.
- Register the firewall
- Upgrade to the same firmware as the secondary unit.
- Click Upload New Firmware, and then browse to the location where you saved the SonicOS firmware image, select the file and click the Upload button.
- Select the Boot icon in the row for one of the following:
Uploaded Firmware - New! – Use this option to restart the appliance with your current configuration settings.
Uploaded Firmware with Factory Default Settings- New! – Use this option to restart the appliance with default configuration settings. - In the confirmation dialog box, click OK to proceed.
- After successfully booting the firmware, the log in screen displays.
- If you restarted with factory default settings, enter the default user name and password (admin/password) to access
- Connect the HA Link to rejoin the primary unit back into the HA pair, running the same firmware as the secondary unit.
- Disconnect X1 to avoid conflict with the secondary
- Import configuration from the secondary unit into the primary
- Connect back all the cables
- Make sure configuration is sync and they show green lights across the board.
- Forced Active/Standby Failover to ensure that everything is well.
Resolution for SonicOS 6.5
This release includes significant user interface changes and many new features that are different from the SonicOS 6.2 and earlier firmware. The below resolution is for customers using SonicOS 6.5 firmware.
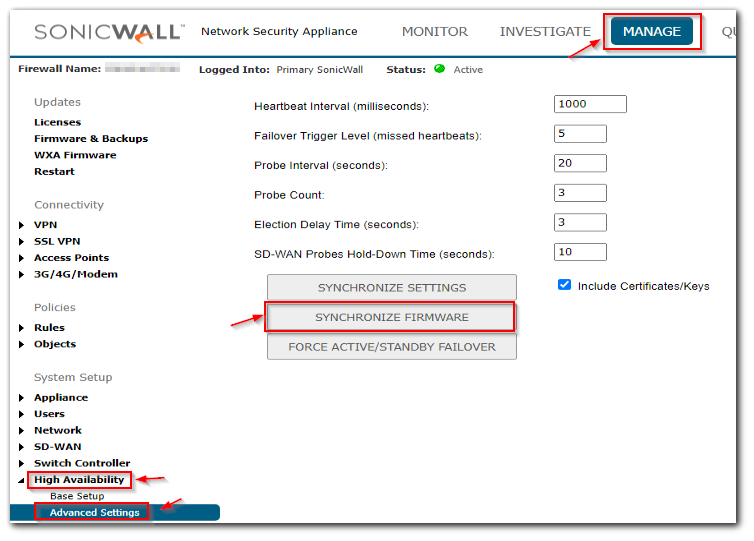
1. Synchronize Firmware
On the current Active appliance (originally the backup unit):
- Go to the High availability | Advanced page.
- Click on the Synchronize Firmware button to push firmware to the backup (idle) unit.
- The firmware will be pushed out to the idle unit; it will reboot and assume Active status again.
- Test the network to ensure all traffic is passing normally.

2. Factory reset the unit
- Make a backup of the secondary unit's config.
- Power off and unplug all cable from primary unit.
- Remove the HA pair in the secondary unit's config.
- Wipe the primary unit's firmware and leave it at factory defaults.
- Insert and Hold the paper clip for 90 secondsPower light
- Interface light Blinking
- Test light was blinking
Using SafeMode to Upgrade Firmware
If you are unable to connect to the SonicOS management interface, you can restart the security appliance in SafeMode. The SafeMode feature allows you to recover quickly from uncertain configuration states with a simplified management interface that includes the same settings available on the System |Settings page. Perform the following steps to use SafeMode to upgrade firmware on the SonicWall security appliance:
- Connect your computer to the MGMT port on the appliance and configure your IP address with an address on the 192.168.1.0/24 subnet, such as 192.168.1.20.
- To force the appliance into SafeMode, use a narrow, straight object, like a straightened paper clip or a toothpick, to press and hold the Reset button on the front of the SonicWall appliance for at least twenty seconds, until the Test light begins blinking.
- The Test light begins to blink when the SonicWall security appliance has rebooted into SafeMode.
- Enter 192.168.1.254 into your computer’s Web browser to access the SafeMode management interface.
- Connect ISP in X1 Interface or connect to SonicOS through the LAN or WAN interface of the appliance, disconnect your computer from the MGMT port, and reconfigure it to automatically obtain an IP address and DNS server address, or reset it to its normal static values.
- Connect your computer to the local network and point your browser to the LAN or WAN IP address of the SonicWall appliance.
- Register the firewall
- Upgrade to the same firmware as the secondary unit.
- Click Upload New Firmware, and then browse to the location where you saved the SonicOS firmware image, select the file and click the Upload button.
- Select the Boot icon in the row for one of the following:
Uploaded Firmware - New! – Use this option to restart the appliance with your current configuration settings.
Uploaded Firmware with Factory Default Settings- New! – Use this option to restart the appliance with default configuration settings. - In the confirmation dialog box, click OK to proceed.
- After successfully booting the firmware, the log in screen displays.
- If you restarted with factory default settings, enter the default user name and password (admin/password) to access
- Connect the HA Link to rejoin the primary unit back into the HA pair, running the same firmware as the secondary unit.
- Disconnect X1 to avoid conflict with the secondary
- Import configuration from the secondary unit into the primary
- Connect back all the cables
- Make sure configuration is sync and they show green lights across the board.
- Forced Active/Standby Failover to ensure that everything is well.
Related Articles
- How to Block Google QUIC Protocol on SonicOSX 7.0?
- How to block certain Keywords on SonicOSX 7.0?
- How internal Interfaces can obtain Global IPv6 Addresses using DHCPv6 Prefix Delegation


 YES
YES NO
NO