-
Products
-
SonicPlatform
SonicPlatform is the cybersecurity platform purpose-built for MSPs, making managing complex security environments among multiple tenants easy and streamlined.
Discover More
-
-
Solutions
-
Federal
Protect Federal Agencies and Networks with scalable, purpose-built cybersecurity solutions
Learn MoreFederalProtect Federal Agencies and Networks with scalable, purpose-built cybersecurity solutions
Learn More - Industries
- Use Cases
-
-
Partners
-
Partner Portal
Access to deal registration, MDF, sales and marketing tools, training and more
Learn MorePartner PortalAccess to deal registration, MDF, sales and marketing tools, training and more
Learn More - SonicWall Partners
- Partner Resources
-
-
Support
-
Support Portal
Find answers to your questions by searching across our knowledge base, community, technical documentation and video tutorials
Learn MoreSupport PortalFind answers to your questions by searching across our knowledge base, community, technical documentation and video tutorials
Learn More - Support
- Resources
- Capture Labs
-
- Company
- Contact Us
Getting Started with Capture Security Center


Description
To start, you need to have a MySonicWall account to access Capture Security Center and related web services. To set that up, go to https://mysonicwall.com and click on Sign Up.
After registration, and successful account activation, go to https://cloud.sonicwall.com to launch Capture Security Center.
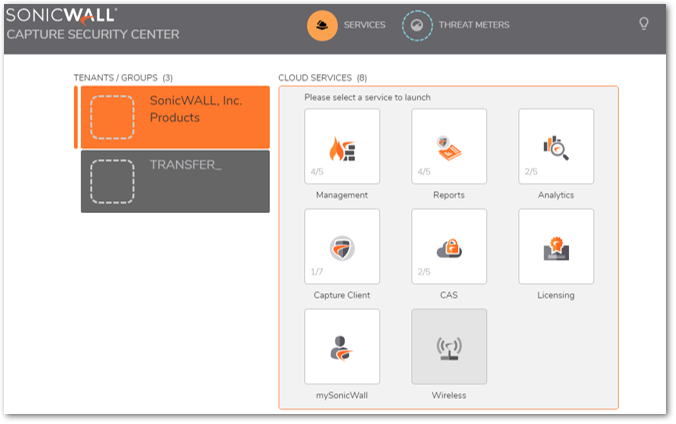
Capture Security Center Services
Initially only the Licensing and MySonicWall tiles will be highlighted. Other service tiles will get highlighted later based on the added firewalls / enabled services.
Threat Meter – SonicWall Security center showing worldwide Threats.
Cloud GMS (CGMS) 2.0 – Include Firewall Management, Reporting & Analytics.
Capture Client – Include security enforcement, DPI-SSL certificate management, behavioral monitoring,
CAS - To secure SaaS application usage and reduce risk by delivering discovery, visibility, and control.
Licensing - Allows to quickly view and activate SonicWall licensing.
MySonicWall – Allows access to MySonicWall account to manage user accounts and products.
To enable and access above service/s, follow specific instructions below for each services. As mentioned earlier, it may require additional licensing on the firewall to enable some services.
Threat Meter
The SonicWall Security Center provides a three-page view of the worldwide attacks. These views can be seen by clicking on the orange bars at the bottom of the window.
- Login to CSC.
- Click THREAT METERS link at the top.
- This takes you directly to the SonicWall Security Center.
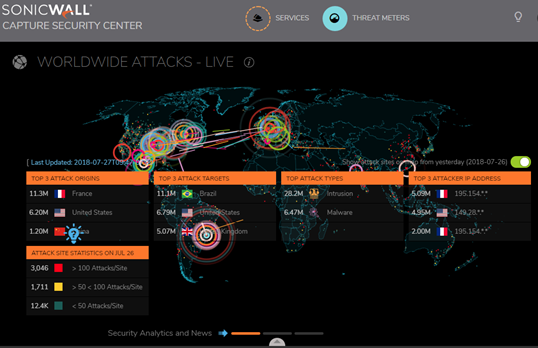
- By default it shows Worldwide Attack. To change view, click at the very bottom link.
CGMS (Management / Reporting / Analytics)
- Registering Firewall for CSC
- Navigate to https://cloud.sonicwall.com and login using your MySonicWall credentials.
- Select the MySonicWall tile.
- On the MySonicWall Dashboard, click Add Product icon.
- Enter the serial number and click Continue.
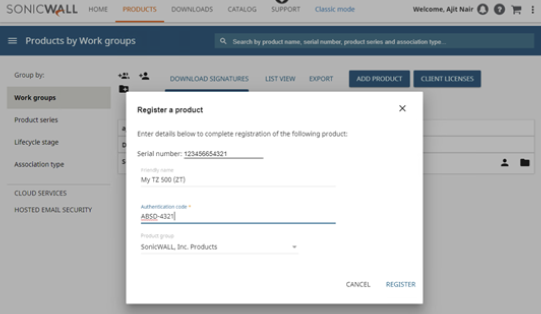
- Provide the Friendly name and the Authentication code.
- Select the Product group from the drop-down menu.
- Click Register.
- Licensing Firewall for CSC services
- Once registered, navigate back to the License panel and enable / purchase the license for the firewall.
- Type of Licenses: Below are license type and overview as what is included.
CSC Management Lite: For Limited Firewall Management
CSC Management: Includes CSC Management Lite + Group level management, Workflow
CSC Management & Reporting: Includes CSC Management + Reports + Schedule Reports
CSC Analytics: CSC Management Lite + Reports + Schedule Reports + Drilldown + CAS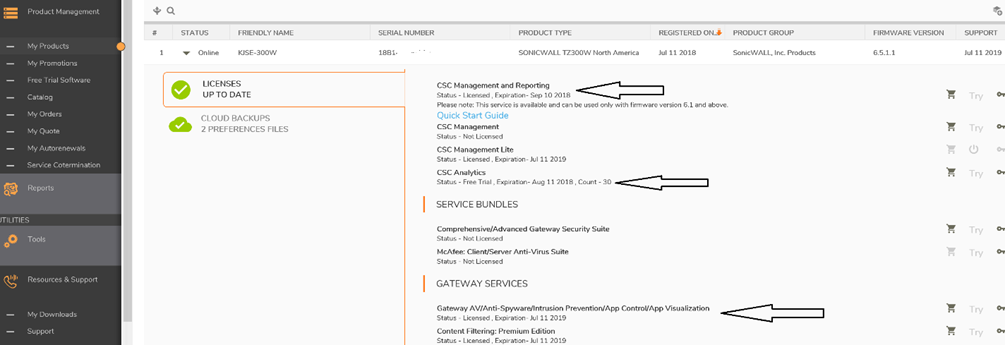
- Upon licensing the Firewall, navigate back to CSC main page and click on the Licensing tab and your firewall should be listed there. Now hover over the Firewall and at the extreme end of the row (right side) click on ‘Try’ and then go back to main CSC page.
- Once back on CSC main page, click on Management and then add the firewall there. If using Zero Touch, you should see the firewall under Device Manager.
Adding Firewall to CSC / CGMS:There are two ways to d this.
- Manually Adding firewall to CSC / CGMS
- Login to CSC and click Management tile which will take you to the CGMS.
- Navigate to Device Manager | Global View and right click.
- Click Add Unit and provide details in the popup box.
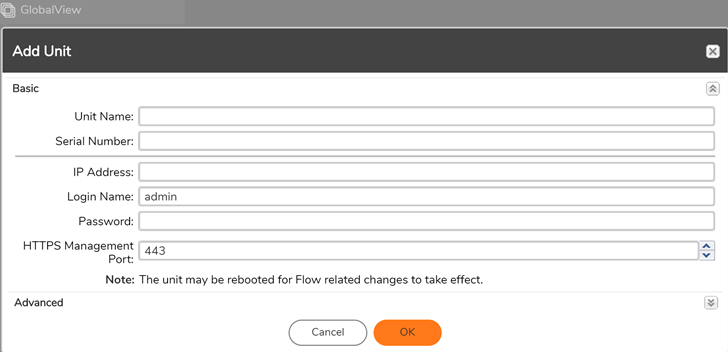
- If needed click the Advanced setting and click OK.

- Once added, the unit will start showing under Global View and under Status you can see the acquisition history.
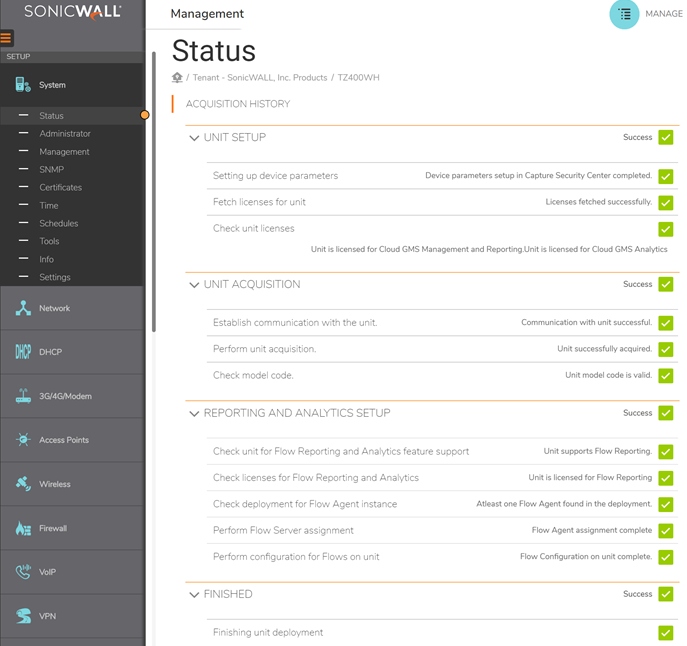
- If non-SonicWall firewalls are between Capture Security Center and a SonicWall firewall please allow the following inbound/outbound services/ports.
- Inbound from CSC to firewall
HTTPS management port – 443 or other custom port
ESP - 50
IKE ports – UDP 500 & UDP 4500 - Outbound from firewall to CSC
Syslog port – UDP 514
ESP - 50
IKE ports – UDP 500 & UDP 4500
If using Zero Touch, TCP port 21021 is required. - Using Zero Touch
- Please refer to the ‘Getting Started Guide - Zero Touch’ to enable and acquire firewall using Zero Touch - https://software.sonicwall.com/gmsvp/Dev-Training/index.html.
- Once the firewall is added and acquired into the GMS, you should be able to Manage firewall, see reporting data or analytics depending on the license enabled on the firewall.
- Return to the Capture Security Center by clicking on the down arrow ( ) at the top of the page and then click on other Tiles like Reporting, Analytics etc. to check data there.
Capture Client: To provision the Capture Client on CSC follow below steps.
- Select MySonicWall from the Capture Security Center.
- Navigate to Product Management | My Products.
- Select the ‘+’ icon to Add Client Licenses.
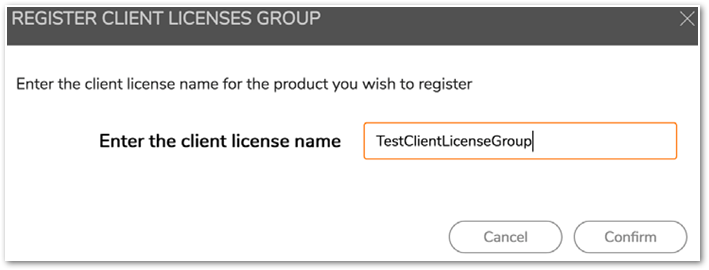
- Enter a name for the Client License Group. The name may be up to 30 characters.
- Click Confirm.
- In the newly created product, click Licenses tab.
- Scroll down to Capture Client. You may need to scroll down using the inside scroll bar.
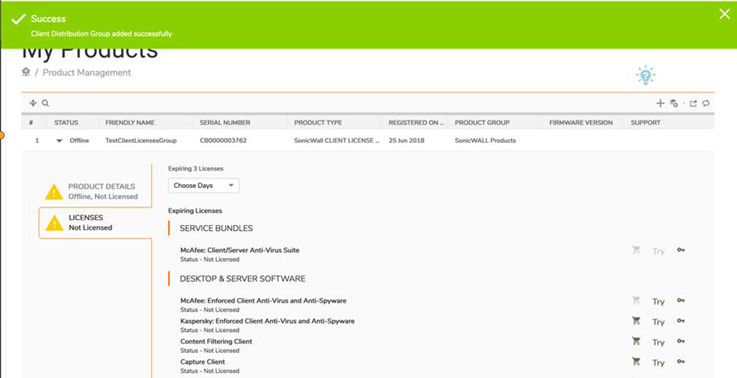
- Click Key icon for Capture Client Advanced Protection to activate the service.
- Enter the activation key (provided by your SonicWall) and click Submit.
- Click on the link for Capture Client Advanced Protection.
- Go back to CSC main page and click Capture Client Tile to access.
Cloud App Security: See below steps to enable CAS
- Enable license i.e. CSC Analytics as CAS bundled as a part of the Analytics license.
- Once enabled login back to CSC and click on CAS tile. You should see the below Dashboard.
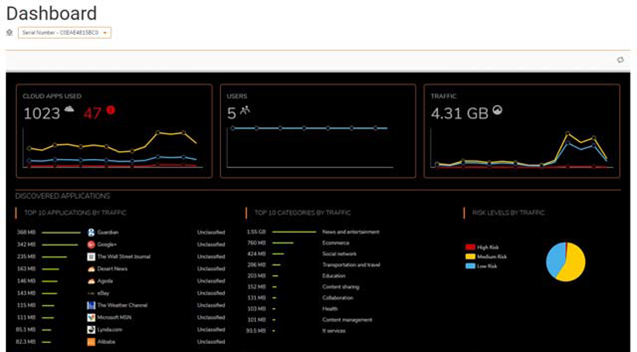
 NOTE: Make sure that you are seeing data in Web Activity Reports on the Reports / Analytics panel for the firewall.
 - If you have multiple firewalls licensed and enabled for CAS click on the dropdown box (top right) and select the firewall.
Related Articles
- How to create and export On-Demand report from CSC / CGMS
- SonicWall NSM – AppFlow ports
- NSM - Firewall System Events and Filters


 YES
YES NO
NO