-
Products
-
SonicPlatform
SonicPlatform is the cybersecurity platform purpose-built for MSPs, making managing complex security environments among multiple tenants easy and streamlined.
Discover More
-
-
Solutions
-
Federal
Protect Federal Agencies and Networks with scalable, purpose-built cybersecurity solutions
Learn MoreFederalProtect Federal Agencies and Networks with scalable, purpose-built cybersecurity solutions
Learn More - Industries
- Use Cases
-
-
Partners
-
Partner Portal
Access to deal registration, MDF, sales and marketing tools, training and more
Learn MorePartner PortalAccess to deal registration, MDF, sales and marketing tools, training and more
Learn More - SonicWall Partners
- Partner Resources
-
-
Support
-
Support Portal
Find answers to your questions by searching across our knowledge base, community, technical documentation and video tutorials
Learn MoreSupport PortalFind answers to your questions by searching across our knowledge base, community, technical documentation and video tutorials
Learn More - Support
- Resources
- Capture Labs
-
- Company
- Contact Us
Geo-IP filter status shows "Country Database: Not downloaded"


Description
This article explains the troubleshooting steps for Geo-IP filter status showing "Country Database: Not downloaded"
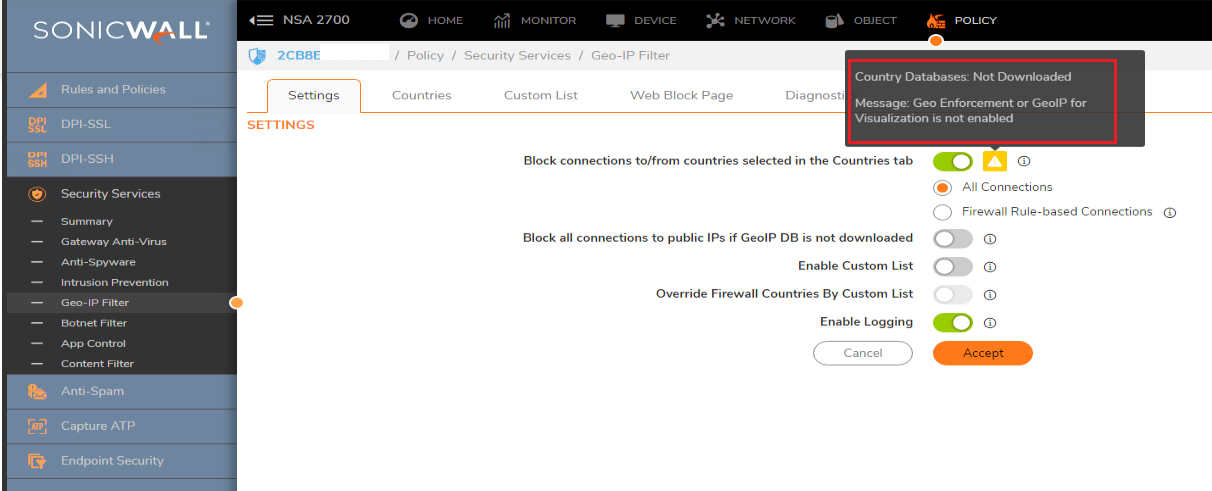
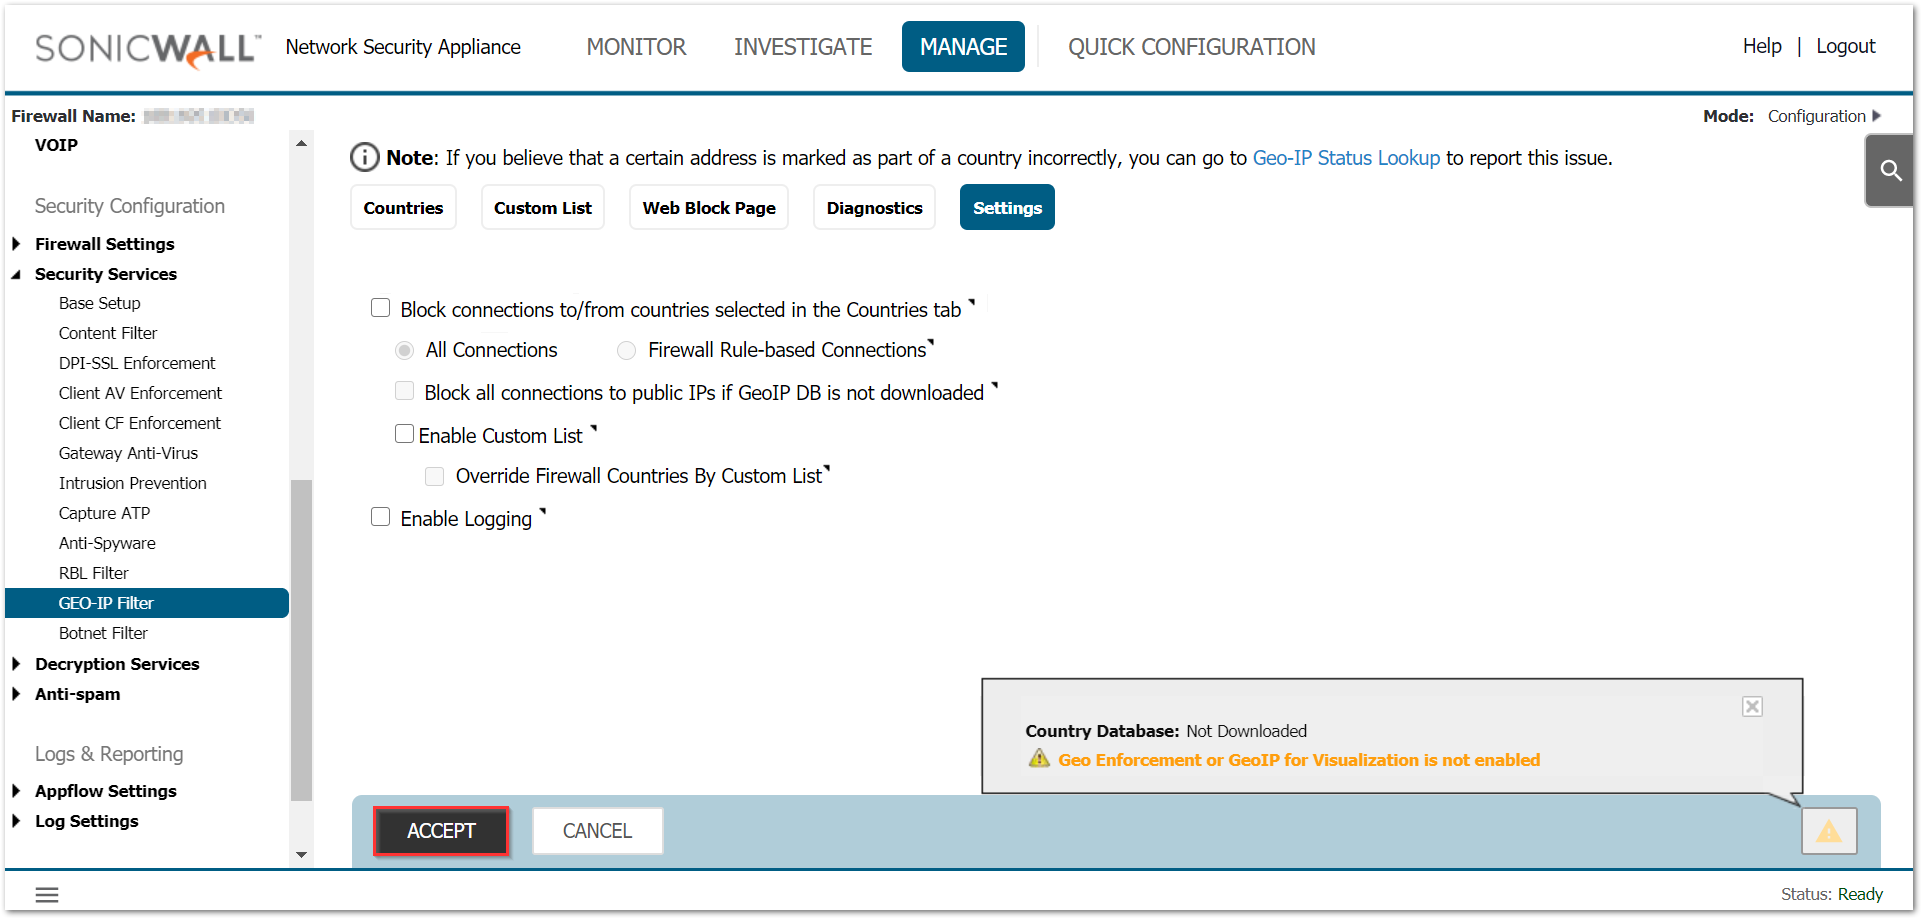
Resolution
Resolution for SonicOS 7.X
This release includes significant user interface changes and many new features that are different from the SonicOS 6.5 and earlier firmware. The below resolution is for customers using SonicOS 7.X firmware.
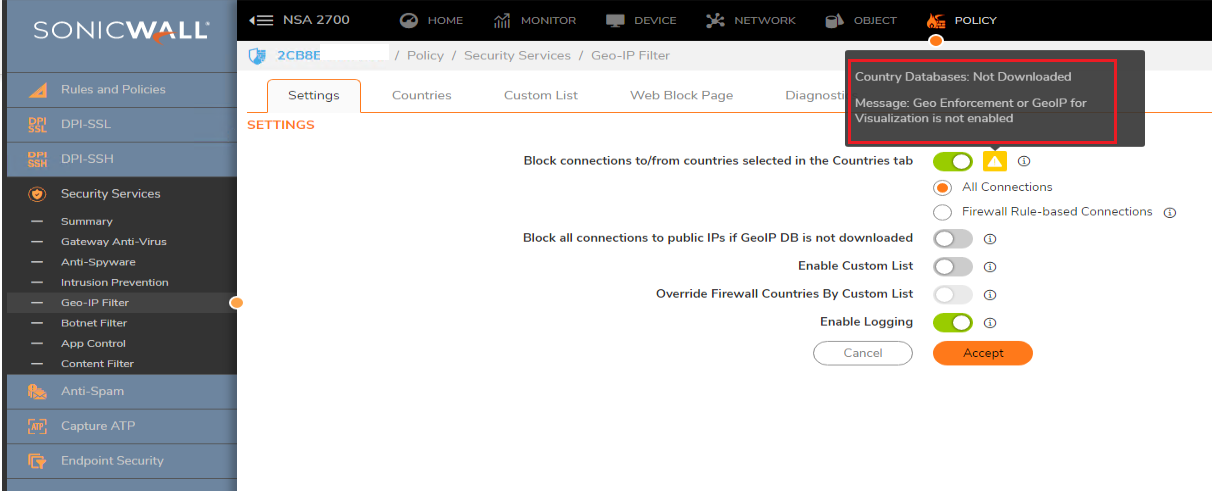
In order for the country database to be downloaded, the firewall should have the Geo-IP feature turned ON. Without this enabled, the firewall will not attempt to download the database. You can enable Geo-IP filter from Policy |Security Services |Geo-IP Filter and Settings tab.
Once enabled, the appliance must be able to resolve the following URL "utmgbdata.global.sonicwall.com". You can Navigate to Device | Diagnostics | DNS Name Lookup and resolve the URL.
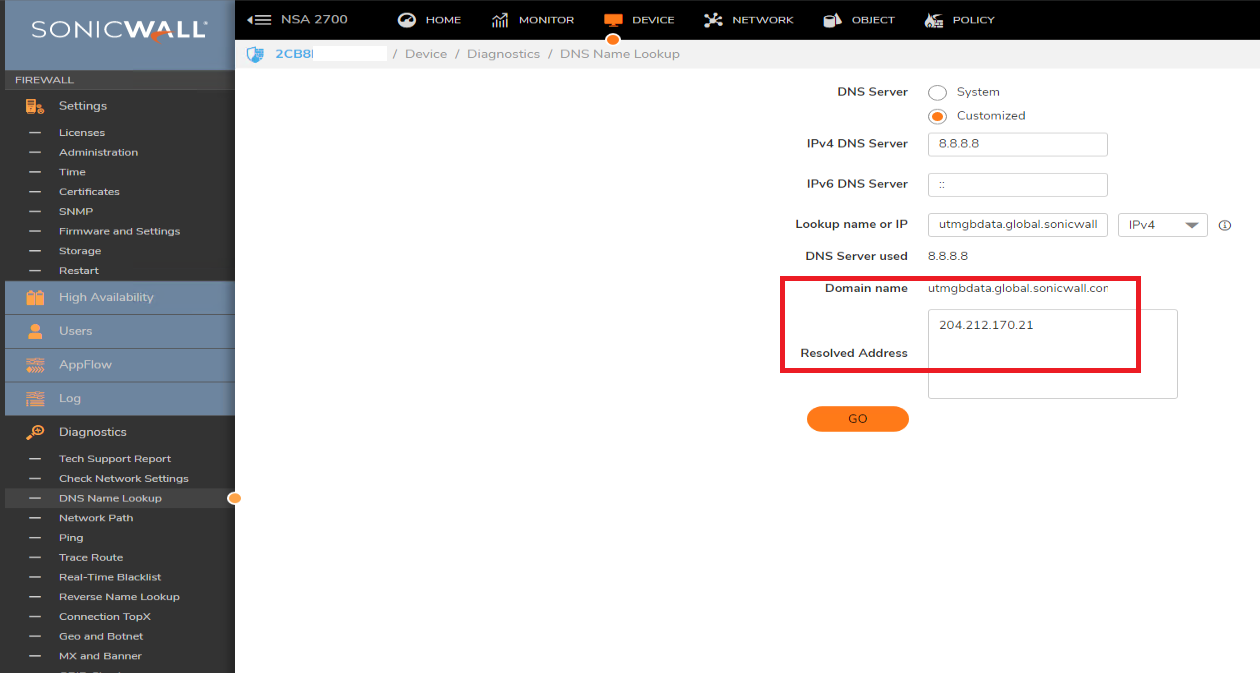
If they are able to resolve the domains, then the download should be successful momentarily after turning ON the feature. If the DNS resolution is not successful, navigate to Network | DNS | Settings and use a public DNS server such as 8.8.8.8 or 8.8.4.4 as the primary DNS server manually.
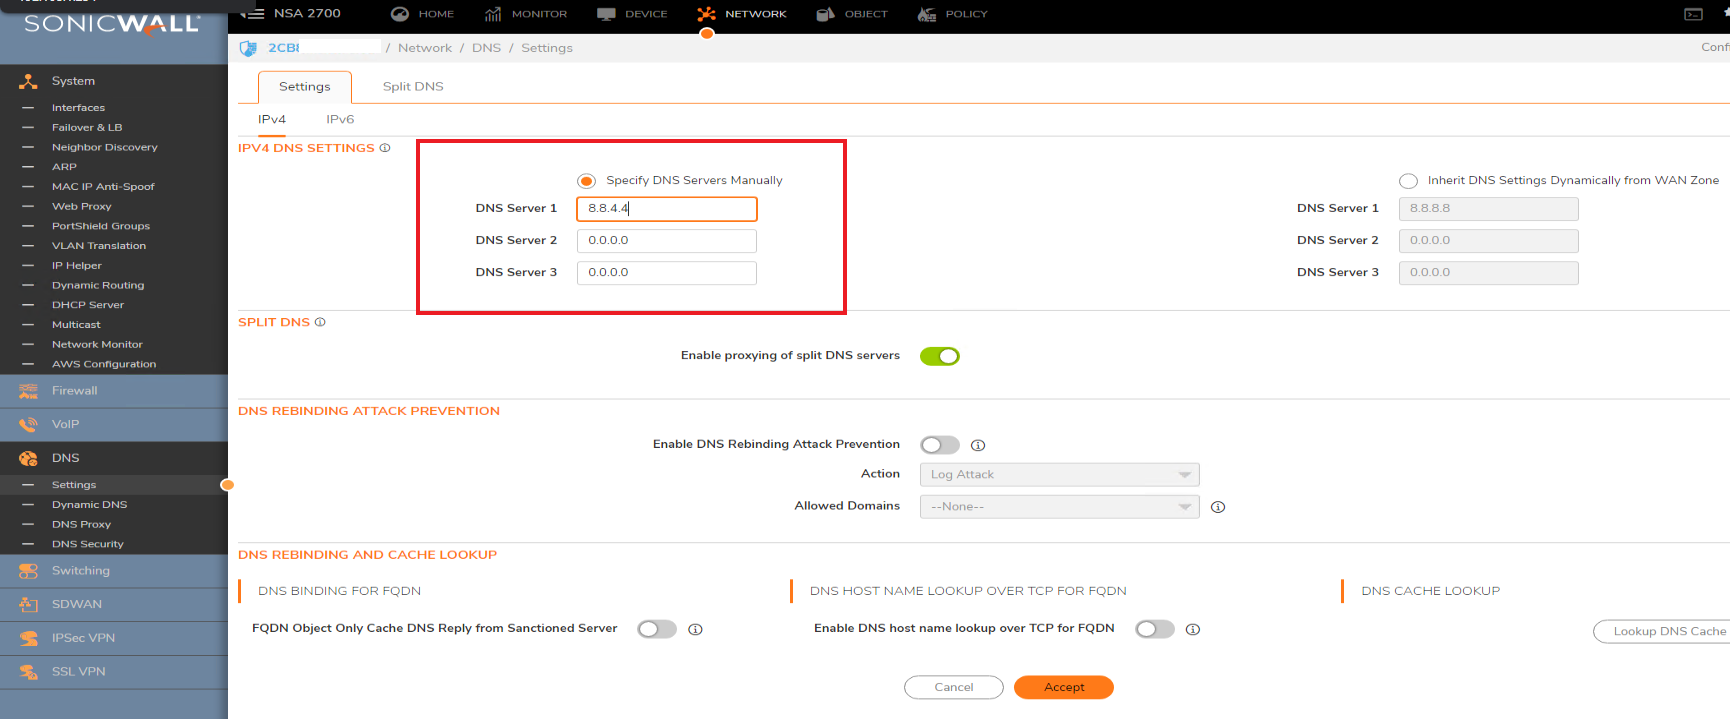
Even after all these steps, if the database download is not successful, the following steps can be taken to download and install the Geo-IP database manually.
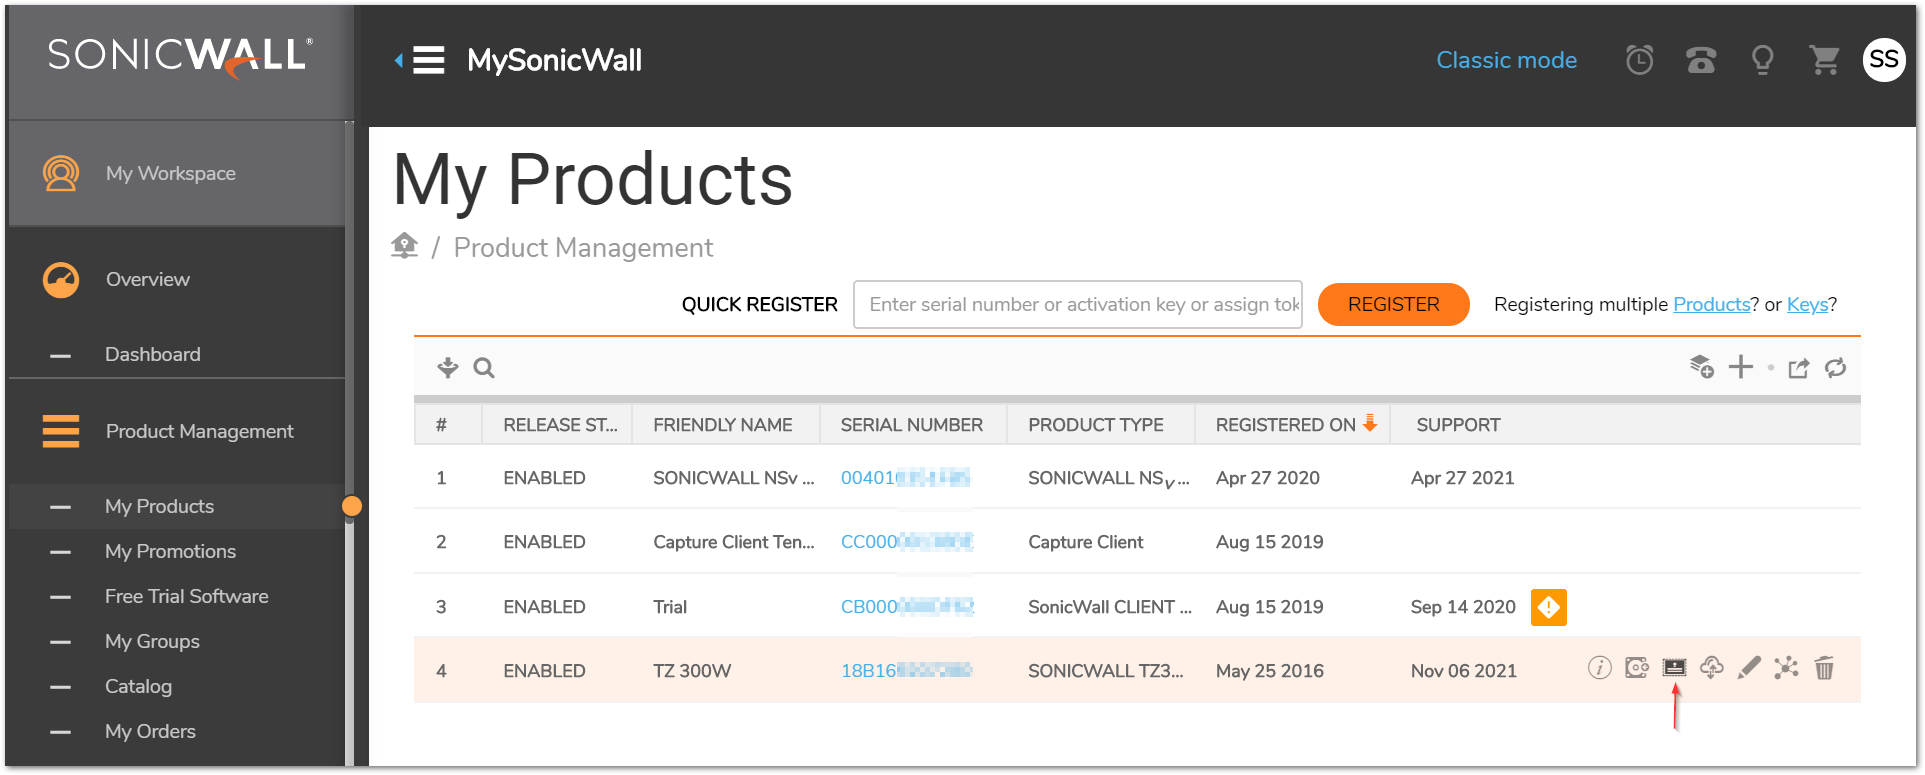
Step 1: To download the Geo-IP signatures manually, visit mysonicwall.com and login with the account that your SonicWall is registered to.
Step 2: Click Product Management | My Products and locate the device you want to download this for. Hover on the product item and select the License icon.
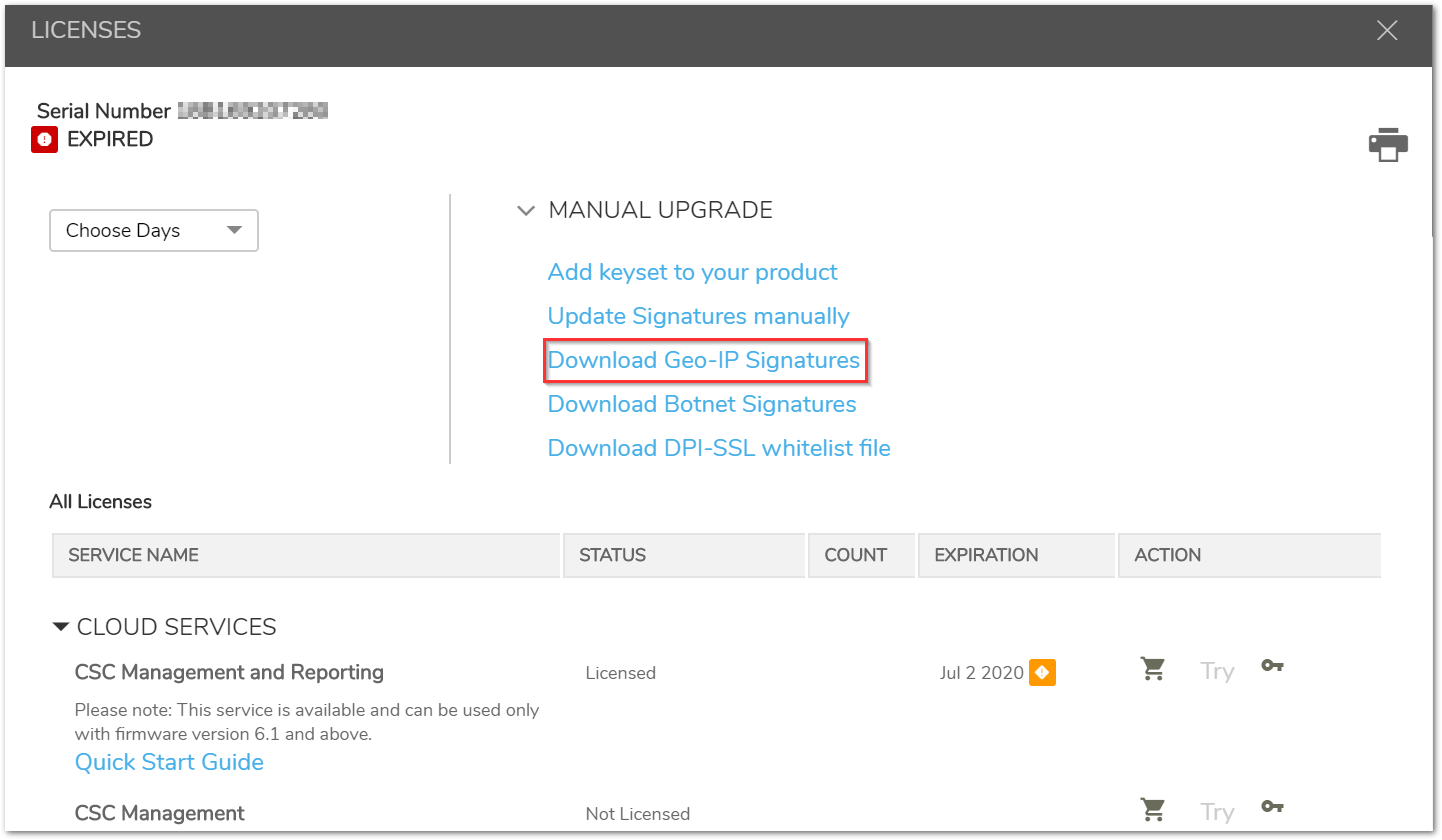
Step 3: Click on download option for 'Download Geo-IP signatures'. It should download the signature file with extension .gz
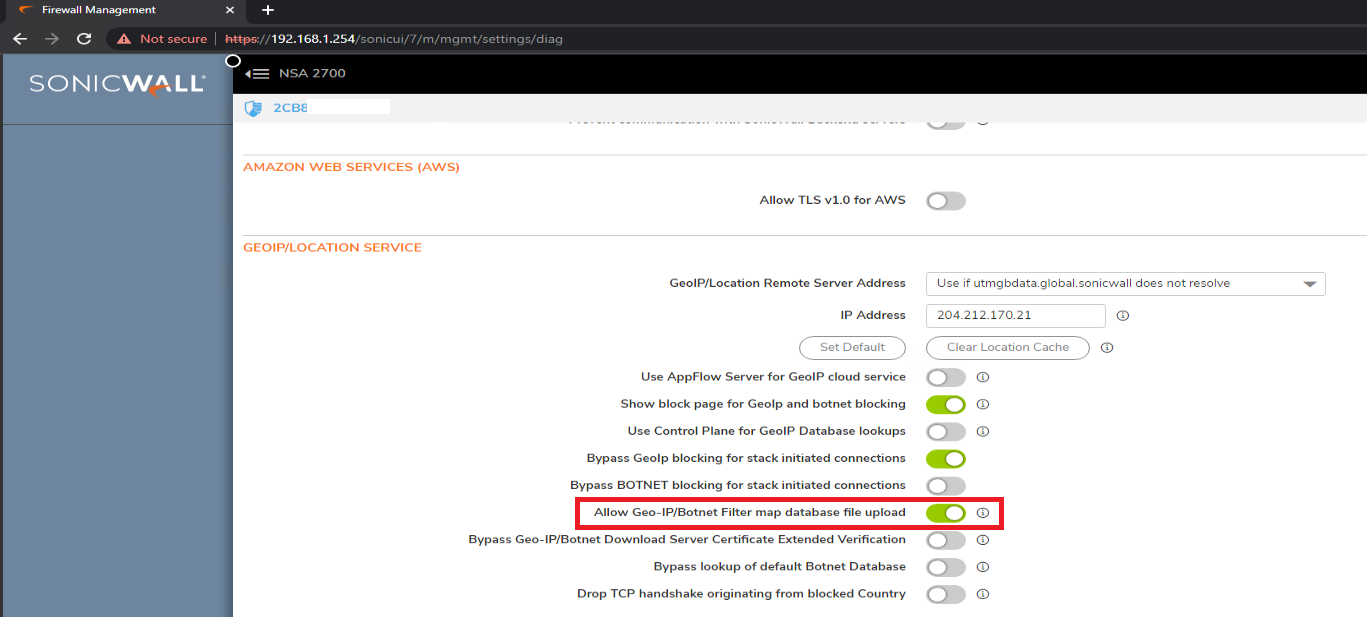
Step 4: Navigate to the diag page of the firewall UI. The diag page be reached by typing IP/sonicui/7/m/mgmt/settings/diag . How can I access the internal settings of the firewall
Step 5: Click on Internal settings and enable the option ' Allow Geo-IP/Botnet Filter map database file upload ' under Geo-IP/Location Service section.
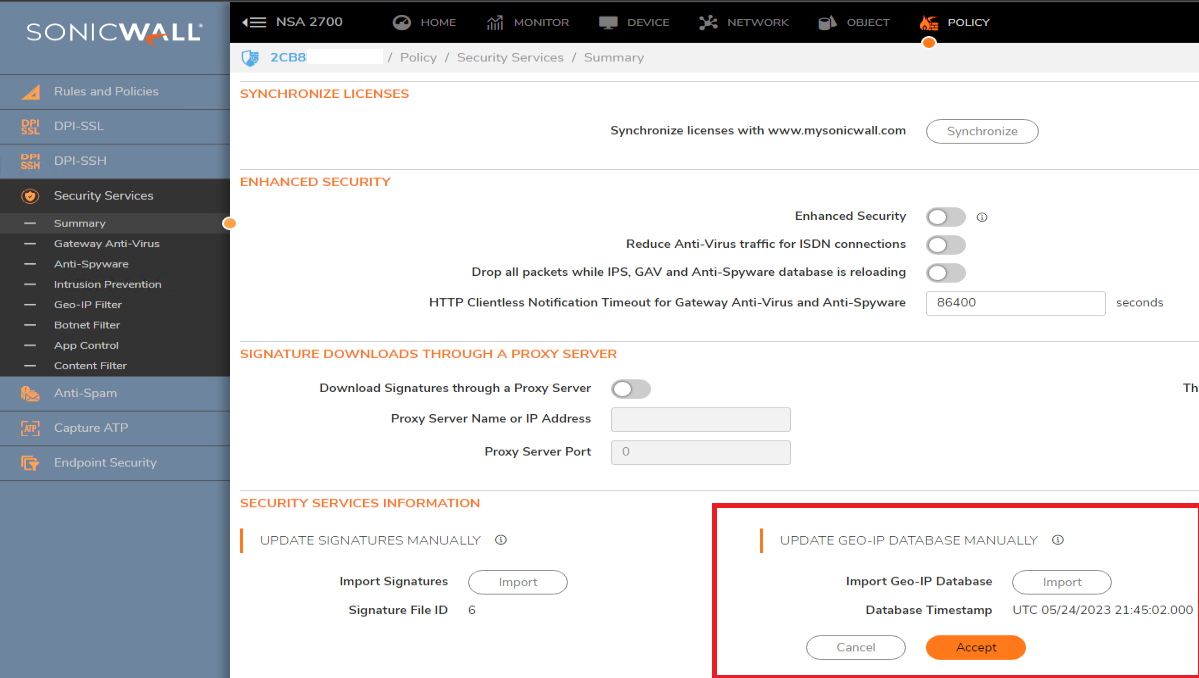
Step 6: Navigate to Policy | Security Services | Summary and Click on Import under Update Geo-IP database manually and select the .gz file downloaded in step 3.
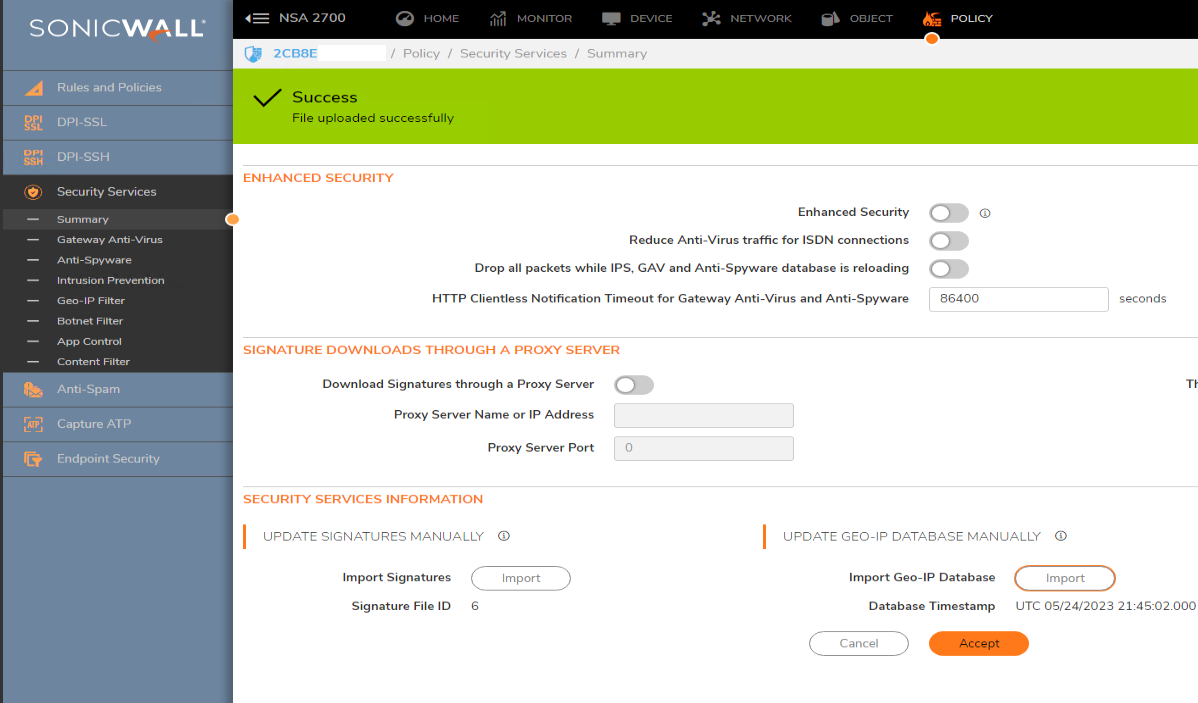
Step 7: If File upload was successful, a status update should show up ad file upload success.
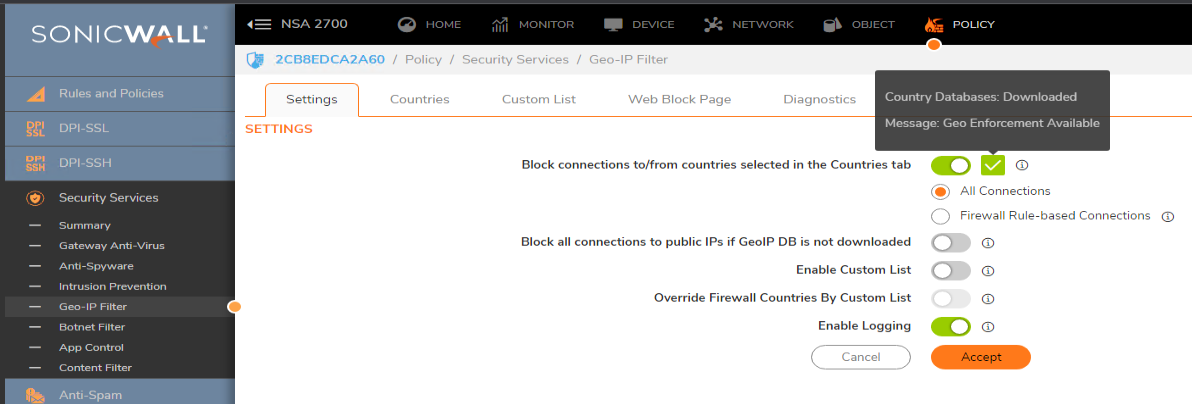
Step 8: Navigate to Policy | security Services | Geo-IP Filter the country database should now be in downloaded status.
Resolution for SonicOS 6.5
This release includes significant user interface changes and many new features that are different from the SonicOS 6.2 and earlier firmware. The below resolution is for customers using SonicOS 6.5 firmware.
In order for the country database to be downloaded, the firewall should have the Geo-IP feature turned ON. Without this enabled, the firewall will not attempt to download the database. You can enable Geo-IP filter from MANAGE | Security Services | GEO-IP Filter and Settings tab.
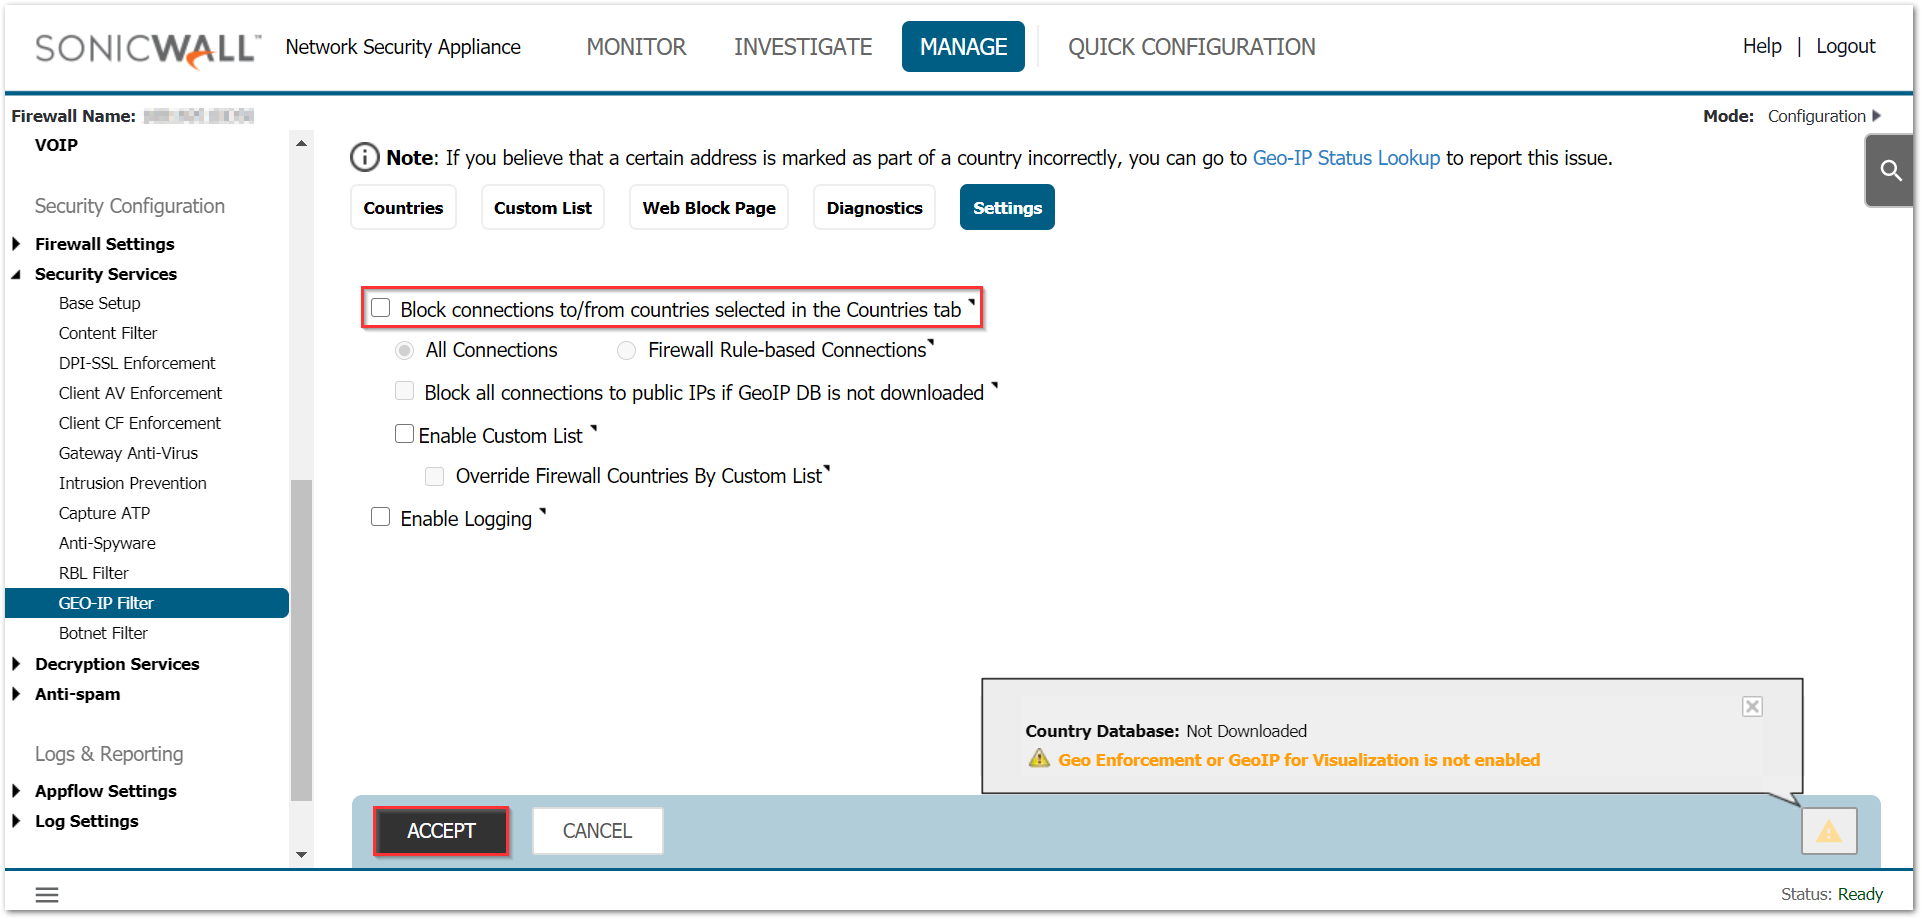
Once enabled, the appliance must be able to resolve the following URL depending on model:
Generation 5 SonicWall (Devices running 5.8 or 5.9 firmware) | "gbdata.global.sonicwall.com"
Generation 6 SonicWall (Devices running 6.2 or 6.5 firmware) | "utmgbdata.global.sonicwall.com"
For Gen 5 appliances, you can navigate to System | Diagnostics and use DNS name lookup under Diagnostic Tools.
For Gen 6 appliances, you can navigate to INVESTIGATE | System Diagnostics and use DNS name lookup under Diagnostic Tools.
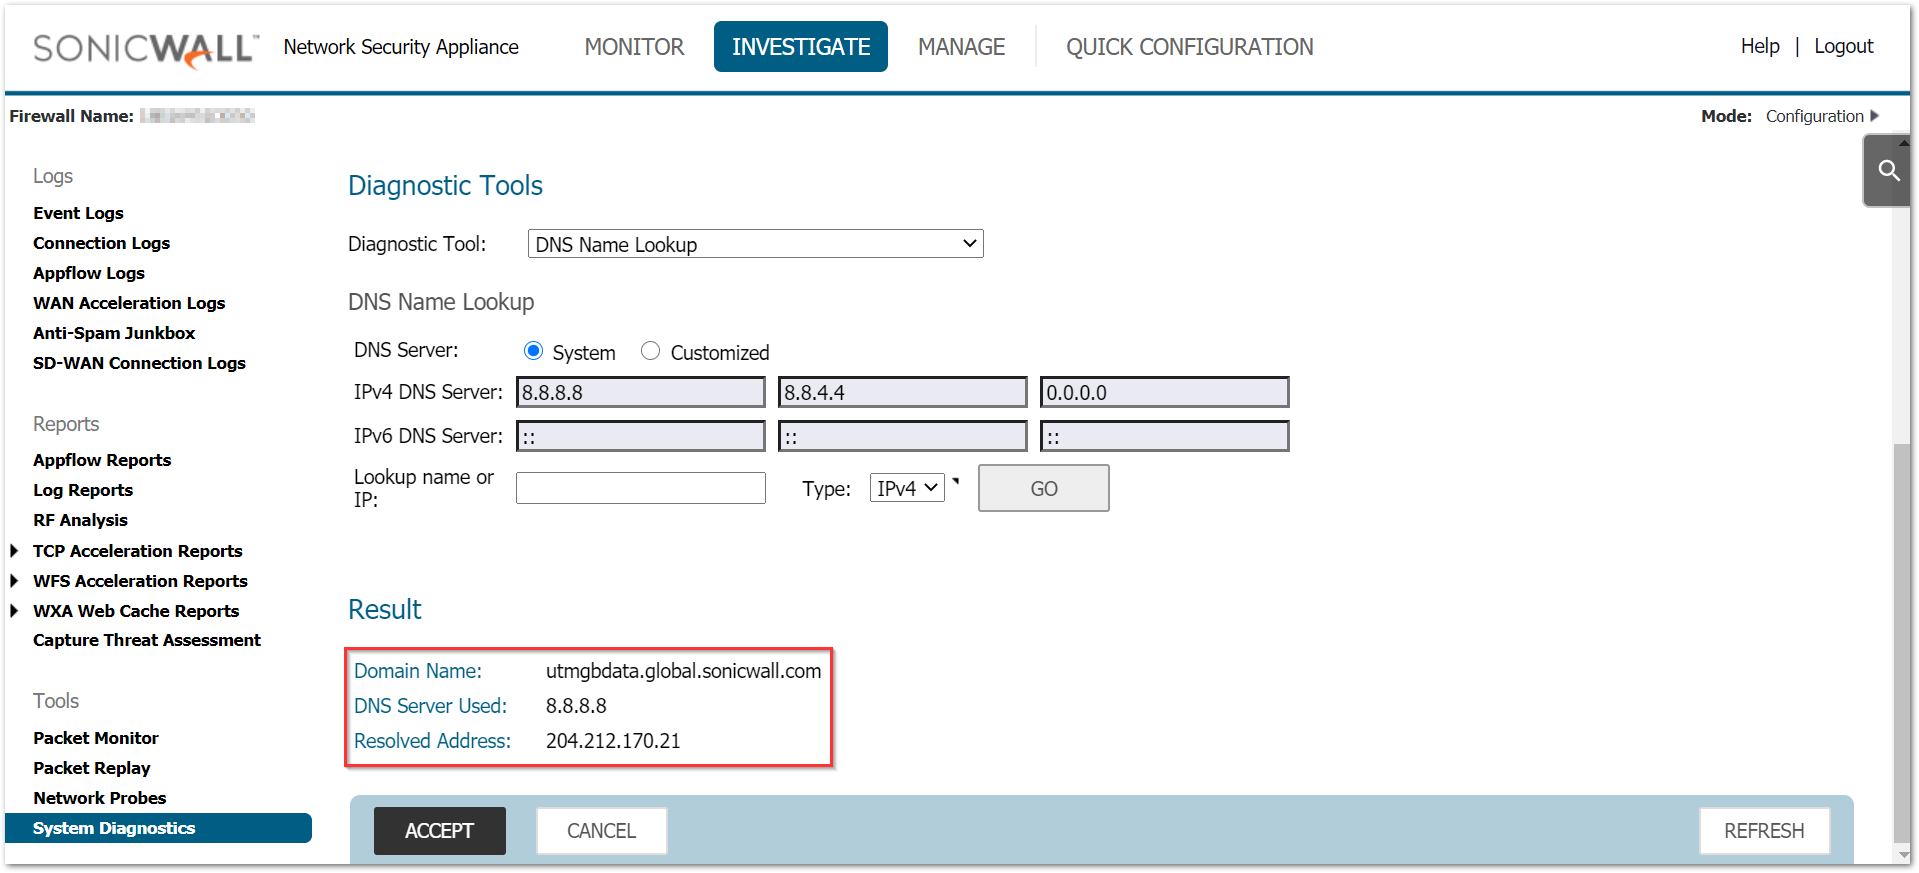
If they are able to resolve the domains, then the download should be successful momentarily after turning ON the feature. If the DNS resolution is not successful, navigate to MANAGE | Network | DNS and use a public DNS server such as 8.8.8.8 or 8.8.4.4 as the primary DNS server manually.
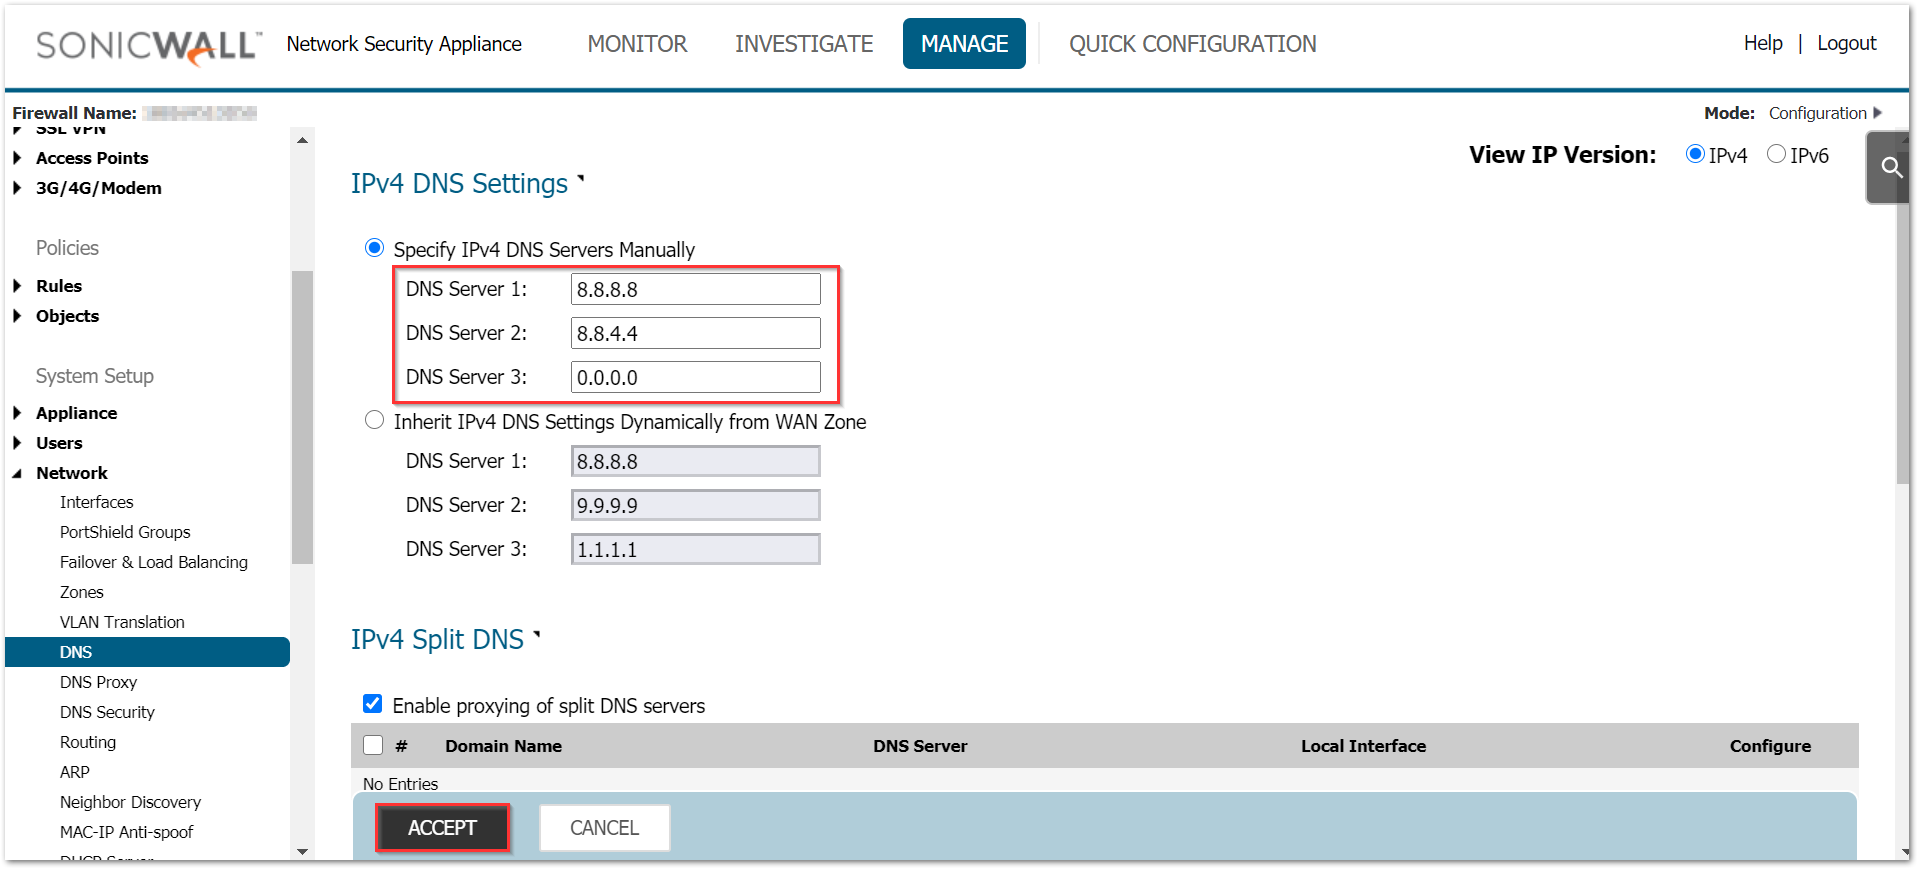
Even after all these steps, if the database download is not successful, the following steps can be taken to download and install the Geo-ip database manually.
- To download the Geo-IP signatures manually, visit mysonicwall.com and login with the account that your SonicWall is registered to.
- Click Product Management | My Products and locate the device you want to download this for. Hover on the product item and select the License icon.
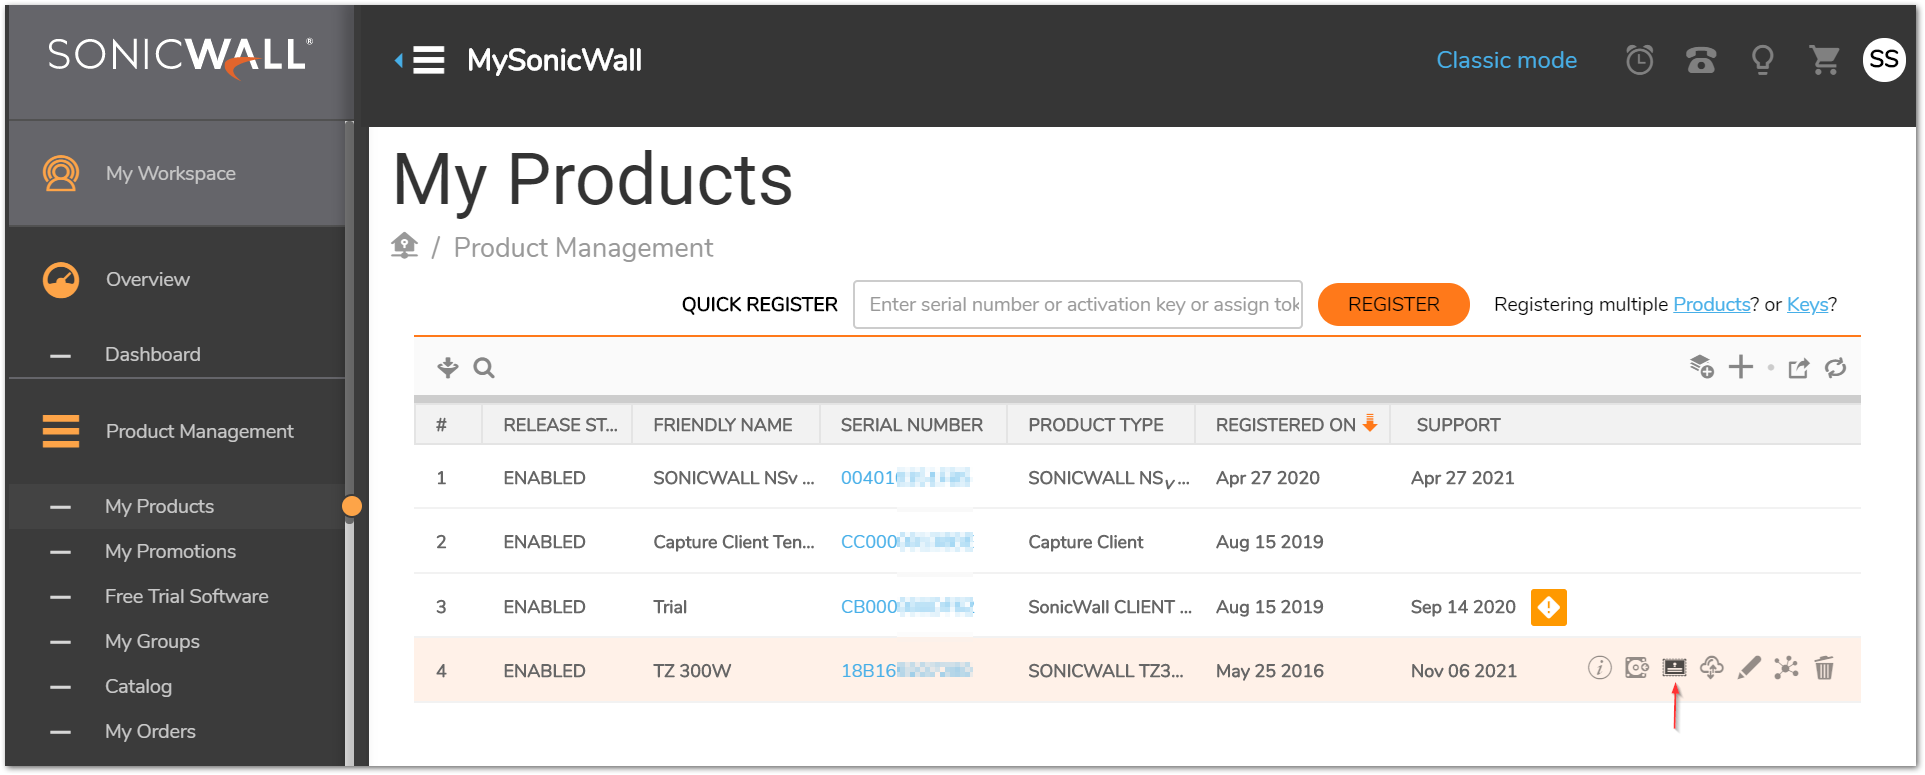
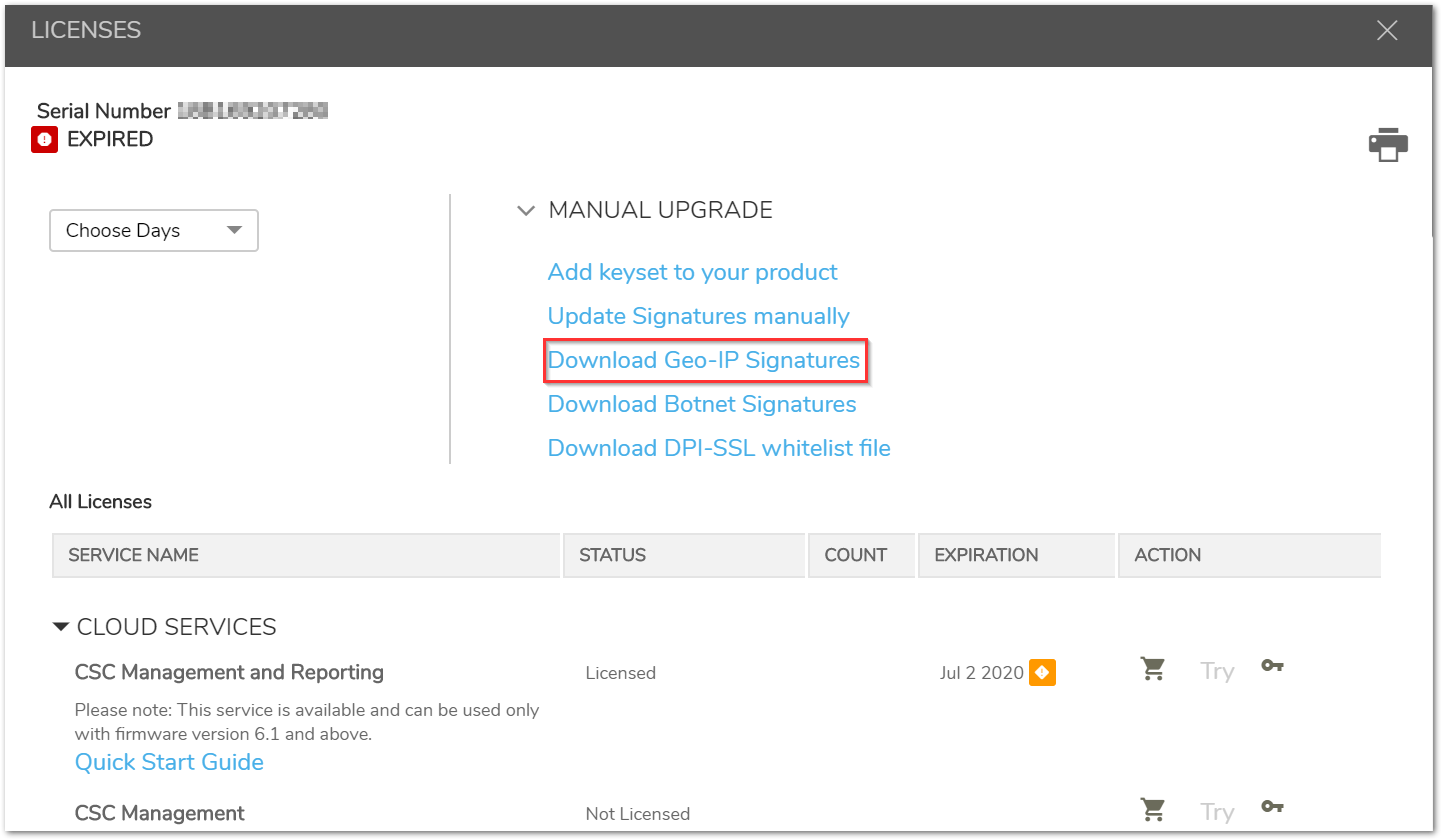
- Click on download option for 'Download Geo-IP Signatures'. It should download the signature file with extension .gz
- Navigate to the diag page of the firewall UI. The Diag page can be reached by typing in the LAN IP of the SonicWall in the browser, with a /diag.html at the end.
 EXAMPLE: 192.168.168.168/diag.html
 - Click on Internal Settings and enable the option 'Allow Geo-IP/Botnet Filter map database file upload' under 'GeoIP/Location Service' section.
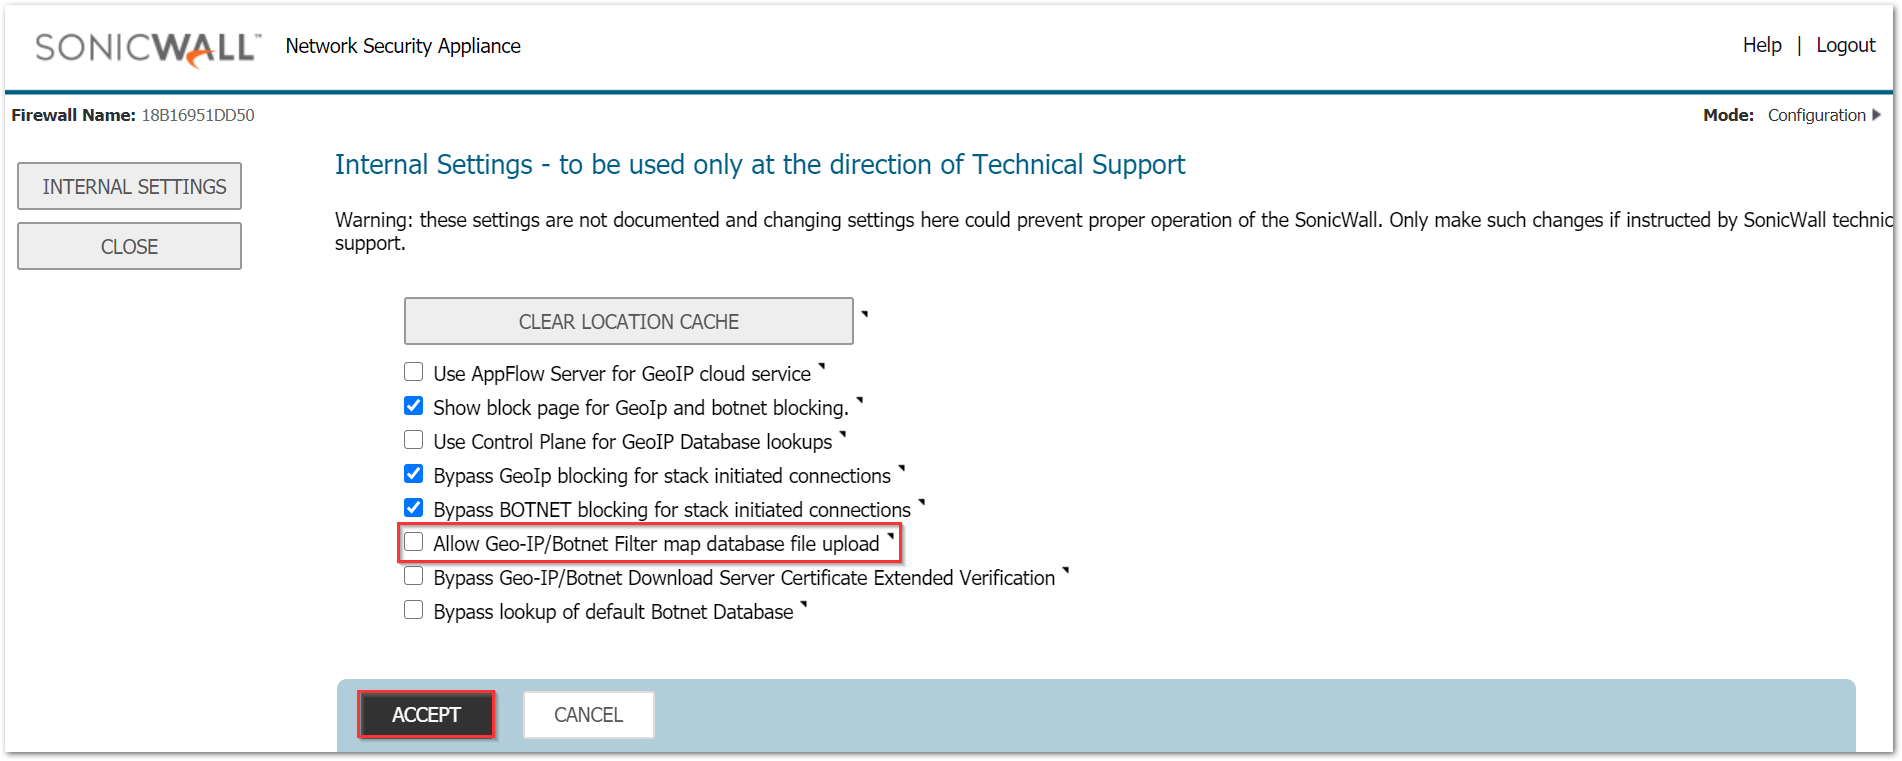
- Navigate to MANAGE | Security Services | Base Setup and scroll down for 'Update Geo-IP Database manually' section. Click on 'Import Geo-IP Database' and browse the .gz file downloaded in Step 3 and click on Import.
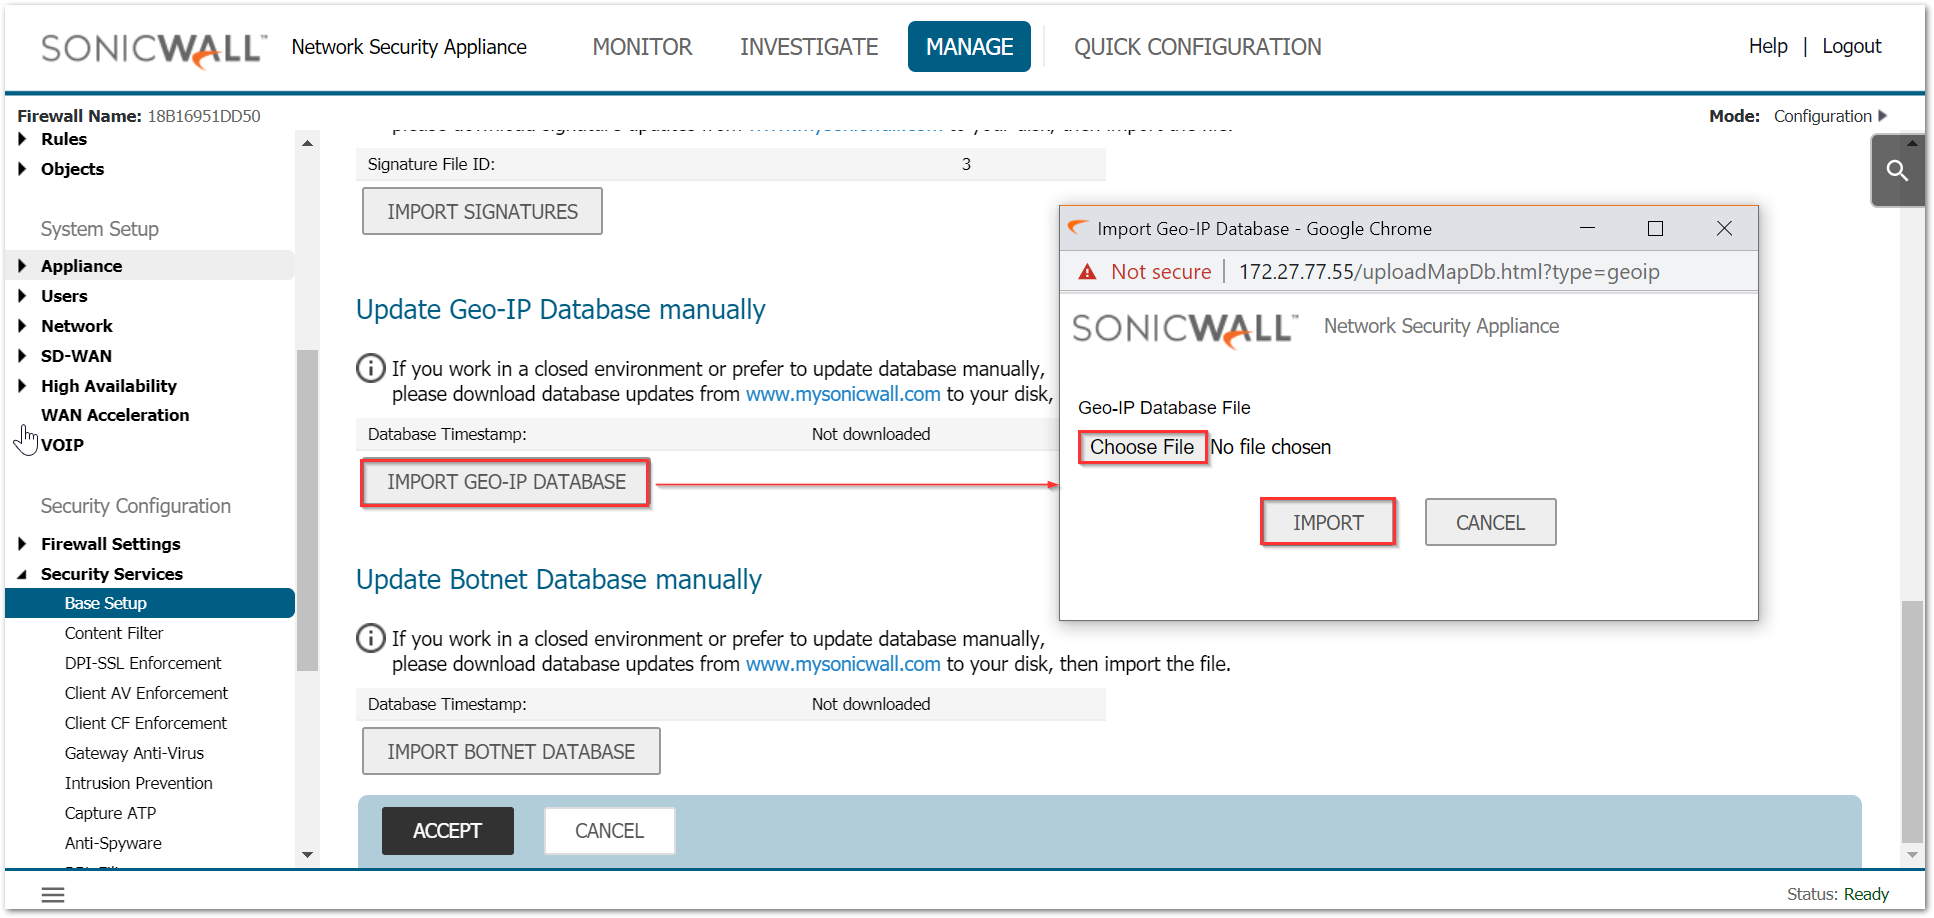
- A warning message will appear and you can click on OK.

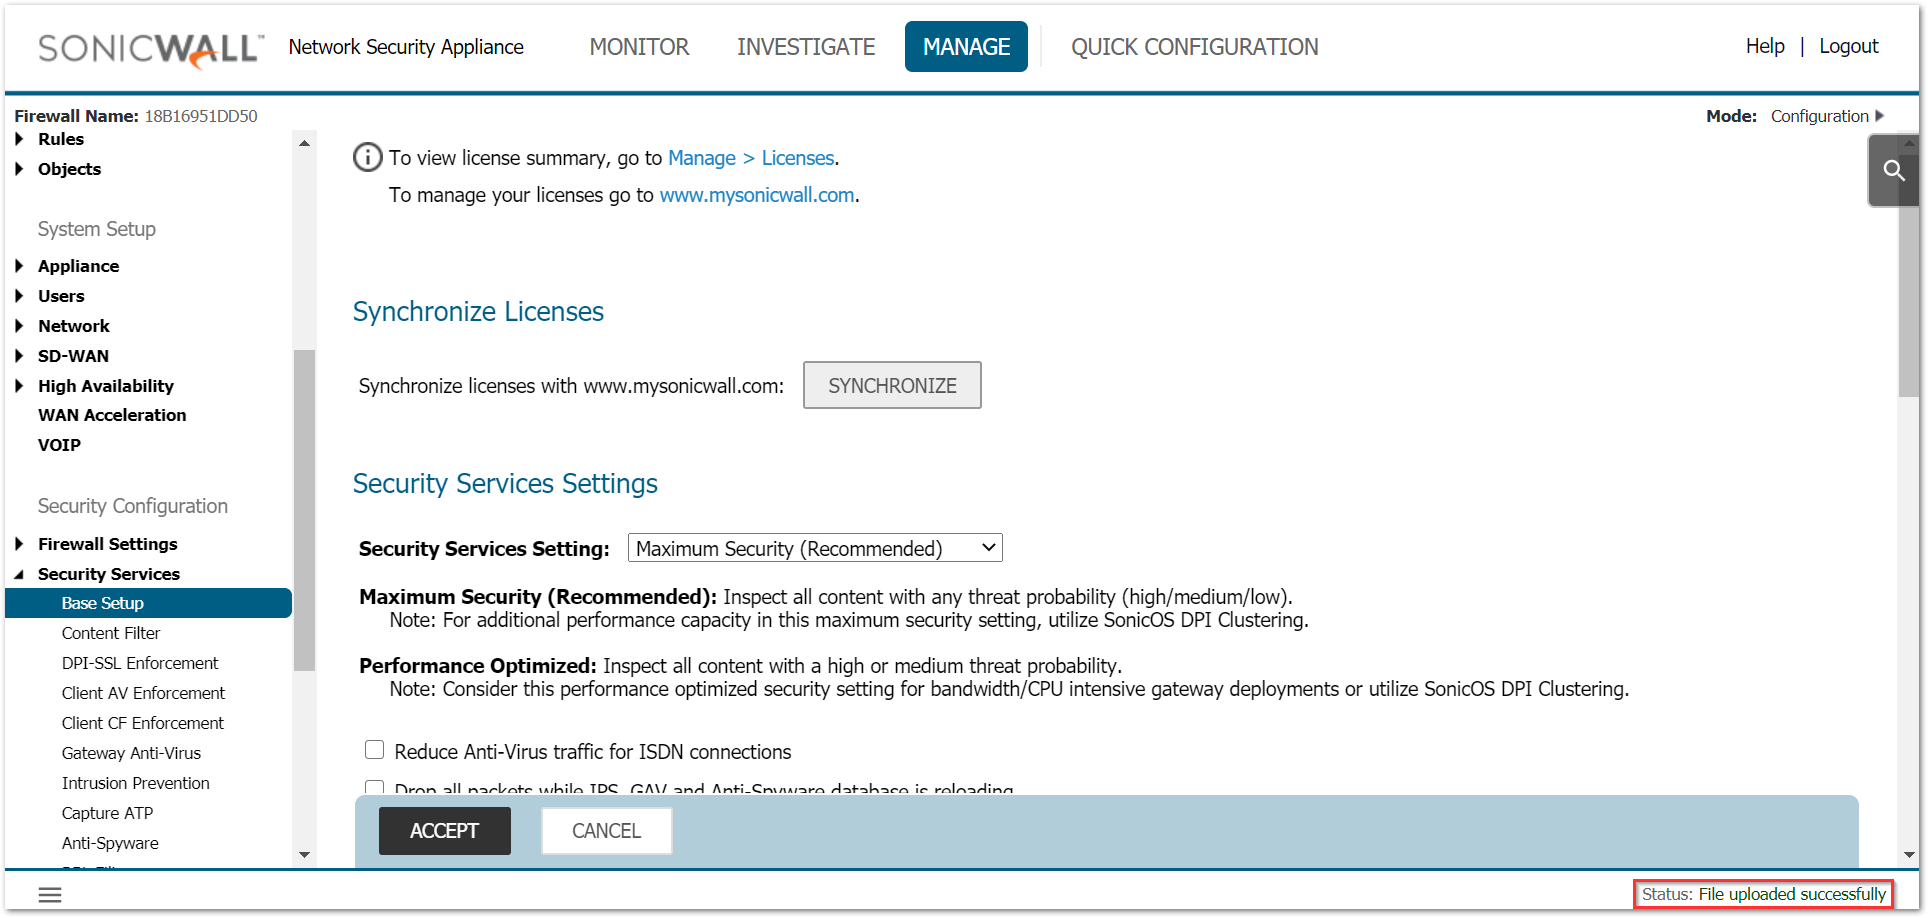
- If the file upload was successful, a status update should show up at the bottom.
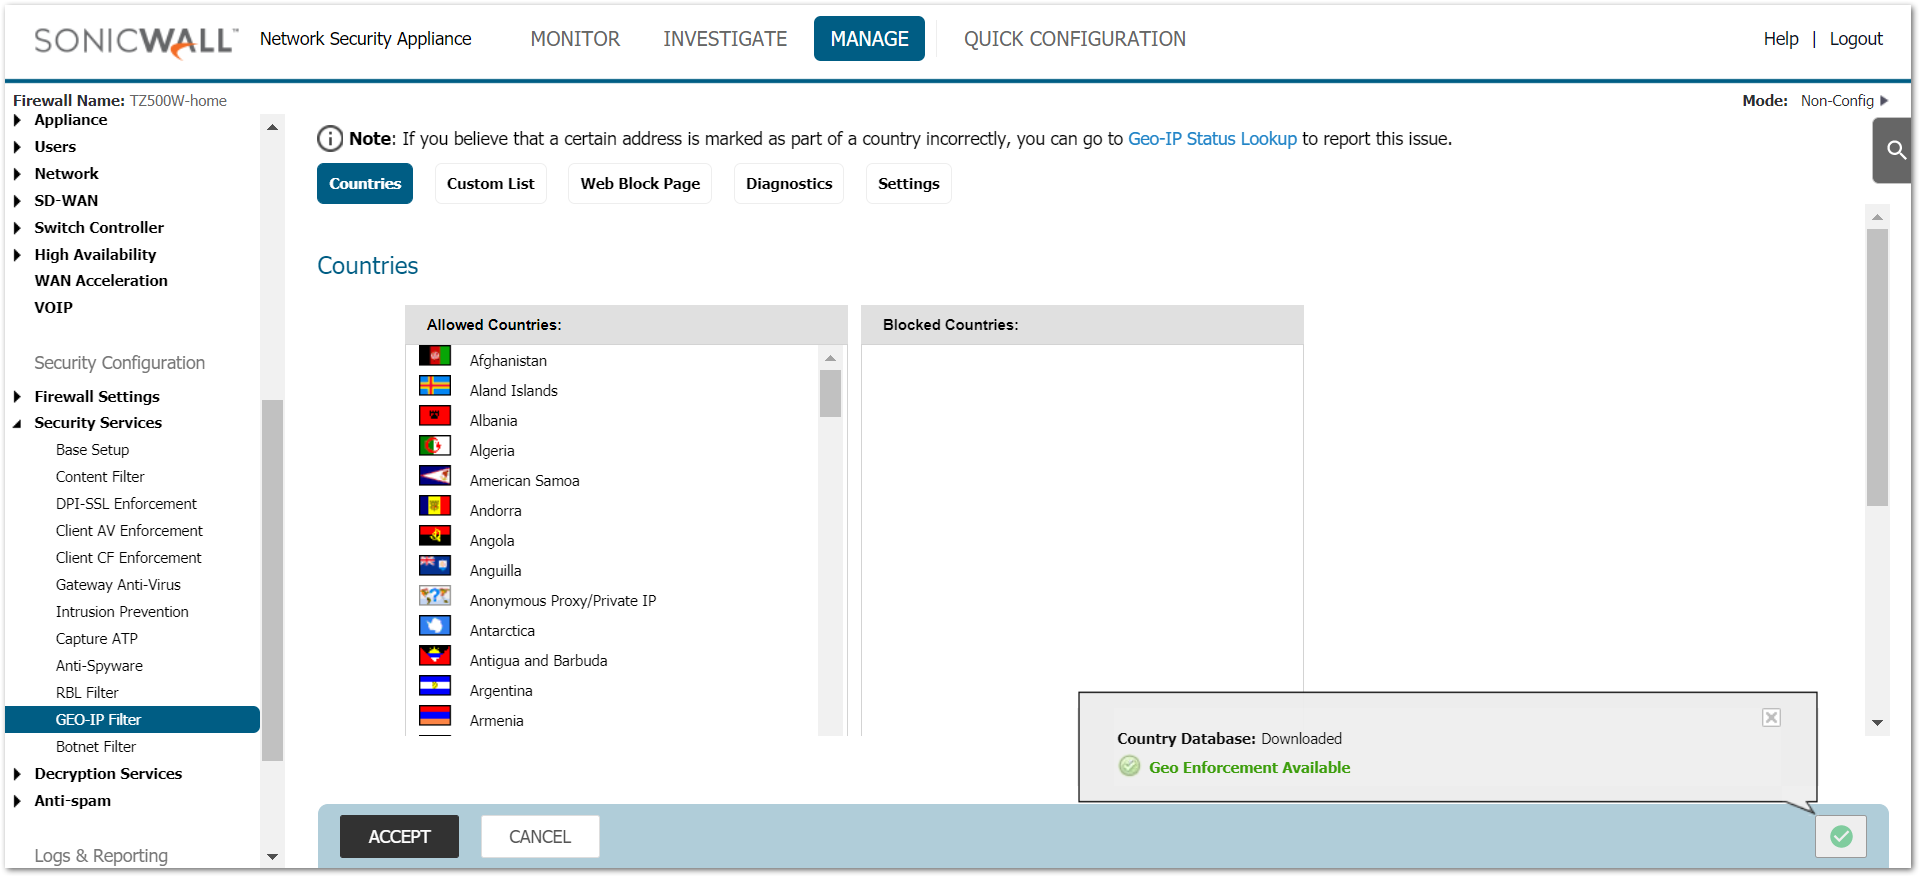
- The country database should now be in downloaded status.
Related Articles
- Error:"Invalid API Argument" when modifying the access rules
- Cysurance Partner FAQ
- Configure probe monitoring for WAN Failover and Loadbalancing - SonicWall UTM
Categories
- Firewalls > TZ Series
- Firewalls > SonicWall SuperMassive E10000 Series
- Firewalls > SonicWall SuperMassive 9000 Series
- Firewalls > SonicWall NSA Series


 YES
YES NO
NO