-
Products
-
SonicPlatform
SonicPlatform is the cybersecurity platform purpose-built for MSPs, making managing complex security environments among multiple tenants easy and streamlined.
Discover More
-
-
Solutions
-
Federal
Protect Federal Agencies and Networks with scalable, purpose-built cybersecurity solutions
Learn MoreFederalProtect Federal Agencies and Networks with scalable, purpose-built cybersecurity solutions
Learn More - Industries
- Use Cases
-
-
Partners
-
Partner Portal
Access to deal registration, MDF, sales and marketing tools, training and more
Learn MorePartner PortalAccess to deal registration, MDF, sales and marketing tools, training and more
Learn More - SonicWall Partners
- Partner Resources
-
-
Support
-
Support Portal
Find answers to your questions by searching across our knowledge base, community, technical documentation and video tutorials
Learn MoreSupport PortalFind answers to your questions by searching across our knowledge base, community, technical documentation and video tutorials
Learn More - Support
- Resources
- Capture Labs
-
- Company
- Contact Us
FQDN(Fully Qualified Domain Name) based NAT


Description
This article details how to use FQDN (Fully Qualified Domain Name) in the Network Address Translation (NAT) policies.
Cause
FQDN Address Objects for NAT is not supported in 6.5.0.X firmwares and in older firmwares.
Resolution
SonicOS 6.5.1.0 supports NAT policies using FQDN Address Objects for the original source/destination.
Use scenarios include:
Scenario 1. Specifying public IP addresses with FQDN to a local server
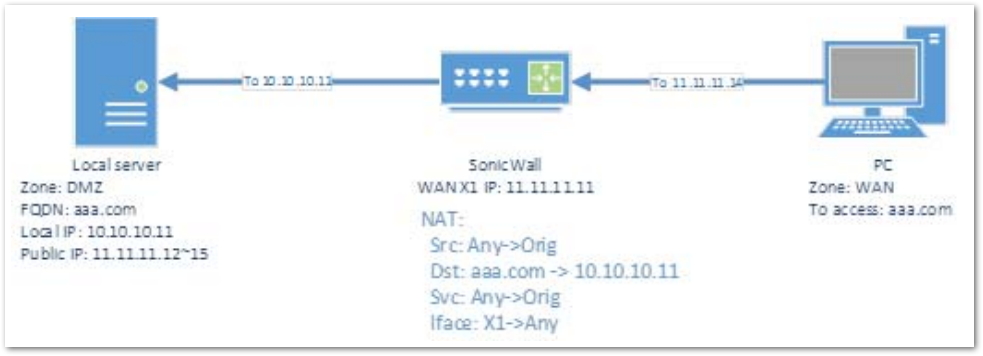
Step 1: Creating the necessary Address Objects
- Click MANAGE | Network | Address Objects
- Click Address Objects | Add button and create two Address Objects as below:
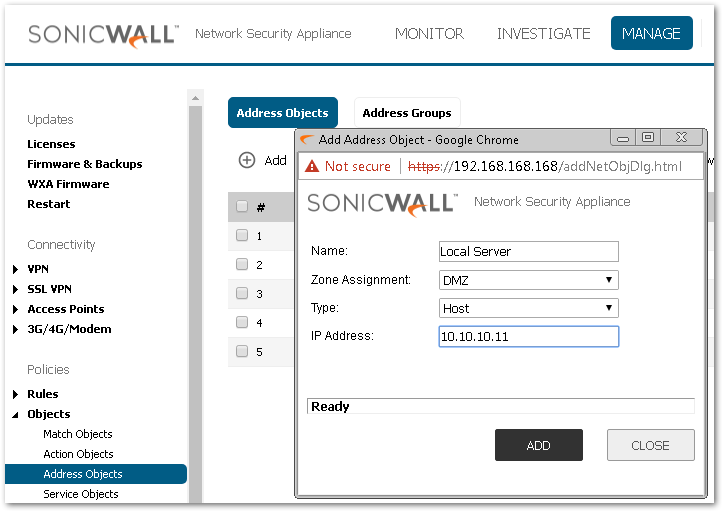
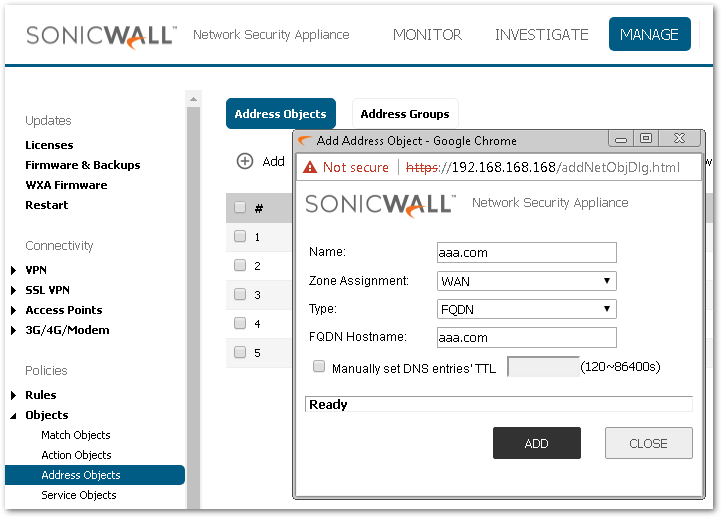
 NOTE: Domain name aaa.com resolves to WAN X1 IP of the SonicWall. DNS record must be configured in the DNS Server.
- Click ADD to add the Address Objects to the SonicWall's Address Object Table.

Step 2: Creating the inbound NAT Policy
- Click MANAGE | Rules | NAT Policies | Add
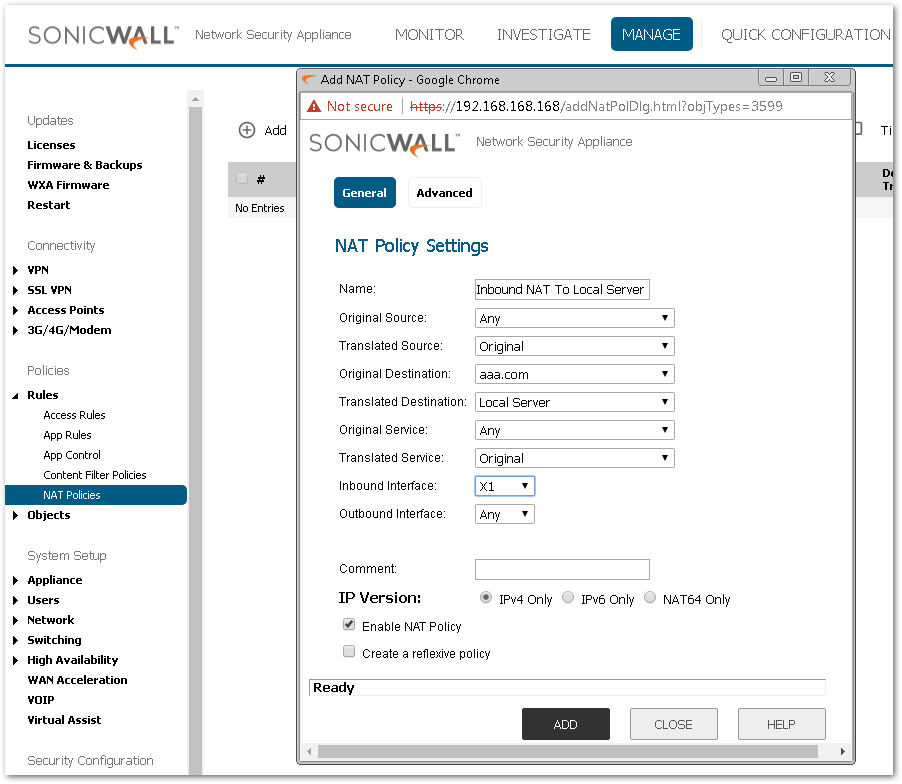
- Click ADD

Step 3: Creating the inbound Firewall Access Rules
- Click MANAGE | Rules | Access Rules
- Click Matrix View | Select your WAN to Appropriate Zone Access Rule. (This will be the Zone the Private IP of the Server resides on.)
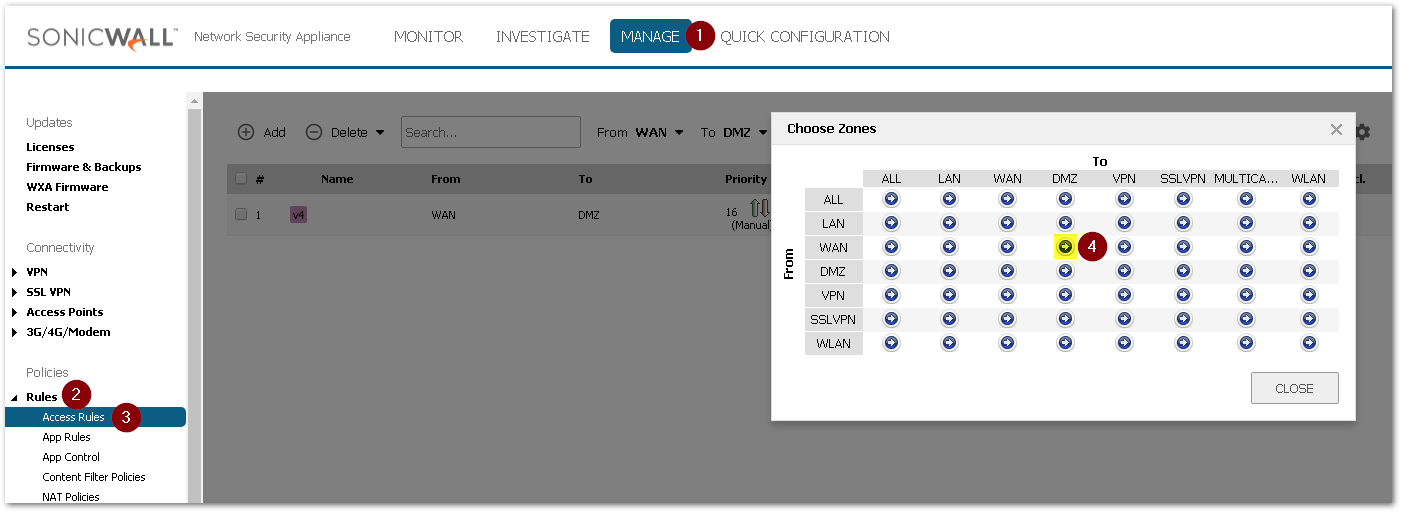
- Click ADD
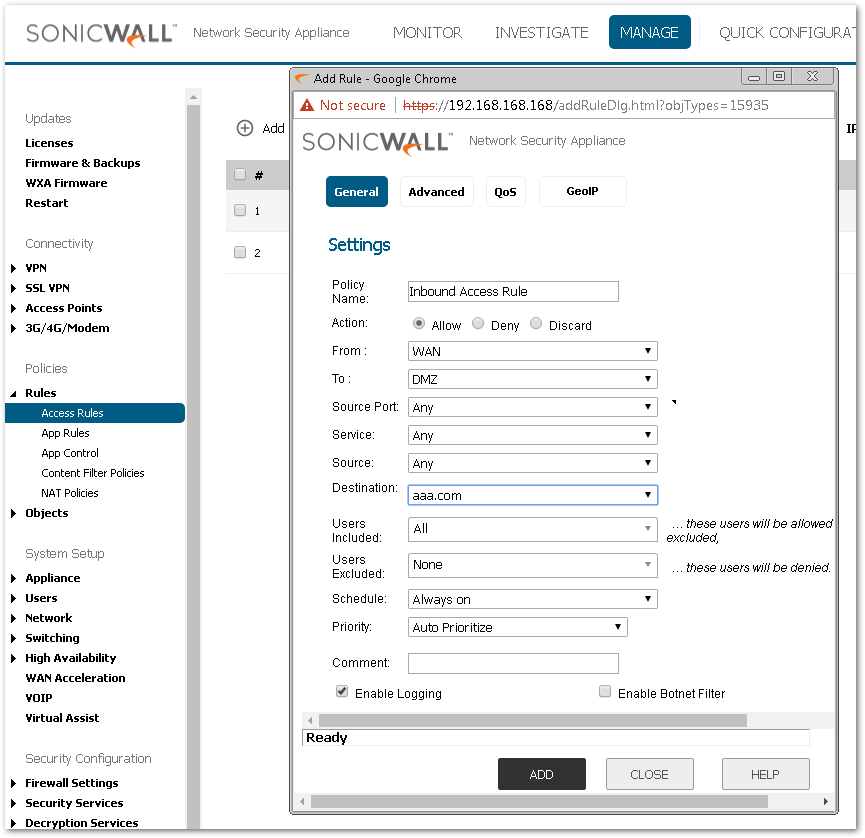
- Click ADD

Scenario 2. Specifying a public server with FQDN for consistency across replacement with a server that has a known IP address
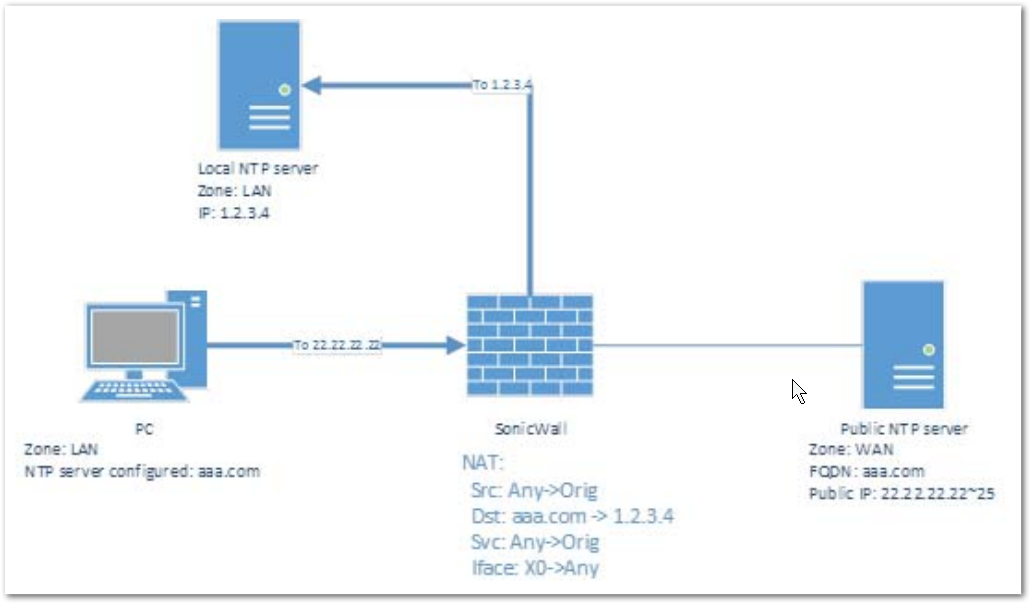
Step 1: Creating the necessary Address Objects
- Click MANAGE | Network | Address Objects
- Click Address Objects | Add button and create following FQDN address object, assuming that aaa.com FQDN address object has already been created from scenario 1.
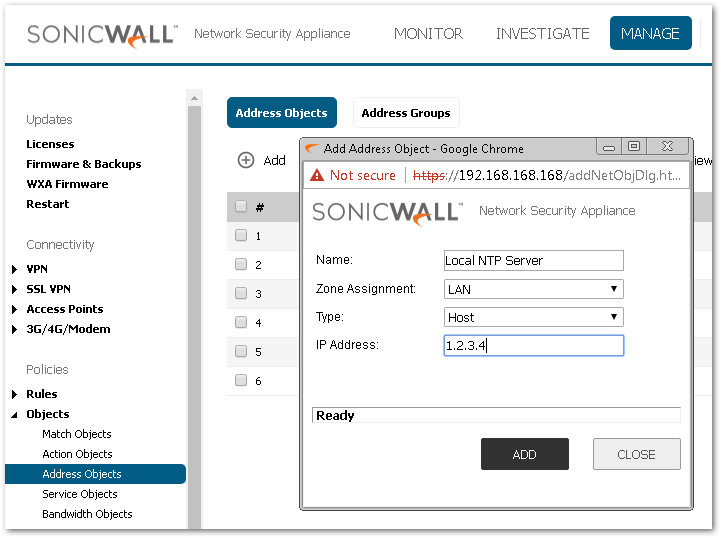
- Click ADD to add the Address Objects to the SonicWall's Address Object Table.

Step 2: Creating the inbound NAT Policy
- Click MANAGE | Rules | NAT Policies | Add
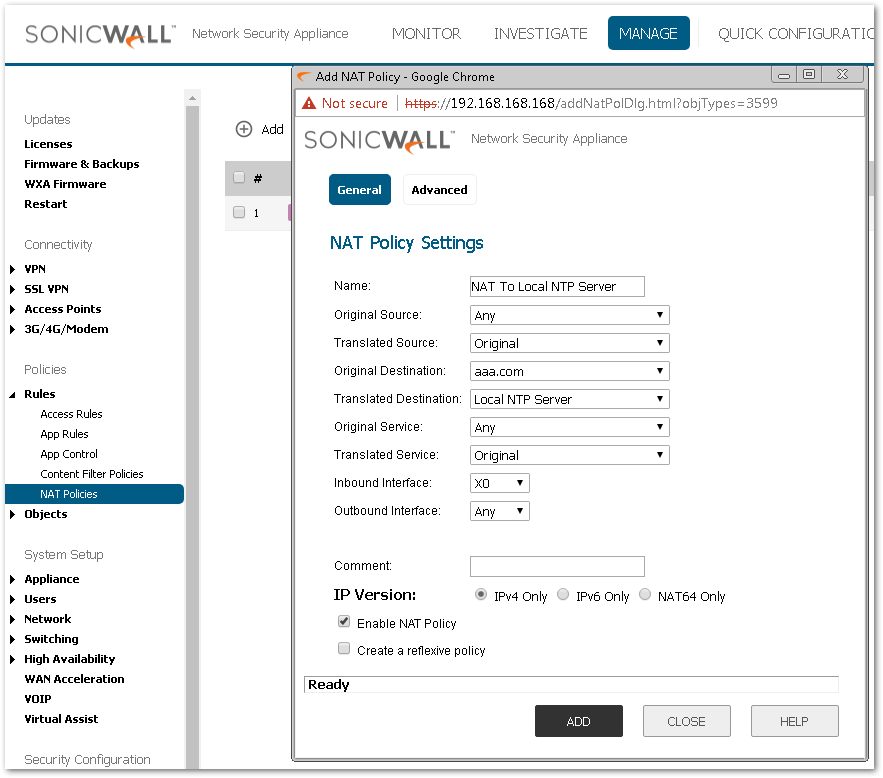
- Click ADD

 NOTE: Creating an access rule from LAN to WAN is NOT necessary since all outbound traffics are allowed from LAN to WAN by default.
Scenario 3. Routing traffic from/to a FQDN to have a source IP address other than the outbound interface IP
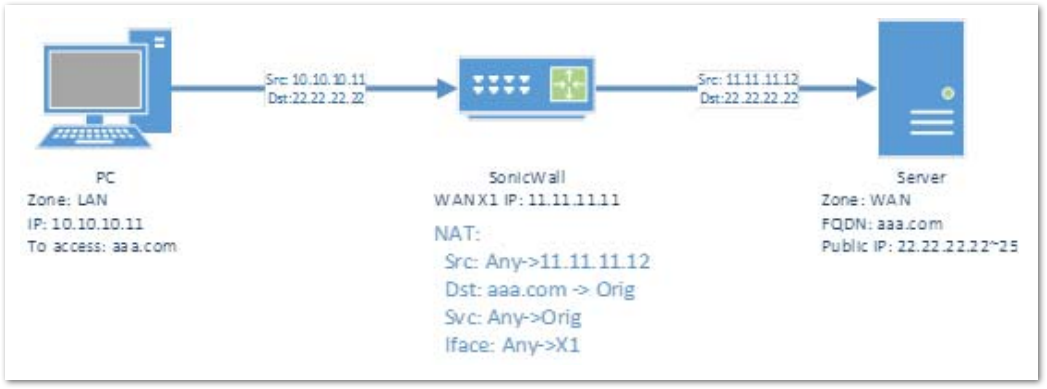
 NOTE: In this case, PC: 10.10.10.11 has been assigned WAN IP: 11.11.11.12 instead of the default WAN X1 IP to access aaa.com which is hosted externally.
Step 1: Creating the necessary Address Objects
- Click MANAGE | Network | Address Objects
- Click Address Objects | Add button and create following FQDN address object, assuming that aaa.com FQDN address object has already been created from scenario 1.
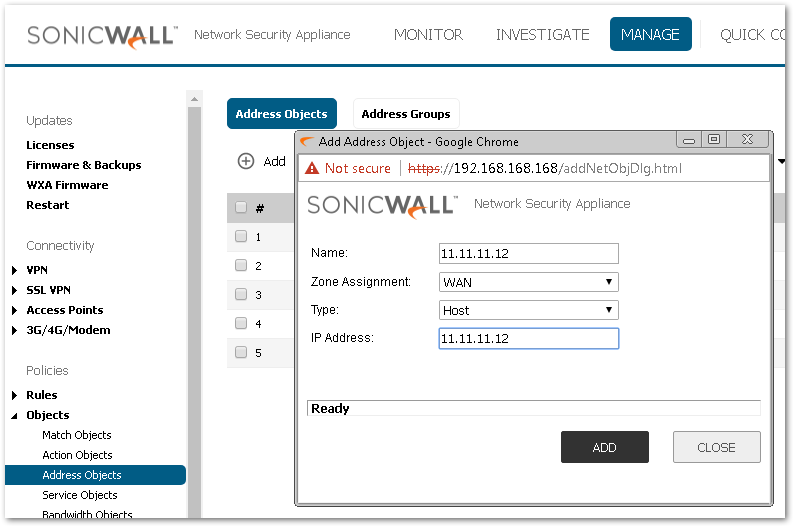
- Click ADD

Step 2: Creating the inbound NAT Policy
- Click MANAGE | Rules | NAT Policies | Add
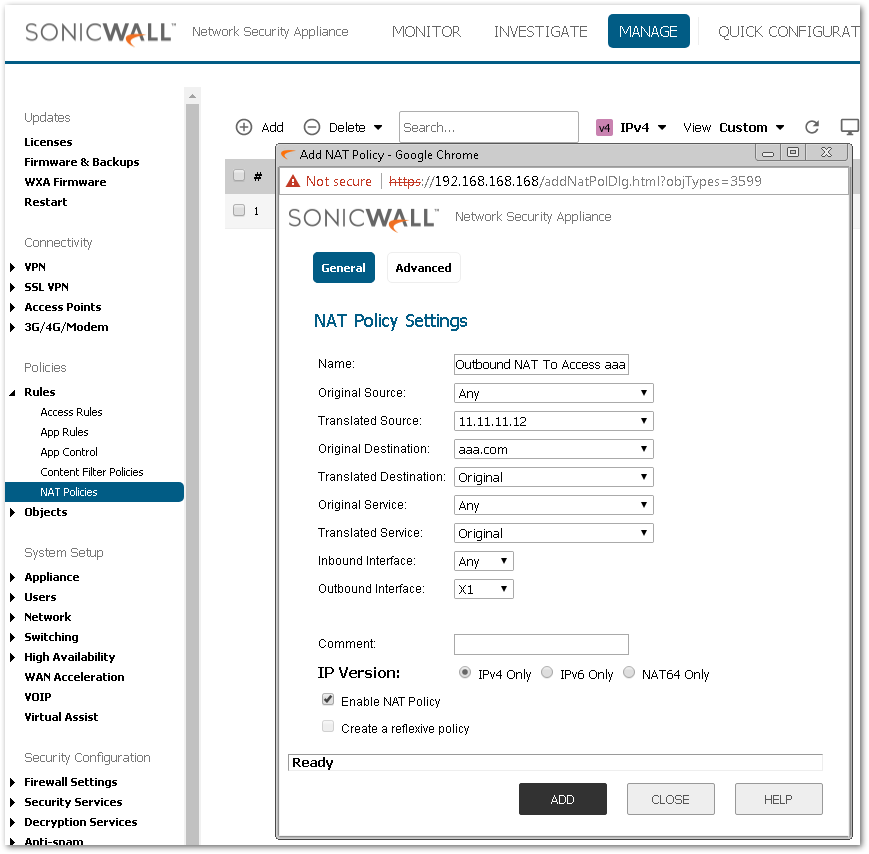
- Click ADD

 NOTE: Creating an access rule from LAN to WAN is NOT necessary since all outbound traffics are allowed from LAN to WAN by default.
 CAUTION: FQDN is not supported for the translated source/destination. Also, the Advanced page is disabled if FQDN is used in either or both the original source/destination fields.
Related Articles
- Error:"Invalid API Argument" when modifying the access rules
- Cysurance Partner FAQ
- Configure probe monitoring for WAN Failover and Loadbalancing - SonicWall UTM
Categories
- Firewalls > SonicWall NSA Series > Networking
- Firewalls > NSa Series > Networking
- Firewalls > NSv Series > Networking


 YES
YES NO
NO