-
Products
-
SonicPlatform
SonicPlatform is the cybersecurity platform purpose-built for MSPs, making managing complex security environments among multiple tenants easy and streamlined.
Discover More
-
-
Solutions
-
Federal
Protect Federal Agencies and Networks with scalable, purpose-built cybersecurity solutions
Learn MoreFederalProtect Federal Agencies and Networks with scalable, purpose-built cybersecurity solutions
Learn More - Industries
- Use Cases
-
-
Partners
-
Partner Portal
Access to deal registration, MDF, sales and marketing tools, training and more
Learn MorePartner PortalAccess to deal registration, MDF, sales and marketing tools, training and more
Learn More - SonicWall Partners
- Partner Resources
-
-
Support
-
Support Portal
Find answers to your questions by searching across our knowledge base, community, technical documentation and video tutorials
Learn MoreSupport PortalFind answers to your questions by searching across our knowledge base, community, technical documentation and video tutorials
Learn More - Support
- Resources
- Capture Labs
-
- Company
- Contact Us
Export/Download technical support files from UTM firewall using SSH


Description
In order to aid the support engineer`s investigation into the root cause of a customer reported issue, a few files are required from the Dell SonicWall UTM firewall. Below is a list of files which would be needed to troubleshoot and validate the probable causes of the issue:
1. Tech Support Report (TSR).
2. Configuration Settings (exp extension/cli).
3. Firewall Logs (CSV or TXT format).
4. Trace logs(Current, Last, All).
5. Packet Capture(Better with both Html and Libpcap).
This article will demonstrate how to export technical support files from the firewall command line interface(CLI) using SSH session in three operation systems, which are Windows, Linux and MacOS.
Resolution
To export technical files from CLI using SSH, firstly enable the SSH management on the firewall:
1. Login to the SonicWall Management Interface.
2. Select Network | Interfaces.
3. Click the Edit icon for an interface (e.g. WAN / X1 interface)
4. Select SSH in the supported Management protocol(s) section.
You will also need an available FTP server.
To export technical files from CLI using SSH on windows, following below steps:
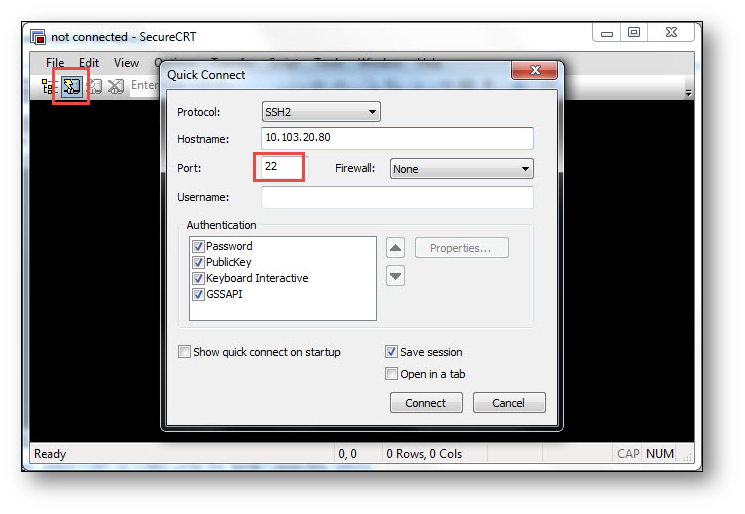
Step 1. Launch SecureCRT.
Step 2. In the Quick Connect window, configure the following:
 NOTE: Be sure the port is 22.
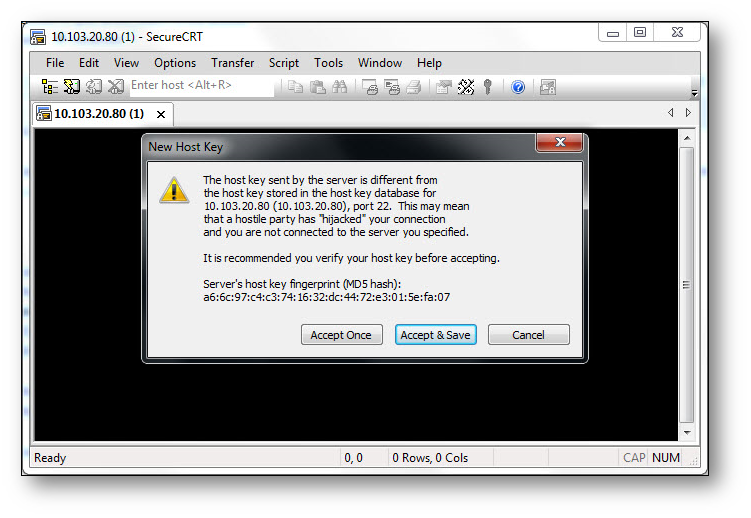
Step 3. Click "Connect", and then for the first time there will be a pop-up window to ask if accept the host key or not. Click "Accept&Save" 

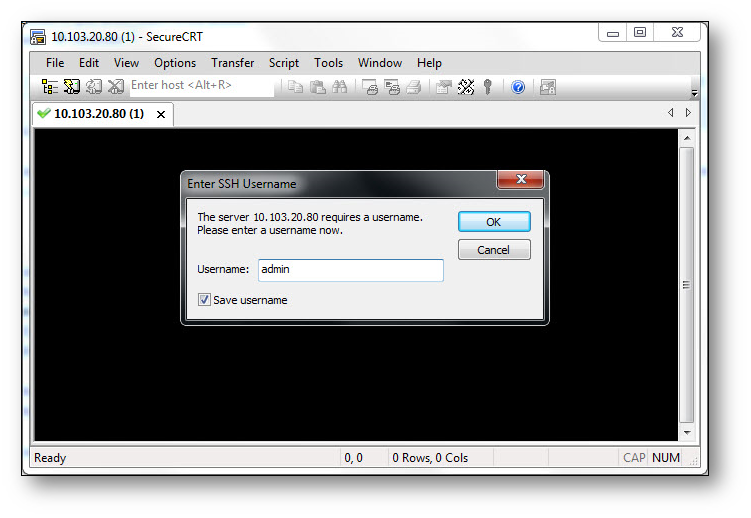
Step 6. To export TSR, issue the command "export tech-support-report ftp ftp://username:password@ftpserver/tsr_3600.wri". export current-config exp ftp ftp://sonicwall:sonicwall@10.103.20.251/3600conf.exp" for the import purpose, or issue the command "export current-config cli ftp ftp://sonicwall:sonicwall@10.103.20.251/3600conf" for configuration review purpose.
Step 8. To export the packet capture file, issue the command "export capture html ftp ftp://sonicwall:sonicwall@10.103.20.251/net.html", or "export capture libpcap ftp ftp://sonicwall:sonicwall@10.103.20.251/net.pcap".
Step 9. To export firewall logs and trace logs, firstly enable the session log on SecureCRT, following steps below.
1. Click on the File menu
2. Select Log Session
3. In the Select Log File window, select a location and enter a name for the log file.
4. Click on Save show log view", "diag show trace current", "diag show trace last" and "diag show trace". And all the returns will be saved in the session log file.
To export technical files from CLI using SSH on Linux and MacOS , is quite same with the CLI commands part. The difference is about how to connect to the firewall via SSH and how to save the session log.
LINUX
Step 1. Navigate to Applications | System Tool | Terminal and click, or on the desktop right click then chose "Open In Terminal", and then will use the command line.  ssh admin@firewall_ip" to logon the firewall via ssh session.
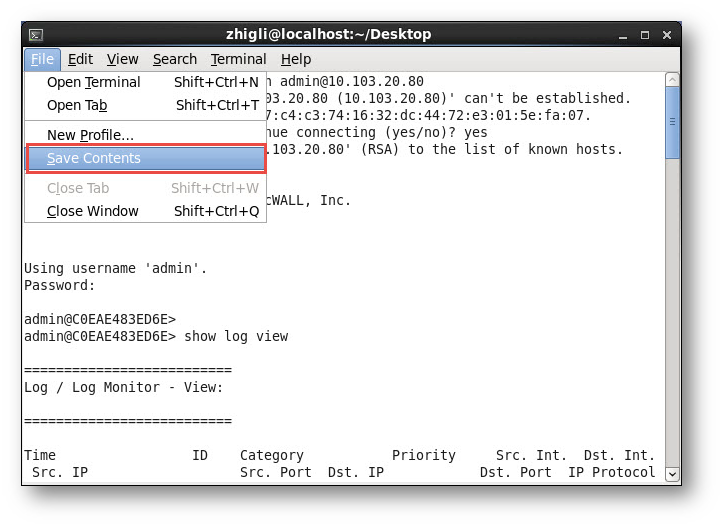
Step 3. Issue the commands mentioned above. And then on the terminal window, navigate to File | Save contents to save the log as a file.

Step 2. Issue the command "ssh admin@firewall_ip" to login the firewall via ssh session.
Step 3. Issue the commands mentioned above. And then navigate to Shell | Export Text As to save the log as a file.
Related Articles
- Error:"Invalid API Argument" when modifying the access rules
- Cysurance Partner FAQ
- Configure probe monitoring for WAN Failover and Loadbalancing - SonicWall UTM
Categories
- Firewalls > TZ Series
- Firewalls > SonicWall SuperMassive E10000 Series
- Firewalls > SonicWall SuperMassive 9000 Series
- Firewalls > SonicWall NSA Series


 YES
YES NO
NO