-
Products
-
SonicPlatform
SonicPlatform is the cybersecurity platform purpose-built for MSPs, making managing complex security environments among multiple tenants easy and streamlined.
Discover More
-
-
Solutions
-
Federal
Protect Federal Agencies and Networks with scalable, purpose-built cybersecurity solutions
Learn MoreFederalProtect Federal Agencies and Networks with scalable, purpose-built cybersecurity solutions
Learn More - Industries
- Use Cases
-
-
Partners
-
Partner Portal
Access to deal registration, MDF, sales and marketing tools, training and more
Learn MorePartner PortalAccess to deal registration, MDF, sales and marketing tools, training and more
Learn More - SonicWall Partners
- Partner Resources
-
-
Support
-
Support Portal
Find answers to your questions by searching across our knowledge base, community, technical documentation and video tutorials
Learn MoreSupport PortalFind answers to your questions by searching across our knowledge base, community, technical documentation and video tutorials
Learn More - Support
- Resources
- Capture Labs
-
- Company
- Contact Us
EVO: Partner Deployment Guide


Description
IMPORTANT
- Documents here contain information on how to complete an EVO Implementation for a customer.
- This guide is meant to serve as a guide with examples ONLY that you can tailor to fit your needs.
- Prerequisites
- Please ensure that you have met all of the prerequisites listed here: EVO Prerequisites
- Firewall and Network Requirements
- Please ensure that you have all of the Firewall and Network Requirements in place prior to deploying EVO as outlined here: EVO Firewall and Network Requirements
- Evo System Requirements
- Please review the minimum system requirements as outlined here: Evo System Requirements
- Supported Operating Systems and Architecture
- EVO is supported on the operating systems and architecture outlined here: EVO Supported Operating Systems and Architecture
Step 1. Assigning Licenses
The first step we need to do it to assign the available licenses to the customer (tenant).
- Expand the below section to see instructions on how to assign licenses to a customer (tenant):
How to Assign Licenses to a customer (tenant)
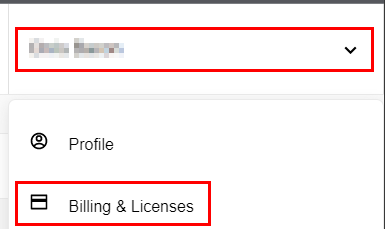
- Click your name from the top navigation bar.
- Click Billing & Licenses.
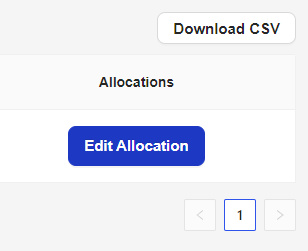
- Click the Edit Allocation button for the customer (tenant) that you want to add/remove licenses to/from.
- Update the number of licenses.
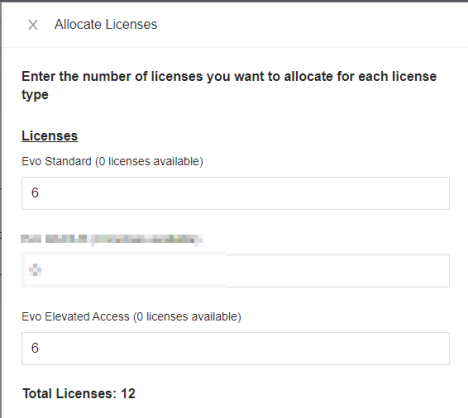
- Click Allocate.
![]()
- If the number of licenses were increased, click I’ll do it later.
Step 2. Directory Setup
The next thing we need to do is setup a directory so that we can sync users to EVO.
- To setup a directory, expand the applicable section below for instructions:
Azure Active Directory
![]() How to sync EVO wtih Azure Active Directory
How to sync EVO wtih Azure Active Directory
Evo Security syncs with active directory (AD) via Microsoft 365 Azure Active Directory service. The service will complete a scan once every 10-minutes, to confirm if there are changes to the users or any new users to be synced to your instance of Evo. The only user details that are synced are first name, last name, and email address. Passwords remain managed by your systems.
Requirements:
- Organization configured for Microsoft Azure Active Directory.
- You have admin access to the organizations Microsoft Azure Active Directory.
- All users have been created under Microsoft Azure Active Directory.
- All users have a unique email address, specific to their user.
- All users are a member of a group to be synced.
- It is recommended that all users that will be synced to EVO are put in a Security Group and only that group is synced with EVO.
- To setup a new directory that syncs to the customer’s Azure AD, follow this KB: Sync with Azure Active Directory (AD) – Evo Support (evosecurity.com)
LDAP/On-Prem Active Directory
![]() How to sync EVO wtih LDAP/On-Prem Active Directory
How to sync EVO wtih LDAP/On-Prem Active Directory
Evo Security syncs with on-premise active directory via a LDAPs (Secure Lightweight Directory Application Protocol) service. The service will complete a scan once every 10-minutes, to confirm if there are changes to the users or any new users to be synced to your instance of Evo. The only user details that are synced are first name, last name, and email address. Passwords remain managed by your systems.
Requirements:
- Active Directory has been setup on a server of Windows Server 2012r2 or higher.
- .NET Framework 4.7.2 (or higher) has been installed on the server.
- All users have been created under the Active Directory.
- All users have a unique email address, specific to their user.
- All users are a member of a group to be synced.
- It is recommended that all users that will be synced to EVO are put in a Security Group and only that group is synced with EVO.
- To setup a new directory that syncs to the customer’s LDAP/On-Premise AD, follow this KB: Sync with On-Prem Active Directory (LDAP) – Evo Support (evosecurity.com)
Google Workspace
![]() How to sync EVO wtih Google Workspace
How to sync EVO wtih Google Workspace
Evo Security syncs with Google Workspace service.
Your users will be able to login using Evo, with their network credentials. The user will be required to enter a code based on multi-factor authentication (MFA) being enabled, and their credentials are authenticated by your network.
Requirements:
- Organization configured for Google Workspace.
- All users have been created under Google Workspace.
- All users have a unique email address, specific to their user.
- All users are a member of a group to be synced.
- It is recommended that all users that will be synced to EVO are put in a Security Group and only that group is synced with EVO.
- To setup a new directory that syncs to the customer’s Google Workspace, follow this KB: Sync with Google Workspace – Evo Support (evosecurity.com)
EVO Cloud
For the below we’re going to add a simple Evo Cloud Directory-as-a-Service (DaaS). Unlike the other directory types, an Evo Cloud directory doesn’t sync users, once the directory is created, you’ll need to add users directly to Evo.
- From the left navigation menu, select My Company. Alternatively, select Customers and choose a customer from the list.
- From the side navigation, click Directories.
- Select the Evo Cloud tab.
- Click the Add New Directory
- Enter a name for the directory.
- Click Create Directory.
At this point, users will automatically start to populate into the People section of the Evo portal if you have setup one of the sync options.
Step 3. User Licensing
Once you have users syncing and showing up in the People section, the next step is to assign those user licenses. To enable features like MFA, SSO, or Elevated Access, all users must have an Evo license assigned to them.
- Expand the below section to see instructions on how to assign licenses to users:
![]() Assigning Licenses
Assigning Licenses
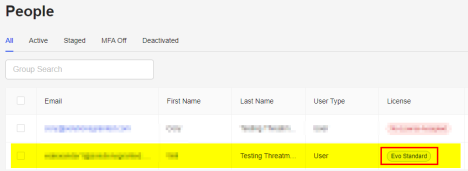
- On the People screen, select the user(s) using the checkbox on the left.
- Click Actions → Assign Licenses → EVO Standard.

- The license for the user now shows EVO Standard
Step 4. Converting Users to Admins
The next step is to convert users to admins. When you or your technicians need to manage customers, need to have privileges within the Evo portal or use Elevated Access/Shared accounts, their user will need to be converted into an Admin.
Converting a user to an admin does not give them additional privileges or access. That is configured separately in subsequent steps.
- Expand the below section to see instructions on how to convert users to admins:
![]() Converting Users into Evo Admins
Converting Users into Evo Admins
- Select People from the left navigation menu.
- In the displayed list of users, click on the user you want to edit.
- Click Convert to Admin.
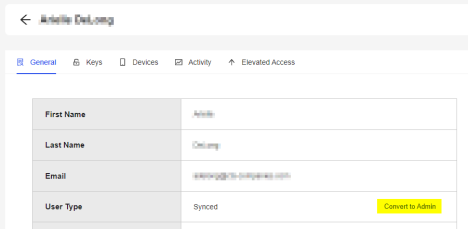
- Click Yes.
Step 5. Setting Up EVO Portal Admins
EVO Portal Admins are users that will have administrative access to your EVO MSP portal.
Role-Based Permission Groups
Role-Based Permissions are permission groups.
- Expand the below section to see instructions on how to create a permission group:
![]() Creating Role-Based Permission Groups & Assigning Users
Creating Role-Based Permission Groups & Assigning Users
- From the dashboard, click Access.
- Click Role-Based Permissions.
- Click Create New Permission Group.
- Enter a name for the new group (EVO Admins) for example, and optionally a description.
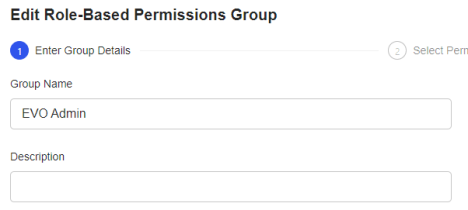
- Click Next.
- Check Select All Roles

- If creating a group for restricted permissions (Technician access for example), you can use the “Technicians” example permissions below.
- Click Next.
- From the list of administrators, check each administrator that should be included in the group.
- Click Complete.
Examples of Permissions for technicians that normally preform basic EVO management functions:
- Users
- All
- Directories
- View Directories
- Elevated Access
- Can be Elevated Admin
- Keys
- All
- Devices
- All
- Billing
- All
- Customers
- All
- Dashboard
- All
Customer Access Permissions
Now we need to grant access to customers (if any) to your EVO admin users.
- Expand the below section to see instructions on how to grant customer permissions to EVO admins:
![]() Managing Customer Access
Managing Customer Access
- From the dashboard, click Access.
- Click Customer Access.
- In the displayed list of customers located on the left, find the customer for the restrictions that are to be made. Click the customer’s name.
- From the list of administrators: Changes made are automatically saved.
- To grant access: Check the row for each user who should be granted access.
- To remove access: Uncheck the row for each user who should no longer be granted access.
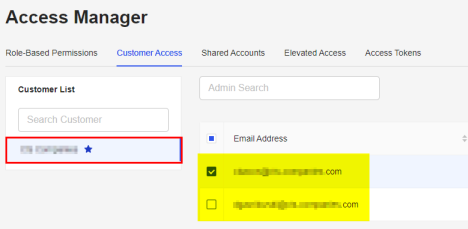
Step 6. Aliases
If you have users that need to use different and/or multiple users names, users can use an alias in order to authenticate and log in.
For information on where to find, how to add, delete, and use Aliases, see: Custom Aliases – Evo Support (evosecurity.com)
Step 7. Elevated Access/Shared Accounts
Follow the below steps to create and give access to shared/elevated access accounts.
For users to be a part of a Permission Group, use a shared account, or have EA groups assigned to them, users need to have been converted to an Admin (See Step 5: Converting Users to Admins).
Role-Based Permission Groups
The first thing you need to do is make sure the EVO users that will be using shared/elevated access accounts, have the correct permissions to do so.
Skip this step if your EVO admin users are already a part of a permissions group with the Can be Elevated Admin option selected.
- Expand the below section to see instructions on how to create a permission group for shared/elevated access permissions:
![]() Creating Role-Based Permission Groups & Assigning Users
Creating Role-Based Permission Groups & Assigning Users
- From the dashboard, click Access.
- Click Role-Based Permissions.
- Click Create New Permission Group.
- Enter a name for the new group (EVO EA Users for example), and optionally a description.
- Click Next.
- Ensure the Can be Elevated Admin is selected under the Elevated Access section.
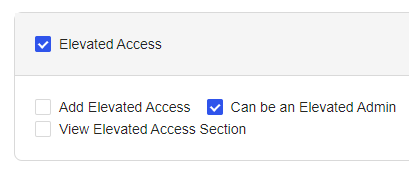
- Click Next Step.
- From the list of administrators. Check the row for each administrator to be included in the group.
- Click Add Permission Group.
Shared Accounts
Shared Accounts are any accounts separate from your normal “user” account. These can be account such as Domain Admins, Local PC admins, Local PC users, conference room accounts, or accounts that need to be used by multiple users. When you log onto a windows machine, or get prompted User Account Control (UAC), you check the Elevated Access option, use your Evo credentials, and the Shared Account will be securely passed onto that machine through the Evo agent (Credential Provider).
![]() Shared Account Examples
Shared Account Examples

![]() Working with Elevated Access Accounts
Working with Elevated Access Accounts
Adding Elevated Access Accounts
- From the dashboard, click Access.
- Click Shared Accounts
- Choose the applicable customer.
- Click the Add Shared Account button.
- Choose one of the below options:
- Add Manually
- Manual EA accounts will need to have the password updated here if it is changed in AD for example.
- Enter the email or username, password and domain.
- Click the Add Shared Account button.
- Add Manually
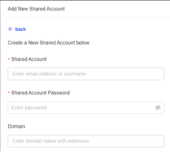
- Selected from Synced Directory
- Choose the directory you wish to import the EA account from.
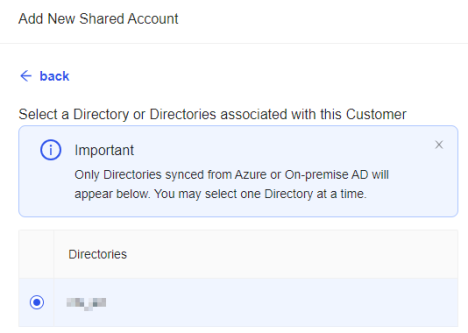
- Click Next Step
- Select the account(s) from the drop down
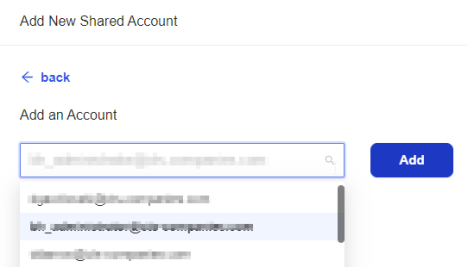
- Click Add.
- Click Next Step
- Enable Password Rotation. Synced EA accounts require password rotation. This means EVO will automatically change the password for this synced EA account in the directory it’s synced from.
- Choose the length of time that EVO should rotate the account’s password.
- Click Add Shared Account.
Elevated Access
Elevated Access is a group that contains shared accounts that gets assigned to EVO admin users with the privilege to use them
- Expand the below section to see instructions on how to create Elevated Access groups and assign them to EVO users:
![]() Creating & Assigning Elevated Access Groups
Creating & Assigning Elevated Access Groups
- From the dashboard, click Access.
- Click Elevated Access
- Click Create Assignment button.
- Enter the group name.
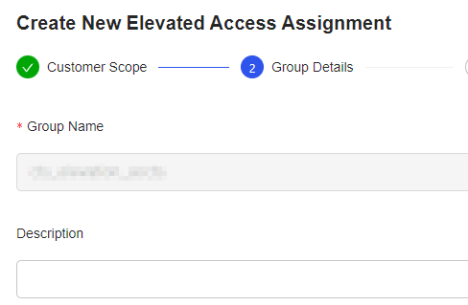
- Click Confirm and Next Step.
- Select Customers
- All Customers - This means that Shared/Elevated access accounts will be used for all customers. This is not common as most customers have different domains/directories.
- Select Customers - This is most common and means that Shared/Elevated access accounts will only be used for selected customers.
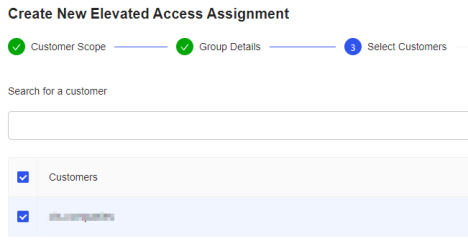
- Click Confirm and Next Step.
- Select the shared account(s) that you wish to assign to user(s).

- Click Confirm and Next Step.
- Select the user(s) that you wish to assign the shared account(s) to

- Click Complete Group Assignment.
![]() Licensing Users
Licensing Users
- Select People from the left navigation menu
- In the displayed list of users, click on the user you want to edit.
- In the bottom row for Licenses, apply the Elevated Access License

Step 8. Integrating Evo with Windows Desktops
The EVO Credential Provider (ECP) Windows Agent is what makes multi-factor authentication (MFA) against a Windows workstation is possible.
Access Tokens
The first step is to create a Token that your machines will use to securely communicate back to Evo.
- Expand the below section to see instructions on how to create an access token:
![]() Creating an Access Token
Creating an Access Token
- Select Access from the left Navigation Menu.
- Select the Access Tokens tab.

- Select the Create Access Token button.
- Fill out the required information.
- Name, enter any name you'd like for the new Access Token
- Type, select Evo Credential Provider
- Customer, select which Customer this Token will be associated with
- Directory, choose the directory it will be associated with
- Expiration Date, choose a date you wish this token to expire. Once it expires, you will no longer be able to use Elevated Access as it will not work, and you'll need to create a new Token.
- Set this for 10 years out.
- Once complete, click Create Access Token
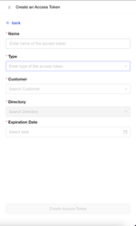
- Once complete, you will be given JSON of your newly created Access Token.
- Click Copy to Clipboard and paste it in your favorite text editor.

- Click Finish and Close.
Save the information copied as you will need it to install the EVO windows Credential Provider application. - THERE IS NO WAY TO VIEW THIS INFORMATION AGAIN
Downloading EVO Credential Provider
To install the ECP, we will first need to download the msi agent from the Evo portal.
- Expand the below section to see instructions on how to download the MSI file:
![]() Downloading EVO Credential Provider
Downloading EVO Credential Provider
- Select Applications from the left navigation menu.
- Click the Windows Desktop card.
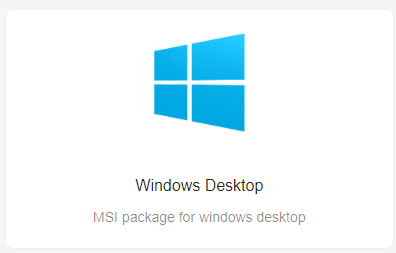
- Click Download Evo Windows Login Agent.

Installing EVO Credential Provider
Requirements:
- Windows Server 2012r2 or higher.
- Windows Desktop 10 or higher.
- Expand the below section to see instructions on how to install the ECP:
![]() Installing/deploying the Windows Agent
Installing/deploying the Windows Agent
- For different methods of installing/deploying the ECP, follow the steps outlined in the Integrating Evo with Windows Desktops KB found here: Integrating Evo with Windows Desktops – Evo Support (evosecurity.com)
- Take note of the following recommendations/best practices before installing
During Installation
- On the Customer Setup step for EVO Login only:
- Entire Feature will be unavailable (Default Selection).
- Leaving this default will allow you authenticate through EVO but also still using windows credentials as well.
- It is recommended to leave this default for testing!
- Entire Feature will be unavailable (Default Selection).
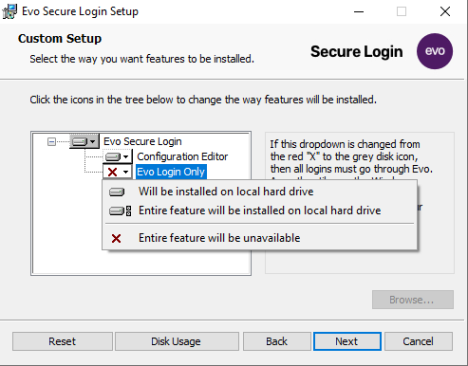
- Entire Feature will be installed on local hard drive.
- Selecting this will replace the Windows Default Credential Provider entirely. This means you will only be able to authenticate to the machine through EVO.

- When you get to the Configuration step for Authentication Mode:
- End User Only > Will only allow for a regular user (non-Elevated) to login.
- Elevated Only > Will only allow Elevated users to login.
- Both > Will allow for either an end user or elevated user to login. (Recommended option)

- MFA Grace Period
- This is how long the machine can stay locked before asking you for MFA again.
After Installation
- DO NOT logoff - stay logged into the same session!
- Start Evo Settings Editor
- Select Connection Test
![]()
- Enter your windows username that matches a synced account in EVO and click Connect
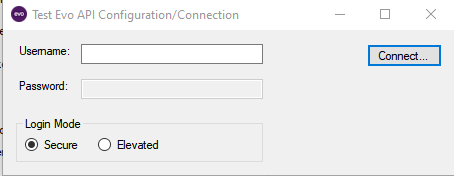
- You should get a prompt in your EVO mobile app and after approving, see a Success message.

- NOTE FOR AZURE AD USERS
- EVO will natively pass through the username of your Azure AD user that is synced to EVO!
- If you are logging onto a PC with a non-Azure AD/local account, you will need to add that account in EVO as a shared account and grant your EVO user the privileges to use it. See Step 6. Elevated Access/Shared Accounts.
- EVO will natively pass through the username of your Azure AD user that is synced to EVO!
- To test a Shared Account
- Select the Elevated option.
- Enter your EVO credentials.
- Click Connect.
- Do not move on until successfully connecting!
- If you cannot connect, verify that the Environment URL and Evo Directory are correct.
- Lock the current session and then try to unlock using the Evo Security login tile. (Other tiles should be available depending on the EVO Login only setting you chose during installation). Make sure you can unlock.
- Once you are convinced all settings are correct, in the Evo Settings Editor select the EVO Login Only checkbox and click Apply (this is not needed if you choose Entire Feature will be installed on local hard drive for the EVO Login only setting during installation).
Scripting
- If you want to save the settings in a JSON file for another installation, start an elevated PowerShell session and run the command "C:\\Program Files\\EvoSecurity\\EvoSecureLogin\\EvoCredProSettings.ps1" -generate . With that command, you can either dump it to the screen or re-direct it to a file.
- You can then use the JSON file to install the CredPro on all computers in the domain using the Evo Installation Script (or using ConnectWise RMM).
Script - https://download.evosecurity.com/release/installers/evoinstall-latest.zip
Step 9. Integrating Evo with Apps
EVO has the ability to integrate to any environment, console, portal, etc. that is able to be configured to use external SSO/SAML authentication. This means that after a SAML integration between Evo and the website, users will be able to use the same 2FA they use to log into their machines.
Configuring SingleSignOn (SSO) Timeout Policy
The first step is to create an SSO policy which lets you control a temporary duration for SSO before the user must re-authenticate or re-approve multi-factor authentication (MFA).
- The SSO rule set as globally will apply to all users.
- Only 1 SSO rule is allowed.
- Expand the below section to see instructions on how to create the environment’s SSO rule:
![]() Configuring the SSO timeout Policy
Configuring the SSO timeout Policy
- From the dashboard, click Policies.
- Click the Add New Policy.
- Click Single Sign-On (SSO) Reset Frequency.
- Use the slider to define the rule.
- To Always Require MFA. Move the slider all the way to the left.
- To expire SSO after a period. Move the slider based on your organizations’ rules. Anywhere between 1 to 7 days.
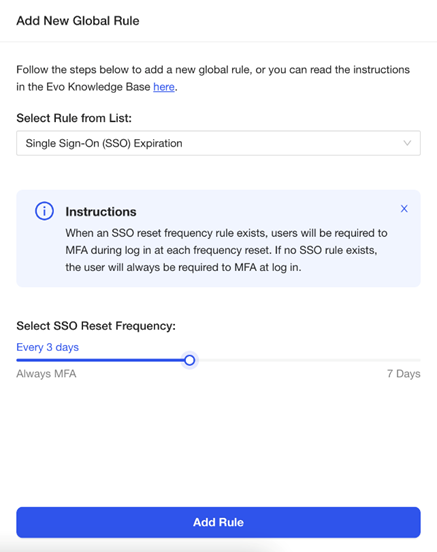
- Click Add Rule.
- It is recommended that if the SAML capable web application allows you to configure a session timeout. You match it to the policy defined within your Evo Portal.
Other SAML Supported Webapps
Next will be a combination of gathering info from the Evo Portal and then uploading it into your favorite SAML supported webapp. Some web apps are pre-defined and have step by step instructions on the Applications page as well.
- Expand the below section to see instructions on how to gather the SAML information you’ll need for your 3rd party application from the EVO portal:
![]() Retrieve the URLs, Fingerprints and public certificate from Evo
Retrieve the URLs, Fingerprints and public certificate from Evo
- From the left nav menu, select My Company. Alternatively, select Customers and choose a customer from the list.
- Select Applications from the left nav menu.
- Click the SAML Web App card.
- Open your favorite text editor. One at a time, click the copy button at the end of each field. Paste the copied detail into the text editor.
- Copy and paste the Sign In URL.
- Copy and paste the Sign Out URL.
- Optionally, copy the Fingerprints as needed. Your 3rd party application should denote which fingerprints are needed.
- Click Download Public Certificate.
- Some SAML webapps will require the public certificate to be rendered in text. Please use your favorite text editor to do so.
- Click Download metadata file.
That’s it for the Evo Portal. Now head on over into your SAML support webapp and uploaded the provided information into it.
Step 10. Creating Customer Sites
Customer sites are used for customers ![]() . To create a customer, follow the below process. After that, you would setup the customer’s tenant/environment just like we did for the partner’s internal tenant/environment in the steps above.
. To create a customer, follow the below process. After that, you would setup the customer’s tenant/environment just like we did for the partner’s internal tenant/environment in the steps above.
- Expand the below section to see instructions on how to create a customer:
![]() To add a new customer, please follow these steps.
To add a new customer, please follow these steps.
- Click on Customers on the left.
- Click Add New Customer on the right.
- Add the Customer Manually
- Name the Customer and your all set.
How do I add or delete customers? – Evo Support (evosecurity.com)
Step 11. Branding
Branding lets you apply your logo and customer colors to the EVO console.
Note that branding is setup at the MSP level and will apply to all customers within the MSP.
- Expand the below section to see instructions on how to setup branding:
![]() Setting up Custom Branding
Setting up Custom Branding
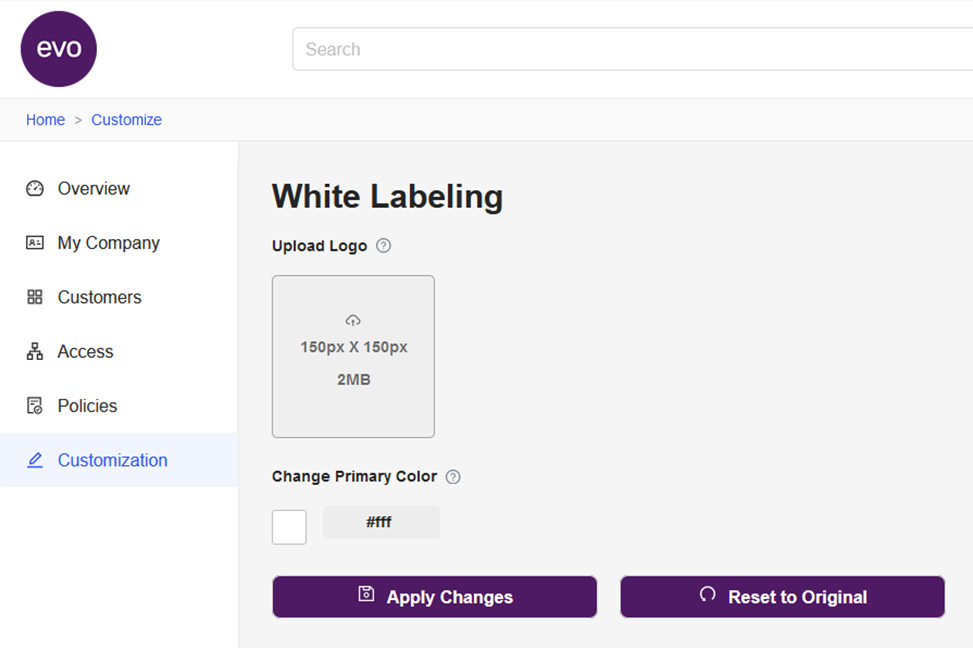
- Simply head to Customization on your home screen.
- Click the option to Upload your Company logo
- Optionally while here you can also change the Primary Color for your Evo portal.
- Once done, click Apply Changes
Step 12. Onboarding/Email Campaigns
In step 4, you saw how to manually send a welcome email to an individual user. EVO’s built in Onboarding tools let you setup automated mass email campaigns to onboard users on a larger scale.
- Expand the below section to see instructions on how to setup an onboarding/email campaign:
![]() Setting Up an Email Campaign
Setting Up an Email Campaign
- From the side navigation, click Onboarding.
- Click New Onboarding.


- Select a directory (ensure to select the directory that you’re syncing users from).
- Enter a description of your email campaign (optional).
- Select the appropriate time zone.
- Select the users to exclude from the communications (for example yourself or any users that are already logged into EVO).
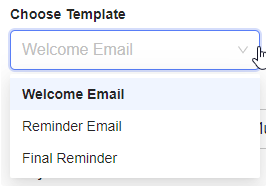
- Select the template for the communication.
- There are currently three email templates you can select from.
- Welcome Email: Send the welcome email to welcome all new users to Evo.
- Reminder Email: Send the reminder email to remind your new users to setup MFA.
- Final Reminder: Send a final reminder email to your users to setup MFA.
- There are currently three email templates you can select from.
- Select the date and time that the email should be sent.
- You can also edit the subject and body if desired.
- If you’d like to send multiple reminders, click the “+” icon to include additional reminders in the campaign. Repeat steps 7 thru 9 for each additional reminder.

- Click Schedule Emails.
- Once the campaign has completed it will be moved from In Progress to Completed.
Related Articles
- Cloud Threat Analytics: SaaS Alerts Onboarding
- NDR: Integration Guide (Start Here)
- MSS CAS Migrations: Frequently Asked Questions (FAQs)


 YES
YES NO
NO