-
Products
-
SonicPlatform
SonicPlatform is the cybersecurity platform purpose-built for MSPs, making managing complex security environments among multiple tenants easy and streamlined.
Discover More
-
-
Solutions
-
Federal
Protect Federal Agencies and Networks with scalable, purpose-built cybersecurity solutions
Learn MoreFederalProtect Federal Agencies and Networks with scalable, purpose-built cybersecurity solutions
Learn More - Industries
- Use Cases
-
-
Partners
-
Partner Portal
Access to deal registration, MDF, sales and marketing tools, training and more
Learn MorePartner PortalAccess to deal registration, MDF, sales and marketing tools, training and more
Learn More - SonicWall Partners
- Partner Resources
-
-
Support
-
Support Portal
Find answers to your questions by searching across our knowledge base, community, technical documentation and video tutorials
Learn MoreSupport PortalFind answers to your questions by searching across our knowledge base, community, technical documentation and video tutorials
Learn More - Support
- Resources
- Capture Labs
-
- Company
- Contact Us
Email Security: Split Architecture Configuration


Description
In the Split configuration there is one Control Center and one or more Remote Analyzers. The Control Center, in addition to acting as the control center for all the Remote Analyzers, acts as a central administration and quarantine server. Remote Analyzers are SMTP proxies placed in the email flow. They judge whether email is good or junk. Good email is routed to its intended destination, and junk email is routed immediately to the Control Center and qurantined there; it is not quarantined on the Remote Analyzers. Remote Analyzer machines can be configured to handle inbound email messages, outbound email messages, or both. Users can log in to the Control Center to change their settings; they never log in to Remote Analyzers. The most common reason for deploying in a Split mode is to support multiple physical data centers, where any settings made by an administrator or end user automatically takes effect in multiple remote locations.
Resolution
The IP addresses used in this example:
20.20.5.158 Control Center
20.20.5.157 Remote Analyzer
20.20.5.156 Remote Analyzer
Part 1: Set up a Remote Analyzer
To set up a Remote Analyzer, install on the machine to be used as a Remote Analyzer and follow the steps below:
1. Log in to the web interface using the Administrator name and password (the default is admin / password).
2. Make This Server a Remote Analyzer:
- Select System | Network Architecture.
- Select the This server is: Split radio button.
- Select the If split, this machine is a: Remote Analyzer Server radio button.
- Click the Apply button.
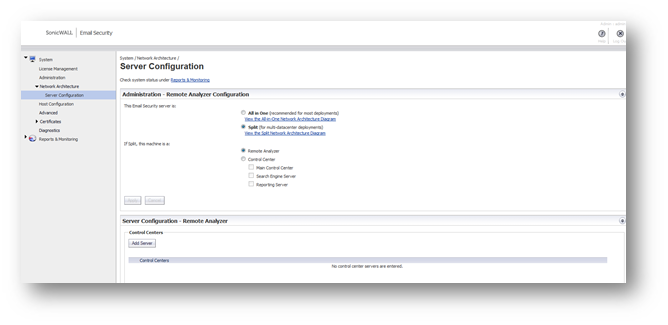
Part 2: Set Up A Control Center
To set up a Control Center, install on the machine to be used as a Control Center, then follow these steps:
Log in to the web interface using the Administrator name and password (the default is admin / password).
Make This Server a Control Center
- Select System | Network Architecture.
- Select the This Server Is: Split radio button.
- Select If Split, this machine is a: Control Center Quarantine Server.
- Click the Apply button.
Once you click Apply, the interface changes to the more complex Control Center interface.
- Click the Add Server button under Inbound/Outbound Remote Analyzer Paths.
- Enter the IP address of a Remote Analyzer that is controlled by this Control Center.
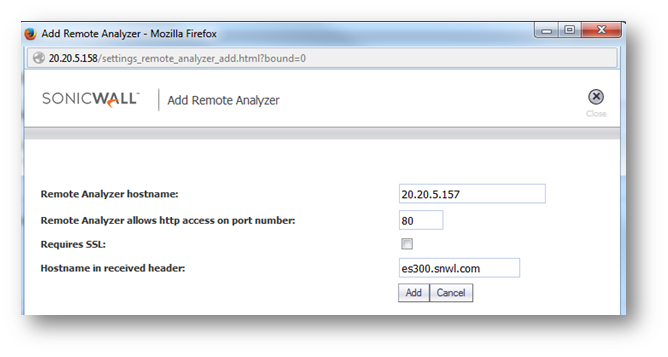
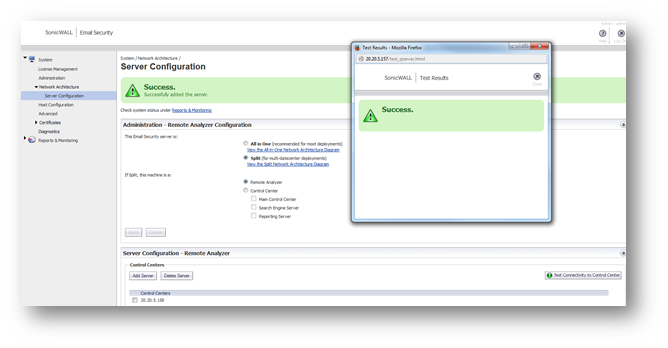
If you log in on the remote analyzer the test connectivity to control center will also return the success
3. Add an SMTP Upstream and Downstream server. Click the Add Path button to the right of the Remote Analyzer Server name you have selected. In the Split configuration, you can specify a different SMTP flow for each Remote Analyzer.
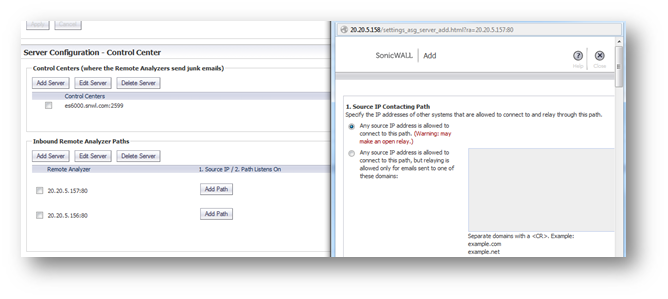
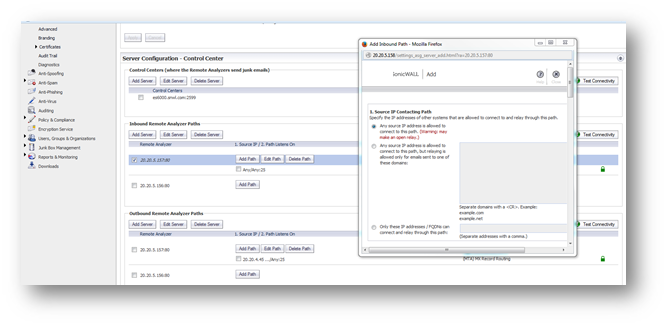
Reserve the following port - Specify a port that can use for miscellaneous internal "localhost to localhost" communication between components. Most Administrators will not need to change the default value.
Enable StartTLS on this path - Enable email communication over an encrypted socket. Click the Configure StartTLS button to configure the way handles encrypted email communications.
Related Articles
- Email Security: How to download the Outlook Junk Tool?
- Configuring SonicWall Email Security to Ensure Maximum effectiveness, High Throughput
- How to exclude the domain from DHA scanning?
Categories
- Email Security > Email Security Appliance
- Email Security > Email Security Software
- Email Security > Hosted Email Security


 YES
YES NO
NO