-
Products
-
SonicPlatform
SonicPlatform is the cybersecurity platform purpose-built for MSPs, making managing complex security environments among multiple tenants easy and streamlined.
Discover More
-
-
Solutions
-
Federal
Protect Federal Agencies and Networks with scalable, purpose-built cybersecurity solutions
Learn MoreFederalProtect Federal Agencies and Networks with scalable, purpose-built cybersecurity solutions
Learn More - Industries
- Use Cases
-
-
Partners
-
Partner Portal
Access to deal registration, MDF, sales and marketing tools, training and more
Learn MorePartner PortalAccess to deal registration, MDF, sales and marketing tools, training and more
Learn More - SonicWall Partners
- Partner Resources
-
-
Support
-
Support Portal
Find answers to your questions by searching across our knowledge base, community, technical documentation and video tutorials
Learn MoreSupport PortalFind answers to your questions by searching across our knowledge base, community, technical documentation and video tutorials
Learn More - Support
- Resources
- Capture Labs
-
- Company
- Contact Us
DNS rules: Configuring Global and Custom DNS Filtering in SonicOS 7.1


Description
DNS Rules allow you to monitor and protect your organization from online threats. When users enter a URL into their web browser, this request is evaluated and, based on your predefined policy, the request is either allowed or blocked.
- If the URL is allowed, users are passed on to the requested URL.
- If the URL is blocked, a page displays informing users why they were blocked from that URL.
All DNS queries go to a DNS resolver. Specially configured DNS resolvers can also act as filters by refusing to resolve queries for certain domains that are tracked in a blocklist, therefore blocking users from reaching those domains. DNS filtering services can also use an allowlist instead of a blocklist.
Resolution
Configuring DNS Filtering
DNS Filtering has global and custom domain settings you can configure based on the requirements of your organization.
- Configuring Global DNS Filtering Settings
- Configuring DNS Filtering Custom Domains
CONFIGURING GLOBAL DNS FILTERING SETTINGS
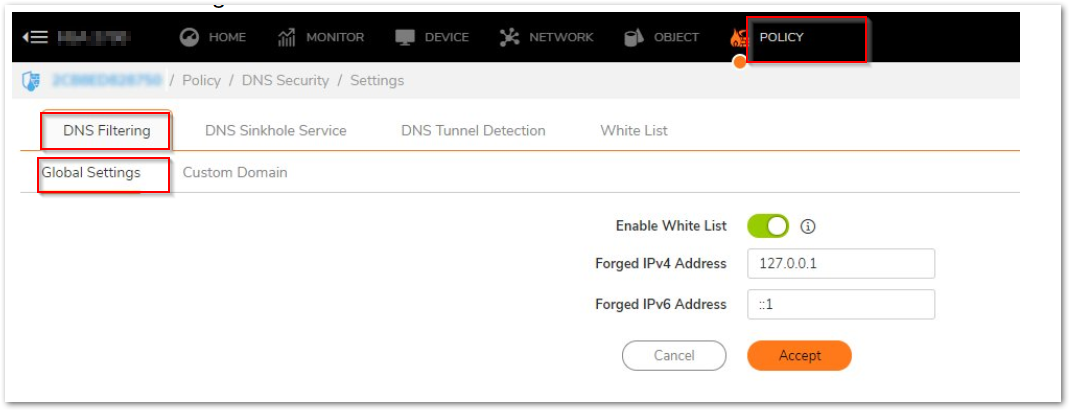
The DNS Filtering Global Settings allow you to enable or disable the use of the White List, as well as specify the values to be used for forged IP addresses.
To configure the DNS Filtering Global Settings
- Navigate to POLICY | DNS Security |Settings.
- Click DNS Filtering.
- Click Global Settings.

- Select Enable White List to enable the use of the White List. (This option is enabled by default.)
- In the Forged IPv4 Address field, enter the value to be used for the forged IPv4 IP address.
- In the Forged IPv6 Address field, enter the value to be used for the forged IPv6 IP address.
- Click Accept.
Configuring DNS Filtering Custom Domains
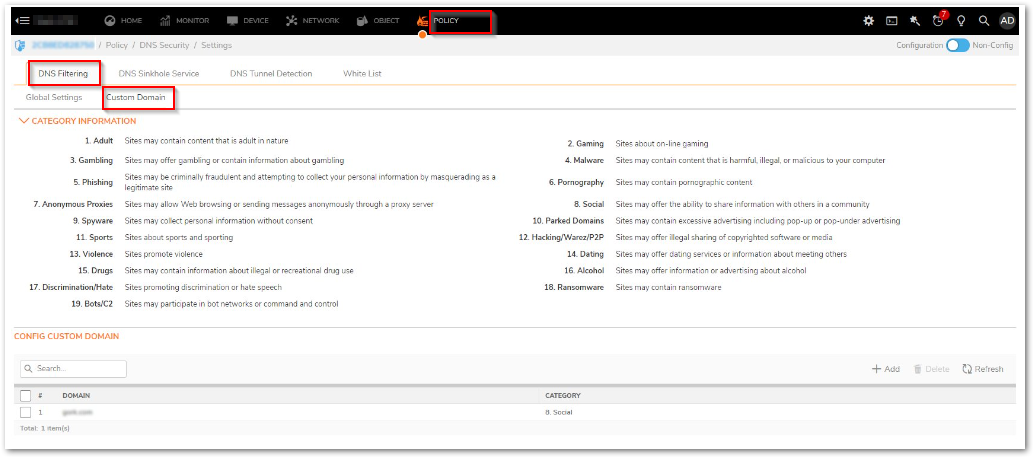
The DNS Filtering Custom Domain settings allow you to .
- The Category Information section lists the available categories for classifying domains.
- The Config Custom Domain section allows you to manage your custom domain settings.
To add a custom domain
- Navigate to POLICY | DNS Security| Settings.
- Click DNS Filtering.
- Click Custom Domain.

- In the Config Custom Domain section, click + Add. The Add DNS Filter Custom Domain dialog displays.

- In the Domain field, enter the domain you want to add as a custom domain. This value can be a fully qualified domain name, such as domain.com, or a wildcard pattern for a domain, such as *.domain.com.
- From the Category list, select a category for the domain.
 NOTE: A domain can only be assigned to one category.
- Click Save.
Related Articles
- Error:"Invalid API Argument" when modifying the access rules
- Cysurance Partner FAQ
- Configure probe monitoring for WAN Failover and Loadbalancing - SonicWall UTM


 YES
YES NO
NO