-
Products
-
SonicPlatform
SonicPlatform is the cybersecurity platform purpose-built for MSPs, making managing complex security environments among multiple tenants easy and streamlined.
Discover More
-
-
Solutions
-
Federal
Protect Federal Agencies and Networks with scalable, purpose-built cybersecurity solutions
Learn MoreFederalProtect Federal Agencies and Networks with scalable, purpose-built cybersecurity solutions
Learn More - Industries
- Use Cases
-
-
Partners
-
Partner Portal
Access to deal registration, MDF, sales and marketing tools, training and more
Learn MorePartner PortalAccess to deal registration, MDF, sales and marketing tools, training and more
Learn More - SonicWall Partners
- Partner Resources
-
-
Support
-
Support Portal
Find answers to your questions by searching across our knowledge base, community, technical documentation and video tutorials
Learn MoreSupport PortalFind answers to your questions by searching across our knowledge base, community, technical documentation and video tutorials
Learn More - Support
- Resources
- Capture Labs
-
- Company
- Contact Us
Customizing Web Block Page for Geo-IP Filter


Description
The Geo-IP Filter has a message that can be displayed when a user attempts to access a blocked website. You can have the message display detailed information, such as the reason why this IP address is blocked, as well as the IP address and the country from which it was detected. You can also create a custom message and include a custom logo.
Resolution
Resolution for SonicOS 7.X
This release includes significant user interface changes and many new features that are different from the SonicOS 6.5 and earlier firmware. The below resolution is for customers using SonicOS 7.X firmware.
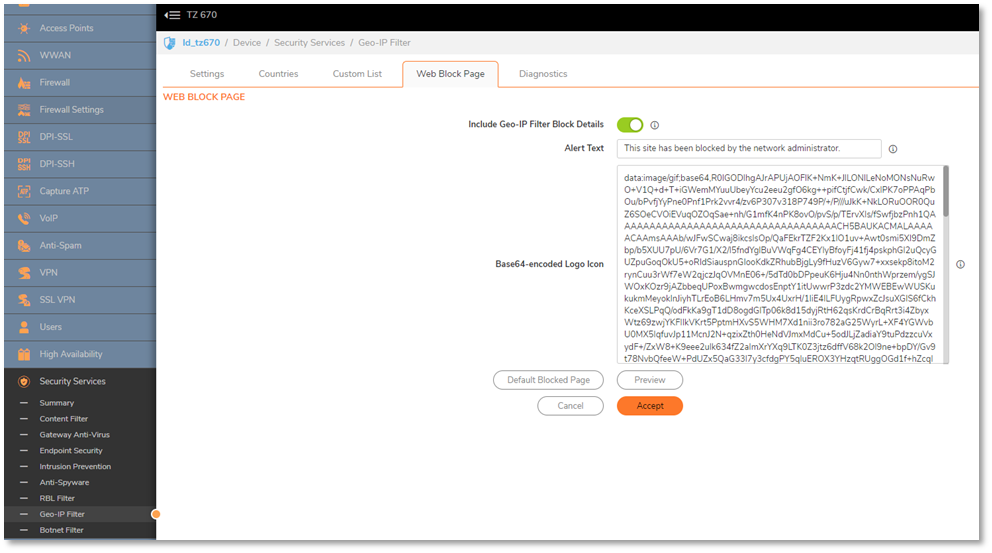
- Login to SonicWall management interface and navigate to Policy | Security Services | Geo-IP Filter.
- Click “Web Block Page” tab

Include Geo-IP Filter Block Details - Select this option to show blocking details, such as reason for the blocking, the IP address, and the country. When disabled, no information is displayed. By default, this option is selected.
Alert Text - l Fill in a custom message, if desired, to be displayed as the Alert text. The message can be up to 100 characters long.
Base64-encoded Logo Icon - In this field, you can specify a Base 64-encoded GIF icon to be displayed instead of the default SonicWall logo.
Preview - Click to display the Web Site Page preview window. This gives you a chance to verify your configuration and make changes if needed.
Default Blocked Page - Reset the blocked message back to the default content.
 NOTE: This web block page will be displayed on the client browser if the user is trying to access a Geo-IP blocked HTTP website. If the Geo-IP blocked website is using HTTPS protocol, access will be denied but the web block page will not be displayed on the client browser. The behavior is the same when using DPI-SSL on the client side.
Web Block Page Display Scenarios
The followings are based on Geo-IP blocked websites, and for all scenarios access will be denied.

Resolution for SonicOS 6.5
This release includes significant user interface changes and many new features that are different from the SonicOS 6.2 and earlier firmware. The below resolution is for customers using SonicOS 6.5 firmware.
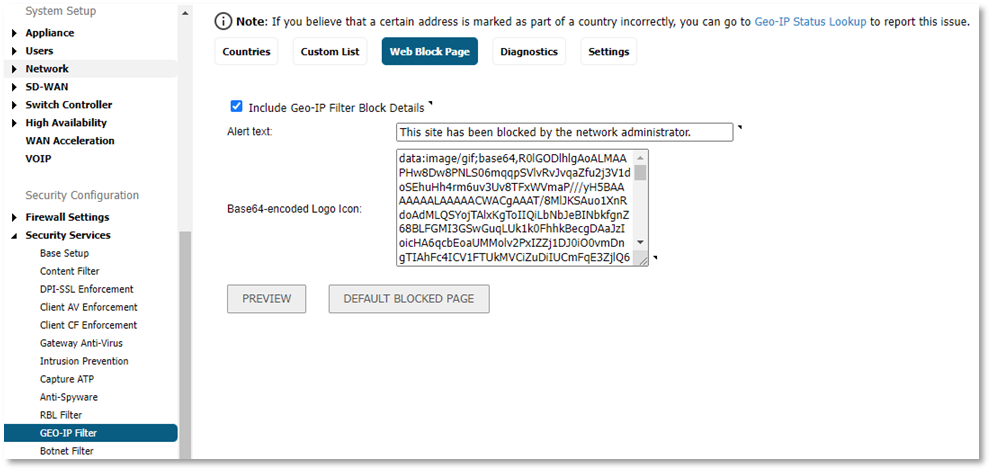
- Login to SonicWall management interface and navigate to Manage| Security Services | Geo-IP Filter.
- Click “Web Block Page” tab

Include Geo-IP Filter Block Details - Select this option to show blocking details, such as reason for the blocking, the IP address, and the country. When disabled, no information is displayed. By default, this option is selected.
Alert Text - l Fill in a custom message, if desired, to be displayed as the Alert text. The message can be up to 100 characters long.
Base64-encoded Logo Icon - In this field, you can specify a Base 64-encoded GIF icon to be displayed instead of the default SonicWall logo.
Preview - Click to display the Web Site Page preview window. This gives you a chance to verify your configuration and make changes if needed.
Default Blocked Page - Reset the blocked message back to the default content.
 NOTE: This web block page will be displayed on the client browser if the user is trying to access a Geo-IP blocked HTTP website. If the Geo-IP blocked website is using HTTPS protocol, access will be denied but the web block page will not be displayed on the client browser. The behavior is the same when using DPI-SSL on the client side.
Web Block Page Display Scenarios
The followings are based on Geo-IP blocked websites, and for all scenarios access will be denied.

Related Articles
- Error:"Invalid API Argument" when modifying the access rules
- Cysurance Partner FAQ
- Configure probe monitoring for WAN Failover and Loadbalancing - SonicWall UTM
Categories
- Firewalls > NSa Series > Geo-IP & Botnet Filter
- Firewalls > TZ Series > Geo-IP & Botnet Filter
- Firewalls > NSsp Series > Geo-IP & Botnet Filter
- Firewalls > NSv Series > Geo-IP & Botnet Filter
- Firewalls > SonicWall SuperMassive 9000 Series > Geo-IP & Botnet Filter


 YES
YES NO
NO