-
Products
-
SonicPlatform
SonicPlatform is the cybersecurity platform purpose-built for MSPs, making managing complex security environments among multiple tenants easy and streamlined.
Discover More
-
-
Solutions
-
Federal
Protect Federal Agencies and Networks with scalable, purpose-built cybersecurity solutions
Learn MoreFederalProtect Federal Agencies and Networks with scalable, purpose-built cybersecurity solutions
Learn More - Industries
- Use Cases
-
-
Partners
-
Partner Portal
Access to deal registration, MDF, sales and marketing tools, training and more
Learn MorePartner PortalAccess to deal registration, MDF, sales and marketing tools, training and more
Learn More - SonicWall Partners
- Partner Resources
-
-
Support
-
Support Portal
Find answers to your questions by searching across our knowledge base, community, technical documentation and video tutorials
Learn MoreSupport PortalFind answers to your questions by searching across our knowledge base, community, technical documentation and video tutorials
Learn More - Support
- Resources
- Capture Labs
-
- Company
- Contact Us
CSE Getting Started: Connect a Directory of Users


Description
In Part One of this Getting Started Series, we will cover how to configure the directory of users using SAML. SAML is chosen over OIDC to future-proof your configuration so that SCIM can push user information to SonicWall Cloud Secure Edge (CSE) in a future configuration. Once this procedure is completed, you’ll be able to start registration of users, log into the CSE App, and view users and devices that have authenticated in the Command Center.
 NOTE: Steps may vary based on your identity provider. You may refer to specific guides here: https://docs.banyansecurity.io/docs/manage-users-and-devices/identity-providers/ or from your identity provider’s documentation.
Resolution
Section One: CSE TrustProvider
Section One will cover how to deploy the TrustProvider
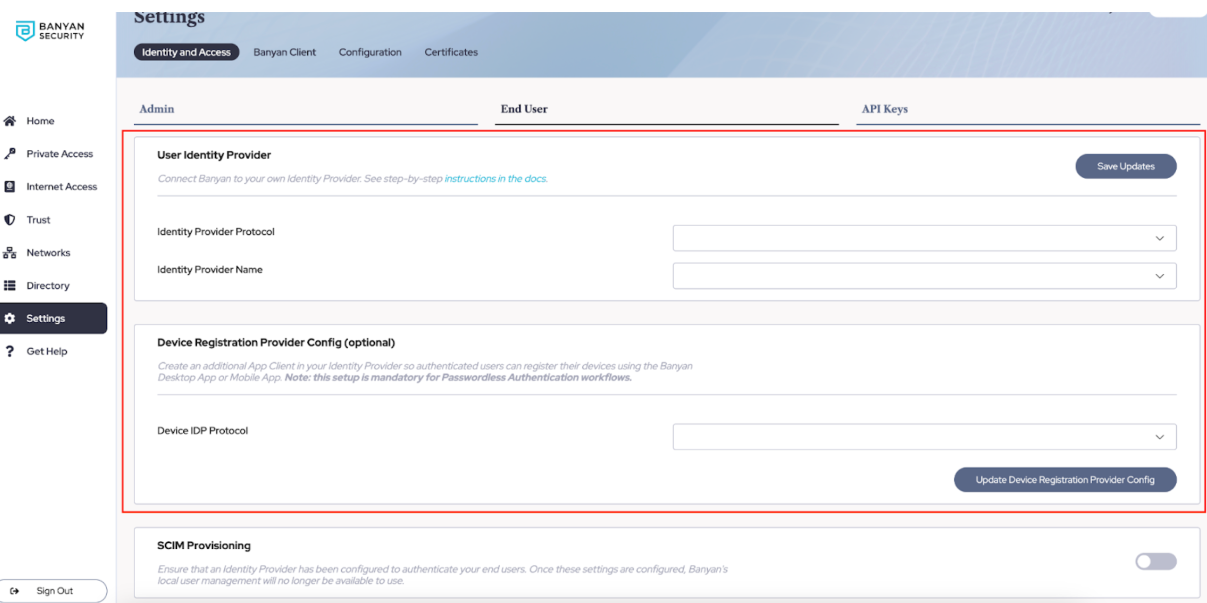
- Navigate to the Command Center and go to Settings | Identity and Access | End User. Once there you will see three configuration sections. The two we will focus on for this guide are the “User Identity Provider” and the “Device Registration Provider” sections, starting with the User Identity Provider.
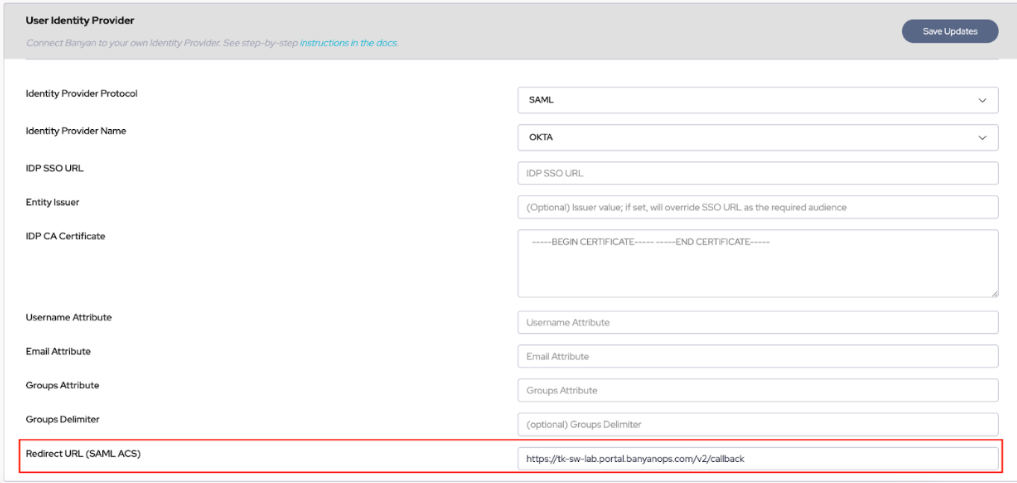
- Select the Identity Provider Protocol and Choose SAML, select the relevant Identity Provider Name, and take note of the Redirect URL (SAML ACS) supplied on this page.
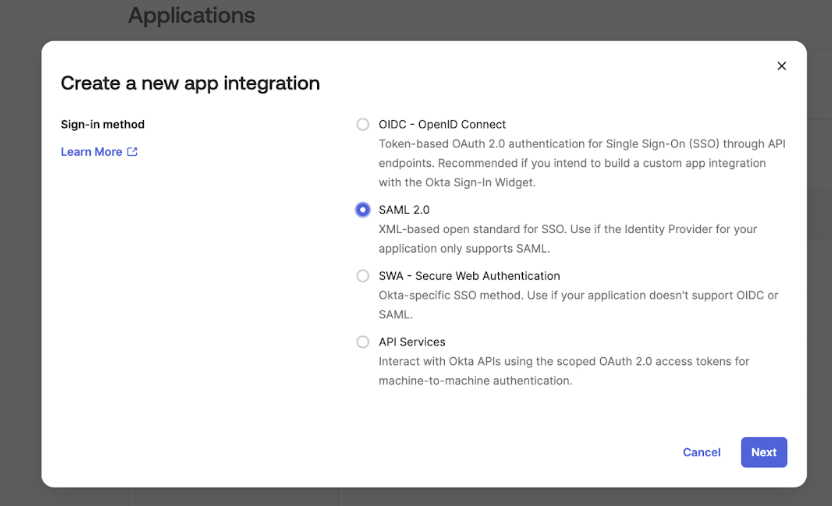
- Navigate to your Identity Provider’s console, then add an application. In this scenario, SonicWall Cloud Secure Edge is the Service Provider in the SSO relationship similar to connecting a SaaS Application. In this example we will use Okta as the Identity Provider (IDP), however, this works with any IDP which supports SAML 2.0.
- Use SonicWall TrustProvider as the name for this first connection and navigate to the SAML configuration screen on your IDP.
Recall the Redirect URL (SAML ACS) value from step 2 and enter it into the following properties. Note: The terminology may vary slightly from IDP to IDP- SP Entity ID
- SAML Consumption (ACS URL)
- SSO URL
Example using Okta: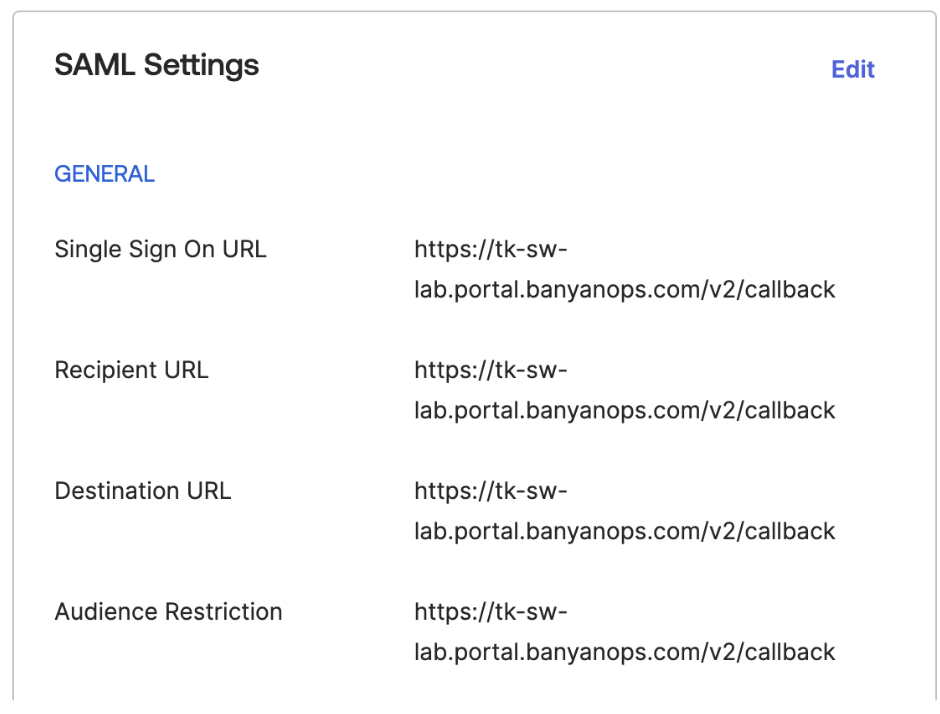
- The next required configuration for CSE in the IDP is to map the SAMl attributes. How mapping works varies from IDP to IDP, however, you may use the following as general guidance:
- Email = User Email
- Unspecified or Email NameID Format
- Username = Full Name
- Unspecified NameID Format
- Groups = All User Groups
- Unspecified NameID Format
Example from Okta: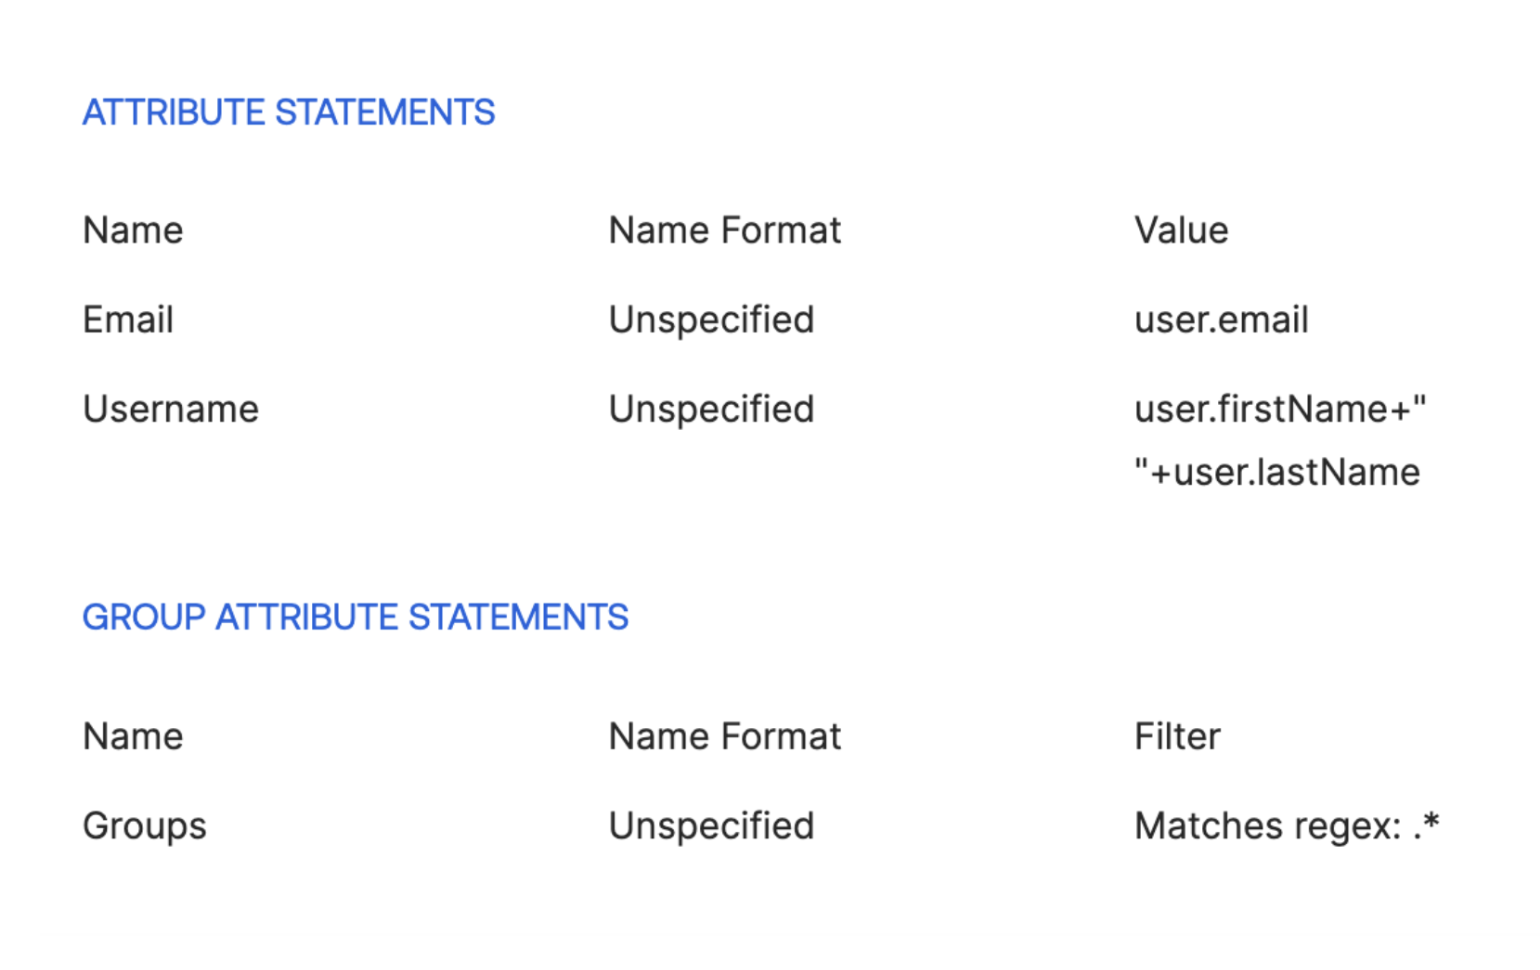
- Unspecified NameID Format
- Email = User Email
- Next, assign your user groups or allow users via policy to access the CSE TrustProvider App.
 TIP: You will want to hide any application tiles from the user as this connection is for the App’s authentication and should not be initiated manually by an end user as this will result in an invalid request error.
 - Finally, it’s time to fill out the CSE Console’s configuration. These values are supplied by your IDP, often after saving the application on the IDP, however, this will also change from provider to provider. The console requires the following inputs to complete this configuration:
- IDP SSO URL - From your IDP
- Entity Issuer (SP) - Use your Redirect URI (SAML ACS) copied from Step 2.
- IDP CA Certificate - From your IDP
- Username Attribute Name - From your IDP
- Email Attribute Name - From your IDP
- Groups Attribute Name - From your IDP
- Group Delimiter - This is the character CSE will look for to separate group names. However, this is only applicable if the Groups attribute is presented as one string in the SAML assertion. This will vary from IDP to IDP.
Then click “Save Updates” on the CSE Console.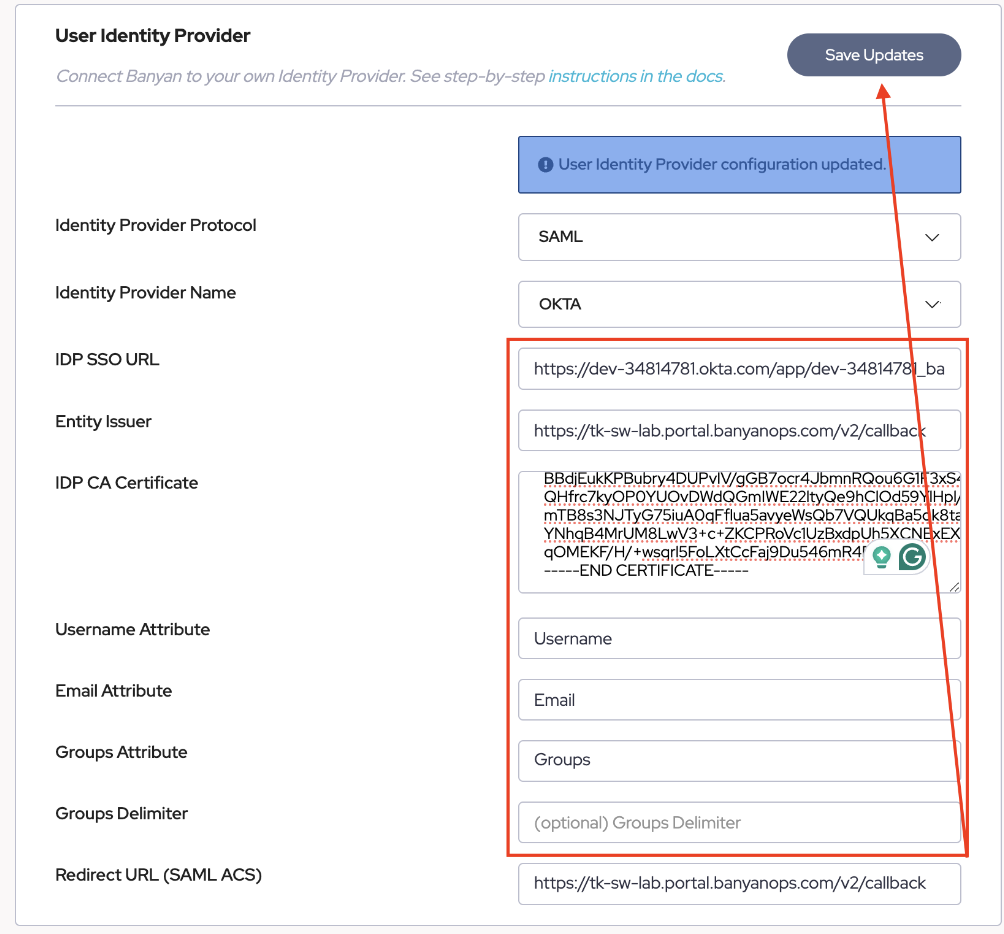
Section Two: Device Registration Provider
The second section in this part one guide is to deploy the Device Registration Provider Connection. This setup is nearly identical in procedure to Section One. However, this second connection is required and provides Reverse Device Trust Verification, authentication for Mobile Devices, tracking user emails on their device certificates, and Passwordless Authentication.
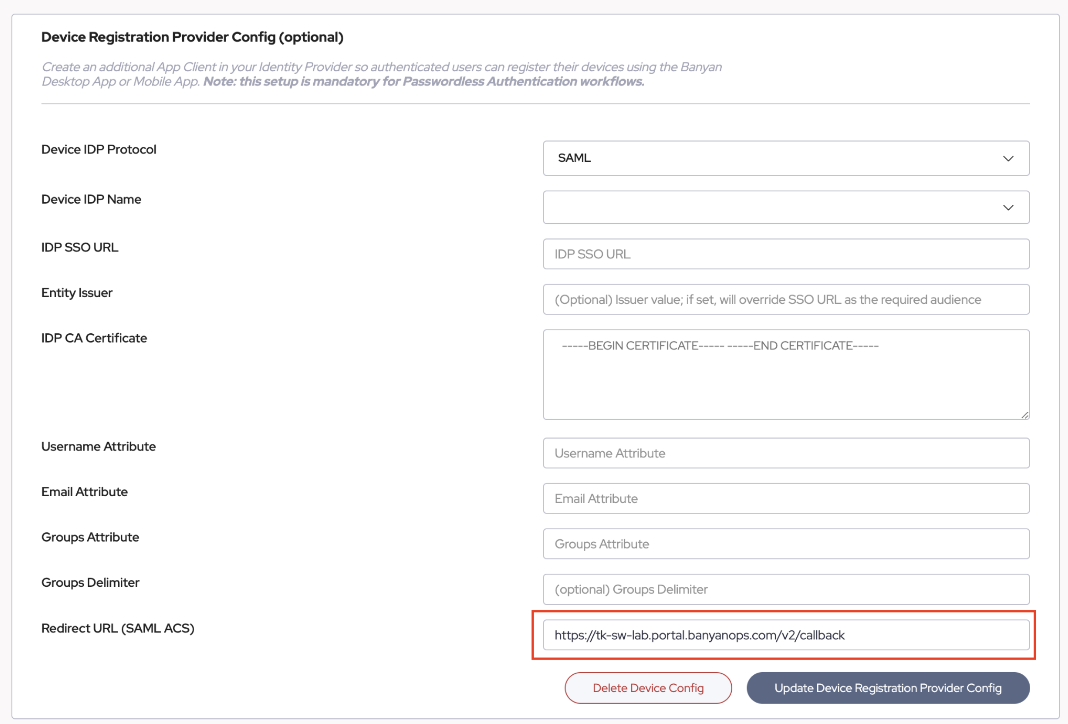
- Navigate to the section below the User Identity Provider configuration we used in Section One on the CSE Console.

- Select the Identity Provider Protocol and Choose SAML, select the relevant Identity Provider Name, and again take note of the Redirect URL (SAML ACS) supplied on this page:
- Navigate back to your Identity Provider’s console, then add another application. As before, CSE is the Service Provider in the SSO relationship similar to connecting a SaaS Application. In this example we will continue to use Okta as the Identity Provider (IDP), however, this works with any IDP which supports SAML 2.0.
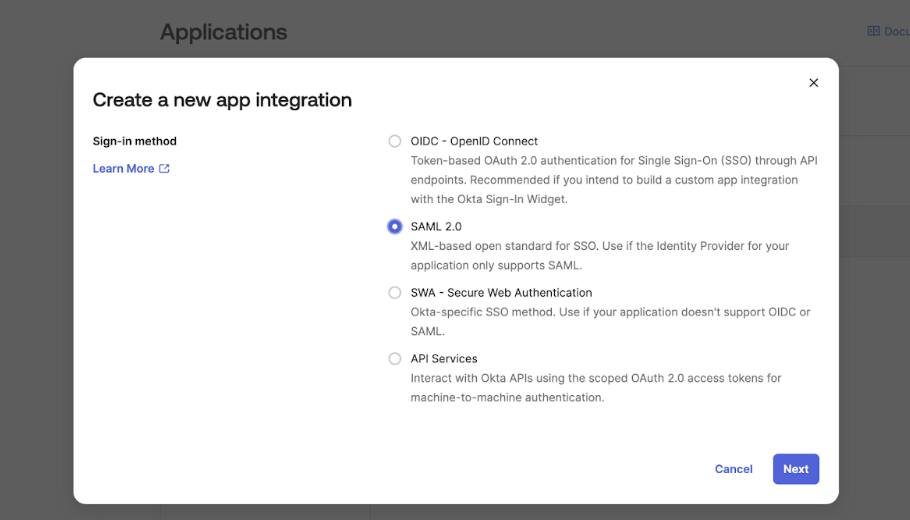
- Use “Device RegistrationProvider” as the name for this second connection and navigate to the SAML configuration screen on your IDP.
Recall the Redirect URL (SAML ACS) value from step 2 and enter it into the following properties. Note: The terminology may vary slightly from IDP to IDP- SP Entity ID
- SAML Consumption (ACS URL)
- SSO URL
Example using Okta: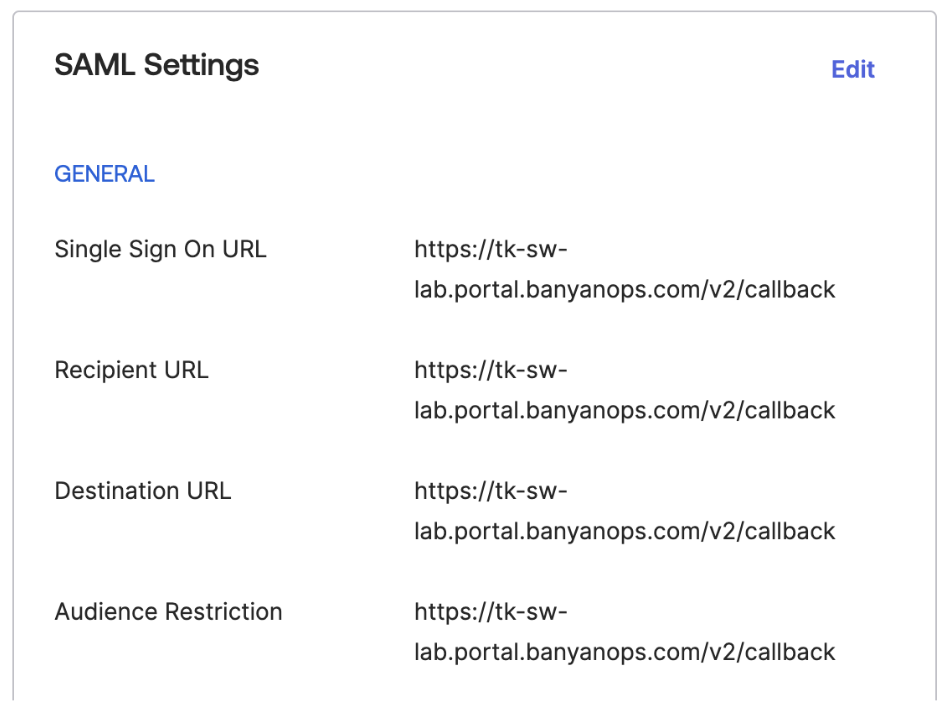
- Then map the SAML Attributes. How mapping works varies from IDP to IDP, however, you may use the following as general guidance:
- Email = User Email
- Unspecified or Email NameID Format
- Username = Full Name
- Unspecified NameID Format
- Groups = All User Groups
- Unspecified NameID Format
Example from Okta: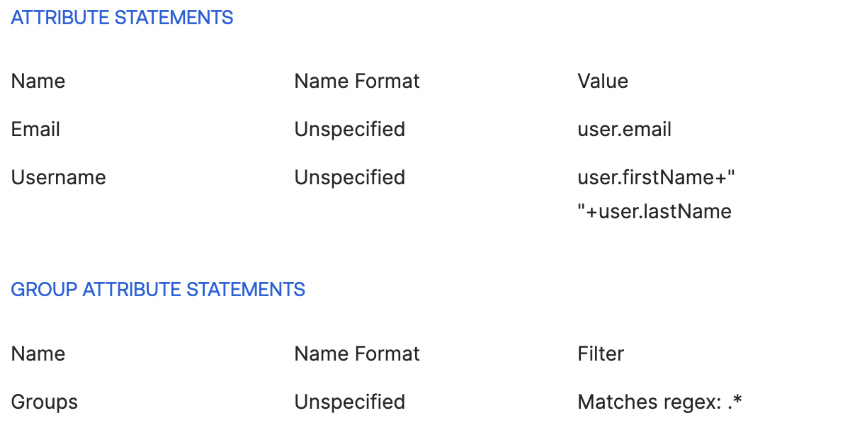
- Unspecified NameID Format
- Email = User Email
- Next, Assign your user groups or allow users via policy to be able to access the Device RegistrationProvider App we just created.
 TIP: You will want to hide any application tiles from the user as this connection is for the App’s authentication and should not be initiated manually by an end user as this will result in an invalid request error.
 - The final step in the configuration is to fill out the Device RegistrationProvider on the CSE Console. Just as in section one. You will fill out the following fields:
- IDP SSO URL - From your IDP
- Entity Issuer (SP) - Use your Redirect URI (SAML ACS) copied from Step 2.
- IDP CA Certificate - From your IDP
- Username Attribute Name - From your IDP
- Email Attribute Name - From your IDP
- Groups Attribute Name - From your IDP
- Group Delimiter - This is the character CSE will look for to separate group names. However, this is only applicable if the Groups attribute is presented as one string in the SAML assertion. This will vary from IDP to IDP.
Then choose “Update Device Registration Provider Config”: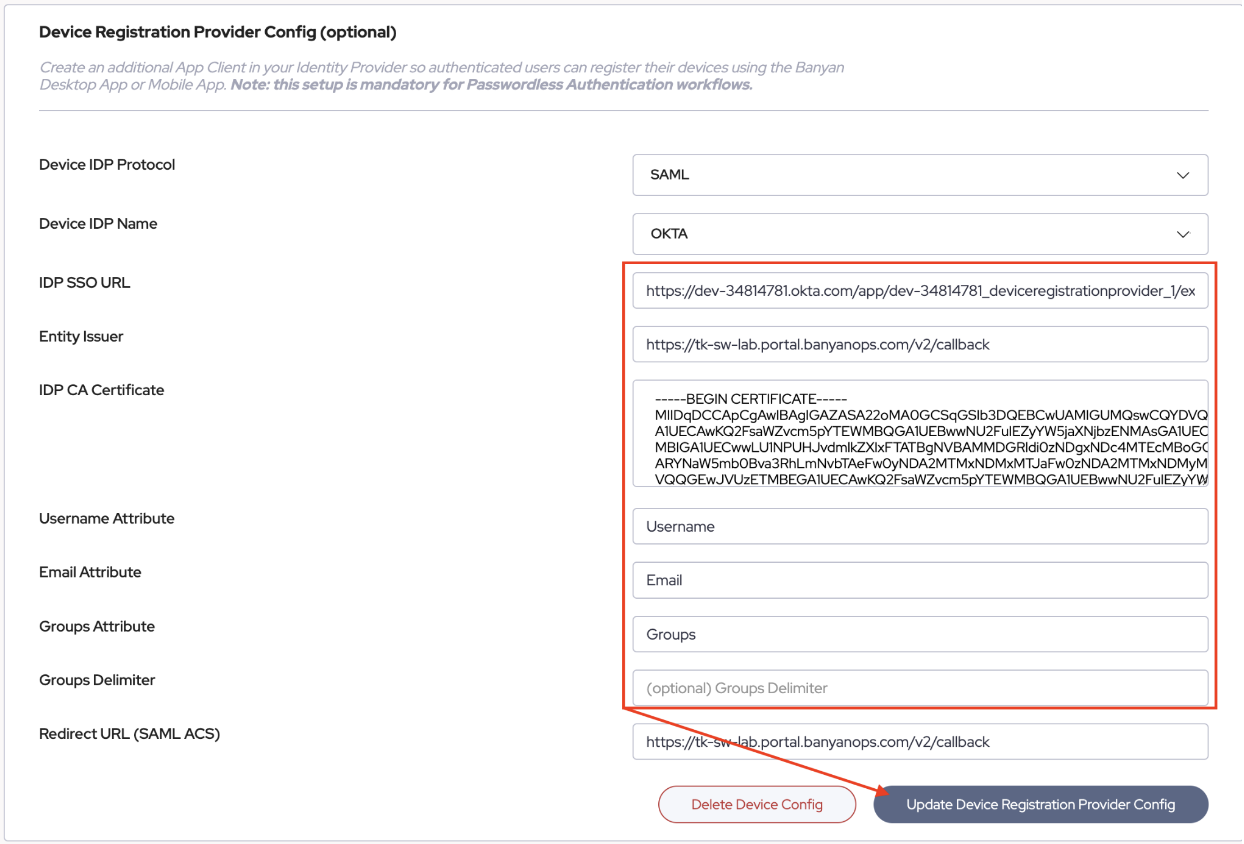
Validation
Part 2 of this guide series will go over registering the CSE Desktop App to validate our work here. If you hit an error in Part 2, please ensure the steps in this guide were followed.
Next Steps
Related Articles
- DNS Filtering Transition FAQ
- Cloud Secure Edge (CSE) behavior when firewall is replaced or upgraded
- Cloud Secure Edge How to remove a Infrastructure service


 YES
YES NO
NO