-
Products
-
SonicPlatform
SonicPlatform is the cybersecurity platform purpose-built for MSPs, making managing complex security environments among multiple tenants easy and streamlined.
Discover More
-
-
Solutions
-
Federal
Protect Federal Agencies and Networks with scalable, purpose-built cybersecurity solutions
Learn MoreFederalProtect Federal Agencies and Networks with scalable, purpose-built cybersecurity solutions
Learn More - Industries
- Use Cases
-
-
Partners
-
Partner Portal
Access to deal registration, MDF, sales and marketing tools, training and more
Learn MorePartner PortalAccess to deal registration, MDF, sales and marketing tools, training and more
Learn More - SonicWall Partners
- Partner Resources
-
-
Support
-
Support Portal
Find answers to your questions by searching across our knowledge base, community, technical documentation and video tutorials
Learn MoreSupport PortalFind answers to your questions by searching across our knowledge base, community, technical documentation and video tutorials
Learn More - Support
- Resources
- Capture Labs
-
- Company
- Contact Us
Configuring Time Management settings for PoE switch ports


Description
Customers can set a static or periodic time schedule on the PoE ports. This ensures that the connected PoE devices are active only during business hours. This feature promotes energy efficiency, reducing electricity consumption and costs.
 NOTE:
NOTE:
This functionality is available on firmware versions 1.2.1.0 and later.
Resolution
Stand-alone Switch:
Step 1: Creating a Schedule Profile/Object
Navigate to System>Time and click on “Add” option for the schedule. You can create a Schedule with the following types.
- Once: Here you can define a single Start and End time.
- Recurring: This option allows you to add recurring entries. You can select the day and time for each schedule. Each profile allows scheduling up to seven entries.
- Mixed: This option helps you to establish a recurring schedule with varying or adaptable start and end times for each day chosen in the recurring list. You can also set up multiple start and end times for a specific day.
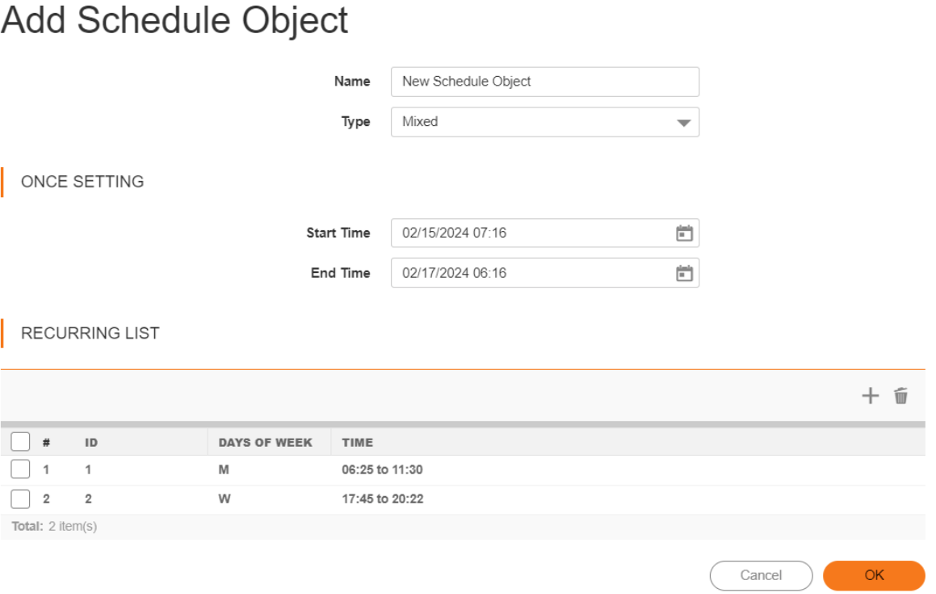
Once the schedule is created, please give it a name and click OK to save the Schedule Profile.
Step 2: Applying the Schedule Profile to a switch port.
Navigate to Switching>Port Settings>Select a Port>PoE section. From the Schedule dropdown menu, select the schedule profile you created in step1.
Click Apply and save the configuration.
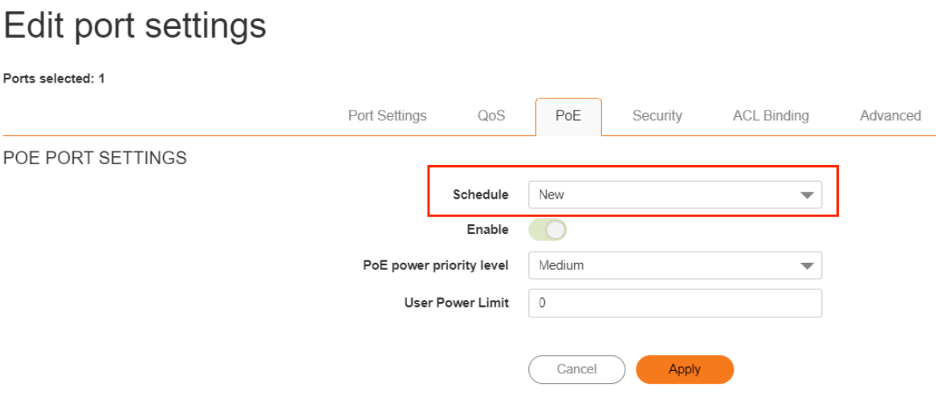
Now the selected port will deliver power as per the configured schedule.
WNM-Managed Switch:
Step1: Creating a Schedule Profile/Object
Log into the WNM console and navigate to Security>Schedule Objects and click on “Add” option for the schedule. You can create a Schedule in 3 types as explained in Step1 of stand-alone switch config above.
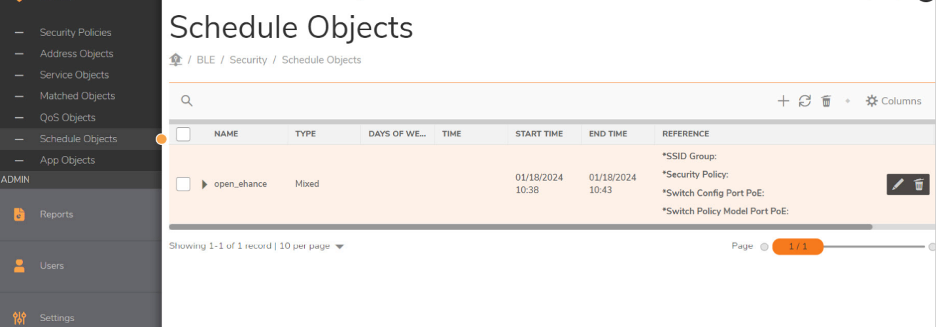
Step2: Applying the Schedule Profile to a switch port.
You have the option to apply the schedule object in two locations: within the Switch Policy and directly on individual switches from the 'Devices' page.
From Switch Policy: Navigate to Policies > Policy Hierarchy > Switch Policy. On the ‘Ports’ section select the appropriate switch model and navigate to PoE section.
Here you can select the Schedule you created in step 1.
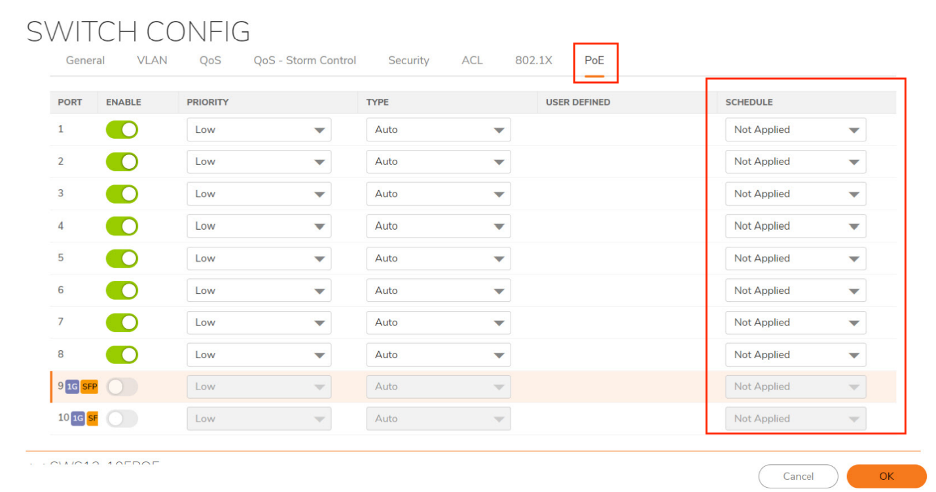
Now the selected port will deliver power as per the configured schedule.
From Devices: Navigate to Network > Devices>Switches, Choose and edit the desired switch.
Navigate to Ports>PoE section and select the schedule configured in step 1 from the dropdown menu. Click OK to save the configuration.
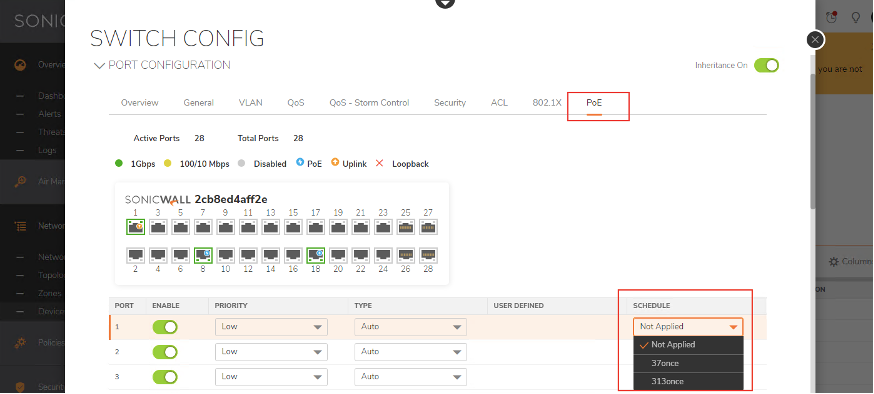
Now the selected port will deliver power as per the configured schedule.
Supported Devices:
SWS12-8PoE, SWS12-10FPoE, SWS14-24FPoE, SWS14-48FPoE
Related Articles
- Supported SonicWall and 3rd party SFP and SFP+ Modules that can be used with SonicWall Switches
- How to enable Port Mirror on Sonicwall Switch.
- Create a new VLAN on Sonicwall Switch managed by WCM.


 YES
YES NO
NO