-
Products
-
SonicPlatform
SonicPlatform is the cybersecurity platform purpose-built for MSPs, making managing complex security environments among multiple tenants easy and streamlined.
Discover More
-
-
Solutions
-
Federal
Protect Federal Agencies and Networks with scalable, purpose-built cybersecurity solutions
Learn MoreFederalProtect Federal Agencies and Networks with scalable, purpose-built cybersecurity solutions
Learn More - Industries
- Use Cases
-
-
Partners
-
Partner Portal
Access to deal registration, MDF, sales and marketing tools, training and more
Learn MorePartner PortalAccess to deal registration, MDF, sales and marketing tools, training and more
Learn More - SonicWall Partners
- Partner Resources
-
-
Support
-
Support Portal
Find answers to your questions by searching across our knowledge base, community, technical documentation and video tutorials
Learn MoreSupport PortalFind answers to your questions by searching across our knowledge base, community, technical documentation and video tutorials
Learn More - Support
- Resources
- Capture Labs
-
- Company
- Contact Us
Configuring SNMP over site to site VPN in SonicOS Enhanced


Description
SNMP (Simple Network Management Protocol) is a network protocol used over User Data gram Protocol (UDP) that allows network administrators to monitor the status of the SonicWall security appliance and receive notification of critical events as they occur on the network. The SonicWall security appliance supports SNMP CV/v2c and all relevant Management Information Base II (MIB) groups except egp and at. The SonicWall security appliance replies to SNMP Get commands for MIBII via any interface and supports a custom SonicWall MIB for generating trap messages. The custom SonicWall MIB is available for download from the SonicWall Web site and can be loaded into third-party SNMP management software such as HP Openview, Tivoli, or SNMPC.
Resolution
Resolution for SonicOS 7.X
This release includes significant user interface changes and many new features that are different from the SonicOS 6.5 and earlier firmware. The below resolution is for customers using SonicOS 7.X firmware.
Procedure:
- Enable SNMP and configure SNMP parameter
- Enable SNMP on the Sonic WALL interface
- Enable SNMP on VPN
- Configure the SNMP monitoring software
>> Enable SNMP and configure SNMP parameters
- Login to the Sonic WALL Management GUI as admin.
- Go to Device| Settings| SNMP.
- Check the box Enable SNMP'.
- Click on the Configure' button and supply the parameters for SNMP or keep the defaults for general configuration.
- Click the OK' button.
- Click the Accept button at the bottom of the page.

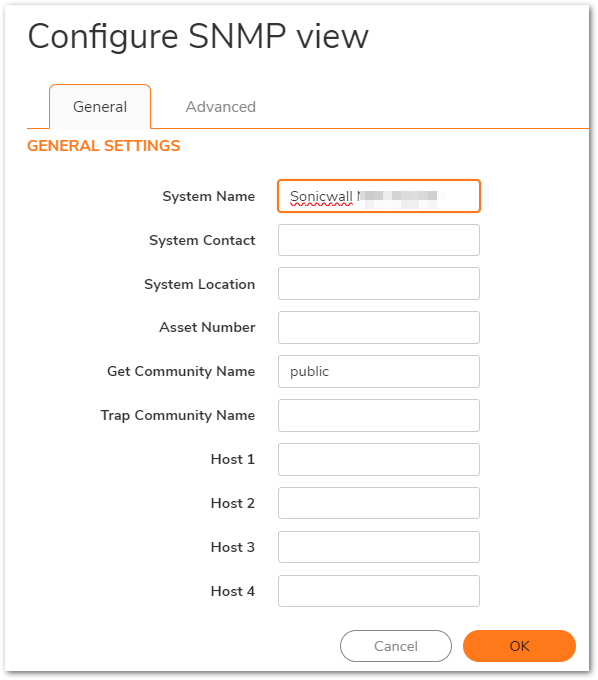
For the SNMP functionality, the "Community name" should be the same in the Sonic WALL and the SNMP monitoring software.
>> Enable SNMP on the Sonic WALL interface
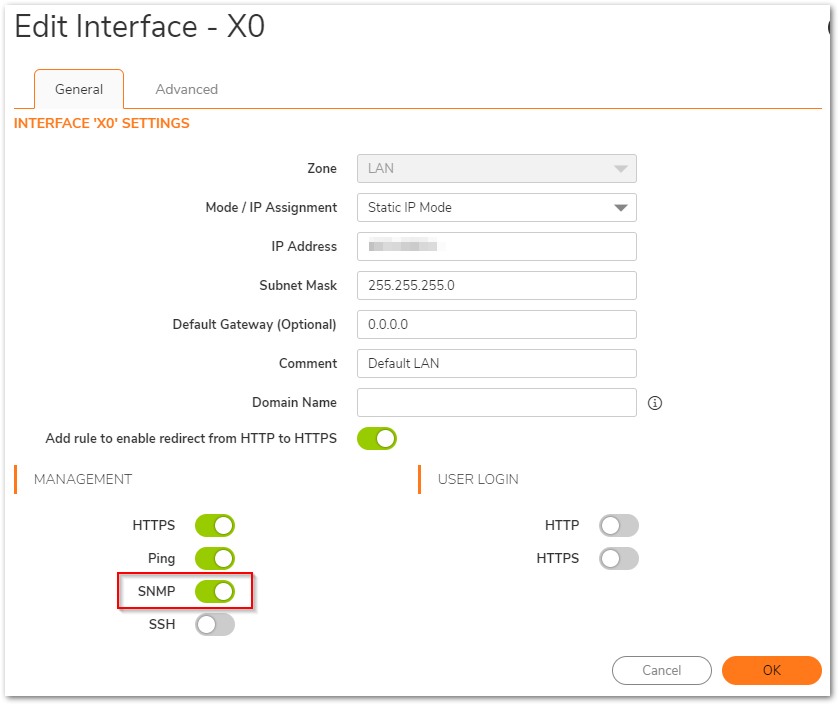
- Go to Network | System | Interfaces and click on the configure button in front of the LAN interface.
- In the Management' section, check the SNMP' box.
- Click the OK button.
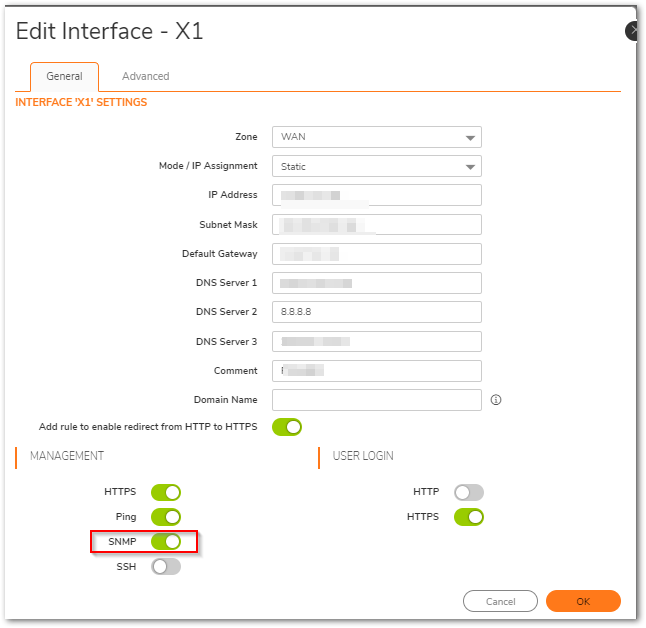
- Go to Network | System | Interfaces and click on the configure button in front of the WAN interface.
- In the Management' section, check the SNMP' box.
- Click the OK' button.
>> Enable SNMP on VPN
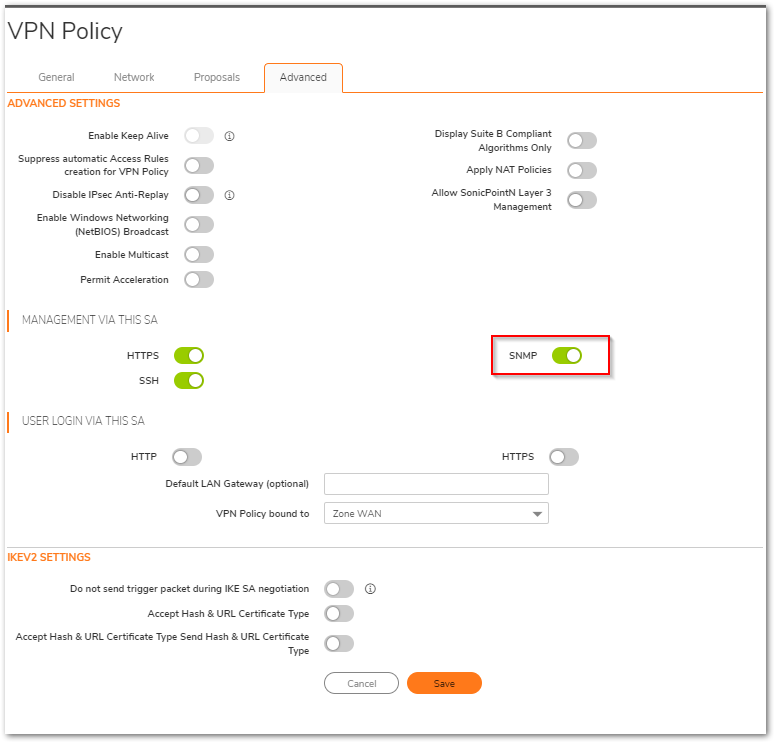
- Go to Network| IPSec VPN | Rules and Settings and click on the configure button in the respective vpn policy.
- Go to Advanced tab and in the Management via this SA ' section, check the SNMP' box.
- Click the OK' button.
 CAUTION: Editing VPN tunnel configuration will re-negotiate the SA,so make sure you are editing the vpn tunnel when you have down time.
>> Configure the SNMP monitoring software
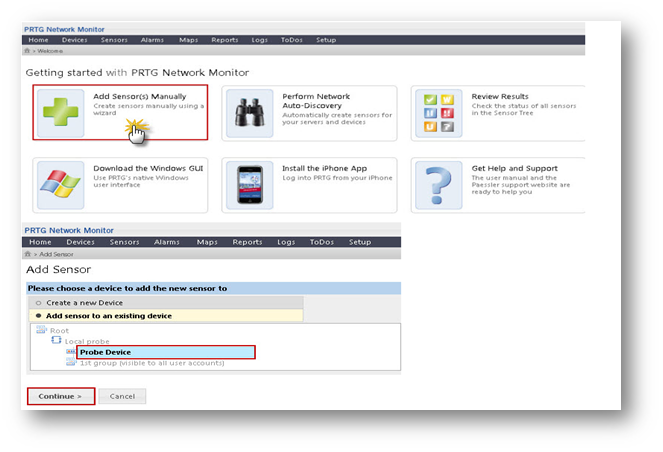
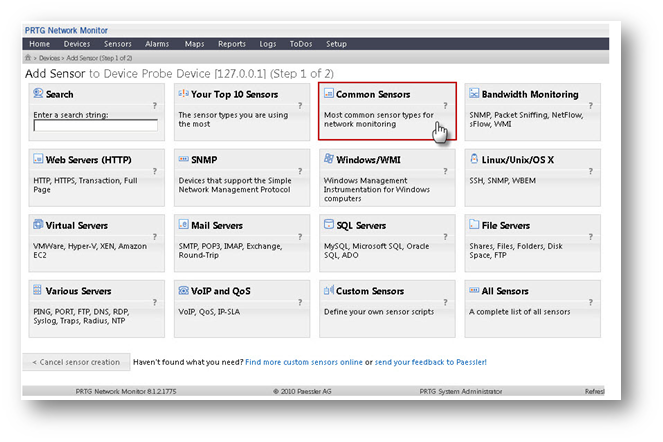
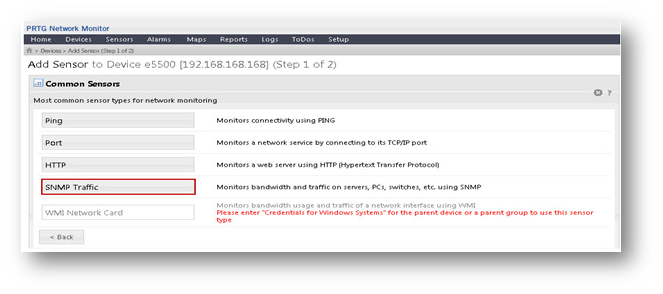
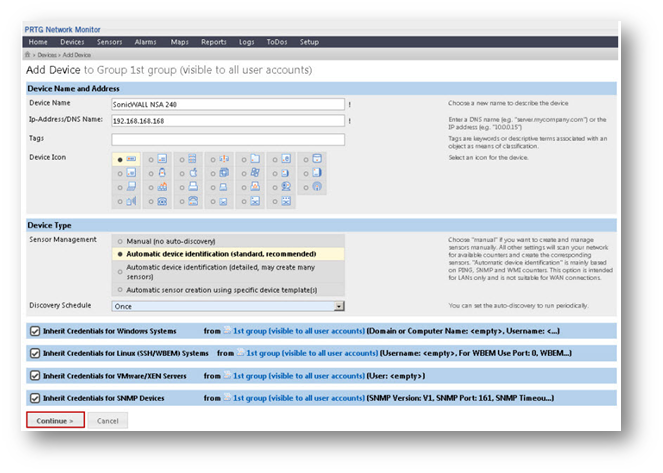
- Open the SNMP software and register the Sonic WALL. (You can download and install a free edition of PRTG from http://www.paessler.com/prtg/download).
Screen shots for PRTG (V8.1.2.1775) are attached below, just enter the Sonic WALL appliance's LAN IP address, along with the community string and it will start gathering data from the Sonic WALL.
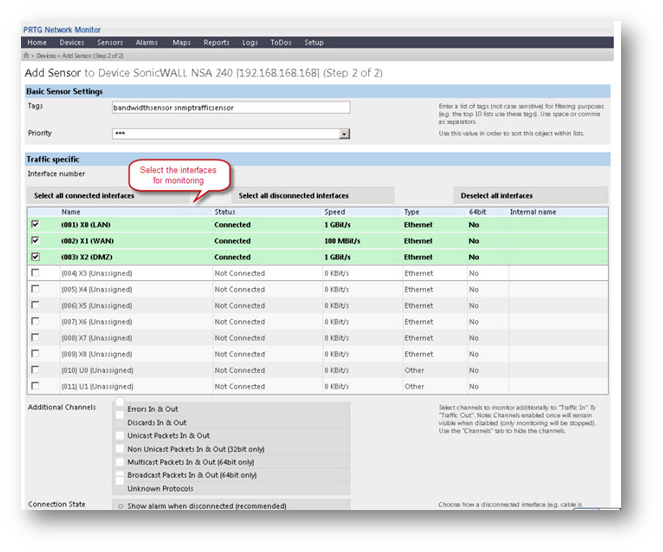
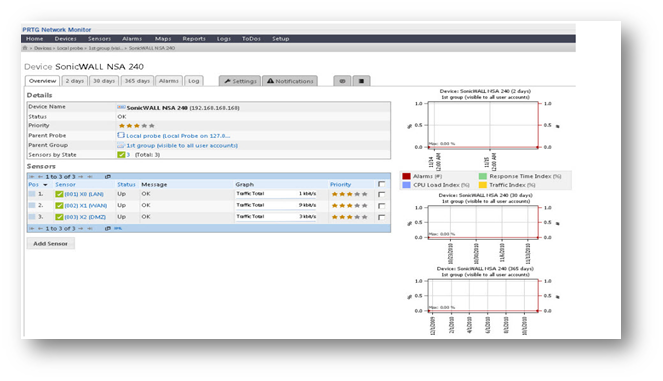
How To Test:
The Live data can be shown in the graph format as below for the X0 interface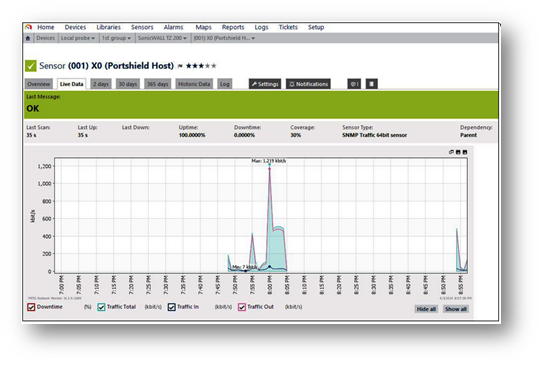
Resolution for SonicOS 6.5
This release includes significant user interface changes and many new features that are different from the SonicOS 6.2 and earlier firmware. The below resolution is for customers using SonicOS 6.5 firmware.
Procedure:
- Enable SNMP and configure SNMP parameter
- Enable SNMP on the Sonic WALL interface
- Enable SNMP on VPN
- Configure the SNMP monitoring software
>> Enable SNMP and configure SNMP parameters
- Login to the Sonic WALL Management GUI as admin.
- Go to Manage | Appliance | SNMP.
- Check the box Enable SNMP'.
- Click on the Configure' button and supply the parameters for SNMP or keep the defaults for general configuration.
- Click the OK' button.
- Click the Accept button at the bottom of the page.
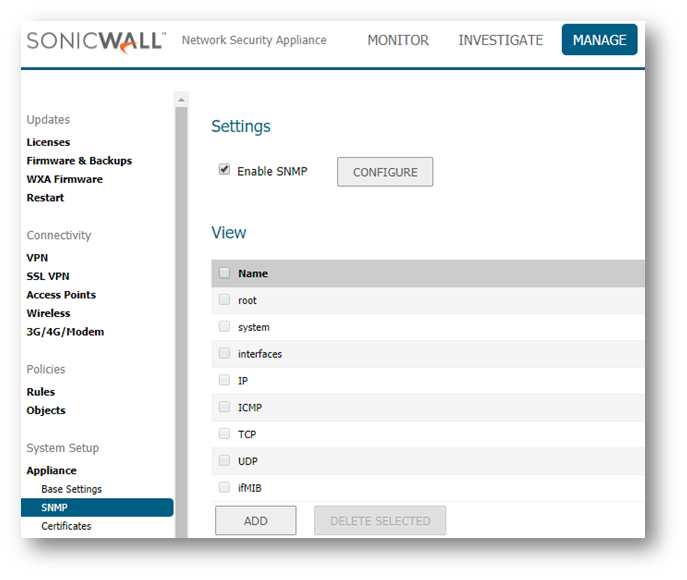
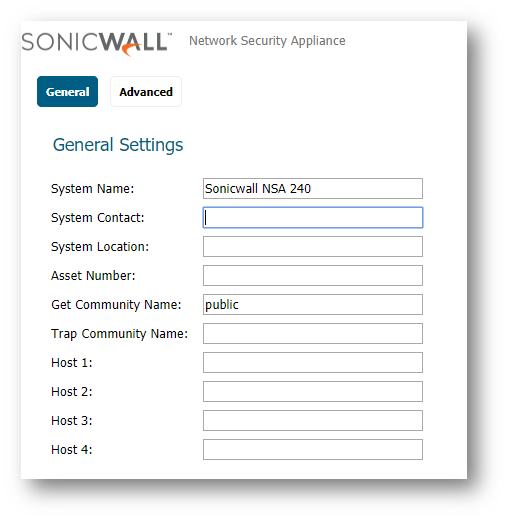
For the SNMP functionality, the "Community name" should be the same in the Sonic WALL and the SNMP monitoring software.
>> Enable SNMP on the Sonic WALL interface
- Go to Manage | Network | Interfaces and click on the configure button in front of the LAN interface.
- In the Management' section, check the SNMP' box.
- Click the OK' button.
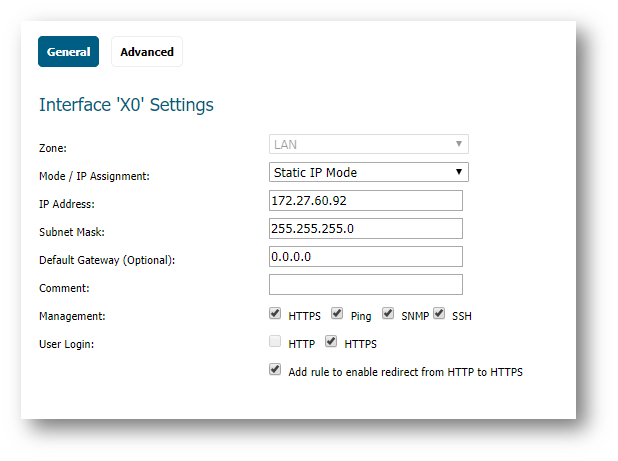
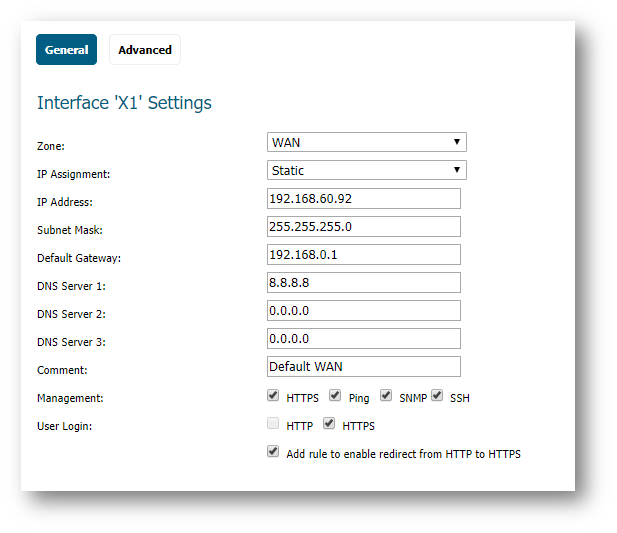
- Go to Manage | Network | Interfaces and click on the configure button in front of the WAN interface.
- In the Management' section, check the SNMP' box.
- Click the OK' button.
>> Enable SNMP on VPN
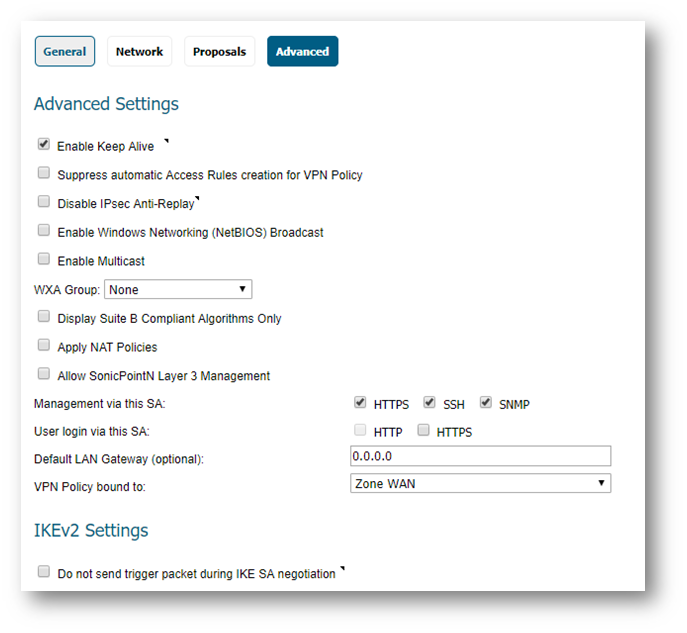
- Go to Manage | VPN | Base Settings and click on the configure button in the respective vpn policy.
- Go to Advanced tab and in the Management via this SA ' section, check the SNMP' box.
- Click the OK' button.
 CAUTION: Editing VPN tunnel configuration will re-negotiate the SA,so make sure you are editing the vpn tunnel when you have down time.
>> Configure the SNMP monitoring software
- Open the SNMP software and register the Sonic WALL. (You can download and install a free edition of PRTG from http://www.paessler.com/prtg/download)
Screen shots for PRTG (V8.1.2.1775) are attached below, just enter the Sonic WALL appliance's LAN IP address, along with the community string and it will start gathering data from the Sonic WALL.


How To Test:
The Live data can be shown in the graph format as below for the X0 interface

Resolution for SonicOS 6.2 and Below
The below resolution is for customers using SonicOS 6.2 and earlier firmware. For firewalls that are generation 6 and newer we suggest to upgrade to the latest general release of SonicOS 6.5 firmware.
Procedure:
- Enable SNMP and configure SNMP parameter
- Enable SNMP on the Sonic WALL interface
- Enable SNMP on VPN
- Configure the SNMP monitoring software
>> Enable SNMP and configure SNMP parameters
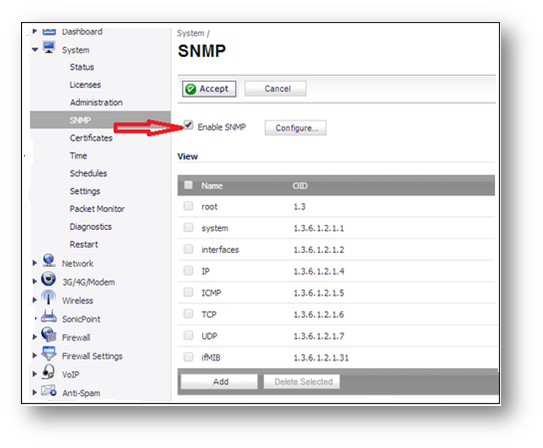
- Login to the Sonic WALL Management GUI as admin.
- Go to System | SNMP.
- Check the box Enable SNMP'.
- Click on the Configure' button and supply the parameters for SNMP or keep the defaults for general configuration.
- Click the OK' button.
- Click the Accept button on the top of the page.
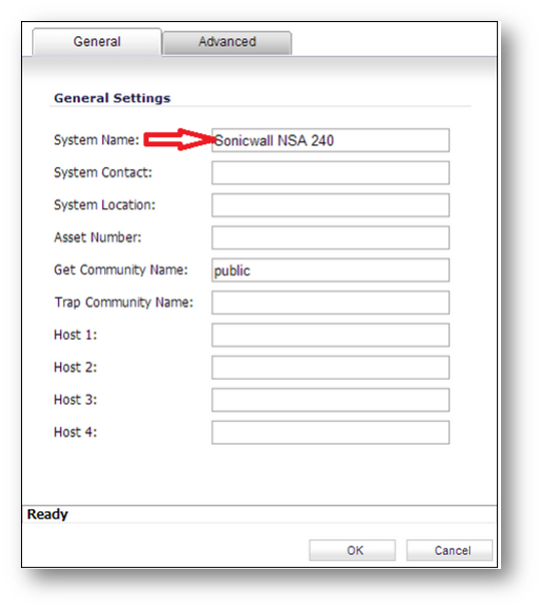
For the SNMP functionality, the "Community name" should be the same in the Sonic WALL and the SNMP monitoring software.
>> Enable SNMP on the Sonic WALL interface
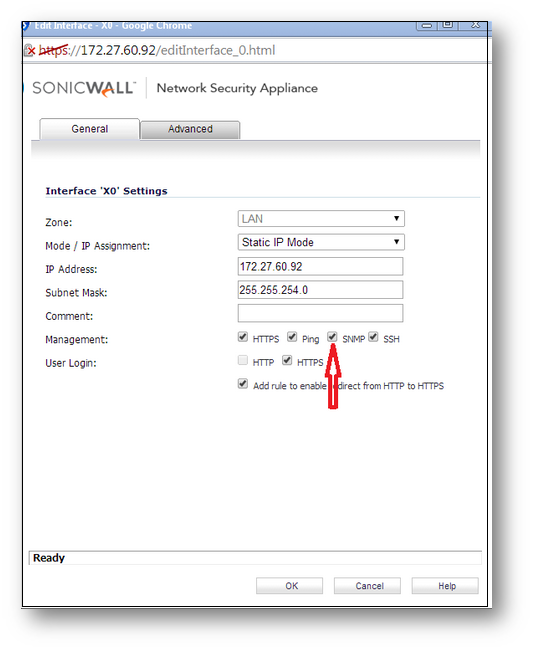
- Go to Network | Interfaces and click on the configure button in front of the LAN interface.
- In the Management' section, check the SNMP' box.
- Click the OK' button.
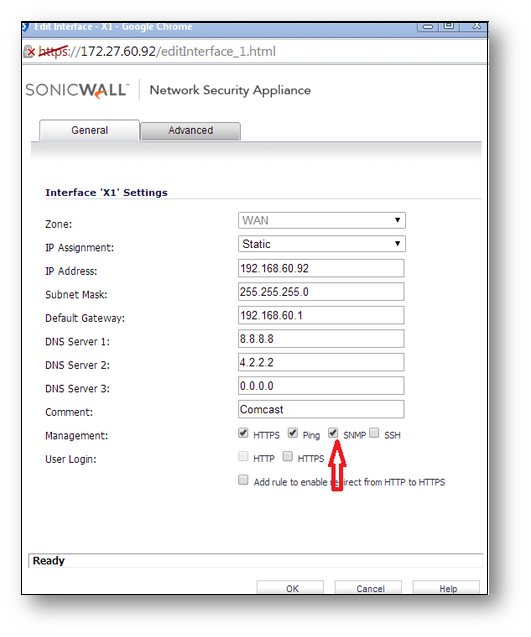
- Go to Network | Interfaces and click on the configure button in front of the WAN interface.
- In the Management' section, check the SNMP' box.
- Click the OK' button.
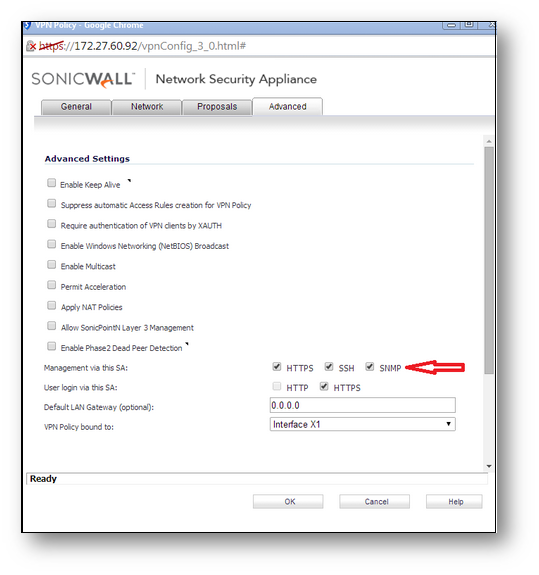
>> Enable SNMP on VPN
- Go to VPN | Settings and click on the configure button in the respective vpn policy.
- Go to Advanced tab and in the Management via this SA ' section, check the SNMP' box.
- Click the OK' button.
Editing VPN tunnel configuration will re-negotiate the SA,so make sure you are editing the vpn tunnel when you have down time.
>> Configure the SNMP monitoring software
- Open the SNMP software and register the Sonic WALL. (You can download and install a free edition of PRTG from http://www.paessler.com/prtg/download)
Screen shots for PRTG (V8.1.2.1775) are attached below, just enter the Sonic WALL appliance's LAN IP address, along with the community string and it will start gathering data from the Sonic WALL.


How To Test:
The Live data can be shown in the graph format as below for the X0 interface

Related Articles
- Error:"Invalid API Argument" when modifying the access rules
- Cysurance Partner FAQ
- Configure probe monitoring for WAN Failover and Loadbalancing - SonicWall UTM
Categories
- Firewalls > SonicWall NSA Series
- Firewalls > SonicWall SuperMassive 9000 Series
- Firewalls > SonicWall SuperMassive E10000 Series
- Firewalls > TZ Series


 YES
YES NO
NO