-
Products
-
SonicPlatform
SonicPlatform is the cybersecurity platform purpose-built for MSPs, making managing complex security environments among multiple tenants easy and streamlined.
Discover More
-
-
Solutions
-
Federal
Protect Federal Agencies and Networks with scalable, purpose-built cybersecurity solutions
Learn MoreFederalProtect Federal Agencies and Networks with scalable, purpose-built cybersecurity solutions
Learn More - Industries
- Use Cases
-
-
Partners
-
Partner Portal
Access to deal registration, MDF, sales and marketing tools, training and more
Learn MorePartner PortalAccess to deal registration, MDF, sales and marketing tools, training and more
Learn More - SonicWall Partners
- Partner Resources
-
-
Support
-
Support Portal
Find answers to your questions by searching across our knowledge base, community, technical documentation and video tutorials
Learn MoreSupport PortalFind answers to your questions by searching across our knowledge base, community, technical documentation and video tutorials
Learn More - Support
- Resources
- Capture Labs
-
- Company
- Contact Us
Configuring Multicast DNS for Apple (Bonjour) on Gen 5 and Gen 6 SonicWall appliances


Description
This articles covers how to configure multicast DNS (Bonjour) on Gen 5 and Gen 6 SonicWall appliances.
Jump to a specific step by clicking the below links:
Step 1: Enabling IP Helper & the mDNS Protocol.
Step 2: Configuring the IP Helper Policies.
Step 3: Configuring the Access Rules.
Resolution
Resolution for SonicOS 6.5
This release includes significant user interface changes and many new features that are different from the SonicOS 6.2 and earlier firmware. The below resolution is for customers using SonicOS 6.5 firmware.
Step 1: Enabling IP Helper & the mDNS Protocol.
1. Log into the SonicWall Management GUI.
2. Navigate to the Manage | Network | IP Helper page.
3. Enable IP Helper by checking the "Enable IP Helper" checkbox. Click "Accept" to save the change.
4. Enable the mDNS Protocol from the Relay Protocols list. The change will auto-apply and the page will refresh.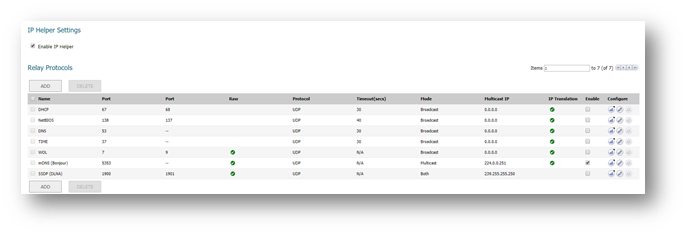
Step 2: Configuring the IP Helper Policies.
1. On the Manage | Network | IP Helper page, find the Policies section.
2. Click the"Add " button to add a new IP Helper Policy.

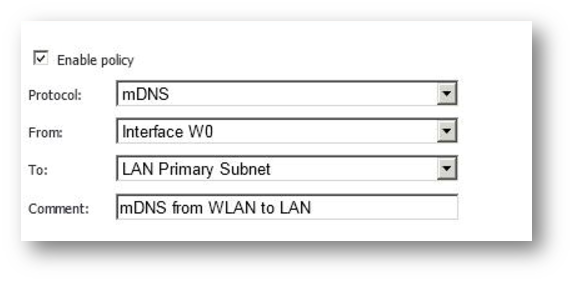
3. Configure the WLAN to LAN IP Helper Policy. The WLAN to LAN policy allows Bonjour discovery to work from LAN clients.
The effect: WLAN devices/systems are discovered by LAN devices/systems.
- Policy Configuration:
- Protocol: mDNS
- From: "Interface W0" (Tip: You can replace "Interface W0" with any specific Interface.)
- To: "LAN Primary Subnet" or "X0 Subnet" (Tip: You can replace this with any specific Destination object. For example: X2 Subnet.)
- Optionally, you can add a comment to the Policy
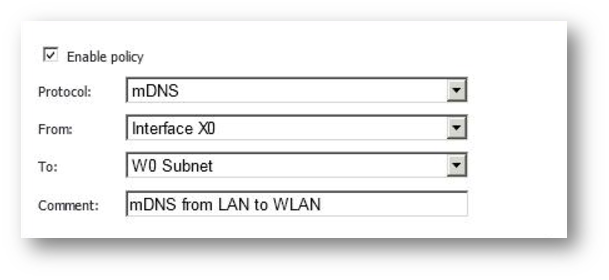
4. Configure the LAN to WLAN IP Helper Policy. The LAN to WLAN policy allows Bonjour discovery to work from WLAN clients.
The effect: LAN devices/systems are discovered by WLAN devices/systems.
Note: This is the reverse of the Policy outlined above.
- Policy Configuration:
- Protocol: mDNS
- From: "Interface X0"
- To: "W0 Subnet"
- Optionally, you can add a comment to the Policy.
5. Review your IP Helper Policies. The IP Helper Policies should look like this:
Notes:
- IP Helper Policies do not allow the discovered services to bypass access rules. Access Rules must be in place between the two Zones in order to utilize discovered services.
- Two IP Helper policies are necessary to allow two-way discovery of services using Bonjour.
- The WLAN to LAN Policy allows LAN clients to discover WLAN clients.
- The LAN to WLAN Policy allows WLAN clients to discover LAN clients.
Step 3: Configuring the Access Rules.
1. Navigate to Rules | Access Rules.
2. Select the "Matrix" View Style. Select the WLAN to LAN intersection.
- Note: By default, the WLAN to LAN Access Rule table contains a single rule that denies any traffic.
- Note: In this example, we will simply edit it to make it Allow instead of Deny. Alternatively, you can add custom rules to allow specific Services configured under Firewall | Services.
- Tip: A list of ports used by Apple s software products can be found here: http://support.apple.com/kb/TS1629

3. Edit the default WLAN to LAN Deny rule. Change the Action to Allow. Click OK.
- The screenshot above is the before image. The screenshot below is the after image.

- Note: By default, the LAN to WLAN Access Rule table contains a single rule that allows any traffic. In this example, no change is required because the default rule is in place.
- Tip: A list of ports used by Apple s software products can be found here: http://support.apple.com/kb/TS1629
Resolution for SonicOS 6.2 and Below
The below resolution is for customers using SonicOS 6.2 and earlier firmware. For firewalls that are generation 6 and newer we suggest to upgrade to the latest general release of SonicOS 6.5 firmware.
Step 1: Enabling IP Helper & the mDNS Protocol.
1. Log into the SonicWall Management GUI.
2. Navigate to the Network | IP Helper page.
3. Enable IP Helper by checking the "Enable IP Helper" checkbox. Click "Accept" to save the change.
4. Enable the mDNS Protocol from the Relay Protocols list. The change will auto-apply and the page will refresh.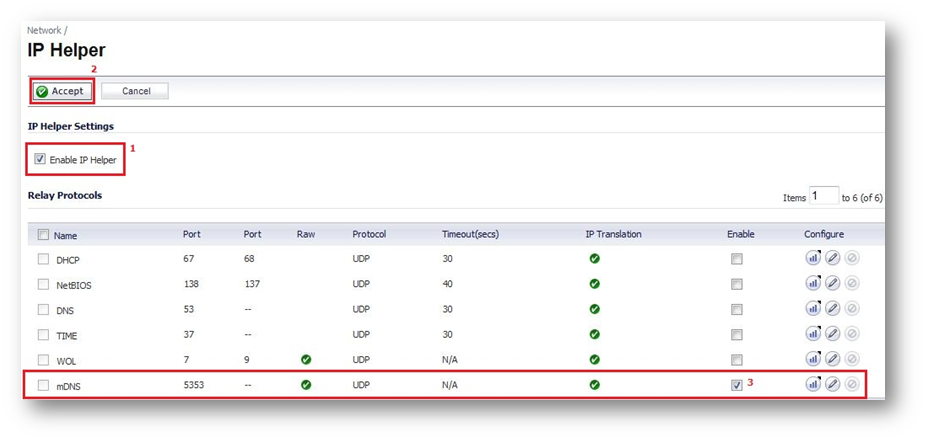
Step 2: Configuring the IP Helper Policies.
1. On the Network | IP Helper page, find the Policies section.
2. Click the"Add " button to add a new IP Helper Policy.

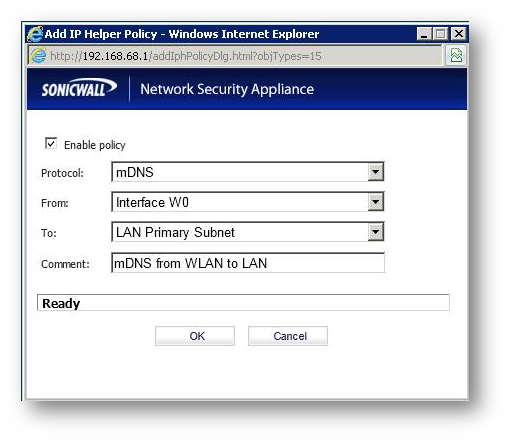
3. Configure the WLAN to LAN IP Helper Policy. The WLAN to LAN policy allows Bonjour discovery to work from LAN clients.
The effect: WLAN devices/systems are discovered by LAN devices/systems.
- Policy Configuration:
- Protocol: mDNS
- From: "Interface W0" (Tip: You can replace "Interface W0" with any specific Interface.)
- To: "LAN Primary Subnet" or "X0 Subnet" (Tip: You can replace this with any specific Destination object. For example: X2 Subnet.)
- Optionally, you can add a comment to the Policy
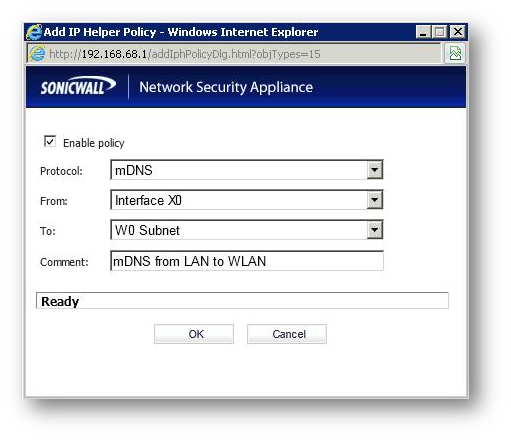
4. Configure the LAN to WLAN IP Helper Policy. The LAN to WLAN policy allows Bonjour discovery to work from WLAN clients.
The effect: LAN devices/systems are discovered by WLAN devices/systems.
Note: This is the reverse of the Policy outlined above.
- Policy Configuration:
- Protocol: mDNS
- From: "Interface X0"
- To: "W0 Subnet"
- Optionally, you can add a comment to the Policy.
5. Review your IP Helper Policies. The IP Helper Policies should look like this:
Notes:
- IP Helper Policies do not allow the discovered services to bypass access rules. Access Rules must be in place between the two Zones in order to utilize discovered services.
- Two IP Helper policies are necessary to allow two-way discovery of services using Bonjour.
- The WLAN to LAN Policy allows LAN clients to discover WLAN clients.
- The LAN to WLAN Policy allows WLAN clients to discover LAN clients.
Step 3: Configuring the Access Rules.
1. Navigate to Firewall | Access Rules.
2. Select the "Matrix" View Style. Select the WLAN to LAN intersection.
- Note: By default, the WLAN to LAN Access Rule table contains a single rule that denies any traffic.
- Note: In this example, we will simply edit it to make it Allow instead of Deny. Alternatively, you can add custom rules to allow specific Services configured under Firewall | Services.
- Tip: A list of ports used by Apple s software products can be found here: http://support.apple.com/kb/TS1629

3. Edit the default WLAN to LAN Deny rule. Change the Action to Allow. Click OK.
- The screenshot above is the before image. The screenshot below is the after image.

- Note: By default, the LAN to WLAN Access Rule table contains a single rule that allows any traffic. In this example, no change is required because the default rule is in place.
- Alternatively, you can add custom rules to allow specific Services configured under Firewall | Services.
- Tip: A list of ports used by Apple s software products can be found here: http://support.apple.com/kb/TS1629
Related Articles
- Error:"Invalid API Argument" when modifying the access rules
- Cysurance Partner FAQ
- Configure probe monitoring for WAN Failover and Loadbalancing - SonicWall UTM
Categories
- Firewalls > SonicWall NSA Series
- Firewalls > SonicWall SuperMassive 9000 Series
- Firewalls > TZ Series


 YES
YES NO
NO