-
Products
-
SonicPlatform
SonicPlatform is the cybersecurity platform purpose-built for MSPs, making managing complex security environments among multiple tenants easy and streamlined.
Discover More
-
-
Solutions
-
Federal
Protect Federal Agencies and Networks with scalable, purpose-built cybersecurity solutions
Learn MoreFederalProtect Federal Agencies and Networks with scalable, purpose-built cybersecurity solutions
Learn More - Industries
- Use Cases
-
-
Partners
-
Partner Portal
Access to deal registration, MDF, sales and marketing tools, training and more
Learn MorePartner PortalAccess to deal registration, MDF, sales and marketing tools, training and more
Learn More - SonicWall Partners
- Partner Resources
-
-
Support
-
Support Portal
Find answers to your questions by searching across our knowledge base, community, technical documentation and video tutorials
Learn MoreSupport PortalFind answers to your questions by searching across our knowledge base, community, technical documentation and video tutorials
Learn More - Support
- Resources
- Capture Labs
-
- Company
- Contact Us
Configuring MAC filtering on the switch port using ACL binding policy on Wireless Network Manager (WNM)


Description
Access Control List (ACL) allows you to define classification rules or establish criteria to provide security to your network by blocking unauthorized users and allowing authorized users to access specific areas or resources. ACLs can provide basic security for access to the network by controlling whether packets are forwarded or blocked at the Switch ports. Access Control Lists (ACLs) are filters that allow you to classify data packets according to a particular content in the packet header, such as the source address, destination address, source port number, destination port number, and more. Packet classifiers identify flows for more efficient processing. Each filter defines the conditions that must match for inclusion in the filter. ACLs are used to provide traffic flow control, restrict contents of routing updates, and determine which types of traffic are forwarded or blocked. This criterion can be specified on a basis of the MAC address or IP address.
Resolution
ACL BINDING ON A SWITCH through Wireless Network Manager (WNM)
- Login to https://cloud.sonicwall.com/ using your Mysonicwall credentials and select the right tenant on the top
- Select the Wireless Network manager
- Navigate to Security| Matched object.
- Select Add (+) icon to create a new Matched objects for the allowed MAC address
- Give a Name, Description, Type: MAC, Source MAC address: User defined, and Enter the allowed MAC address on the Source MAC value field as shown in the below picture.
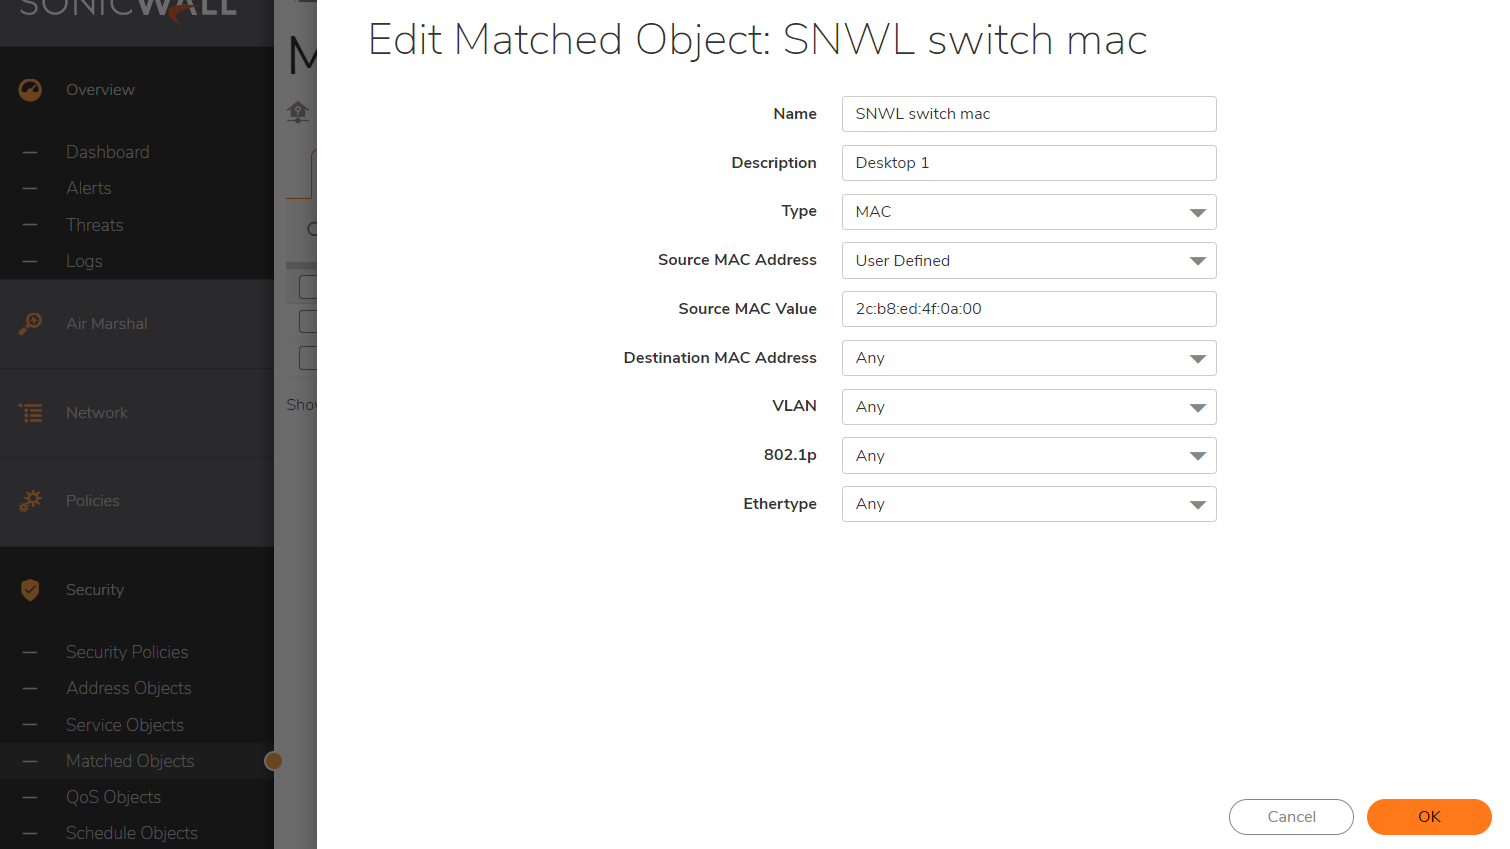
- Create one more address object to Deny all.
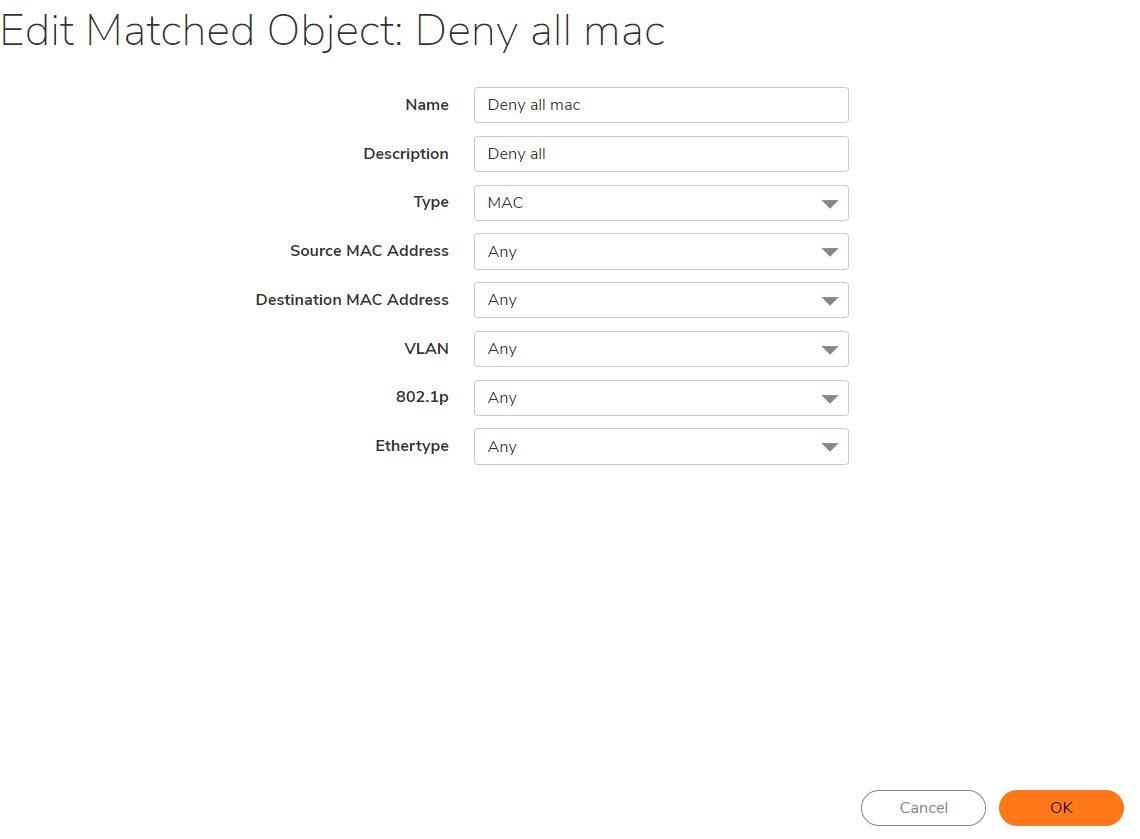
- Navigate to Security|Matched object|Matched Groups.
- Select Add (+) icon to create a new Matched group for the allowed MAC address
- Select the allowed MAC address and add it and Save it.
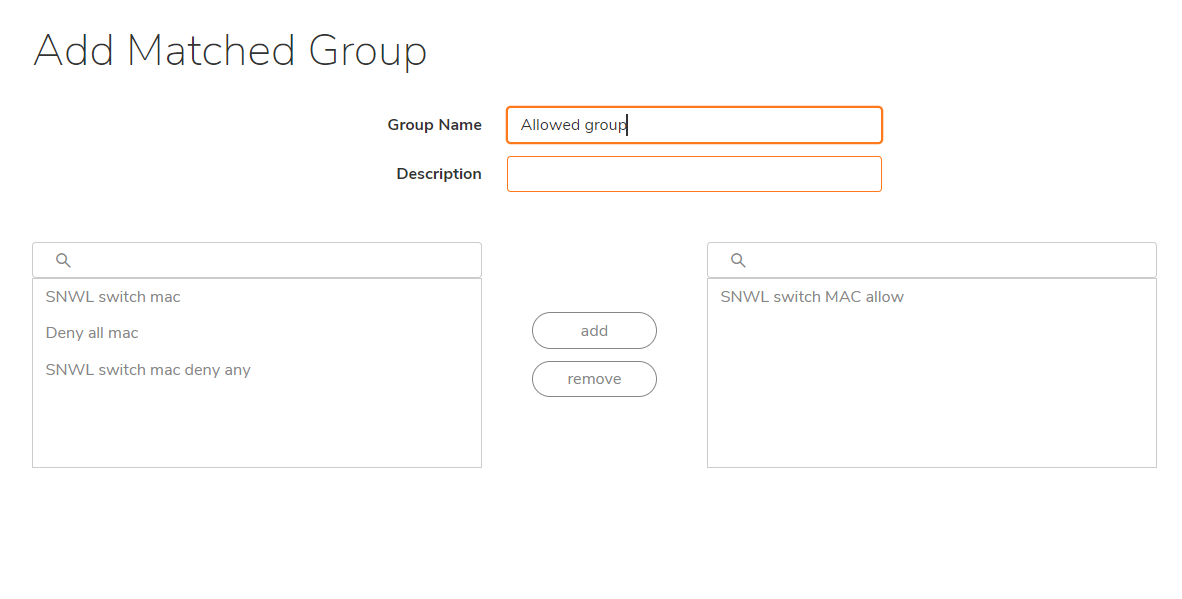
- Select Add (+) icon to create a new Matched group for the Deny MAC address
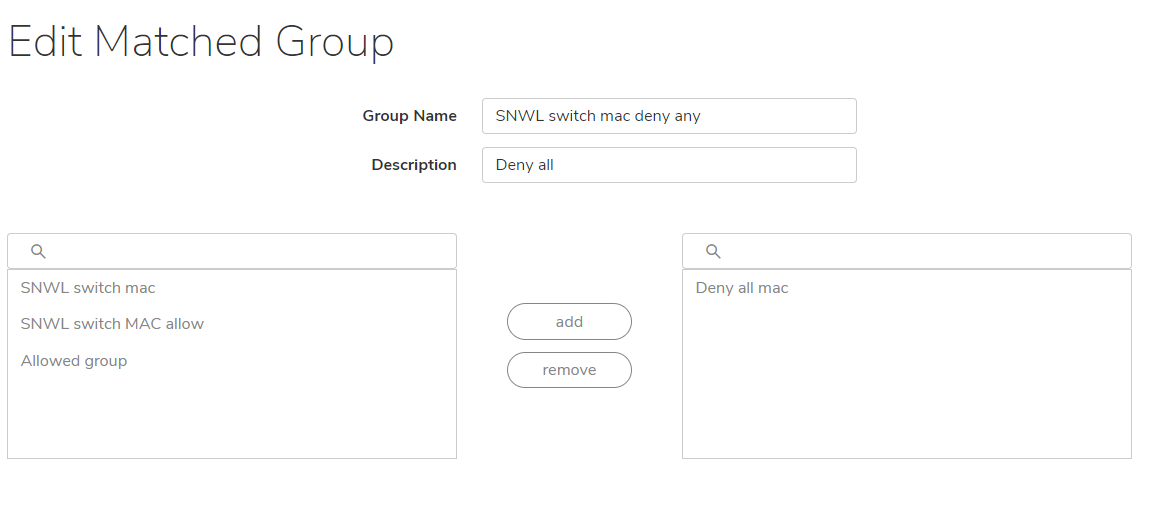
- Navigate to Security|Security Policies|Switches.
- Select Add (+) icon to create a ACL security policy
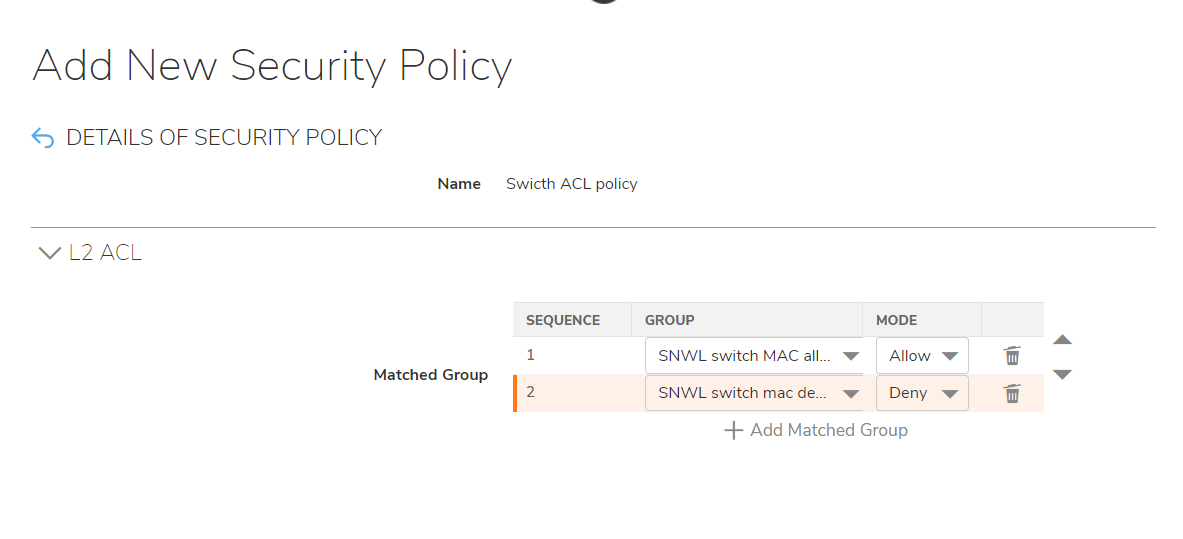
- Give a Name and Type: ACL security policy.
- Select the Allow matched group from the drop-down and select Allow mode.
- Select +Add matched group
- Select the Deny all matched group from the drop-down and select Deny mode.
- Navigate to Network|Devices|Switches
- Select the Switch and click on Edit/configure icon on the switch
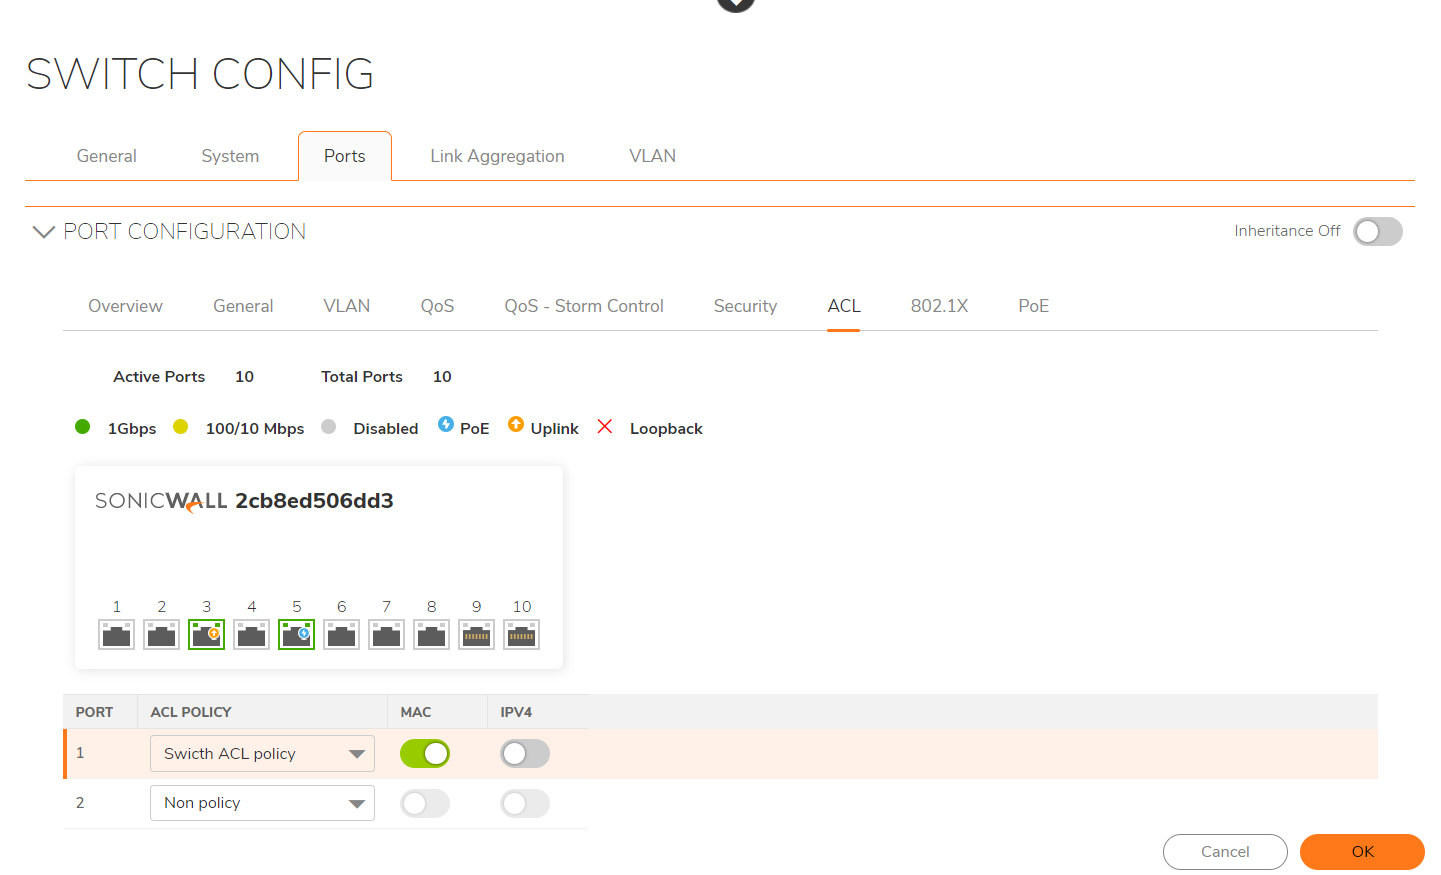
- Navigate to Ports|ACL
- Select the port from the list and select the ACL security policy from the drop-down and enable MAC as shown in the below picture.
- Save the changes.
How to Test:
If another machine whose MAC address is not listed in the cache would try to communicate through the switch port. They won't be able to connect through the switch port.
Related Articles
- Supported SonicWall and 3rd party SFP and SFP+ Modules that can be used with SonicWall Switches
- How to enable Port Mirror on Sonicwall Switch.
- Create a new VLAN on Sonicwall Switch managed by WCM.


 YES
YES NO
NO