


-
Products
-
SonicPlatform
SonicPlatform is the cybersecurity platform purpose-built for MSPs, making managing complex security environments among multiple tenants easy and streamlined.
Discover More
-
-
Solutions
-
Federal
Protect Federal Agencies and Networks with scalable, purpose-built cybersecurity solutions
Learn MoreFederalProtect Federal Agencies and Networks with scalable, purpose-built cybersecurity solutions
Learn More - Industries
- Use Cases
-
-
Partners
-
Partner Portal
Access to deal registration, MDF, sales and marketing tools, training and more
Learn MorePartner PortalAccess to deal registration, MDF, sales and marketing tools, training and more
Learn More - SonicWall Partners
- Partner Resources
-
-
Support
-
Support Portal
Find answers to your questions by searching across our knowledge base, community, technical documentation and video tutorials
Learn MoreSupport PortalFind answers to your questions by searching across our knowledge base, community, technical documentation and video tutorials
Learn More - Support
- Resources
- Capture Labs
-
- Company
- Contact Us
Configuring Guest Services on the LAN / DMZ zone
 10/14/2021
  312 People found this article helpful
 517,799 Views

Description
SonicWall User Guest Services provided network administrators with an easy solution for creating wired and wireless guest passes and/or locked-down Internet-only network access for visitors or untrusted network nodes. This functionality can be extended to wireless or wired users on the WLAN, LAN, DMZ, or public/semi-public zone of your choice.
This article describes how to enable Guest Services on the LAN zone.
Resolution
Resolution for SonicOS 7.X
This release includes significant user interface changes and many new features that are different from the SonicOS 6.5 and earlier firmware. The below resolution is for customers using SonicOS 7.X firmware.
Enable Guest Services on the LAN zone
- Login to the SonicWall management GUI.
- Navigate to Object | Match Objects | Zones page.
- Click Configure button for the zone you wish to add Guest Services to. In this example the LAN zone.
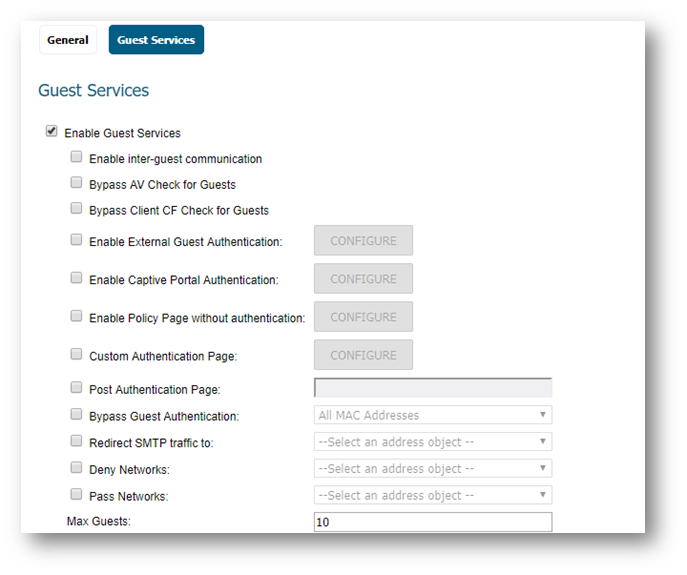
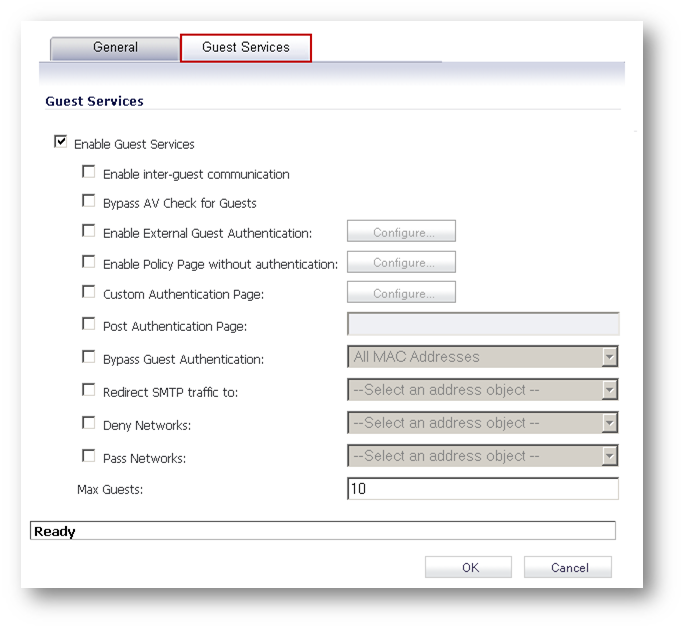
- Click Guest Services tab.
- Enable the check box under Enable Guest Services. Click OK, will enable Guest Services on the LAN zone.
 CAUTION:Enabling Guest Services will immediately affect all users on that zone and allow access to Internet Only. it is recommended to test this feature by creating a New zone and assigning it to an unused interface before implementing on production network.
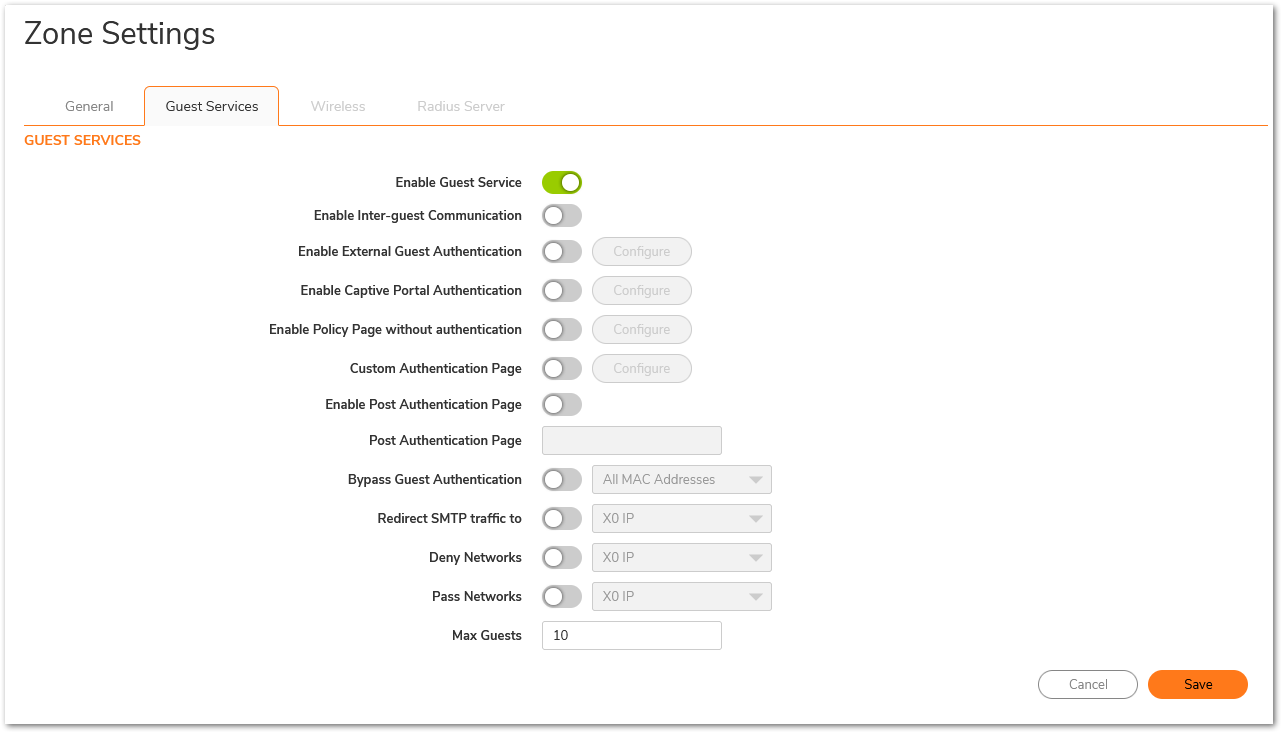
- Enable inter-guest communication - Allows guests to communicate directly with other users who are connected to this zone.
- Bypass AV Check for Guests - Allows guest traffic to bypass Anti-Virus protection.
- Enable External Guest Authentication - Requires guests connecting from the device or network you select to authenticate before gaining access.
- Custom Authentication Page - Redirects users to a custom authentication page when they first connect to the network. Click Configure to set up the custom authentication page. Enter either a URL to an authentication page or a custom challenge statement in the text field, and click OK.
- Post Authentication Page - Directs users to the page you specify immediately after successful authentication. Enter a URL for the post-authentication page in the field.
- Bypass Guest Authentication - Allows the Guest Services feature to integrate into environments already using some form of user-level authentication. This feature automates the authentication process, allowing wireless users to reach Guest Services resources without requiring authentication. This feature should only be used when unrestricted Guest Service access is desired, or when another device upstream is enforcing authentication.
- Redirect SMTP traffic to - Redirects SMTP traffic incoming on this zone to an SMTP server you specify. Select the address object to redirect traffic to.
- Deny Networks - Blocks traffic to the networks you name. Select the subnet, address group, or IP address to block traffic to.
- Pass Networks - Allows traffic through the Guest Service-enabled zone to the networks you select.
- Max Guests - Specifies the maximum number of guest users allowed to connect to this zone. The default setting is 10.
Guest Profiles
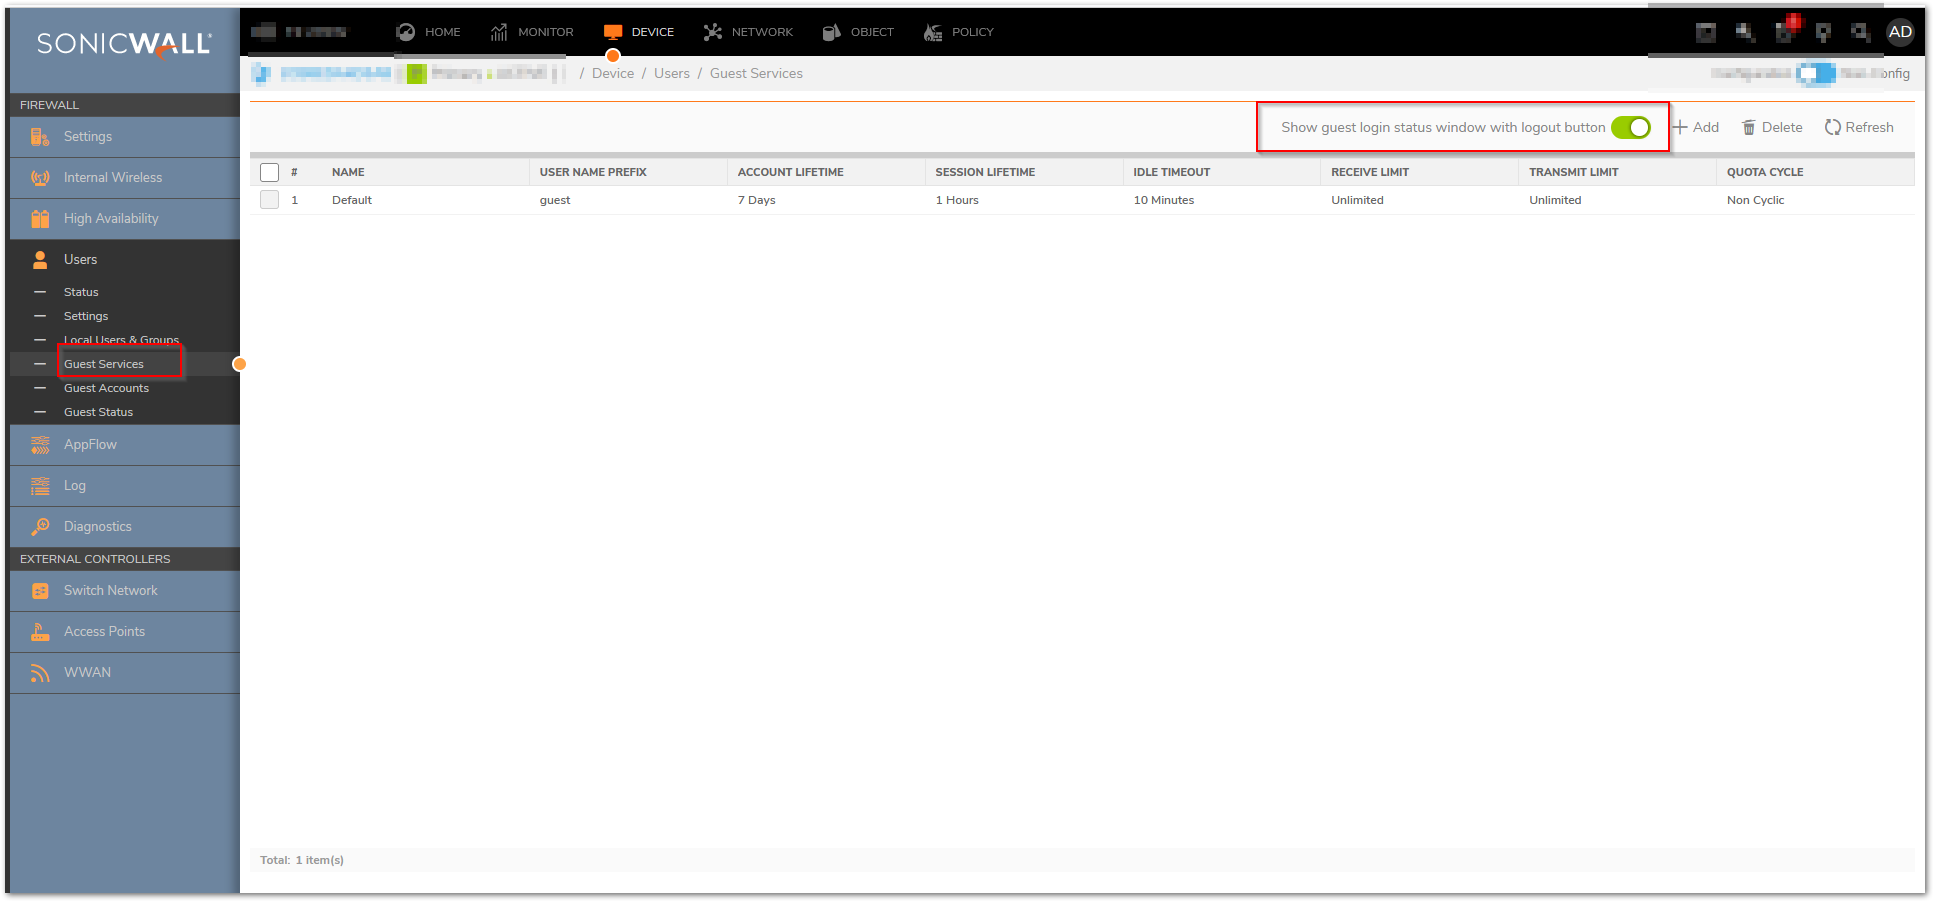
The Guest Profiles page enables you to view, add, edit and delete profiles. A default profile is auto-created which can be edited by clicking on the Configure button. Alternatively a new profile can be created by clicking on the Add button.
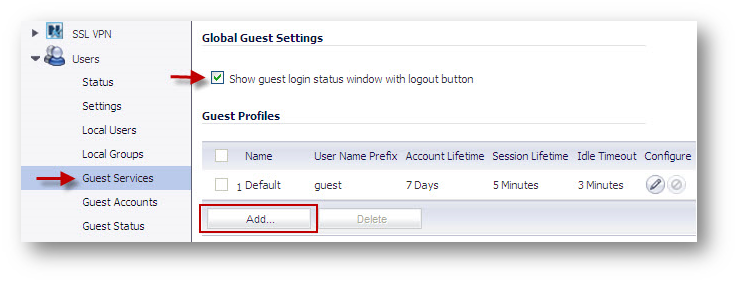
- Navigate to Device| Users | Guest Services page.
- Check Show guest login status window with logout button to display a user login window on the users’s workstation whenever the user is logged in
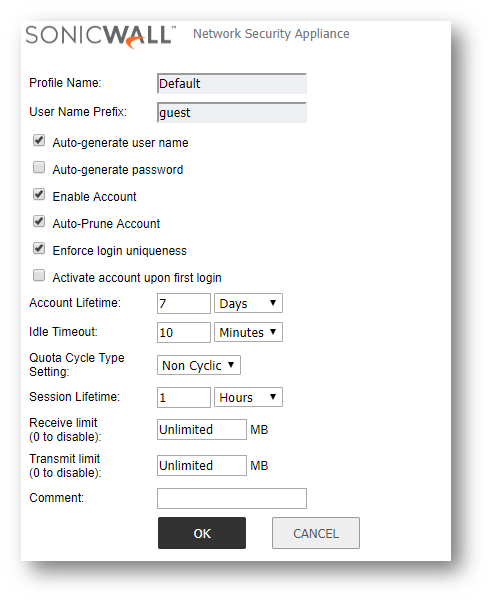
- The following options are available for configuring in the Add Guest Profile window.
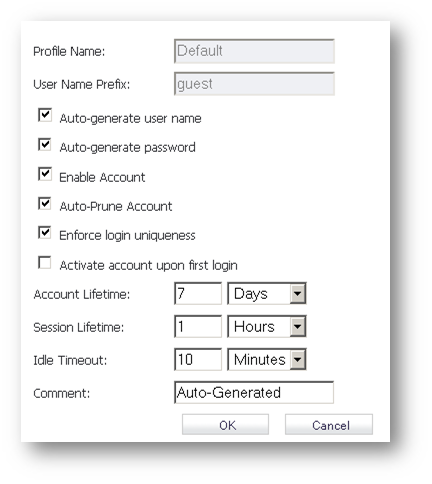
- Profile Name: Enter the name of the profile.
- User Name Prefix: Enter the first part of every user account name generated from this profile.
- Auto-generate user name: Check this to allow guest accounts generated from this profile to have an automatically generated user name. The user name is usually the prefix plus a two- or three-digit number.
- Auto-generate password: Check this to allow guest accounts generated from this profile to have an automatically generated password. The generated password is an eight-character unique alphabetic string.
- Enable Account: Check this for all guest accounts generated from this profile to be enabled upon creation.
- Auto-Prune Account: Check this to have the account removed from the database after its lifetime expires.
- Enforce login uniqueness: Check this to allow only a single instance of an account to be used at any one time. By default, this feature is enabled when creating a new guest account. If you want to allow multiple users to login with a single account, disable this enforcement by clearing the Enforce login uniqueness checkbox.
- Activate Account Upon First Login: Checking this box delays the Account Expiration timer until a user logs into the account for the first time.
- Account Lifetime: This setting defines how long an account remains on the security appliance before the account expires. If Auto-Prune is enabled, the account is deleted when it expires. If the Auto-Prune checkbox is cleared, the account remains in the list of guest accounts with an Expired status, allowing easy reactivation
- Session Lifetime: Defines how long a guest login session remains active after it has been activated. By default, activation occurs the first time a guest user logs into an account. The Session Lifetime cannot exceed the value set in the Account Lifetime.
- Idle Timeout: Defines the maximum period of time when no traffic is passed on an activated guest services session. Exceeding the period defined by this setting expires the session, but the account itself remains active as long as the Account Lifetime hasn't expired. The Idle Timeout cannot exceed the value set in the Session Lifetime.
- Comment: Any text can be entered as a comment in the Comment field.

Adding Individual Guest Users
Guest accounts are temporary accounts set up for users to log into your network. You can create these accounts manually, as needed or generate them in batches. SonicOS includes profiles you can configure in advance to automate configuring guest accounts when you generate them. Guest accounts are typically limited to a pre-determined life-span. After their life span, by default, the accounts are removed.
Guest Services determine the limits and configuration of the guest accounts. The Users | Guest Services page displays a list of Guest Profiles. Guest profiles determine the configuration of guest accounts when they are generated. In the Device| Users | Guest Services page,
you can add, delete, and configure Guest Profiles. In addition, you can determine if all users who log in to the security appliance see a user login window that displays the amount of time remaining in their current login session.
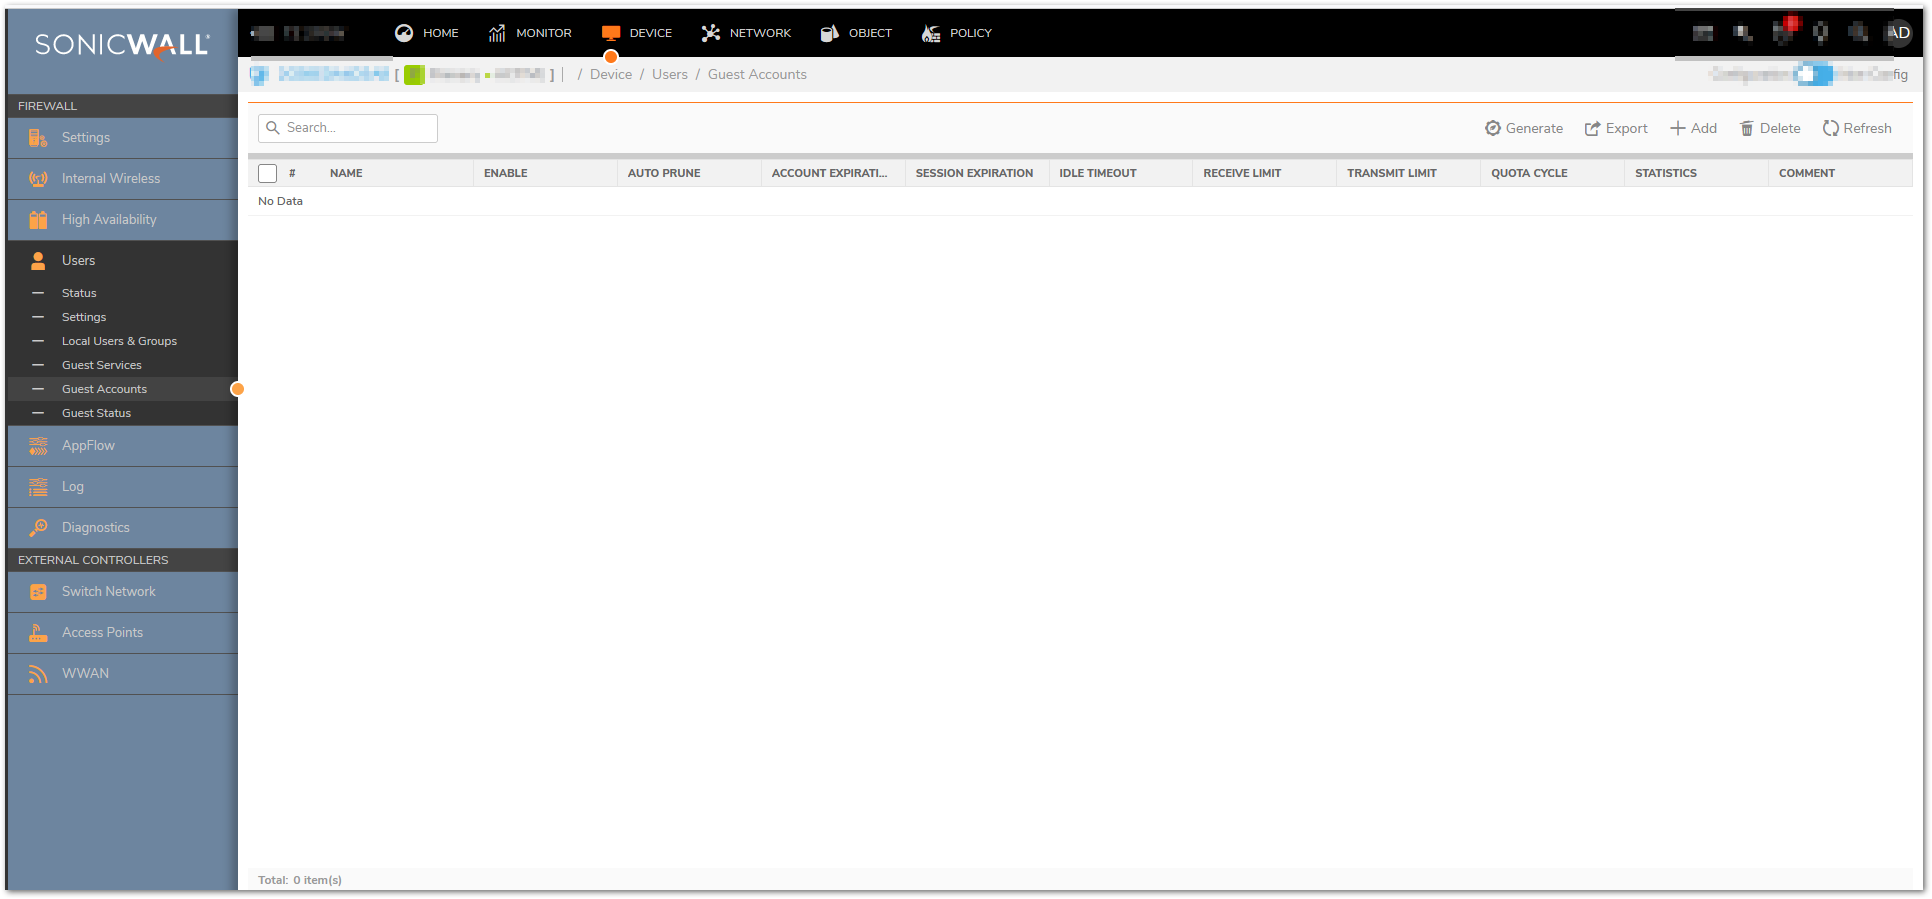
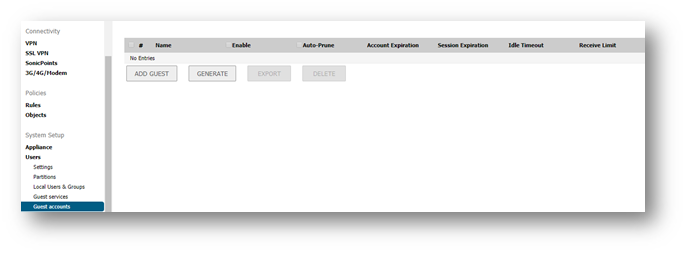
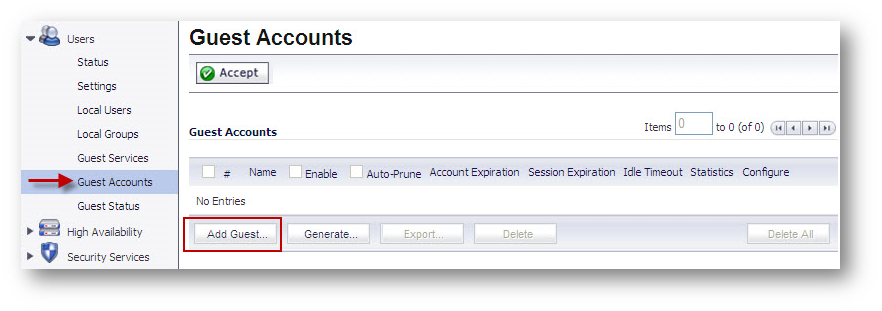
- Navigate to Device| Users | Guest Accounts page.
- Click Add Guest.
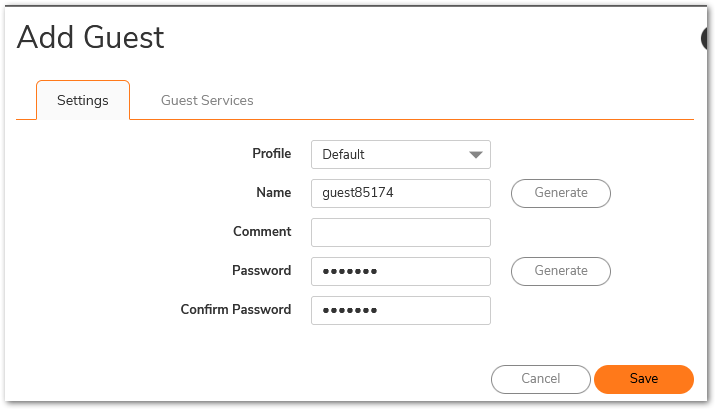
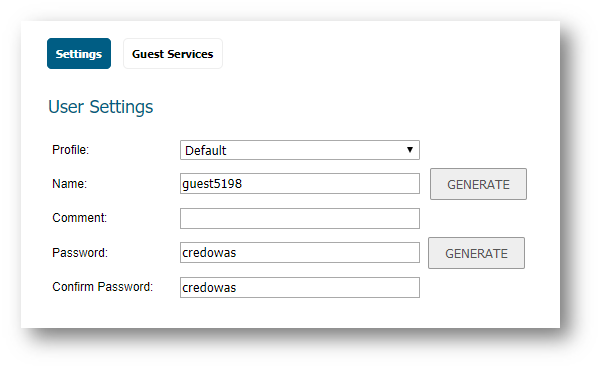
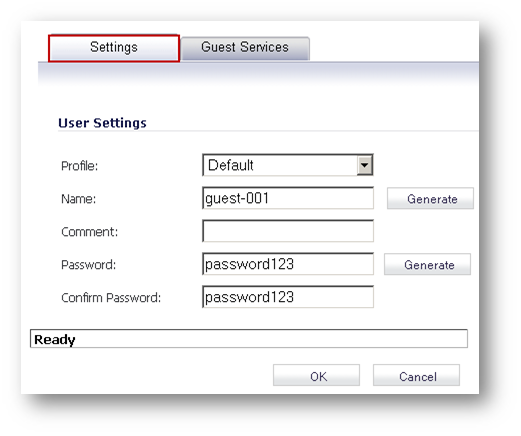
- Enter the following in the Settings tab of the Add Guest Account window.
- Profile: Select the Guest Profile to generate this account from.
- Name: Enter a name for the account or click Generate. The generated name is the prefix in the profile and a random two or three digit number.
- Comment: Enter a descriptive comment.
- Password: Enter the user account password or click Generate. The generated password is a random string of eight alphabetic characters.
- Confirm Password: If you did not generate the password, re-enter it.
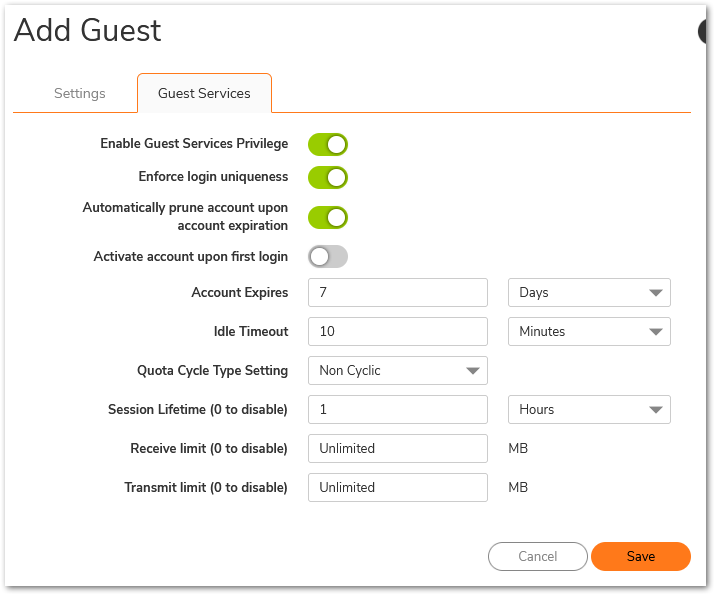
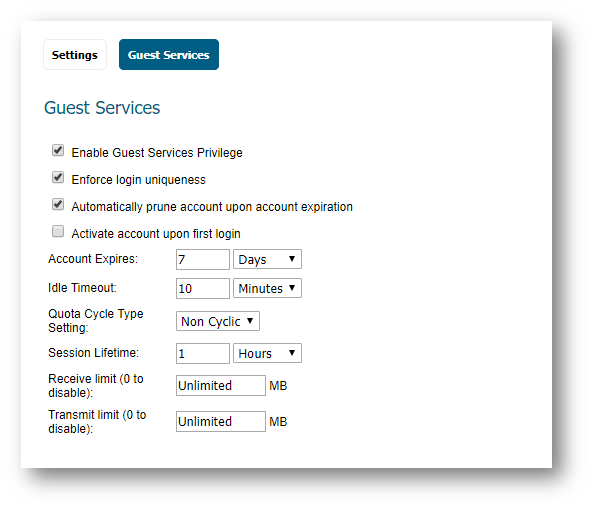
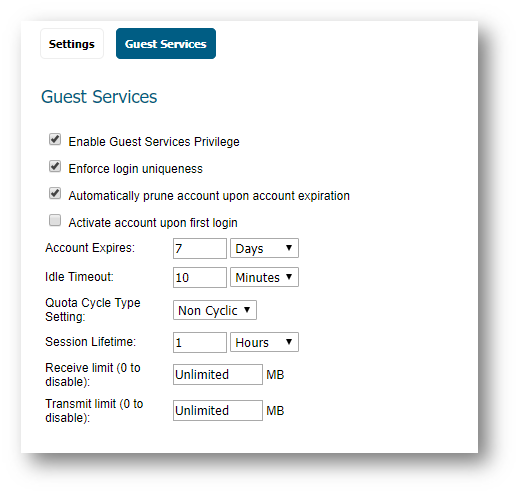
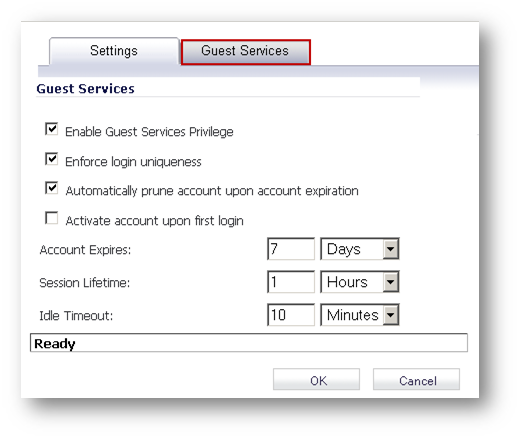
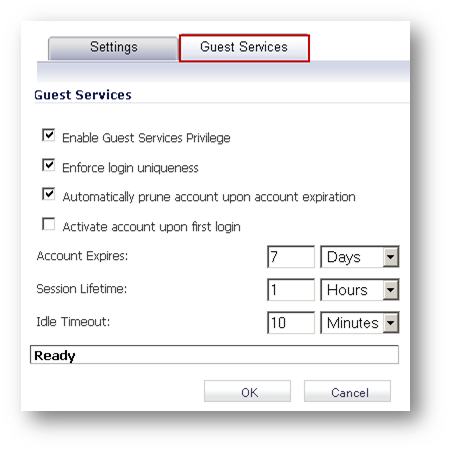
- Enter the following in the Guest Services tab of the Add Guest Account window.
- Enable Guest Services Privilege: Check this for the account to be enabled upon creation.
- Enforce login uniqueness: Check this to allow only one instance of this account to log into the security appliance at one time. Leave it unchecked to allow multiple users to use this account at once.
- Automatically prune account upon account expiration: Check this to have the account removed from the database after its lifetime expires.
- Activate account upon first login: Check this option to begin the timing for the account expiration.
- Account Expires: This setting defines how long an account remains on the security appliance before the account expires. If Automatically prune account upon account expiration is enabled, the account is deleted when it expires. If the Automatically prune account upon account expiration checkbox is cleared, the account remains in the list of guest accounts with an Expired status, allowing easy reactivation. This setting overrides the account lifetime setting in the profile.
- Session Lifetime: Defines how long a guest login session remains active after it has been activated. By default, activation occurs the first time a guest user logs into an account. The Session Lifetime cannot exceed the value set in the Account Lifetime. This setting overrides the session lifetime setting in the profile.
- Idle Timeout: Defines the maximum period of time when no traffic is passed on an activated guest services session. Exceeding the period defined by this setting expires the session, but the account itself remains active as long as the Account Lifetime hasn't expired. The Idle Timeout cannot exceed the value set in the Session Lifetime. This setting overrides the idle timeout setting in the profile.
- Click OK.
Generating Multiple Guest Accounts
- Click Generate button on the Device| Users | Guest Accounts page.
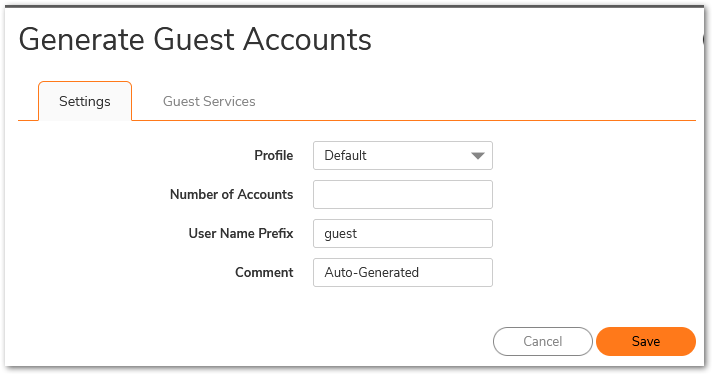
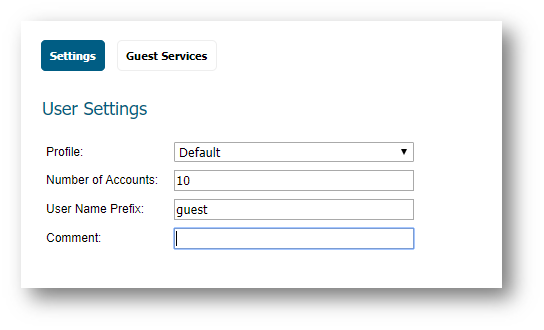
- Configure the following in the Settings tab of the Generate Guest Accounts window.
- Profile: Select the Guest Profile to generate the accounts from.
- Number of Accounts: Enter the number of accounts to generate.
- User Name Prefix: Enter the prefix from which account names are generated. For example, if you enter "Guest" the generated accounts will have names like Guest123 and Guest234.
- Comment: Enter a descriptive comment.
- Configure the following in the Guest Services tab of the Generate Guest Accounts window.
- Enable Guest Services Privilege: Check this for the accounts to be enabled upon creation.
- Enforce login uniqueness: Check this to allow only one instance of each generated account to log into the security appliance at one time. Leave it unchecked to allow multiple users to use this account at once.
- Automatically prune account upon account expiration: Check this to have the account removed from the database after its lifetime expires. This setting overrides the Auto-Prune setting in the guest profile, if they differ.
- Account Expires: This setting defines how long an account remains on the security appliance before the account expires. If Auto-Prune is enabled here, the account is deleted when it expires. If the Auto-Prune checkbox is cleared, the account remains in the list of guest accounts with an Expired status, allowing easy reactivation. This setting overrides the account expires setting in the profile.
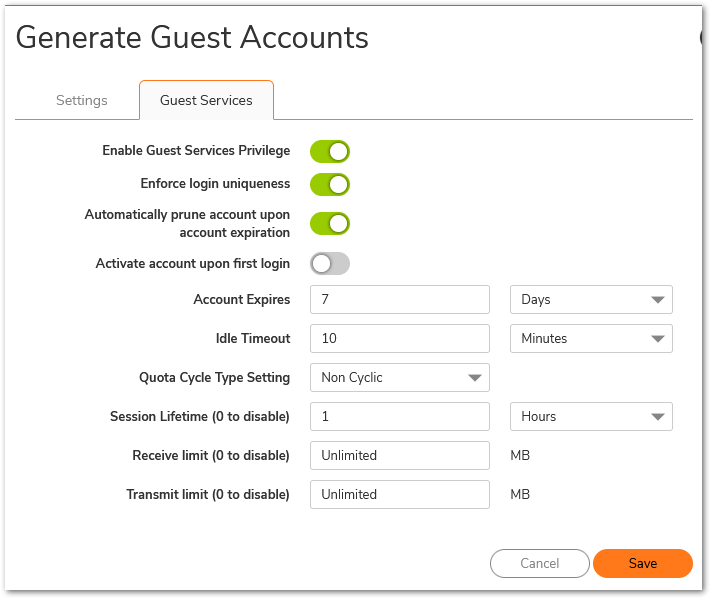
- Click OK, will generate the number of user accounts specified in the Settings tab.
Testing
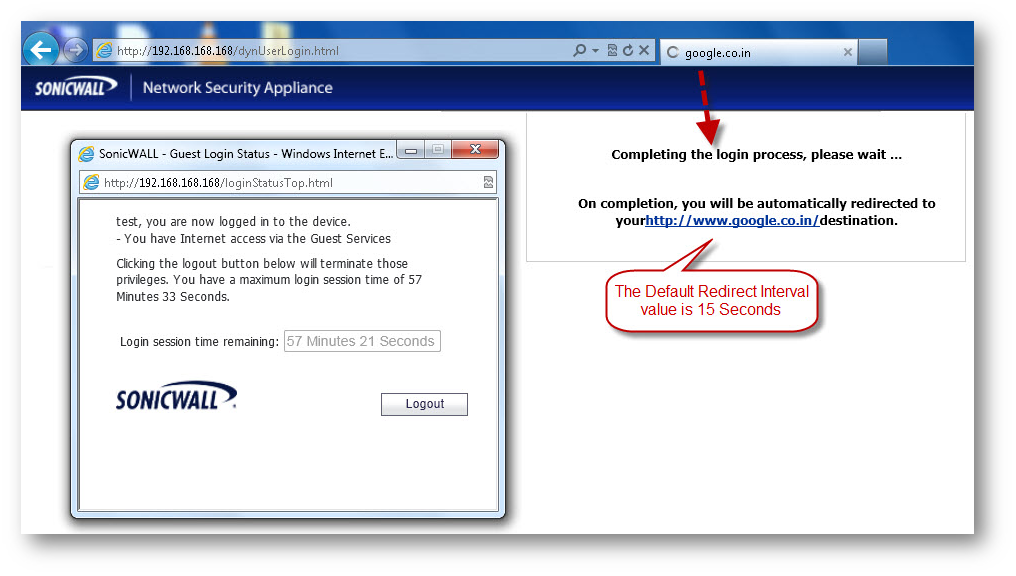
- When trying to go online from a host on the LAN zone, the host will be prompted for authentication. On successful login using the Guest User credentials, a Guest Login Status will be displayed with remaining login session time.


Resolution for SonicOS 6.5
This release includes significant user interface changes and many new features that are different from the SonicOS 6.2 and earlier firmware. The below resolution is for customers using SonicOS 6.5 firmware.
Enable Guest Services on the LAN zone
- Login to the SonicWall management GUI.
- Navigate to Manage | Network | Zones page.
- Click Configure button for the zone you wish to add Guest Services to. In this example the LAN zone.
- Click Guest Services tab.
- Enable the check box under Enable Guest Services. Click OK, will enable Guest Services on the LAN zone. CAUTION:Enabling Guest Services will immediately affect all users on that zone and allow access to Internet Only. it is recommended to test this feature by creating a New zone and assigning it to an unused interface before implementing on production network.
- The following additional options can be configured.
- Enable inter-guest communication - Allows guests to communicate directly with other users who are connected to this zone.
- Bypass AV Check for Guests - Allows guest traffic to bypass Anti-Virus protection.
- Enable External Guest Authentication - Requires guests connecting from the device or network you select to authenticate before gaining access.
- Custom Authentication Page - Redirects users to a custom authentication page when they first connect to the network. Click Configure to set up the custom authentication page. Enter either a URL to an authentication page or a custom challenge statement in the text field, and click OK.
- Post Authentication Page - Directs users to the page you specify immediately after successful authentication. Enter a URL for the post-authentication page in the field.
- Bypass Guest Authentication - Allows the Guest Services feature to integrate into environments already using some form of user-level authentication. This feature automates the authentication process, allowing wireless users to reach Guest Services resources without requiring authentication. This feature should only be used when unrestricted Guest Service access is desired, or when another device upstream is enforcing authentication.
- Redirect SMTP traffic to - Redirects SMTP traffic incoming on this zone to an SMTP server you specify. Select the address object to redirect traffic to.
- Deny Networks - Blocks traffic to the networks you name. Select the subnet, address group, or IP address to block traffic to.
- Pass Networks - Allows traffic through the Guest Service-enabled zone to the networks you select.
- Max Guests - Specifies the maximum number of guest users allowed to connect to this zone. The default setting is 10.
Guest Profiles
The Guest Profiles page enables you to view, add, edit and delete profiles. A default profile is auto-created which can be edited by clicking on the Configure button. Alternatively a new profile can be created by clicking on the Add button.
- Navigate to Users | Guest Services page.
- Check Show guest login status window with logout button to display a user login window on the users’s workstation whenever the user is logged in.

- The following options are available for configuring in the Add Guest Profile window.
- Profile Name: Enter the name of the profile.
- User Name Prefix: Enter the first part of every user account name generated from this profile.
- Auto-generate user name: Check this to allow guest accounts generated from this profile to have an automatically generated user name. The user name is usually the prefix plus a two- or three-digit number.
- Auto-generate password: Check this to allow guest accounts generated from this profile to have an automatically generated password. The generated password is an eight-character unique alphabetic string.
- Enable Account: Check this for all guest accounts generated from this profile to be enabled upon creation.
- Auto-Prune Account: Check this to have the account removed from the database after its lifetime expires.
- Enforce login uniqueness: Check this to allow only a single instance of an account to be used at any one time. By default, this feature is enabled when creating a new guest account. If you want to allow multiple users to login with a single account, disable this enforcement by clearing the Enforce login uniqueness checkbox.
- Activate Account Upon First Login: Checking this box delays the Account Expiration timer until a user logs into the account for the first time.
- Account Lifetime: This setting defines how long an account remains on the security appliance before the account expires. If Auto-Prune is enabled, the account is deleted when it expires. If the Auto-Prune checkbox is cleared, the account remains in the list of guest accounts with an Expired status, allowing easy reactivation
- Session Lifetime: Defines how long a guest login session remains active after it has been activated. By default, activation occurs the first time a guest user logs into an account. The Session Lifetime cannot exceed the value set in the Account Lifetime.
- Idle Timeout: Defines the maximum period of time when no traffic is passed on an activated guest services session. Exceeding the period defined by this setting expires the session, but the account itself remains active as long as the Account Lifetime hasn't expired. The Idle Timeout cannot exceed the value set in the Session Lifetime.
- Comment: Any text can be entered as a comment in the Comment field.
Adding Individual Guest Users
Guest accounts are temporary accounts set up for users to log into your network. You can create these accounts manually, as needed or generate them in batches. SonicOS includes profiles you can configure in advance to automate configuring guest accounts when you generate them. Guest accounts are typically limited to a pre-determined life-span. After their life span, by default, the accounts are removed.
Guest Services determine the limits and configuration of the guest accounts. The Users | Guest Services page displays a list of Guest Profiles. Guest profiles determine the configuration of guest accounts when they are generated. In the Users | Guest Services page,
you can add, delete, and configure Guest Profiles. In addition, you can determine if all users who log in to the security appliance see a user login window that displays the amount of time remaining in their current login session.
- Navigate to Users | Guest Accounts page.
- Click Add Guest.
- Enter the following in the Settings tab of the Add Guest Account window.
- Profile: Select the Guest Profile to generate this account from.
- Name: Enter a name for the account or click Generate. The generated name is the prefix in the profile and a random two or three digit number.
- Comment: Enter a descriptive comment.
- Password: Enter the user account password or click Generate. The generated password is a random string of eight alphabetic characters.
- Confirm Password: If you did not generate the password, re-enter it.
- Enter the following in the Guest Services tab of the Add Guest Account window.
- Enable Guest Services Privilege: Check this for the account to be enabled upon creation.
- Enforce login uniqueness: Check this to allow only one instance of this account to log into the security appliance at one time. Leave it unchecked to allow multiple users to use this account at once.
- Automatically prune account upon account expiration: Check this to have the account removed from the database after its lifetime expires.
- Activate account upon first login: Check this option to begin the timing for the account expiration.
- Account Expires: This setting defines how long an account remains on the security appliance before the account expires. If Automatically prune account upon account expiration is enabled, the account is deleted when it expires. If the Automatically prune account upon account expiration checkbox is cleared, the account remains in the list of guest accounts with an Expired status, allowing easy reactivation. This setting overrides the account lifetime setting in the profile.
- Session Lifetime: Defines how long a guest login session remains active after it has been activated. By default, activation occurs the first time a guest user logs into an account. The Session Lifetime cannot exceed the value set in the Account Lifetime. This setting overrides the session lifetime setting in the profile.
- Idle Timeout: Defines the maximum period of time when no traffic is passed on an activated guest services session. Exceeding the period defined by this setting expires the session, but the account itself remains active as long as the Account Lifetime hasn't expired. The Idle Timeout cannot exceed the value set in the Session Lifetime. This setting overrides the idle timeout setting in the profile.
- Click OK.
Generating Multiple Guest Accounts
- Click Generate button on the Users | Guest Accounts page.
- Configure the following in the Settings tab of the Generate Guest Accounts window.
- Profile: Select the Guest Profile to generate the accounts from.
- Number of Accounts: Enter the number of accounts to generate.
- User Name Prefix: Enter the prefix from which account names are generated. For example, if you enter "Guest" the generated accounts will have names like Guest123 and Guest234.
- Comment: Enter a descriptive comment.
- Configure the following in the Guest Services tab of the Generate Guest Accounts window.
- Enable Guest Services Privilege: Check this for the accounts to be enabled upon creation.
- Enforce login uniqueness: Check this to allow only one instance of each generated account to log into the security appliance at one time. Leave it unchecked to allow multiple users to use this account at once.
- Automatically prune account upon account expiration: Check this to have the account removed from the database after its lifetime expires. This setting overrides the Auto-Prune setting in the guest profile, if they differ.
- Account Expires: This setting defines how long an account remains on the security appliance before the account expires. If Auto-Prune is enabled here, the account is deleted when it expires. If the Auto-Prune checkbox is cleared, the account remains in the list of guest accounts with an Expired status, allowing easy reactivation. This setting overrides the account expires setting in the profile.
- Click OK, will generate the number of user accounts specified in the Settings tab.

Testing
- When trying to go online from a host on the LAN zone, the host will be prompted for authentication. On successful login using the Guest User credentials, a Guest Login Status will be displayed with remaining login session time.
Resolution for SonicOS 6.2 and Below
The below resolution is for customers using SonicOS 6.2 and earlier firmware. For firewalls that are generation 6 and newer we suggest to upgrade to the latest general release of SonicOS 6.5 firmware.
Enable Guest Services on the LAN zone
- Login to the SonicWall management GUI.
- Navigate to Network | Zone page.
- Click Configure button for the zone you wish to add Guest Services to.
 EXAMPLE: LAN zone.
 - Click Guest Services tab.
- Enable the check box under Enable Guest Services. Click OK, will enable Guest Services on the LAN zone. CAUTION: Enabling Guest Services will immediately affect all users on that zone and allow access to Internet Only. it is recommended to test this feature by creating a New zone and assigning it to an unused interface before implementing on production network.
- The following additional options can be configured.
- Enable inter-guest communication - Allows guests to communicate directly with other users who are connected to this zone.
- Bypass AV Check for Guests - Allows guest traffic to bypass Anti-Virus protection.
- Enable External Guest Authentication - Requires guests connecting from the device or network you select to authenticate before gaining access.
- Custom Authentication Page - Redirects users to a custom authentication page when they first connect to the network. Click Configure to set up the custom authentication page. Enter either a URL to an authentication page or a custom challenge statement in the text field, and click OK.
- Post Authentication Page - Directs users to the page you specify immediately after successful authentication. Enter a URL for the post-authentication page in the field.
- Bypass Guest Authentication - Allows the Guest Services feature to integrate into environments already using some form of user-level authentication. This feature automates the authentication process, allowing wireless users to reach Guest Services resources without requiring authentication. This feature should only be used when unrestricted Guest Service access is desired, or when another device upstream is enforcing authentication.
- Redirect SMTP traffic to - Redirects SMTP traffic incoming on this zone to an SMTP server you specify. Select the address object to redirect traffic to.
- Deny Networks - Blocks traffic to the networks you name. Select the subnet, address group, or IP address to block traffic to.
- Pass Networks - Allows traffic through the Guest Service-enabled zone to the networks you select.
- Max Guests - Specifies the maximum number of guest users allowed to connect to this zone. The default setting is 10.
Guest Profiles
The Guest Profiles page enables you to view, add, edit and delete profiles. A default profile is auto-created which can be edited by clicking on the Configure button. Alternatively a new profile can be created by clicking on the Add button.
- Navigate to the Users | Guest Services page.
- Check Show guest login status window with logout button to display a user login window on the users’s workstation whenever the user is logged in.
- The following options are available for configuring in the Add Guest Profile window.
- Profile Name: Enter the name of the profile.
- User Name Prefix: Enter the first part of every user account name generated from this profile.
- Auto-generate user name: Check this to allow guest accounts generated from this profile to have an automatically generated user name. The user name is usually the prefix plus a two- or three-digit number.
- Auto-generate password: Check this to allow guest accounts generated from this profile to have an automatically generated password. The generated password is an eight-character unique alphabetic string.
- Enable Account: Check this for all guest accounts generated from this profile to be enabled upon creation.
- Auto-Prune Account: Check this to have the account removed from the database after its lifetime expires.
- Enforce login uniqueness: Check this to allow only a single instance of an account to be used at any one time. By default, this feature is enabled when creating a new guest account. If you want to allow multiple users to login with a single account, disable this enforcement by clearing the Enforce login uniqueness checkbox.
- Activate Account Upon First Login: Checking this box delays the Account Expiration timer until a user logs into the account for the first time.
- Account Lifetime: This setting defines how long an account remains on the security appliance before the account expires. If Auto-Prune is enabled, the account is deleted when it expires. If the Auto-Prune checkbox is cleared, the account remains in the list of guest accounts with an Expired status, allowing easy reactivation
- Session Lifetime: Defines how long a guest login session remains active after it has been activated. By default, activation occurs the first time a guest user logs into an account. The Session Lifetime cannot exceed the value set in the Account Lifetime.
- Idle Timeout: Defines the maximum period of time when no traffic is passed on an activated guest services session. Exceeding the period defined by this setting expires the session, but the account itself remains active as long as the Account Lifetime hasn't expired. The Idle Timeout cannot exceed the value set in the Session Lifetime.
- Comment: Any text can be entered as a comment in the Comment field.
Adding Individual Guest Users
Guest accounts are temporary accounts set up for users to log into your network. You can create these accounts manually, as needed or generate them in batches. SonicOS includes profiles you can configure in advance to automate configuring guest accounts when you generate them. Guest accounts are typically limited to a pre-determined life-span. After their life span, by default, the accounts are removed.
Guest Services determine the limits and configuration of the guest accounts. The Users | Guest Services page displays a list of Guest Profiles. Guest profiles determine the configuration of guest accounts when they are generated. In the Users | Guest Services page,
you can add, delete, and configure Guest Profiles. In addition, you can determine if all users who log in to the security appliance see a user login window that displays the amount of time remaining in their current login session.
- Navigate to the Users | Guest Accounts page.
- Click Add Guest.
- Enter the following in the Settings tab of the Add Guest Account window.
- Profile: Select the Guest Profile to generate this account from.
- Name: Enter a name for the account or click Generate. The generated name is the prefix in the profile and a random two or three digit number.
- Comment: Enter a descriptive comment.
- Password: Enter the user account password or click Generate. The generated password is a random string of eight alphabetic characters.
- Confirm Password: If you did not generate the password, re-enter it.
- Enter the following in the Guest Services tab of the Add Guest Account window.
- Enable Guest Services Privilege: Check this for the account to be enabled upon creation.
- Enforce login uniqueness: Check this to allow only one instance of this account to log into the security appliance at one time. Leave it unchecked to allow multiple users to use this account at once.
- Automatically prune account upon account expiration: Check this to have the account removed from the database after its lifetime expires.
- Activate account upon first login: Check this option to begin the timing for the account expiration.
- Account Expires: This setting defines how long an account remains on the security appliance before the account expires. If Automatically prune account upon account expiration is enabled, the account is deleted when it expires. If the Automatically prune account upon account expiration checkbox is cleared, the account remains in the list of guest accounts with an Expired status, allowing easy reactivation. This setting overrides the account lifetime setting in the profile.
- Session Lifetime: Defines how long a guest login session remains active after it has been activated. By default, activation occurs the first time a guest user logs into an account. The Session Lifetime cannot exceed the value set in the Account Lifetime. This setting overrides the session lifetime setting in the profile.
- Idle Timeout: Defines the maximum period of time when no traffic is passed on an activated guest services session. Exceeding the period defined by this setting expires the session, but the account itself remains active as long as the Account Lifetime hasn't expired. The Idle Timeout cannot exceed the value set in the Session Lifetime. This setting overrides the idle timeout setting in the profile.
- Click OK.
Generating Multiple Guest Accounts
- Click Generate button on the Users | Guest Accounts page.
- Configure the following in the Settings tab of the Generate Guest Accounts window.
- Profile: Select the Guest Profile to generate the accounts from.
- Number of Accounts: Enter the number of accounts to generate.
- User Name Prefix: Enter the prefix from which account names are generated. For example, if you enter "Guest" the generated accounts will have names like Guest123 and Guest234.
- Comment: Enter a descriptive comment.

- Configure the following in the Guest Services tab of the Generate Guest Accounts window.
- Enable Guest Services Privilege: Check this for the accounts to be enabled upon creation.
- Enforce login uniqueness: Check this to allow only one instance of each generated account to log into the security appliance at one time. Leave it unchecked to allow multiple users to use this account at once.
- Automatically prune account upon account expiration: Check this to have the account removed from the database after its lifetime expires. This setting overrides the Auto-Prune setting in the guest profile, if they differ.
- Account Expires: This setting defines how long an account remains on the security appliance before the account expires. If Auto-Prune is enabled here, the account is deleted when it expires. If the Auto-Prune checkbox is cleared, the account remains in the list of guest accounts with an Expired status, allowing easy reactivation. This setting overrides the account expires setting in the profile.
- Click OK, will generate the number of user accounts specified in the Settings tab.
Testing
- When trying to go online from a host on the LAN zone, the host will be prompted for authentication. On successful login using the Guest User credentials, a Guest Login Status will be displayed with remaining login session time.
Related Articles
- Error:"Invalid API Argument" when modifying the access rules
- Cysurance Partner FAQ
- Configure probe monitoring for WAN Failover and Loadbalancing - SonicWall UTM
Categories
- Firewalls > NSa Series > Networking
- Firewalls > NSv Series > Networking
- Firewalls > TZ Series > Networking
 YES
YES NO
NO