-
Products
-
SonicPlatform
SonicPlatform is the cybersecurity platform purpose-built for MSPs, making managing complex security environments among multiple tenants easy and streamlined.
Discover More
-
-
Solutions
-
Federal
Protect Federal Agencies and Networks with scalable, purpose-built cybersecurity solutions
Learn MoreFederalProtect Federal Agencies and Networks with scalable, purpose-built cybersecurity solutions
Learn More - Industries
- Use Cases
-
-
Partners
-
Partner Portal
Access to deal registration, MDF, sales and marketing tools, training and more
Learn MorePartner PortalAccess to deal registration, MDF, sales and marketing tools, training and more
Learn More - SonicWall Partners
- Partner Resources
-
-
Support
-
Support Portal
Find answers to your questions by searching across our knowledge base, community, technical documentation and video tutorials
Learn MoreSupport PortalFind answers to your questions by searching across our knowledge base, community, technical documentation and video tutorials
Learn More - Support
- Resources
- Capture Labs
-
- Company
- Contact Us
Configuring Built-in Wireless with Corporate SSID bridged to LAN (Access to Internet & LAN resource


Description
Configuring Built-in Wireless with Corporate SSID bridged to LAN (Access to Internet & LAN resources with same IP subnet as X0) and Guest SSID (Access only to Internet & no access to internal network).
You can use a VAP for creating different set of groups for users who are commonly in the office, on campus, etc.. Also it decides to whom should be given full access to all network resources, providing that the connection is authenticated and secure. You can also create group like guest for only Internet access and no access to the local resource to make network secure. Using Bridge mode we can make a wireless to have same subnet as like the LAN interface for better communication between resource sharing networks.
- Configuring W0 (WLAN) interface in same subnet of LAN
- Creating a new Guest zone
- Creating a new VLAN for Guest zone
- Adding a DHCP Scope for the VAP Sub-Interface
- Creating SSIDs for Corporate & Guest Users under Virtual Access Point
- Adding SSIDs to Virtual Access Point Group
- Adding VAP Group to Internal Wireless Radio
Resolution
Resolution for SonicOS 7.X
This release includes significant user interface changes and many new features that are different from the SonicOS 6.5 and earlier firmware. The below resolution is for customers using SonicOS 7.X firmware.
Configuring W0 (WLAN) interface in same subnet of LAN
 NOTE: If you wish to bridge W0 interface to X0 interface (to be in same IP subnet), then you need to remove PortShield of X0 interface from other interface.Portshielded Interface cannot be Bridged to any interface (or) Bridged interface cannot be Portshielded to any interface.
A Wireless LAN (WLAN) subnet allows you to split a single wireless radio interface (W0) into many virtual network connections, each carrying its own set of configurations. The WLAN subnet solution allows each VAP to have its own virtual separate subinterface, even though there is only a single 802.11 radio.
- Please login to your SonicWall management page.
- Navigate to Network | System | Interfaces; on the right side configure your W0 interface.
- Mode / IP Assignment as Layer 2 Bridge Mode (IP Route Option).
- Bridged to X0.
- Enable Management & User Login if you want to manage it from W0 interface.
- Click OK.
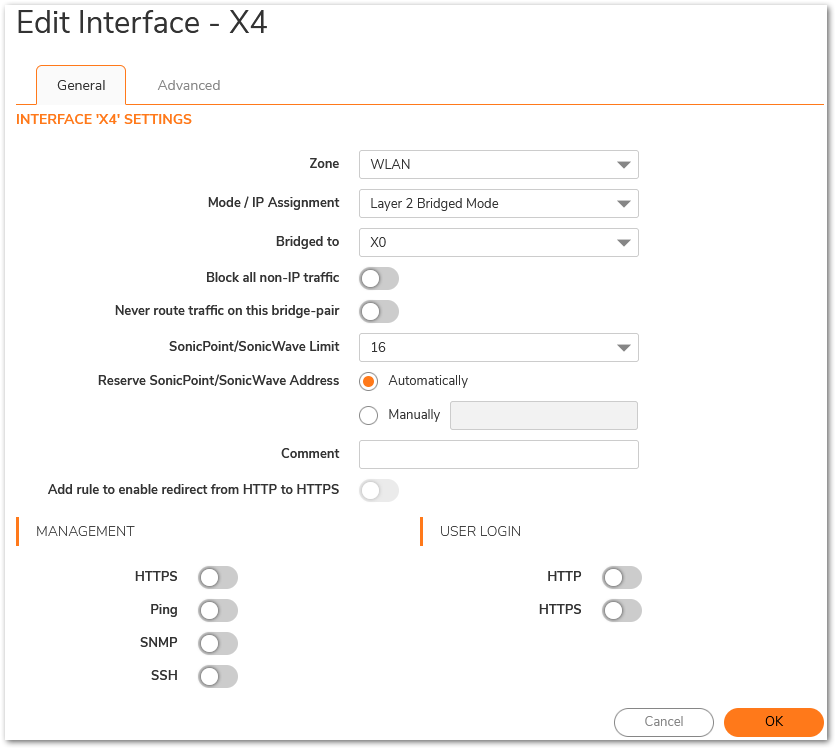
Creating a new Guest zone
- Please login to your SonicWall management.
- Navigate to Object|Match Onjects |Zones, on the right side Click Add.
- Add new Guest zone as below.
- Name: Guest (Any Friendly name).
- Security Type: Wireless.
- Disable Interface trust (Since guest needs to access only Internet) and click OK.
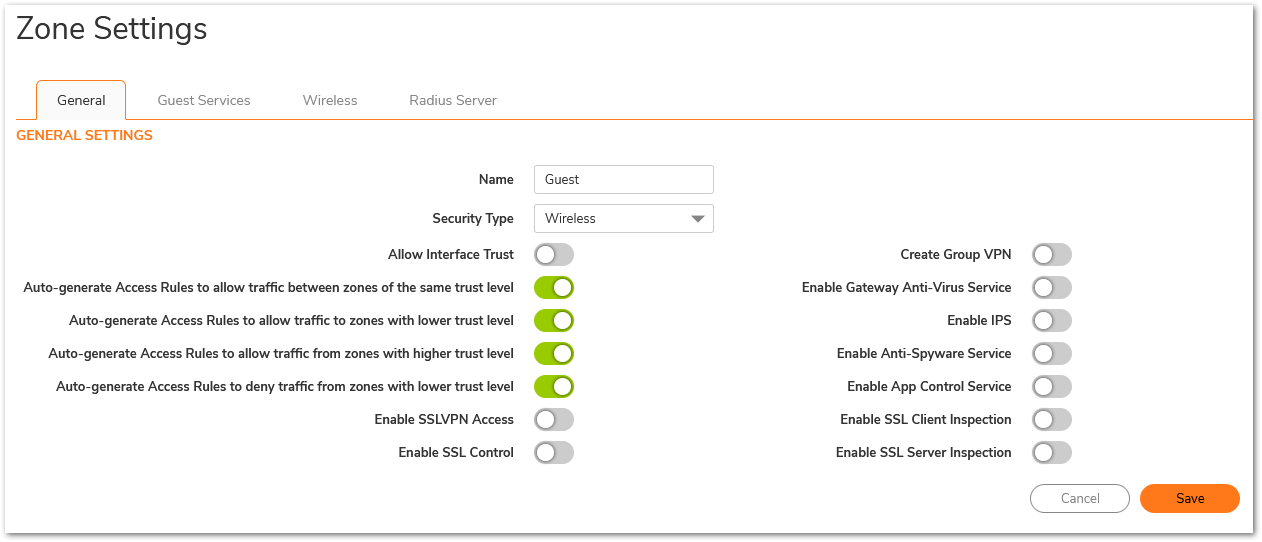
Creating a new VLAN for Guest zone
- Please login to your SonicWall management page and follow below steps.
- Navigate to Network | Interfaces.
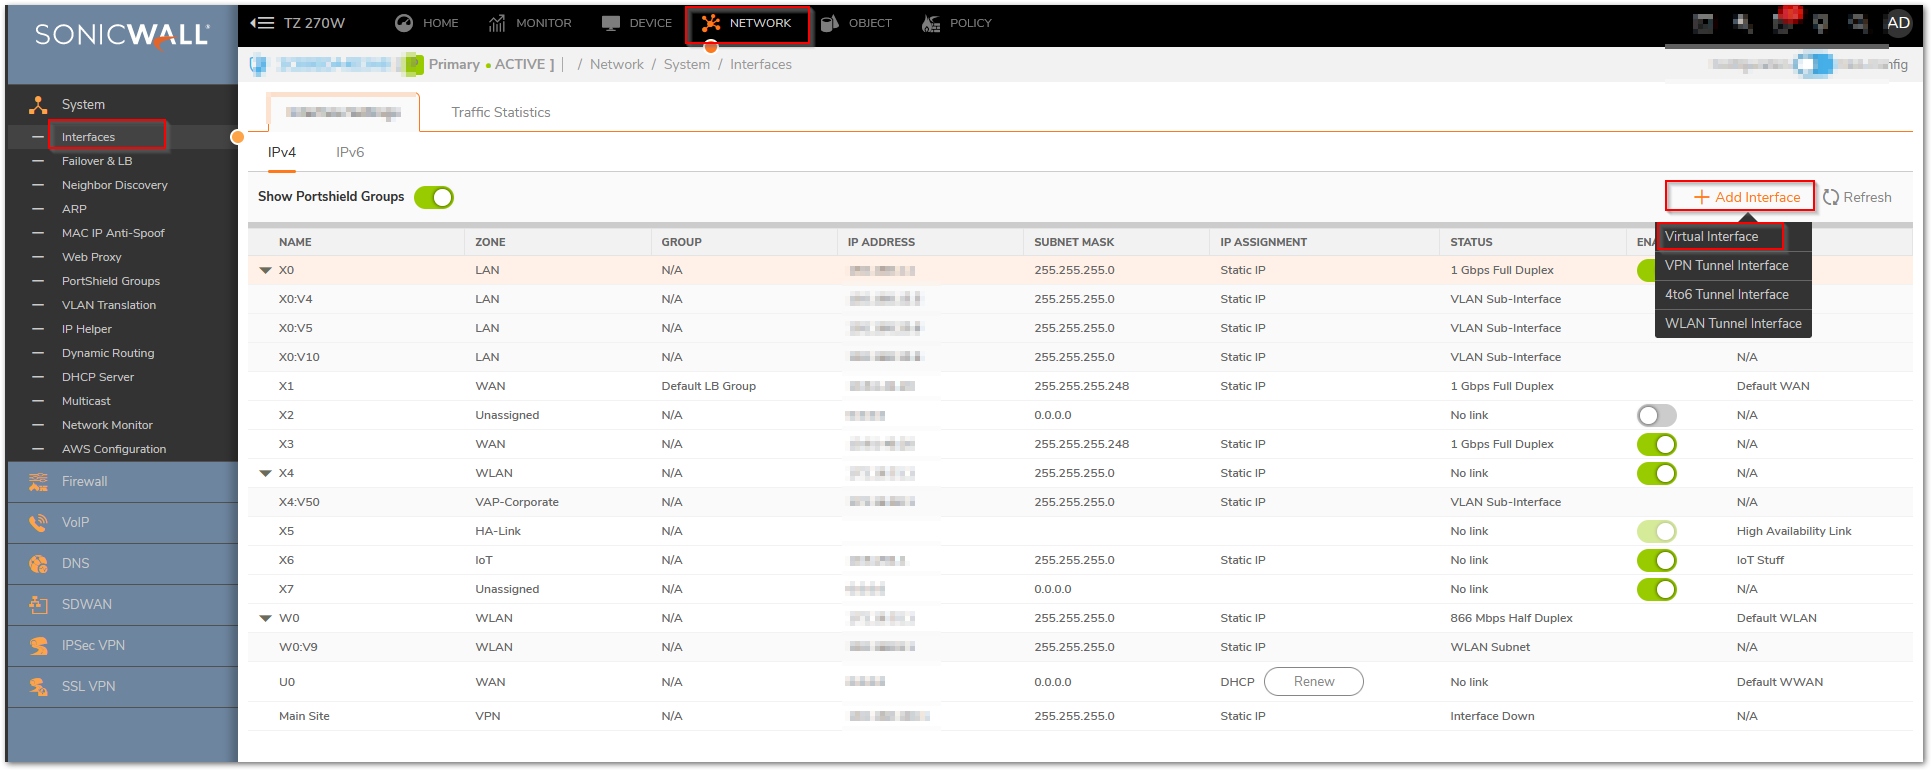
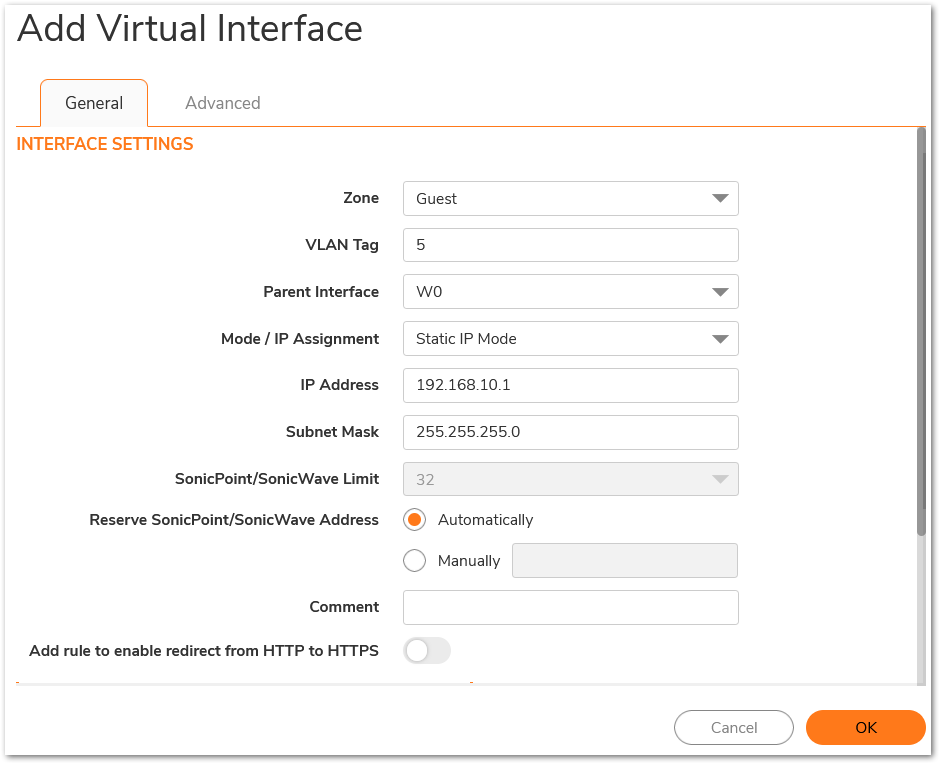
Add new Guest VLAN as follow
- Zone: Guest (Custom zone which you created for guest)
- VLAN Tag: 5 (enter a number of your choice).
- Parent Interface: W0 (Interface under which you want this Virtual/VLAN Interface to be created).
- Mode/IP Assignment: Static IP.
- IP Address as 192.168.10.1 (Any New IP Subnet for guest network).
- Enable or Disable Management & User login of new zone based on your requirement.
Adding a DHCP scope for Guest Sub-interface
The DHCP server assigns leased IP addresses to users within specified ranges, known as Scopes. Take care in making these settings manually, as a scope of 200 addresses for multiple interfaces that will only use 30 can lead to connection issues due to lease exhaustion. The DHCP scope should be resized as each interface/sub-interface is defined to ensure that adequate DHCP space remains for all subsequently defined interfaces. Failure to do so may cause the auto-creation of subsequent DHCP scopes to fail, requiring manual creation after performing the requisite scope resizing.
- Please login to your SonicWall Management page and follow below steps.
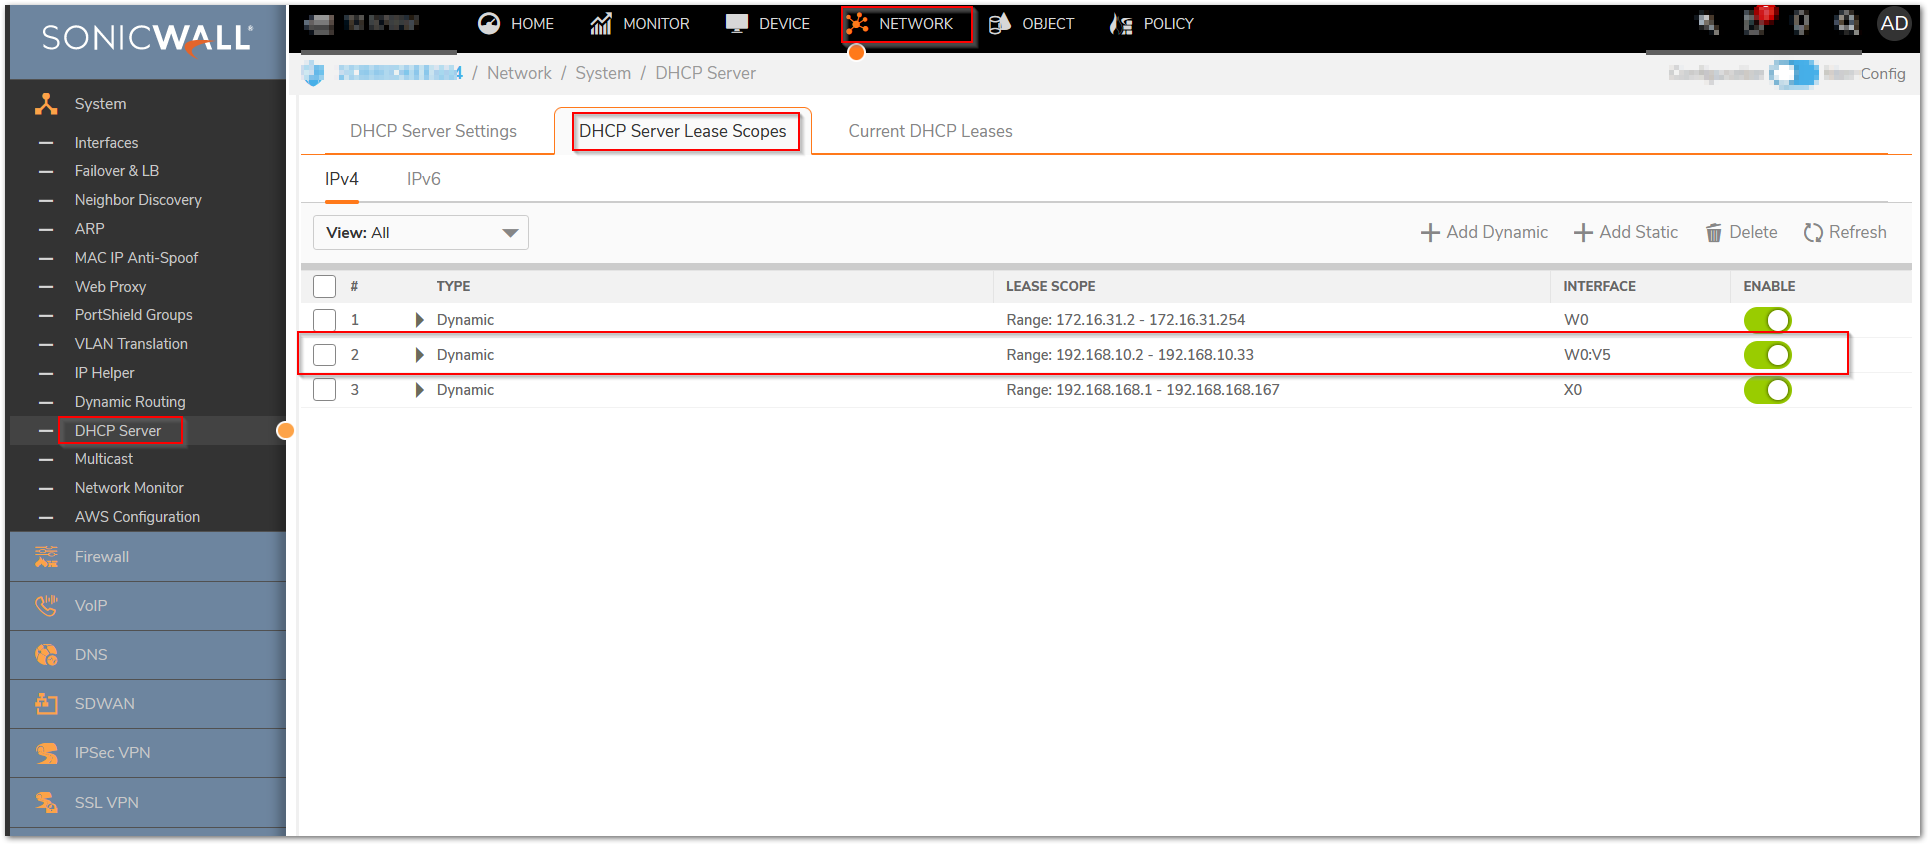
- Navigate to Network | System | DHCP Server page.
- Ensure Enable DHCP Server option is Checked and navigate to DHCP server lease scopes.
- SonicWall appliance will automatically add a DHCP scope when an Interface/Sub-Interface is created.
Creating SSIDs for Corporate & Guest users under Virtual Access Points
The VAP Settings feature allows for setup of general VAP settings, SSID for broadcast, Authentication type, Pass Phrase and wireless subnet name are configured through VAP Settings.
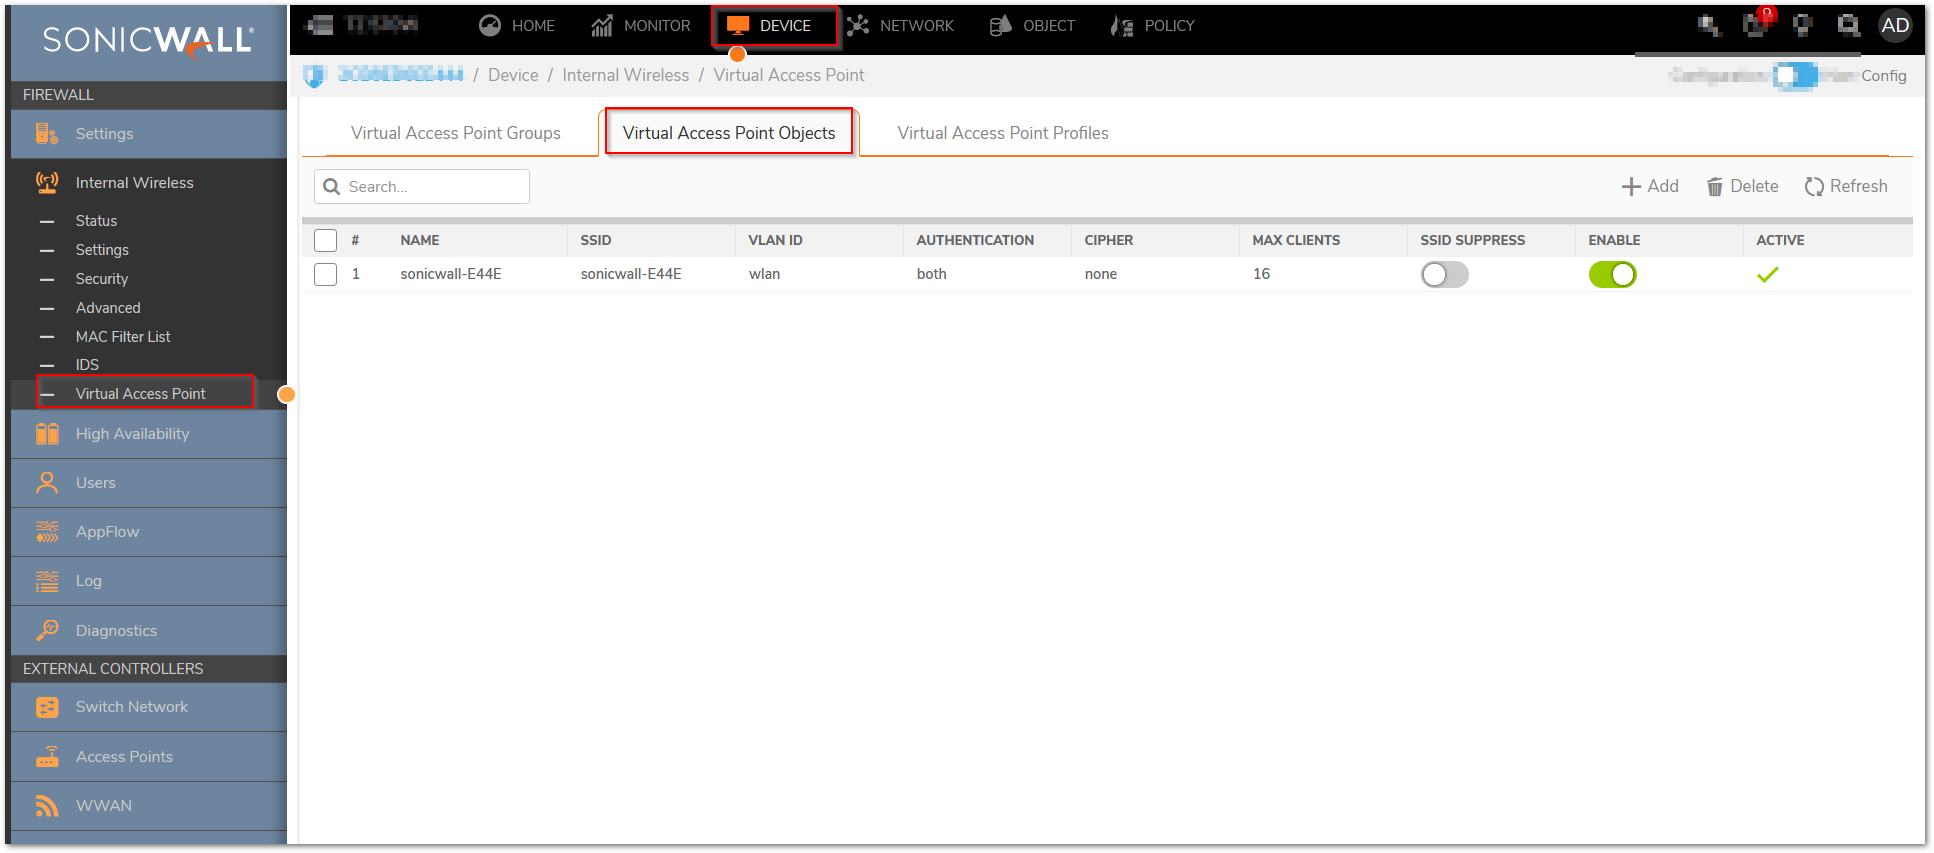
- Please login to your SonicWall management page and navigate to Device | Internal Wireless | Virtual Access Point page to Virtual Access Points Objects.
Corporate VAP
- Please login to your SonicWall management page.
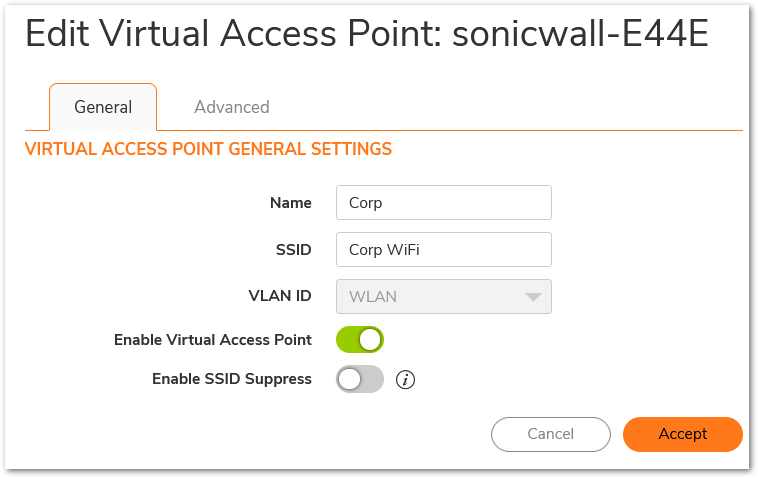
- Navigate to Device | Internal Wireless | Virtual Access Point page, On the Virtual Access Points Objects you will find the Default Virtual Access Points. Configure it to change the corporate SSID name, Authentication type, cipher type & Pass phrase.
- Click Configure.
- Name: Corp (Any Friendly name).
- SSID: Corp WiFi (Type the SSID name which you would like to broadcast for corporate wifi connection).
- VLAN ID: WLAN (By Default).
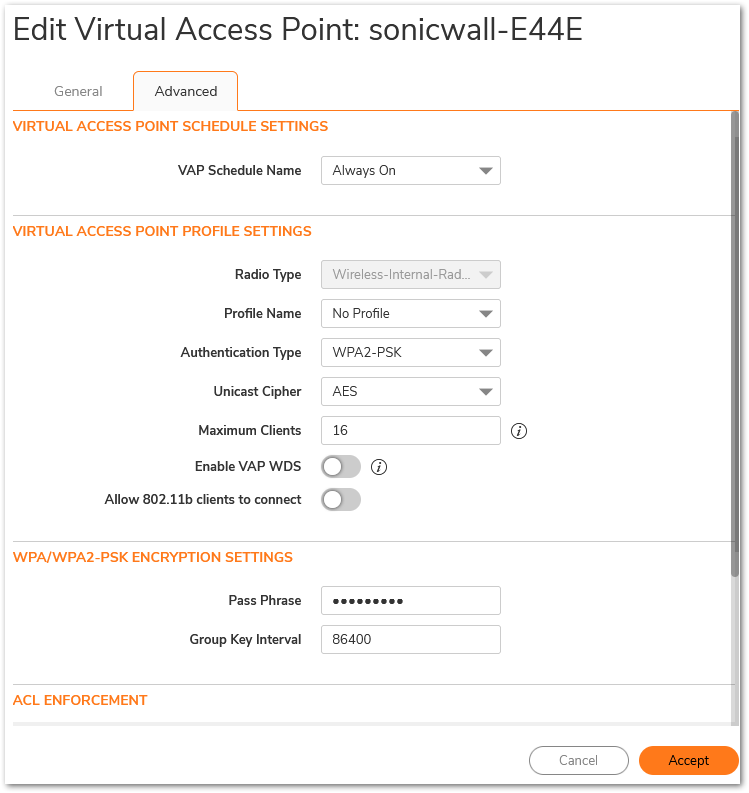
- Click Advanced Tab, to change the Authentication type, Cipher type & Pass Phrase for your corporate network.
Guest VAP
- Please login to your SonicWall management page.
- Navigate to Device | Internal Wireless | Virtual Access Point page.
- Under Virtual Access Points section, Click Add button to add new SSID for guest.
- Name: guest (Any Friendly name).
- SSID: Guest WiFi (Type the SSID name which you would like to broadcast for guest wifi connection).
- VLAN ID: W0:V5.
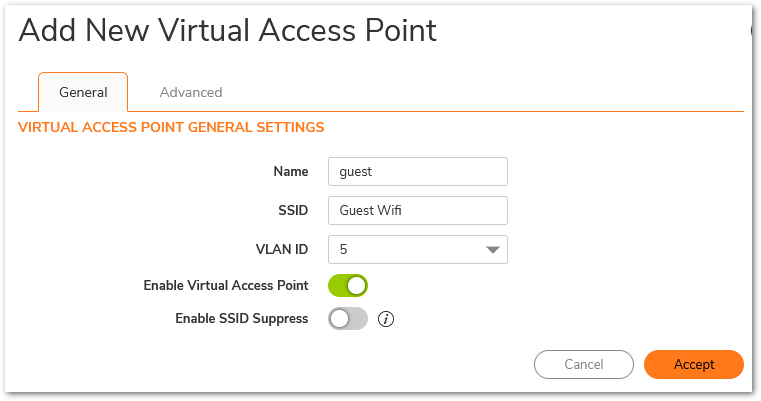
- Click Advanced Tab, to change the Authentication type, Cipher type & Pass Phrase for your corporate network.

Adding SSIDs to Virtual Access Points Group
- The Virtual Access Point Groups feature allows for grouping of multiple VAP objects to be simultaneously applied to your internal wireless radio. Virtual Access Point Groups are configured from the Internal Wireless | Virtual Access Point page.
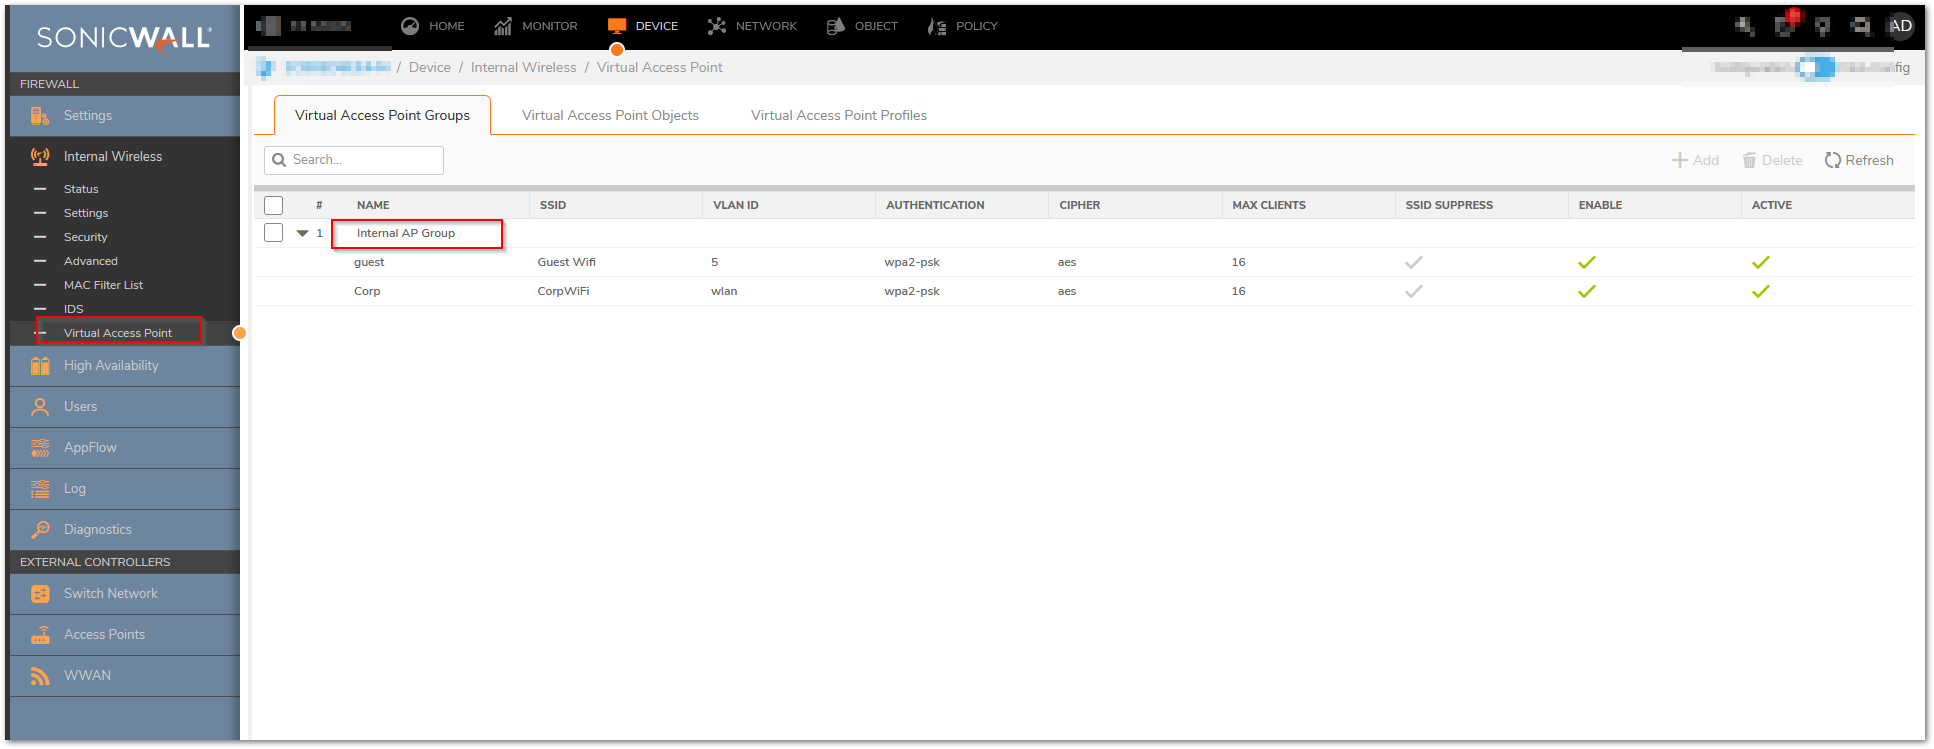
- Click Configure button under Virtual Access Point Group to get below screen where you can add both SSID as members of Virtual AP Group box.
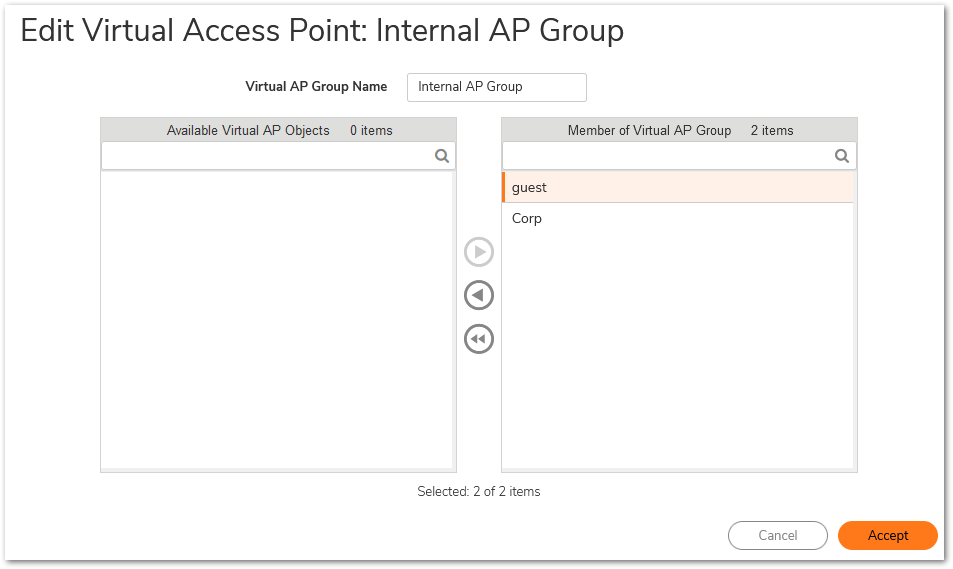
- Then both the SSIDs will be added to the Internal AP Group under Virtual Access Point Groups.
Adding VAP Group to Internal Wireless
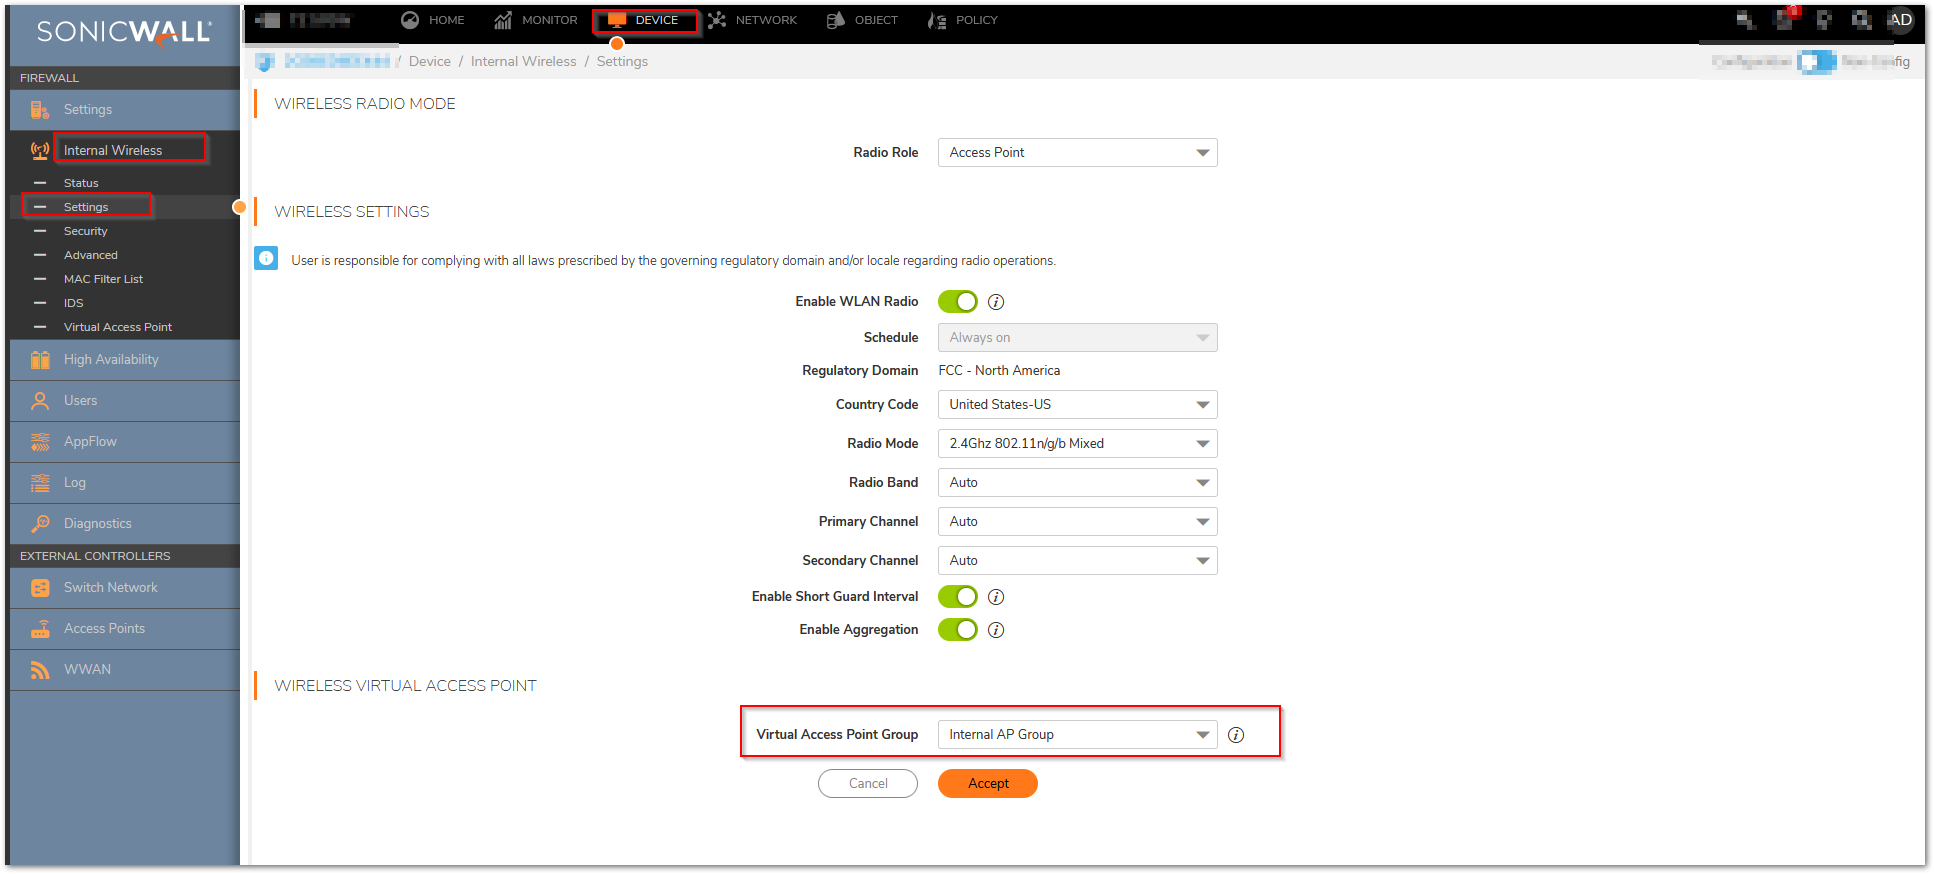
- After your VAPs are configured and added to a VAP group, that group must be specified in the Internal Wireless | Settings page in order for the VAPs to be available through your internal wireless radio. The default group is called Internal AP Group scroll to the bottom of the page).
How to Test
Corporate VAP:
From you wireless client computer, scan and connect to the SSID (Corp WiFi) and enter the Preshared Key (e.g. if WPA is chosen). Once connected your wireless adapter will acquire an the IP address from the appropriate interface which is in the same subnet of LAN (X0 interface).
- Access (or) Ping any web page to check the connectivity to Internet.
- Access (or) Ping any LAN computer to check the connectivity to Internal LAN network.
Guest VAP
From you wireless client computer, scan and connect to the SSID (Guest WiFi) and enter the Preshared Key (e.g. if WPA is chosen). Once connected your wireless adapter will acquire an the IP address from the appropriate interface.
- Access (or) Ping any web page to check the connectivity to Internet.
- Access (or) Ping any LAN computer to check access deny to internal Internal LAN network.
Resolution for SonicOS 6.5
This release includes significant user interface changes and many new features that are different from the SonicOS 6.2 and earlier firmware. The below resolution is for customers using SonicOS 6.5 firmware.
Resolution for SonicOS 6.2 and Below
The below resolution is for customers using SonicOS 6.2 and earlier firmware. For firewalls that are generation 6 and newer we suggest to upgrade to the latest general release of SonicOS 6.5 firmware.
Configuring W0 (WLAN) interface in same subnet of LAN
 NOTE: If you wish to bridge W0 interface to X0 interface (to be in same IP subnet), then you need to remove PortShield of X0 interface from other interface.Portshielded Interface cannot be Bridged to any interface (or) Bridged interface cannot be Portshielded to any interface.
A Wireless LAN (WLAN) subnet allows you to split a single wireless radio interface (W0) into many virtual network connections, each carrying its own set of configurations. The WLAN subnet solution allows each VAP to have its own virtual separate subinterface, even though there is only a single 802.11 radio.
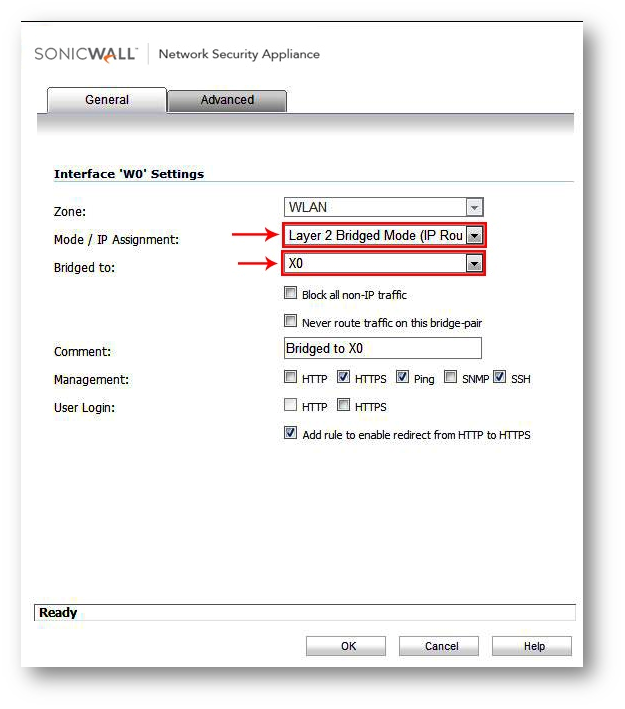
- Please login to your SonicWall management page.
- Navigate to Network | Interfaces; on the right side configure your W0 interface.
- Mode / IP Assignment as Layer 2 Bridge Mode (IP Route Option).
- Bridged to X0.
- Enable Management & User Login if you want to manage it from W0 interface.
- Click OK.
Creating a new Guest zone
- Please login to your SonicWall management.
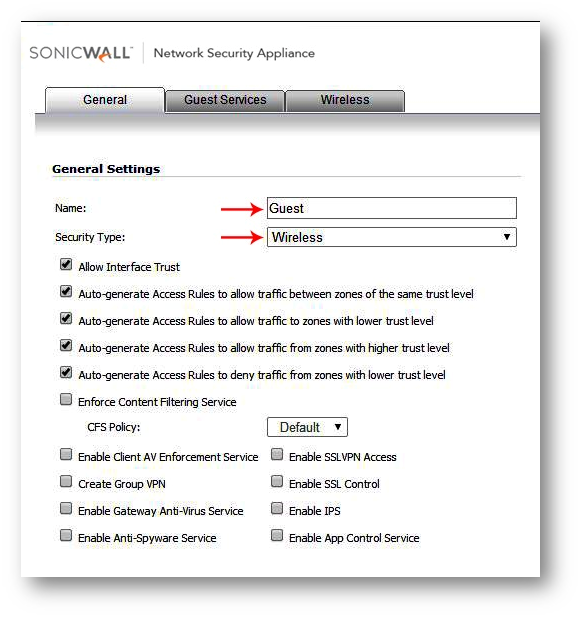
- Navigate to Network |Zones, on the right side Click Add.
- Add new Guest zone as below.
- Name: Guest (Any Friendly name).
- Security Type: Wireless.
- Disable (Uncheck) Interface trust (Since guest needs to access only Internet) and click OK.
Creating a new VLAN for Guest zone
- Please login to your SonicWall management page and follow below steps.
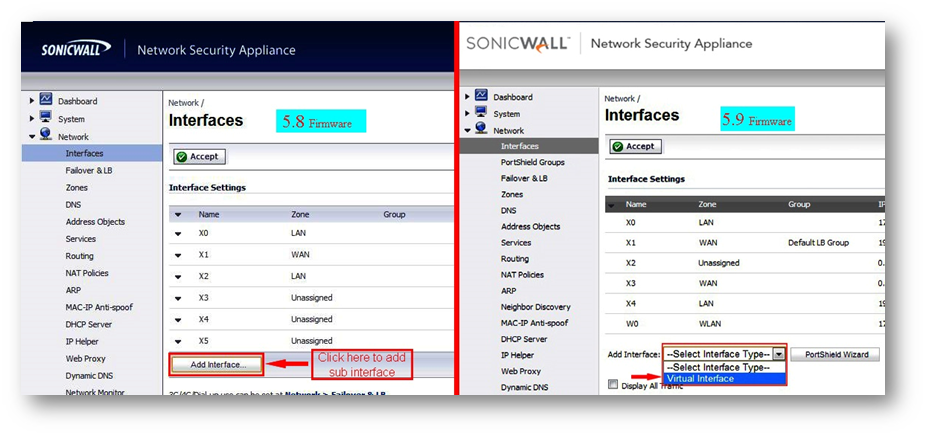
- Navigate to Network | Interfaces.
- In 5.8 firmware: Click Add Interface Button to add VLAN.
- In 5.9 firmware: Select Virtual Interface from Drop down box of Add interface to add VLAN.
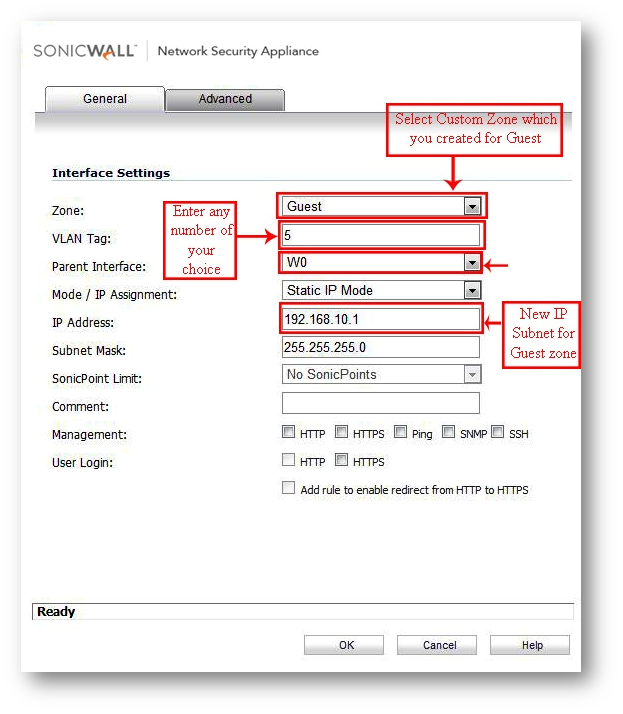
Add new Guest VLAN as follow
- Zone: Guest (Custom zone which you created for guest)
- VLAN Tag: 5 (enter a number of your choice).
- Parent Interface: W0 (Interface under which you want this Virtual/VLAN Interface to be created).
- Mode/IP Assignment: Static IP.
- IP Address as 192.168.10.1 (Any New IP Subnet for guest network).
- Enable or Disable Management & User login of new zone based on your requirement.
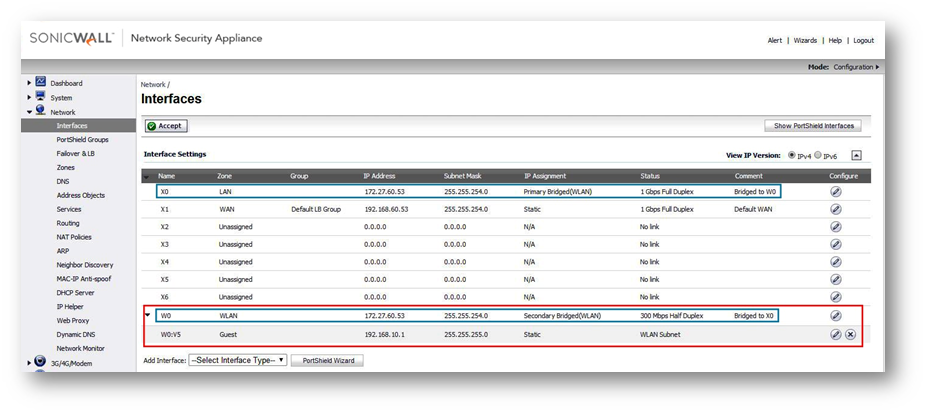
- Under Network | Interfaces, you can see the W0 bridged with X0 with same IP address and Guest interface as W0:V5 (Zone as Guest) with new IP subnet.
Adding a DHCP scope for Guest Sub-interface
The DHCP server assigns leased IP addresses to users within specified ranges, known as Scopes. Take care in making these settings manually, as a scope of 200 addresses for multiple interfaces that will only use 30 can lead to connection issues due to lease exhaustion. The DHCP scope should be resized as each interface/sub-interface is defined to ensure that adequate DHCP space remains for all subsequently defined interfaces. Failure to do so may cause the auto-creation of subsequent DHCP scopes to fail, requiring manual creation after performing the requisite scope resizing.
- Please login to your SonicWall Management page and follow below steps.
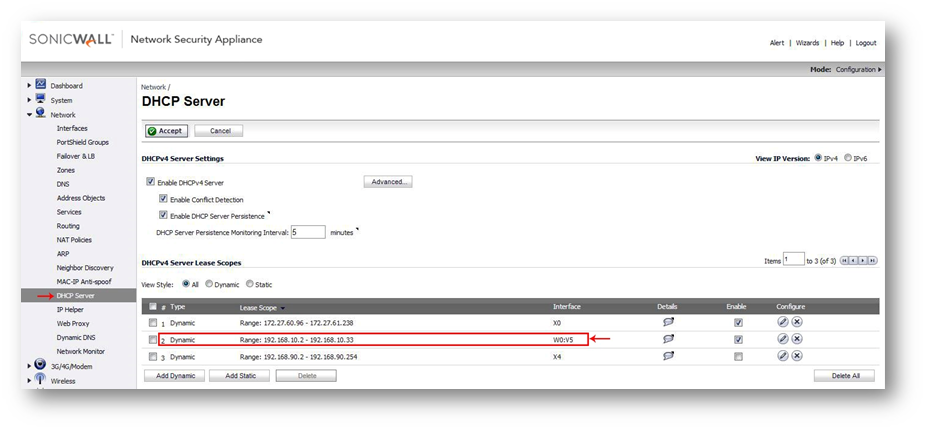
- Navigate to Network | DHCP Server page.
- Ensure Enable DHCP Server option is Checked.
- SonicWall appliance will automatically add a DHCP scope when an Interface/Sub-Interface is created.
Creating SSIDs for Corporate & Guest users under Virtual Access Points
The VAP Settings feature allows for setup of general VAP settings, SSID for broadcast, Authentication type, Pass Phrase and wireless subnet name are configured through VAP Settings.
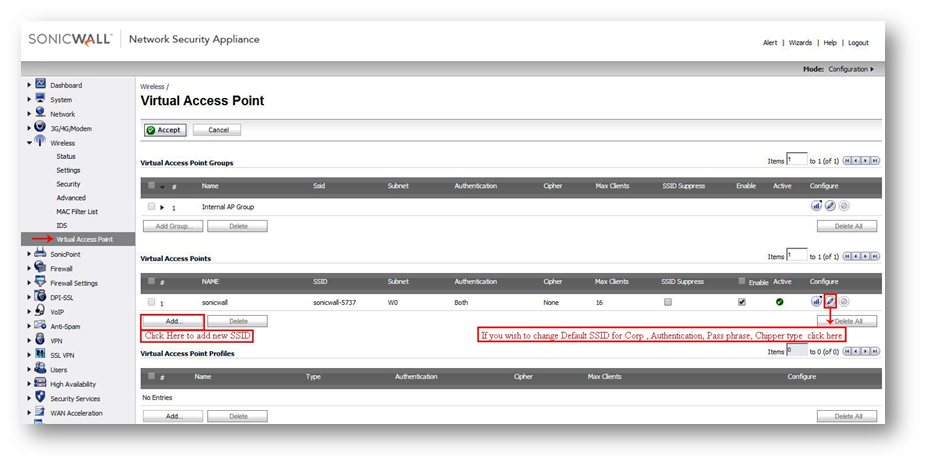
- Please login to your SonicWall management page and navigate to Wireless | Virtual Access Point page.
Corporate VAP
- Please login to your SonicWall management page.
- Navigate to Wireless | Virtual Access Point page, On the right side you will find the Default Virtual Access Points. Configure it to change the corporate SSID name, Authentication type, cipher type & Pass phrase.
- Click Configure.
- Name: Corp (Any Friendly name).
- SSID: Corp WiFi (Type the SSID name which you would like to broadcast for corporate wifi connection).
- VLAN ID: WLAN (By Default).
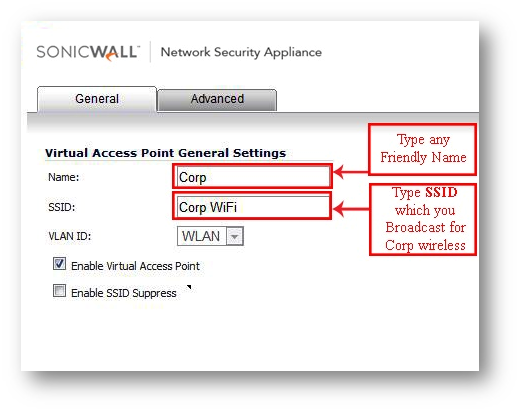
- Click Advanced Tab, to change the Authentication type, Cipher type & Pass Phrase for your corporate network.

Guest VAP
- Please login to your SonicWall management page.
- Navigate to Wireless | Virtual Access Point page.
- Under Virtual Access Points section, Click Add button to add new SSID for guest.
- Name: guest (Any Friendly name).
- SSID: Guest WiFi (Type the SSID name which you would like to broadcast for guest wifi connection).
- VLAN ID: W0:V5.
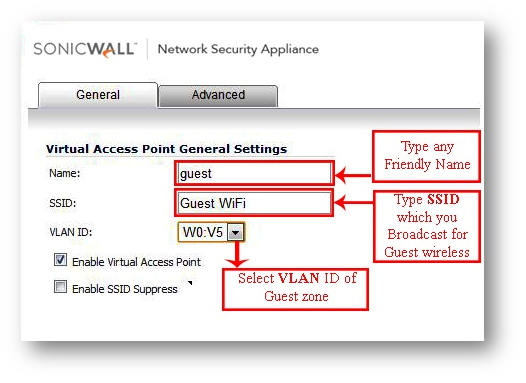
- Click Advanced Tab, to change the Authentication type, Cipher type & Pass Phrase for your Guest network.
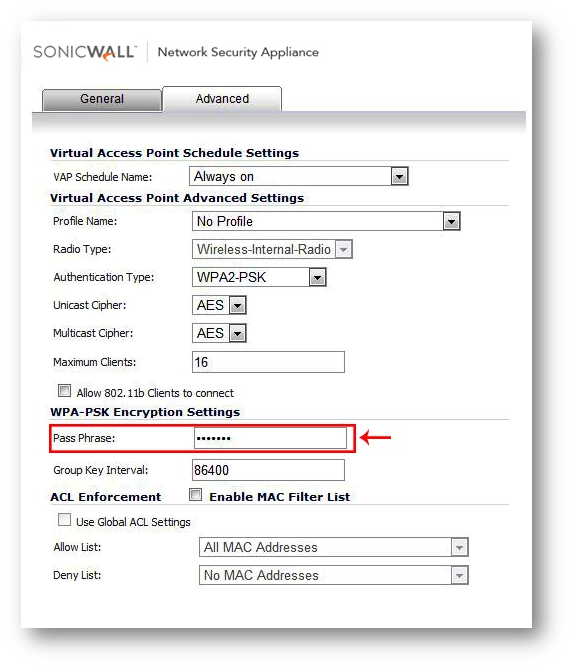
Adding SSIDs to Virtual Access Points Group
- The Virtual Access Point Groups feature allows for grouping of multiple VAP objects to be simultaneously applied to your internal wireless radio. Virtual Access Point Groups are configured from the Wireless | Virtual Access Point page.

- Click Configure button under Virtual Access Point Group to get below screen where you can add both SSID as members of Virtual AP Group box.
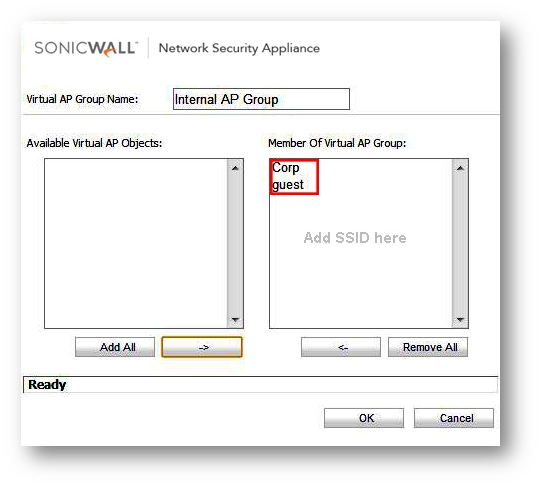
- Then both the SSIDs will be added to the Internal AP Group under Virtual Access Point Groups.

Adding VAP Group to Internal Wireless
- After your VAPs are configured and added to a VAP group, that group must be specified in the Wireless | Settings page in order for the VAPs to be available through your internal wireless radio. The default group is called Internal AP Group scroll to the bottom of the page).
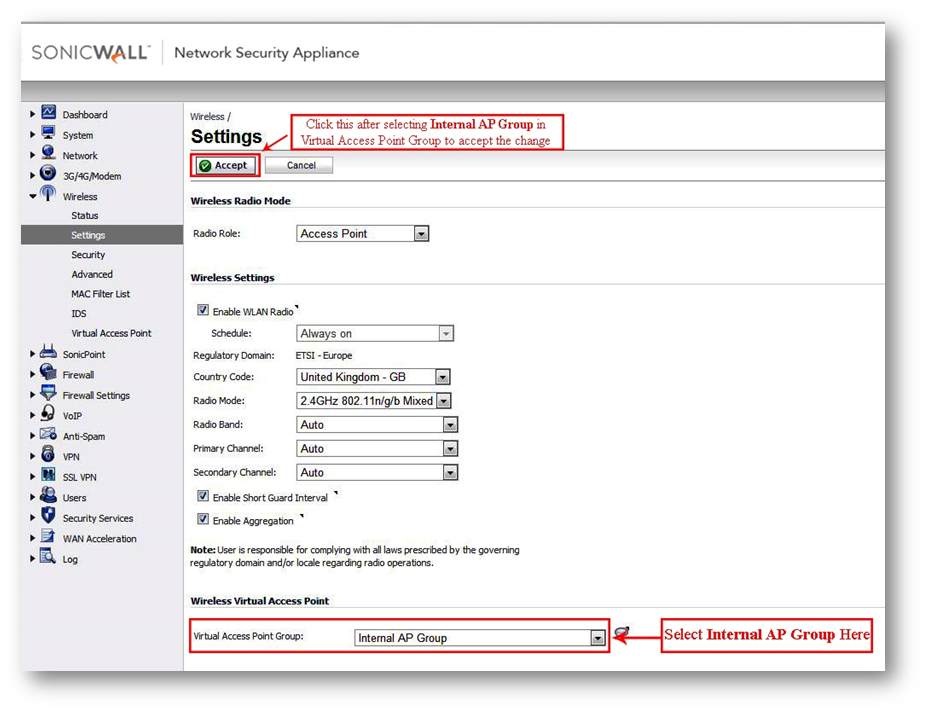
How to Test
Corporate VAP:
From you wireless client computer, scan and connect to the SSID (Corp WiFi) and enter the Preshared Key (e.g. if WPA is chosen). Once connected your wireless adapter will acquire an the IP address from the appropriate interface which is in the same subnet of LAN (X0 interface).
- Access (or) Ping any web page to check the connectivity to Internet.
- Access (or) Ping any LAN computer to check the connectivity to Internal LAN network.
Guest VAP
From you wireless client computer, scan and connect to the SSID (Guest WiFi) and enter the Preshared Key (e.g. if WPA is chosen). Once connected your wireless adapter will acquire an the IP address from the appropriate interface.
- Access (or) Ping any web page to check the connectivity to Internet.
- Access (or) Ping any LAN computer to check access deny to internal Internal LAN network.
Related Articles
- How to Block Google QUIC Protocol on SonicOSX 7.0?
- How to block certain Keywords on SonicOSX 7.0?
- How internal Interfaces can obtain Global IPv6 Addresses using DHCPv6 Prefix Delegation
Categories
- Firewalls > NSa Series > Networking
- Firewalls > TZ Series > Networking
- Firewalls > NSv Series > Networking


 YES
YES NO
NO