-
Products
-
SonicPlatform
SonicPlatform is the cybersecurity platform purpose-built for MSPs, making managing complex security environments among multiple tenants easy and streamlined.
Discover More
-
-
Solutions
-
Federal
Protect Federal Agencies and Networks with scalable, purpose-built cybersecurity solutions
Learn MoreFederalProtect Federal Agencies and Networks with scalable, purpose-built cybersecurity solutions
Learn More - Industries
- Use Cases
-
-
Partners
-
Partner Portal
Access to deal registration, MDF, sales and marketing tools, training and more
Learn MorePartner PortalAccess to deal registration, MDF, sales and marketing tools, training and more
Learn More - SonicWall Partners
- Partner Resources
-
-
Support
-
Support Portal
Find answers to your questions by searching across our knowledge base, community, technical documentation and video tutorials
Learn MoreSupport PortalFind answers to your questions by searching across our knowledge base, community, technical documentation and video tutorials
Learn More - Support
- Resources
- Capture Labs
-
- Company
- Contact Us
Configuring Access and Trunks using Standalone access


Description
Trunk Port : A trunk port is a specific type of port on a network switch that allows data to flow across a network node for multiple virtual local area networks or VLANs. A trunk port of a switch is that port that can pass multiple VLANs and VLAN traffic through it. Usually the uplink port of a switch is configured as a trunk. Trunk ports are also used to extend a network connecting VLANs with same VLAN id that is configured on multiple switches.
Access Port : An access port is a switch port that is dedicated to a specific network. An access port transports traffic to and from only the specified VLAN allotted to it. Unlike a trunk port, it will not deliver exclusive identifying tags (either 802.1Q or ISL tags) because the VLAN intended for it is pre-assigned.
Usually, an access port will only have a single VLAN set up on the interface and it carries traffic for just a single VLAN. If the VLAN for an access port is not configured, the interface can carry traffic using only the default VLAN, which is usually VLAN 1 (native VLAN).
It is possible to configure Ethernet interfaces as either access ports or trunk ports, but they are unable to function as both types of port at the same time.
Resolution
Configuring Trunk and access ports on a SonicWall switch while using in Standalone configuration :
 TIP: SonicWall uses the terminology as ‘tagged’ ports and ‘untagged’ ports for trunk ports and access ports respectively .
- Login to the SonicWall switch : https://x.x.x.x
- Navigate to VLAN > 802.1Q
- By default all the ports of the SonicWall switch are a part of the Native Vlan 1. So, by default, the configurations will be that all the ports are tagged in the native VLAN

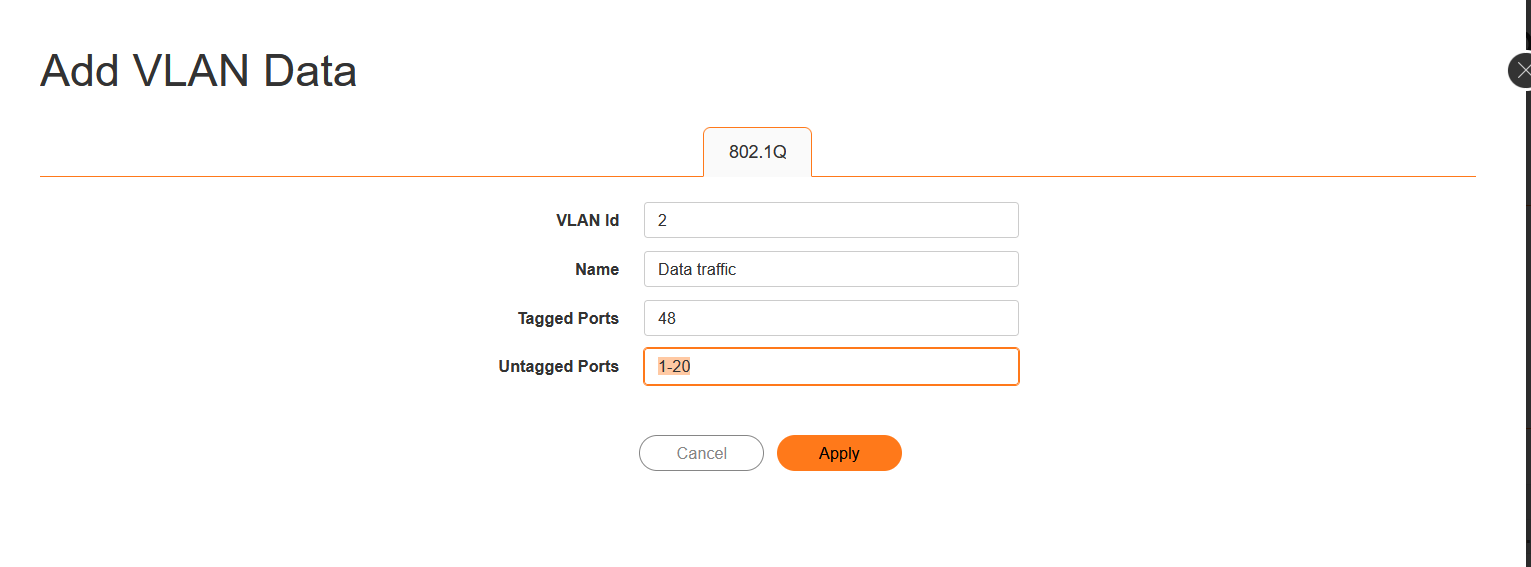
Now let us suppose that we need to create a VLAN 2 and make the ports 1-20 a part of that VLAN. Port 48 is used as an uplink port that connects to the upstream firewall or router that has VLAN 2 configurations along with other VLAN configurations as well. That means we have to configure ports 1-20 as access ports of VLAN 2 and port 48 as the trunk port which will pass VLAN 2 traffic along with the other VLANs traffic as well
So we will add a VLAN to the switch and tag port 48in it and untag ports 1-20 in it
- Navigate to VLAN > 802.1Q
- Add a VLAN
- Enter the VLAN id as 2
- Enter the name you want to provide
- Under tagged port, enter 48
- In Untagged ports. Enter 1-20
- Click on Apply.

- Now the ports 1-20 will be a part of VLAN 20 and port 48 will be the trunk port that will pass VLAN 2 traffic
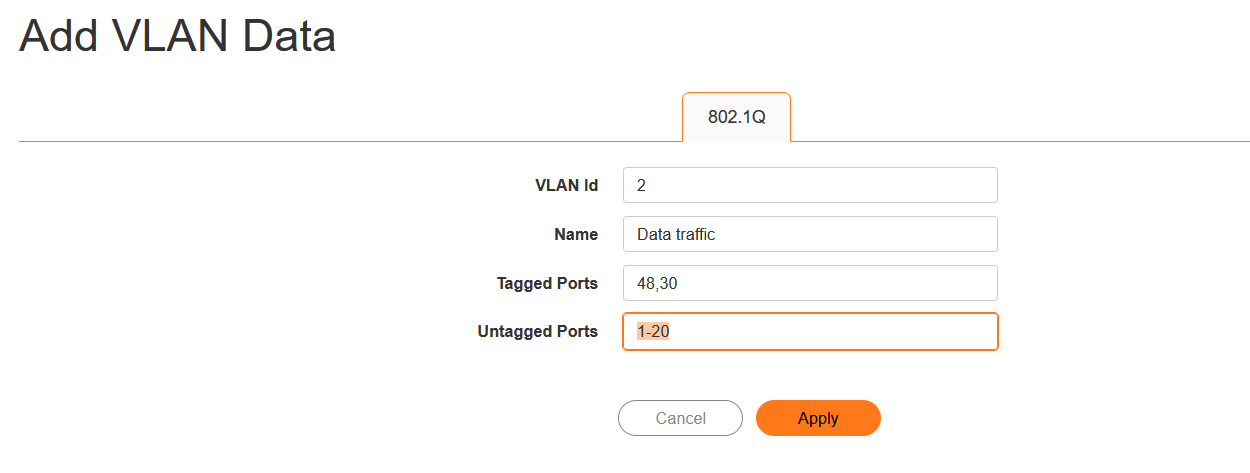
- Let us suppose we want the VLAN 2 to be passed to a downstream device as well along with other VLANs through port 30. In that case we have to add port 30 in the tagged ports of VLAN 2

- Now port 30 will also act as a trunk port that will allow VLAN 2 along with all the other VLANs it has been tagged with.
 TIP: We can tag a same port is as many VLANs as we want but we cannot untag a port in more that one VLAN. That means a port can be a trunk port and pass as many VLANs as it is tagged in but it can be an access port of only a particular VLAN.
Related Articles
- Supported SonicWall and 3rd party SFP and SFP+ Modules that can be used with SonicWall Switches
- How to enable Port Mirror on Sonicwall Switch.
- Create a new VLAN on Sonicwall Switch managed by WCM.


 YES
YES NO
NO