-
Products
-
SonicPlatform
SonicPlatform is the cybersecurity platform purpose-built for MSPs, making managing complex security environments among multiple tenants easy and streamlined.
Discover More
-
-
Solutions
-
Federal
Protect Federal Agencies and Networks with scalable, purpose-built cybersecurity solutions
Learn MoreFederalProtect Federal Agencies and Networks with scalable, purpose-built cybersecurity solutions
Learn More - Industries
- Use Cases
-
-
Partners
-
Partner Portal
Access to deal registration, MDF, sales and marketing tools, training and more
Learn MorePartner PortalAccess to deal registration, MDF, sales and marketing tools, training and more
Learn More - SonicWall Partners
- Partner Resources
-
-
Support
-
Support Portal
Find answers to your questions by searching across our knowledge base, community, technical documentation and video tutorials
Learn MoreSupport PortalFind answers to your questions by searching across our knowledge base, community, technical documentation and video tutorials
Learn More - Support
- Resources
- Capture Labs
-
- Company
- Contact Us
Configuring a Virtual Access Point (VAP) Profile for Internal Wireless Corporate Users


Description
Wireless: Configuring a Virtual Access Point (VAP) Profile for Wireless Corporate Users.
You can use a VAP for a set of users who are commonly in the office, on campus, and to whom should be given full access to all network resources, providing that the connection is authenticated and secure. These users would already belong to the network's Directory Service, Microsoft Active Directory, which provides an EAP interface through IAS Internet Authentication Services.
Resolution
Resolution for SonicOS 7.X
This release includes significant user interface changes and many new features that are different from the SonicOS 6.5 and earlier firmware. The below resolution is for customers using SonicOS 7.X firmware.
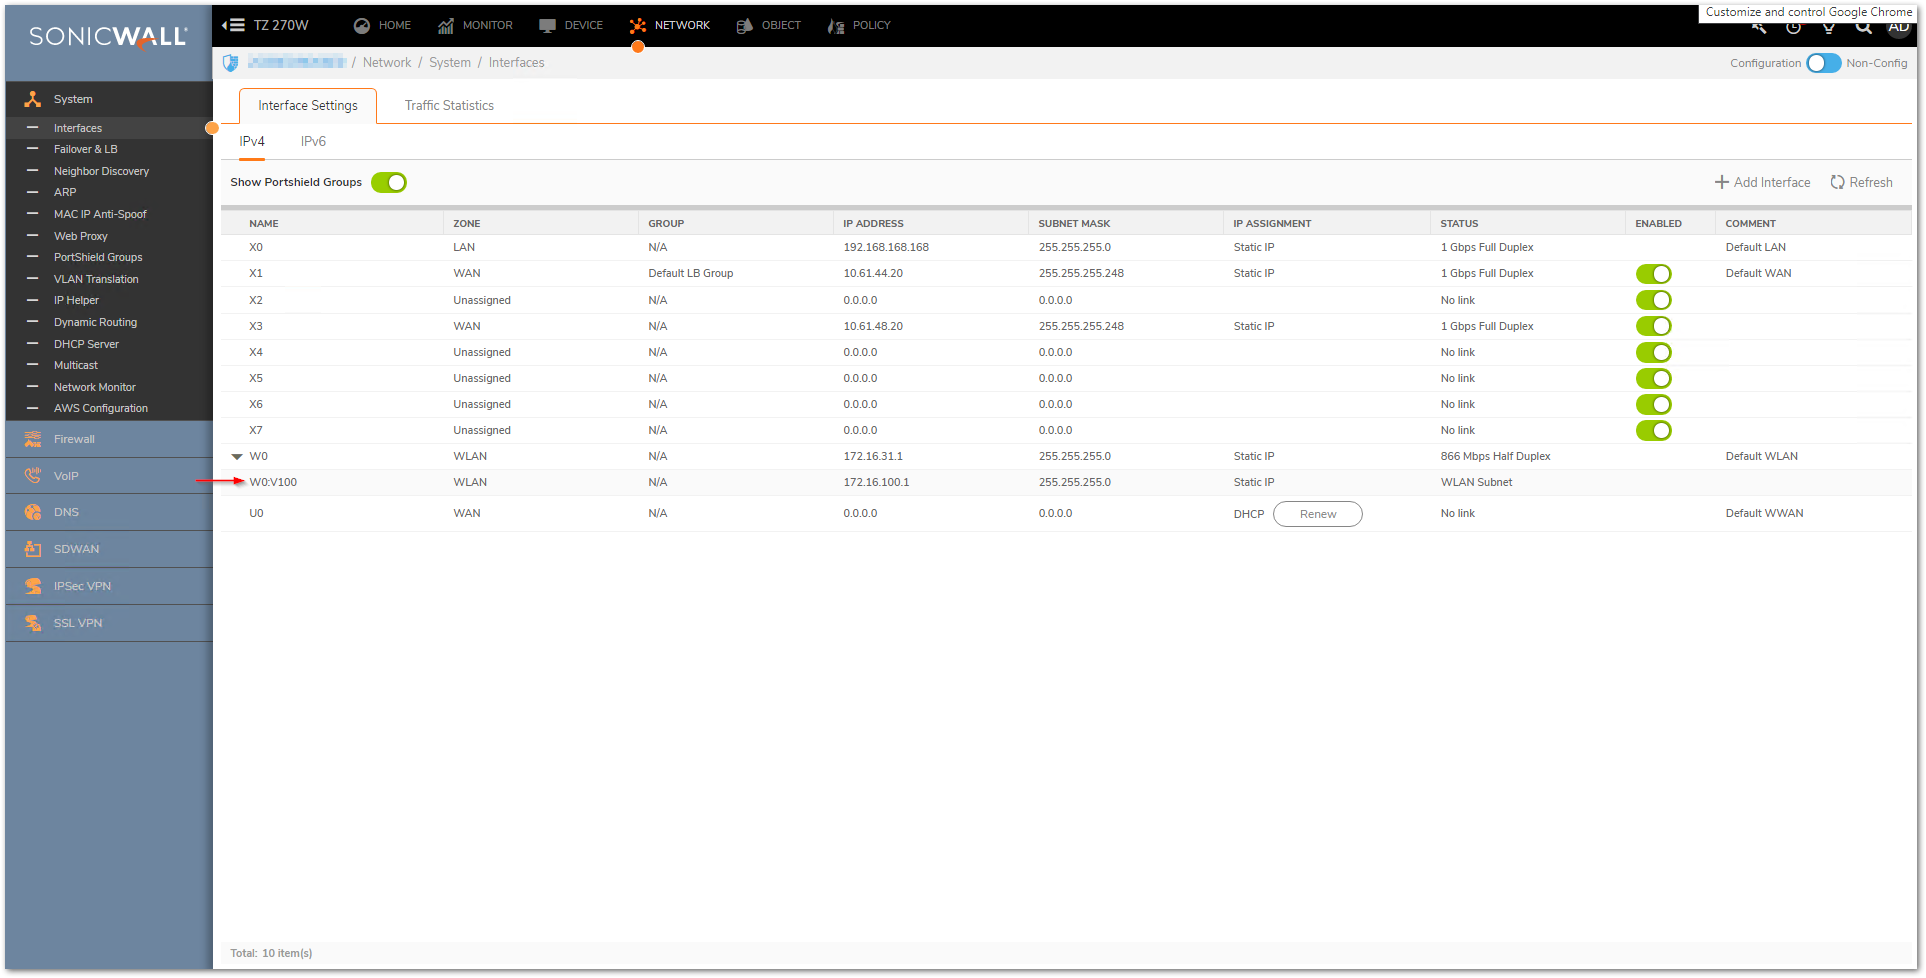
Adding a Wireless LAN (WLAN) Sub-Interface for VAP
A Wireless LAN (WLAN) subnet allows you to split a single wireless radio interface (W0) into many virtual network connections, each carrying its own set of configurations. The WLAN subnet solution allows each VAP to have its own virtual separate subinterface, even though there is only a single 802.11 radio.
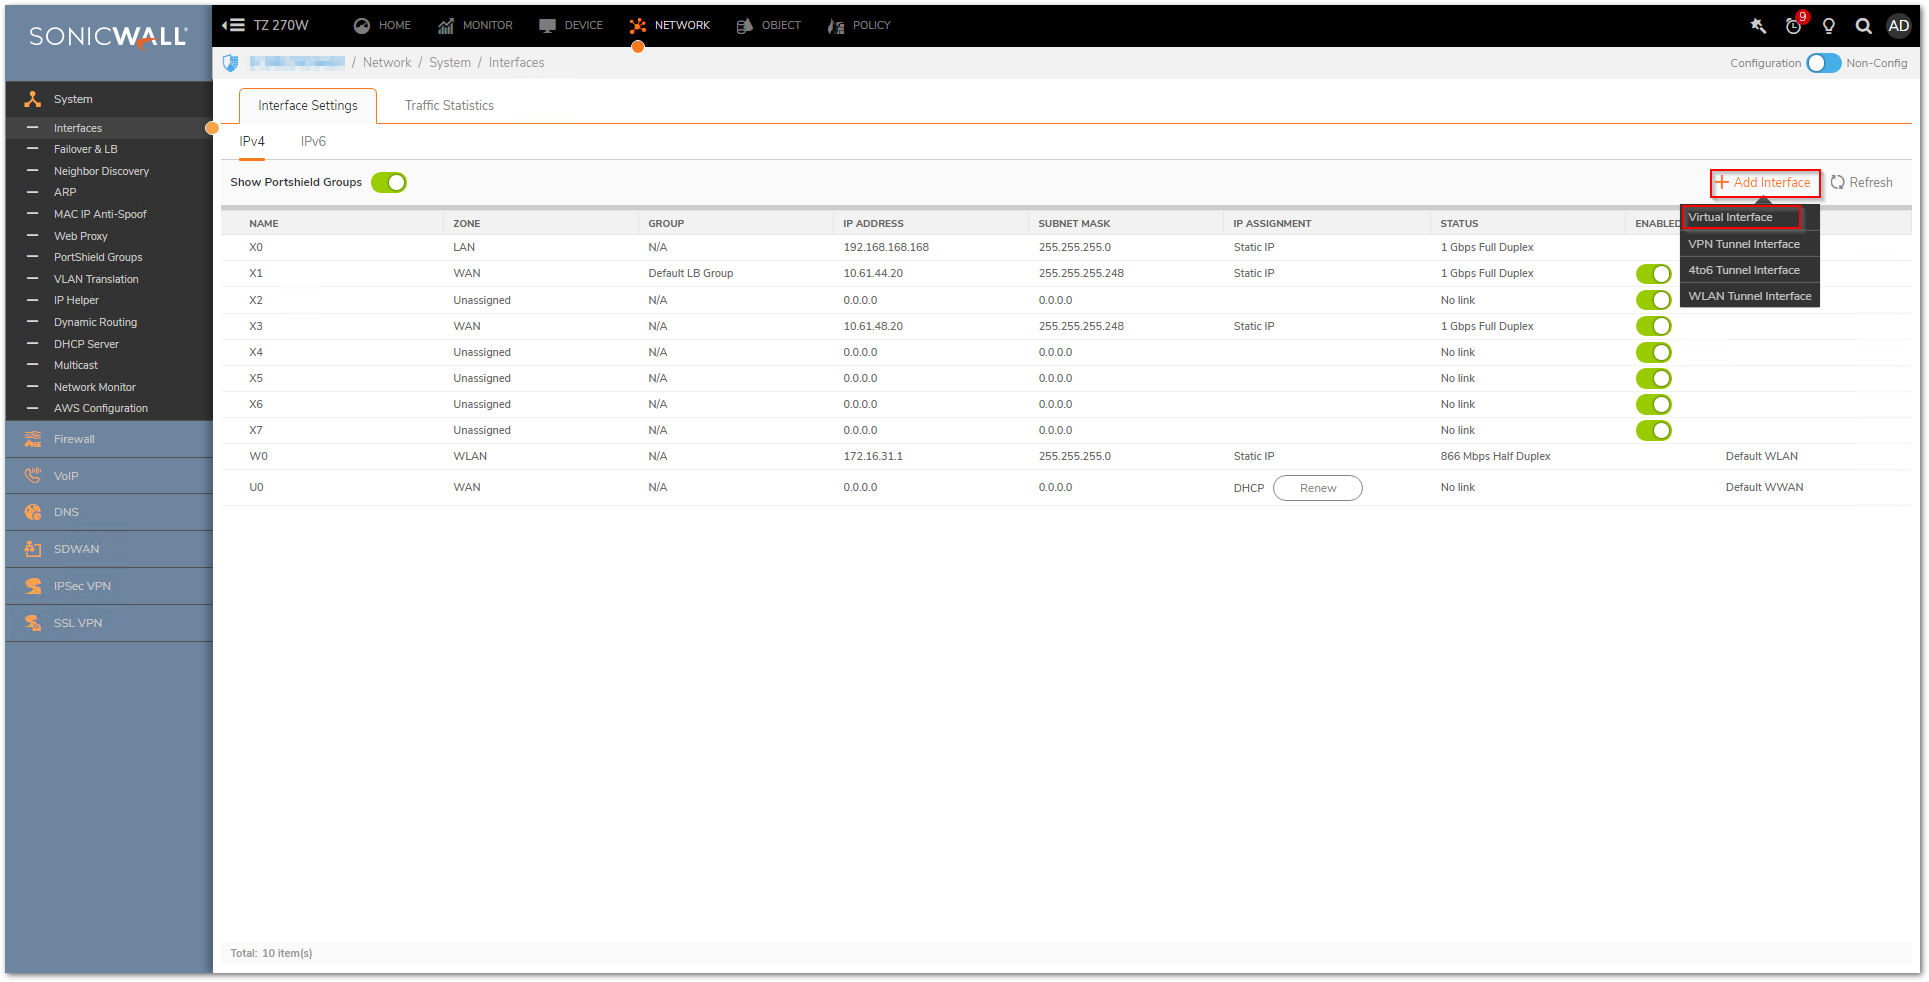
- Browse to NETWORK | System | Interfaces | Interface Settings page.
- WLAN subnets are configured by clicking on the option "Add Interface" and selecting the option from the drop down " Virtual Interface".
- Configure the Sub-interface
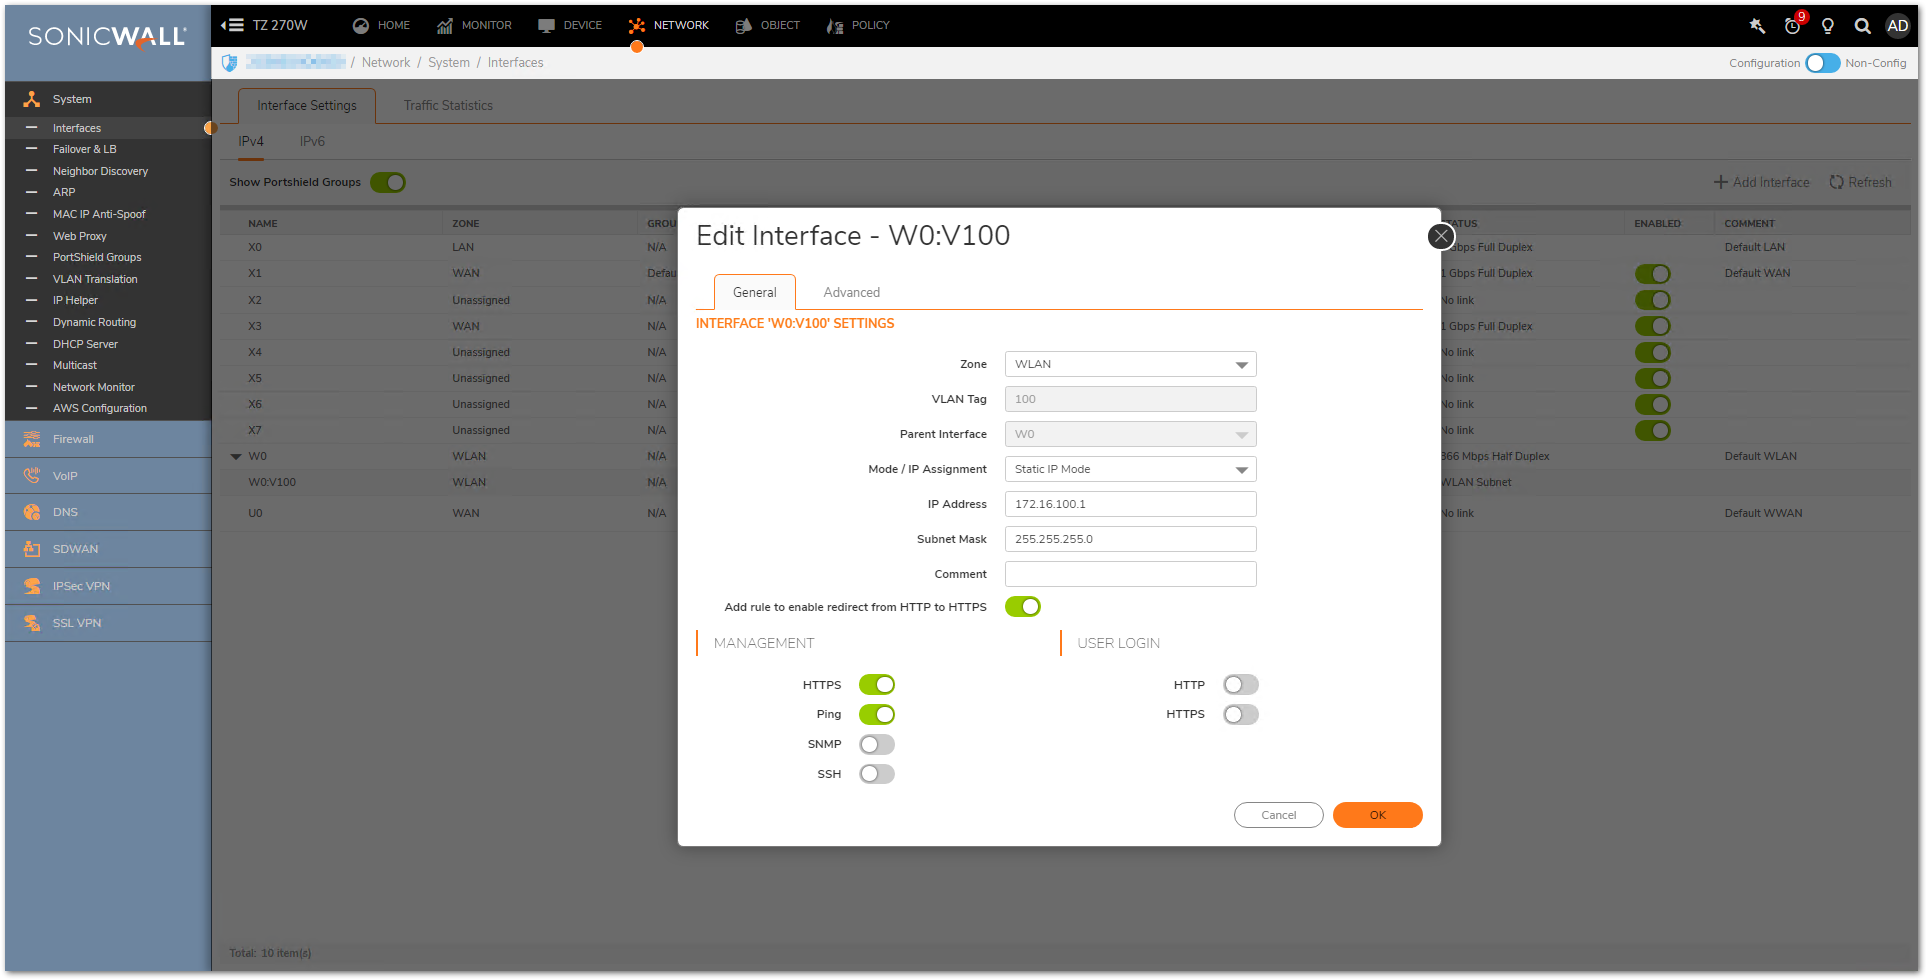
Zone: Select WLAN
VLAN Tag: Enter a number e.g 100
Parent Interface: Select W0
IP Assignment: Static
IP Address/Subnet Mask (Enter IP subnet for VAP)
Management (optional): Select a method if you wish to access SonicWall appliance from VAP subnet. - Click OK
Adding a DHCP Scope for the VAP Sub-Interface
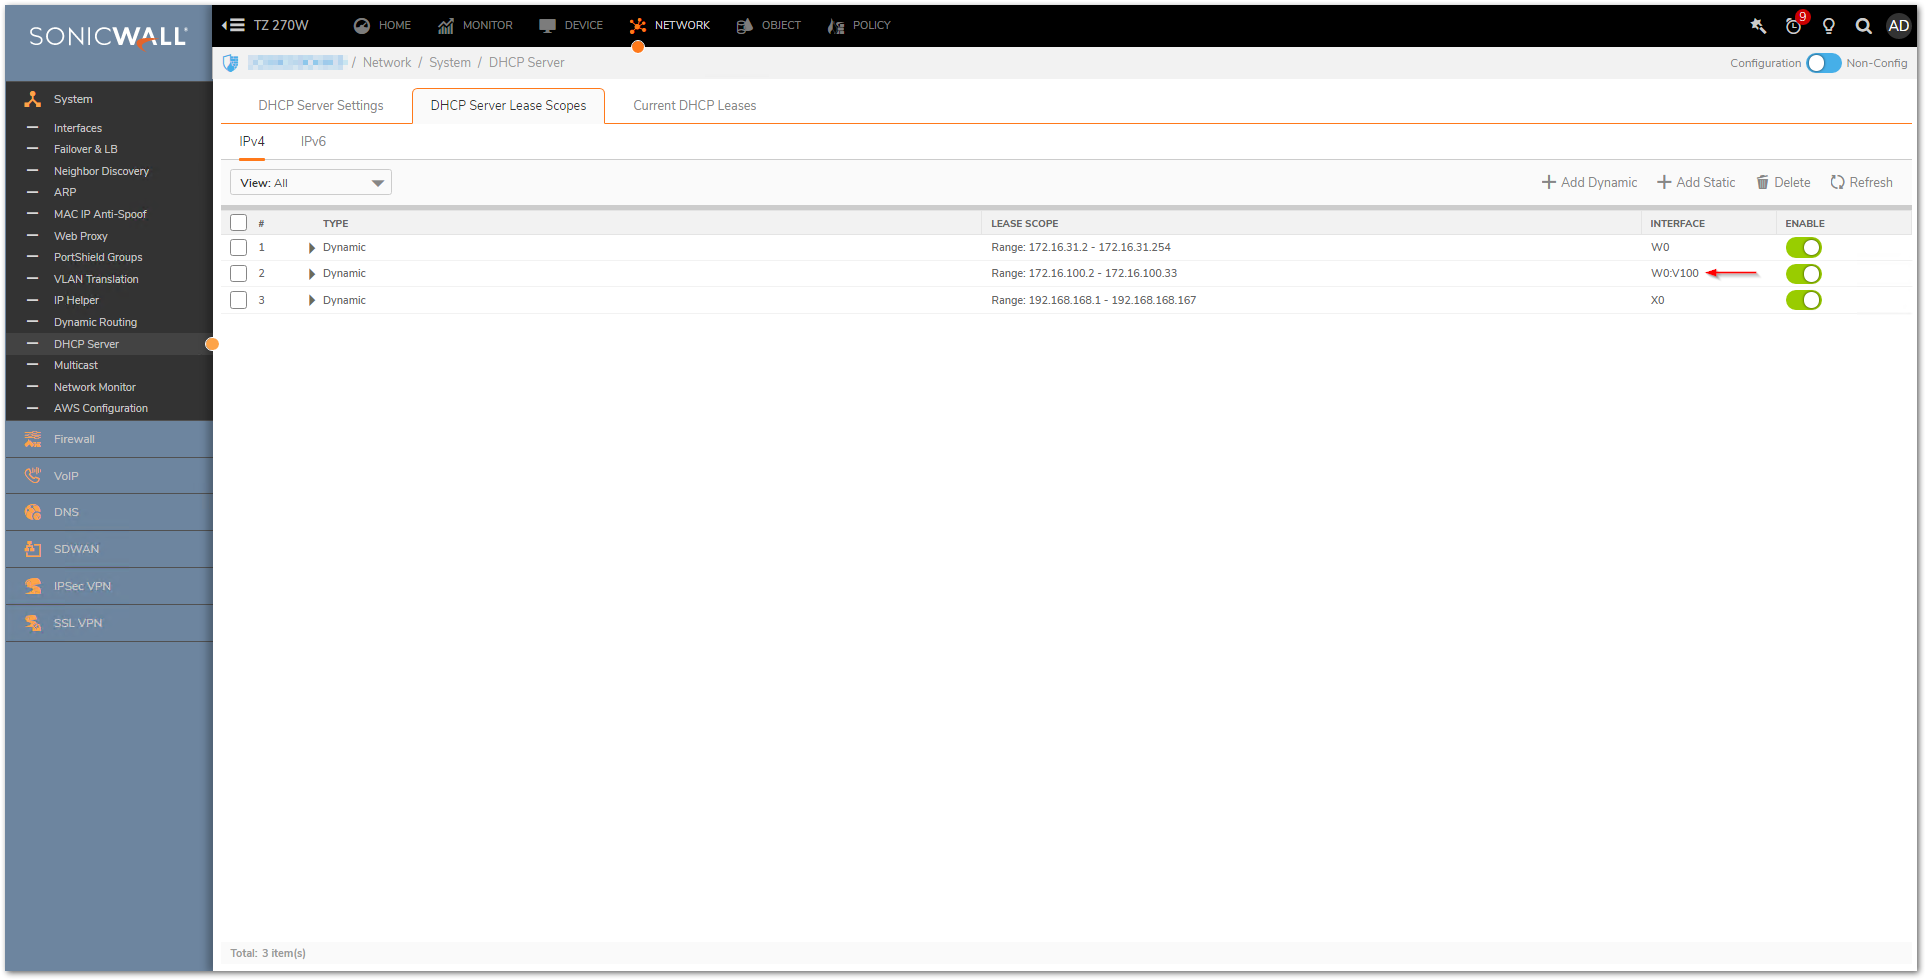
The DHCP server assigns leased IP addresses to users within specified ranges, known as "Scopes". Take care in making these settings manually, as a scope of 200 addresses for multiple interfaces that will only use 30 can lead to connection issues due to lease exhaustion. The DHCP scope should be resized as each interface/subinterface is defined to ensure that adequate DHCP space remains for all subsequently defined interfaces. Failure to do so may cause the auto-creation of subsequent DHCP scopes to fail, requiring manual creation after performing the requisite scope resizing.
- Ensure Enable DHCPv4 Server option is enabled in Network | System | DHCP Server | DHCP Server Settings Page
- DHCP Server Scope is set from the Network | System | DHCP Server | DHCP Server Lease Scopes.
- SonicWall appliance will automatically add a DHCP scope when an Interface/Sub-Interface is created.
Adding a New Virtual Access Point - Profile
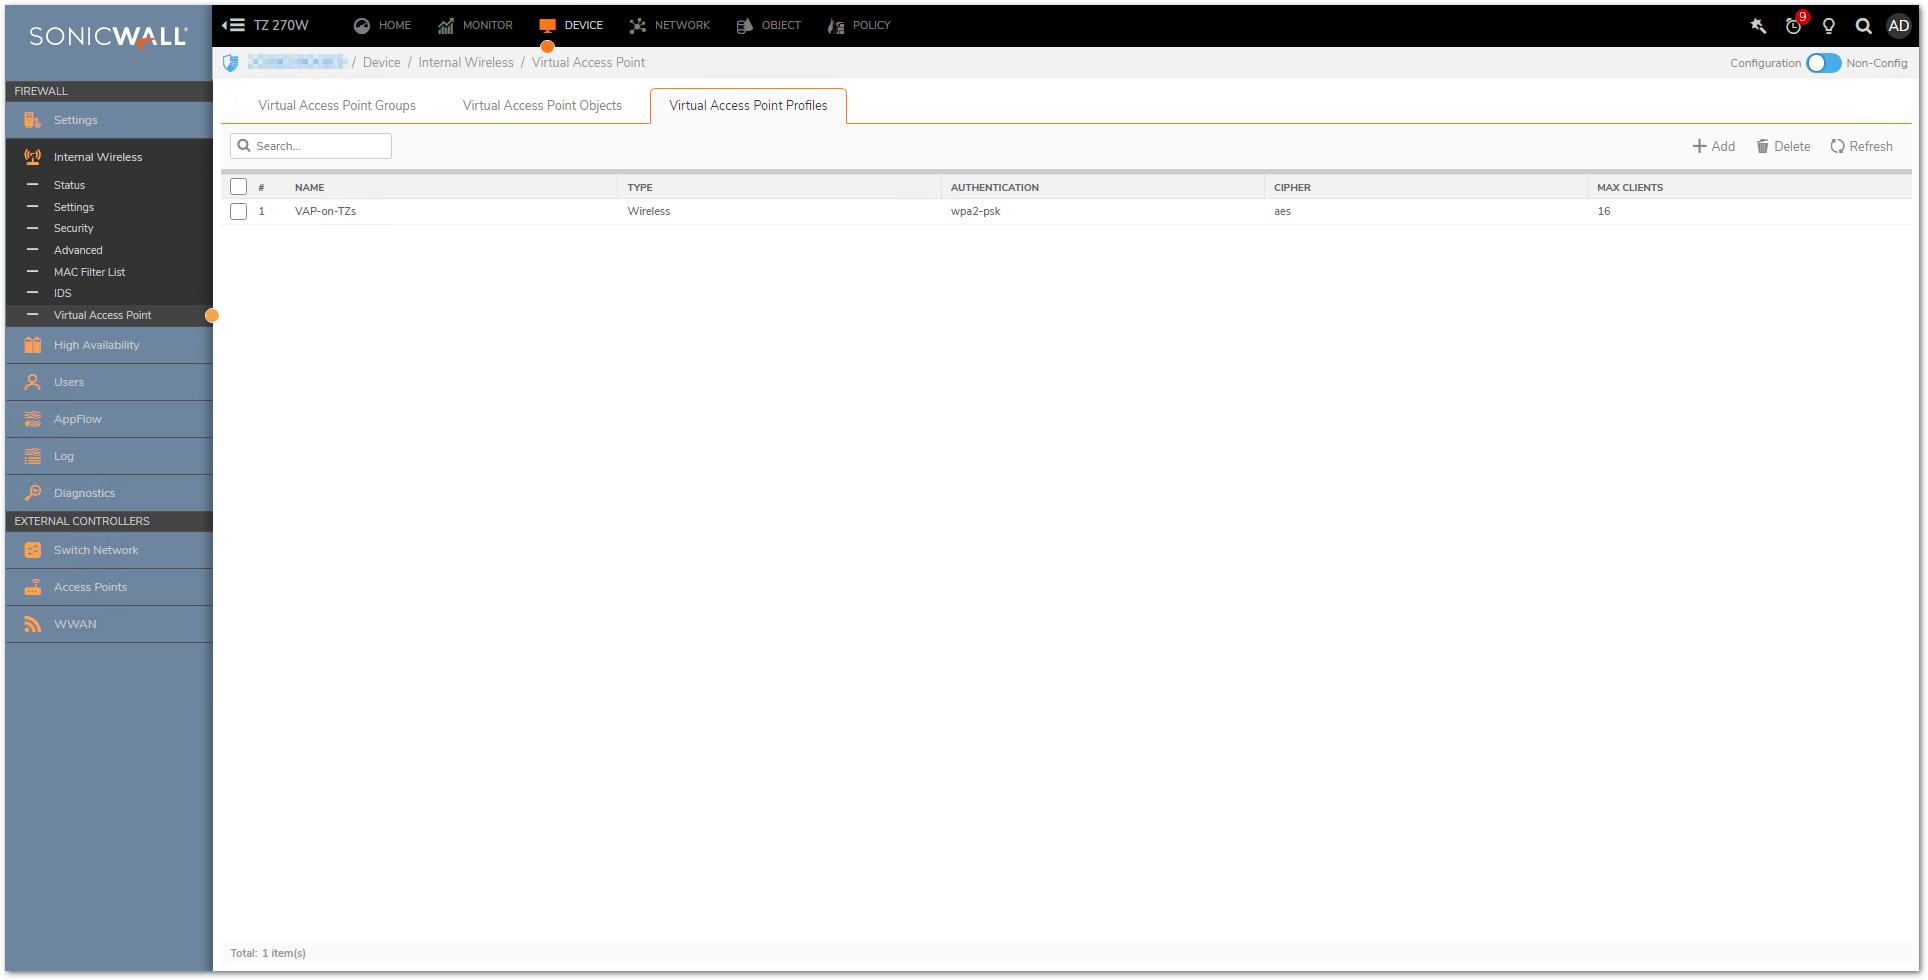
A Virtual Access Point Profile allows the administrator to pre-configure and save access point settings in a profile. VAP Profiles allows settings to be easily applied to new Virtual Access Points.
- Virtual Access Point Profiles are configured from the Device | Internal Wireless | Virtual Access Point | Virtual Access Point Profiles page.
- Click Add button. Type in a Profile Name and choose an Authentication Type.
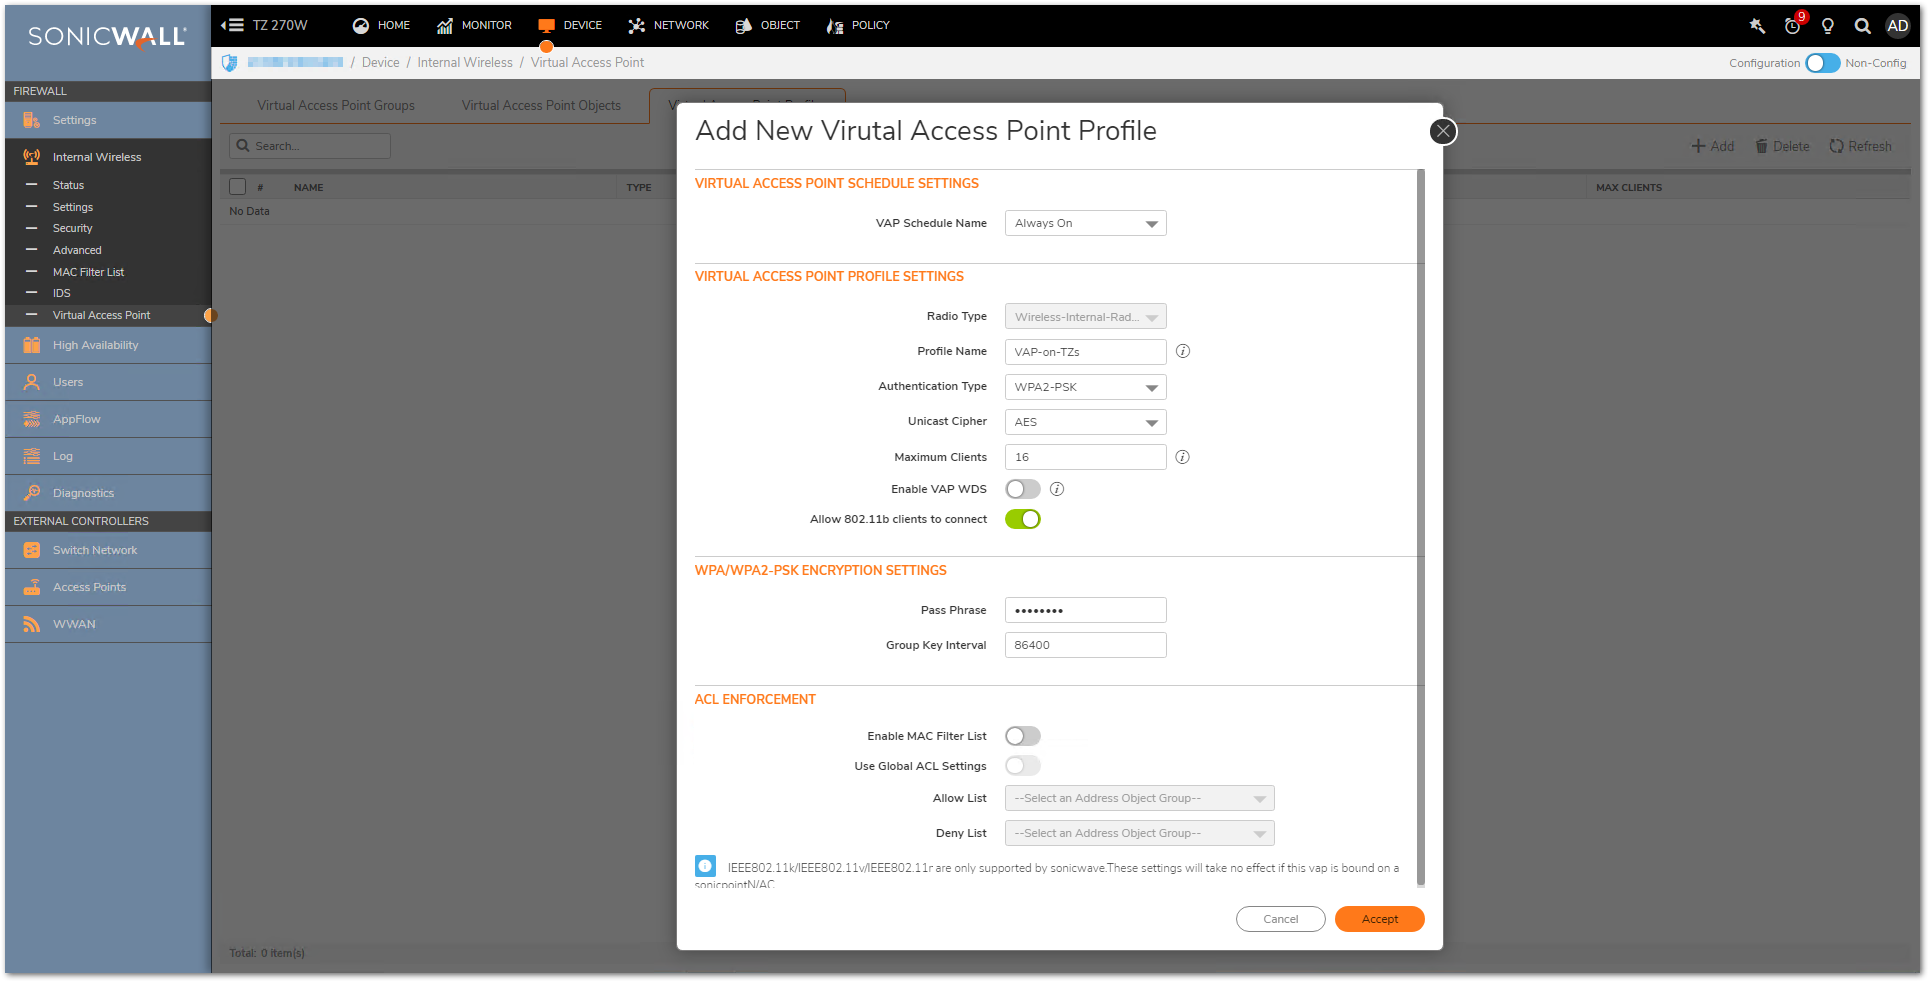
- Click Accept
Adding a New Virtual Access Point
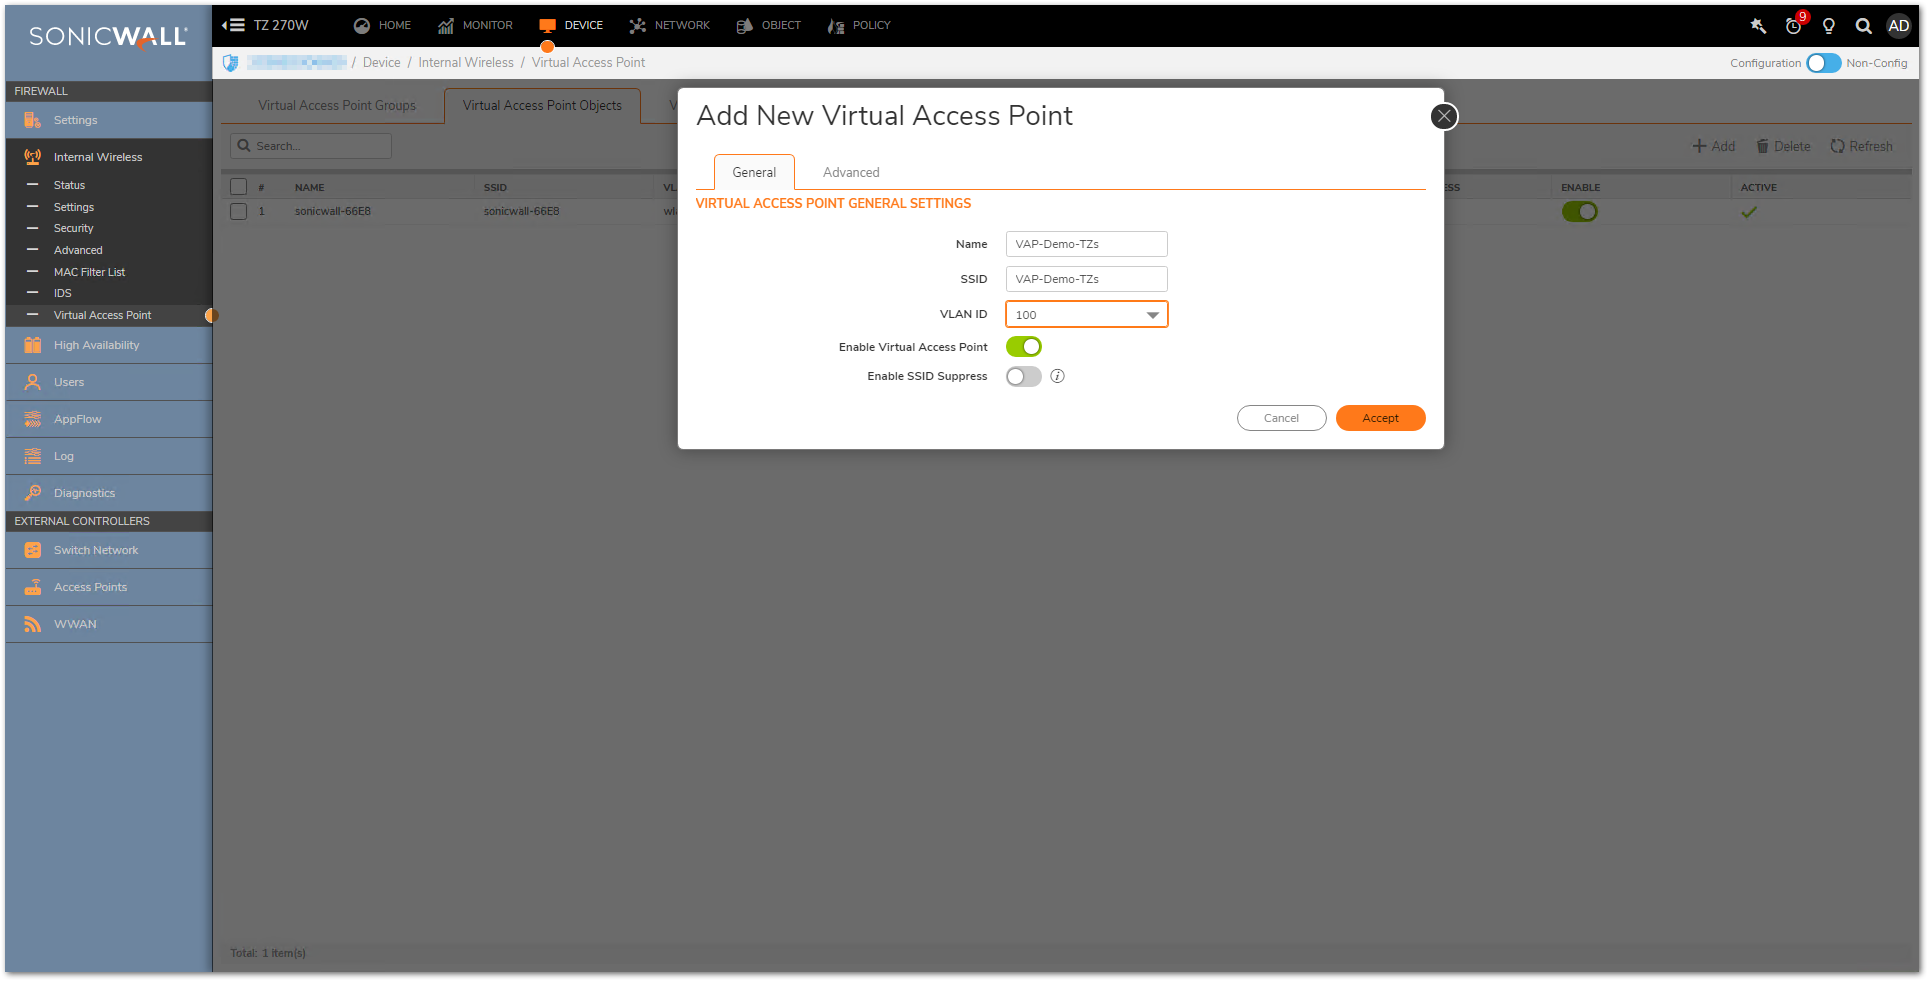
The VAP Settings feature allows for setup of general VAP settings. SSID and VLAN ID are configured through VAP Settings.
- Virtual Access Points are configured from the Device | Internal Wireless | Virtual Access Point | Virtual Access Point Objects page.
- Click Add
- Enter the Name and SSID
- Under VLAN ID: choose the appropriate VLAN ID from the drop down list that was assigned to the WLAN sub-interfaces.
- Click on "Advanced" and from the "Profile Name" choose the configured Profile
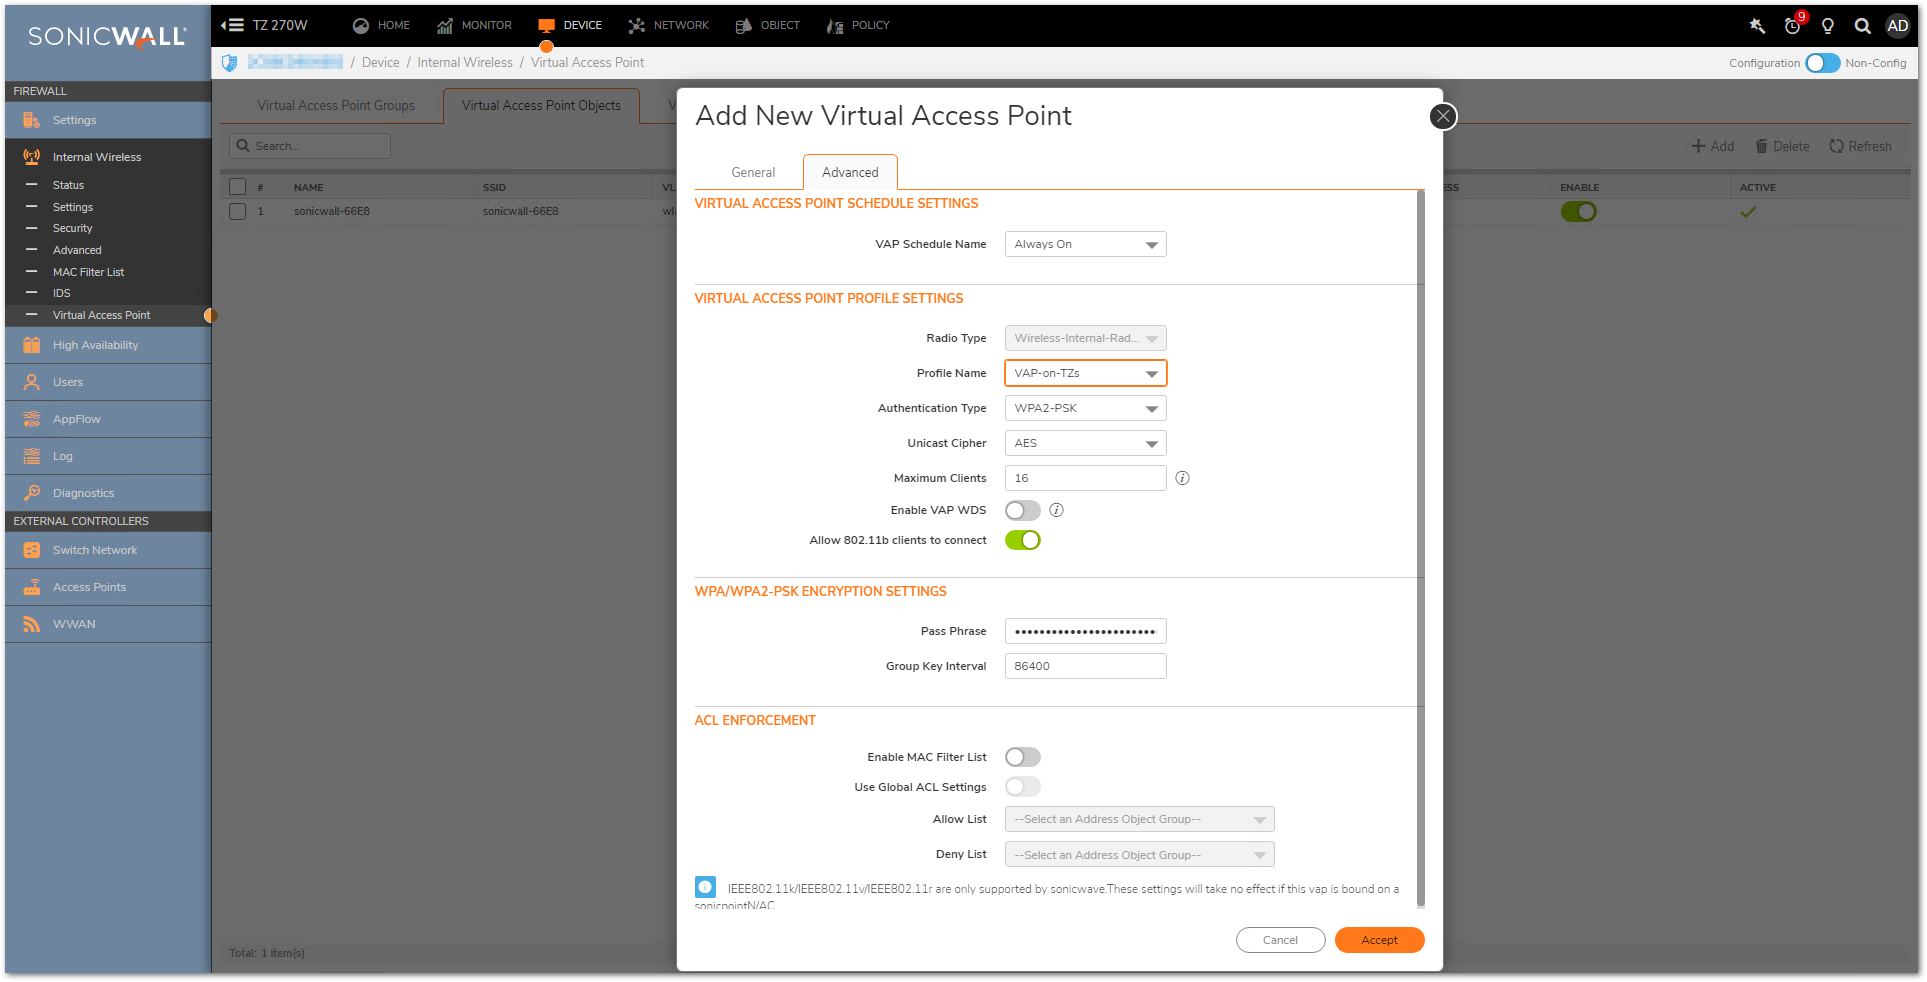
- Click Accept
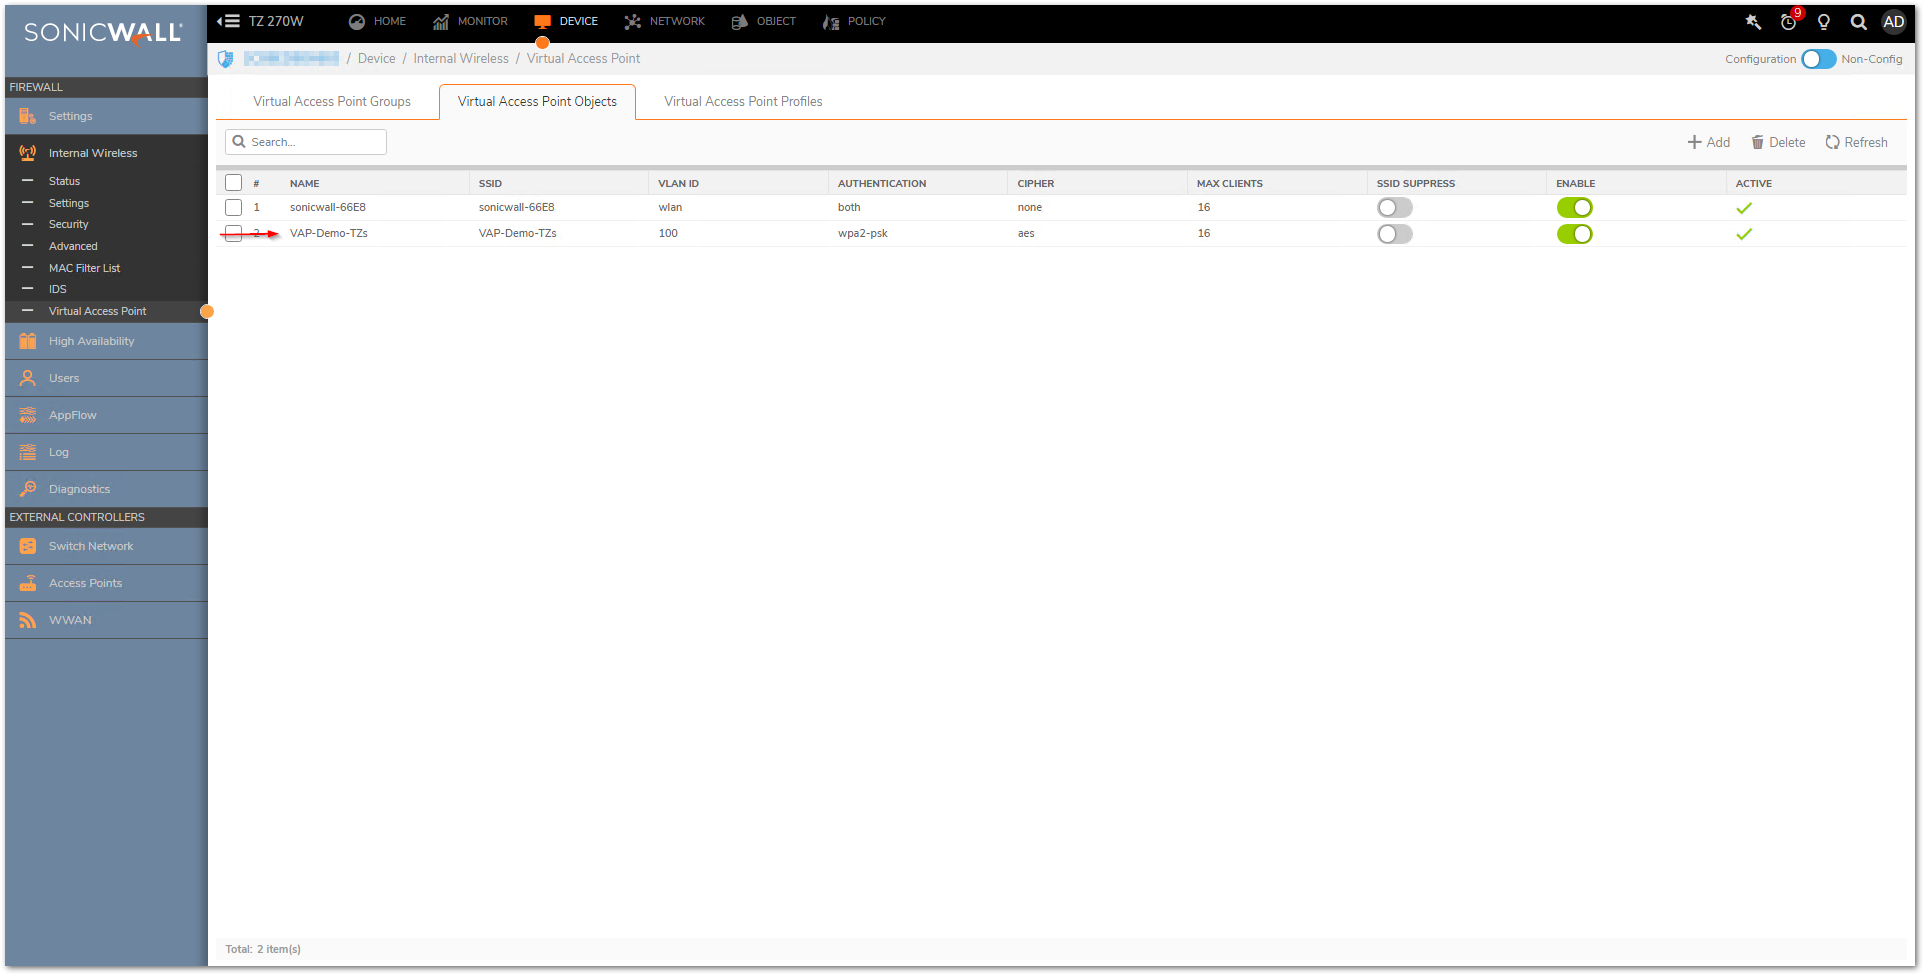
Virtual Access Point Group
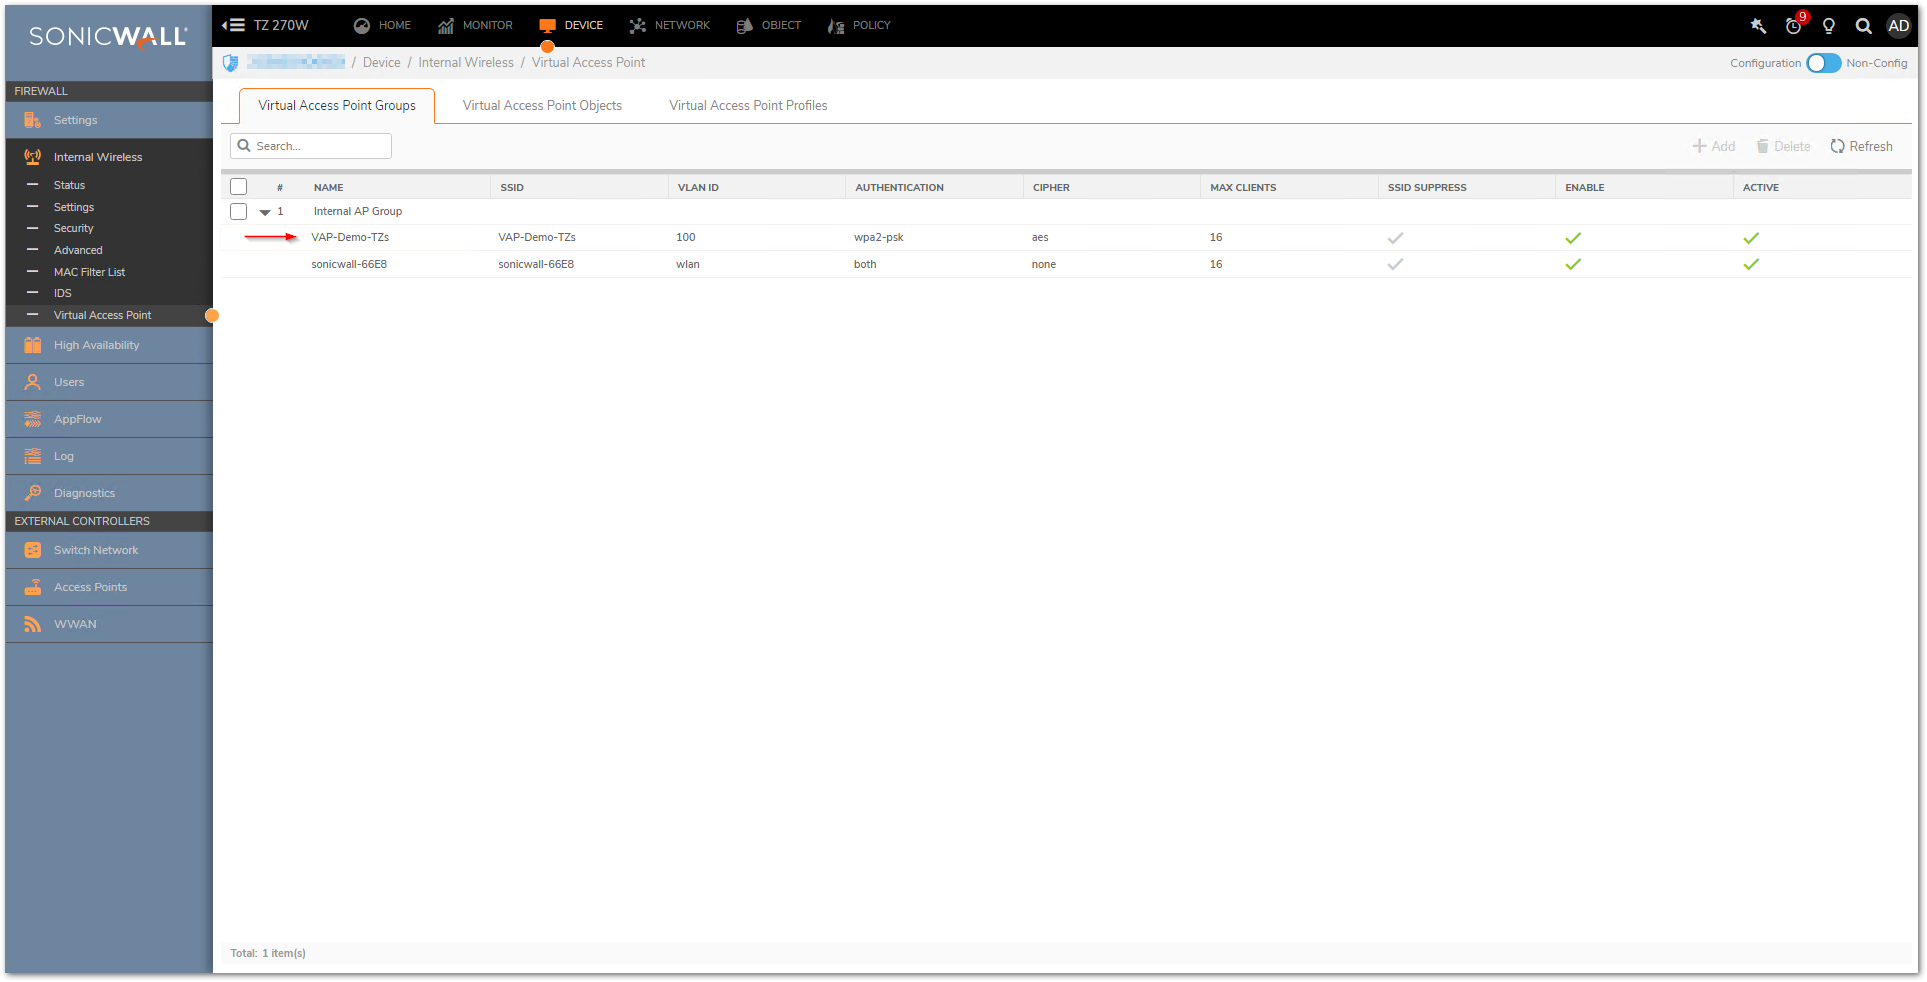
The Virtual Access Point Groups feature allows for grouping of multiple VAP objects to be simultaneously applied to your internal wireless radio. Virtual Access Point Groups are configured from the Device | Internal Wireless | Virtual Access Point | Virtual Access Point Groups page.
- Click on the Edit button of the VAP group
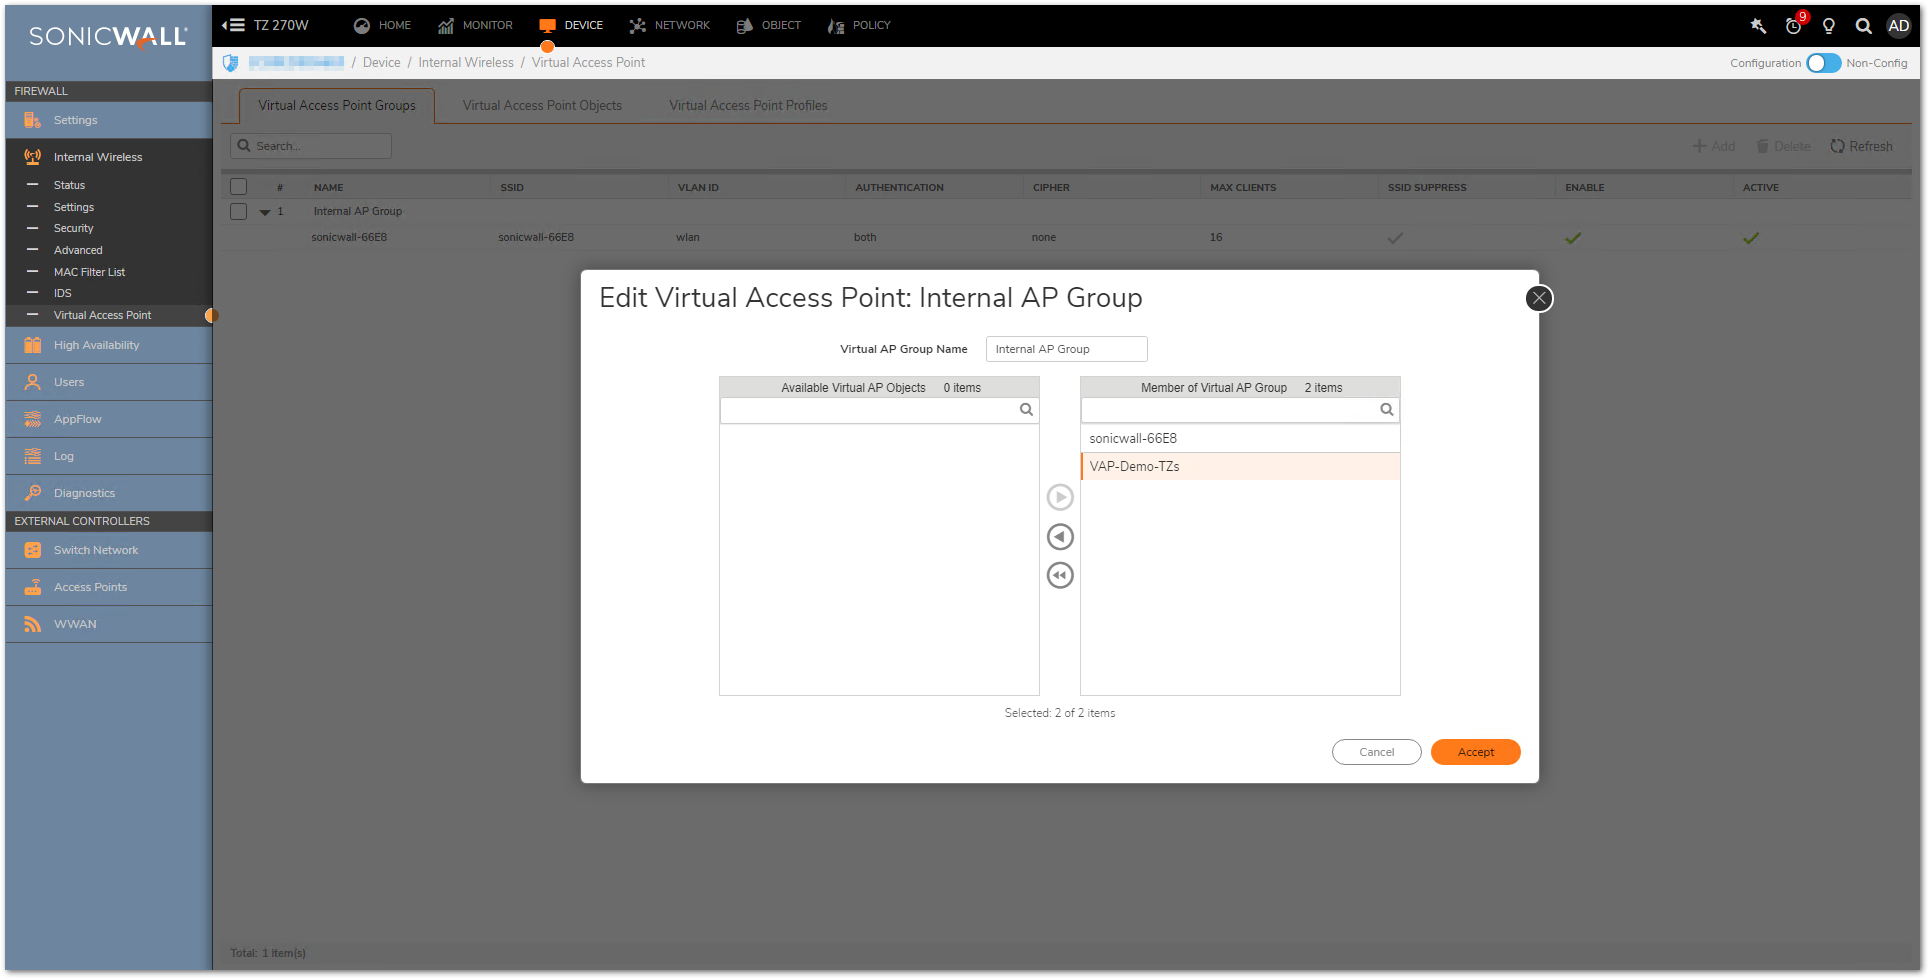
- Move the Virtual Access Point Object to the right and make it a part of the "Virtual AP Group" and click on "Accept"
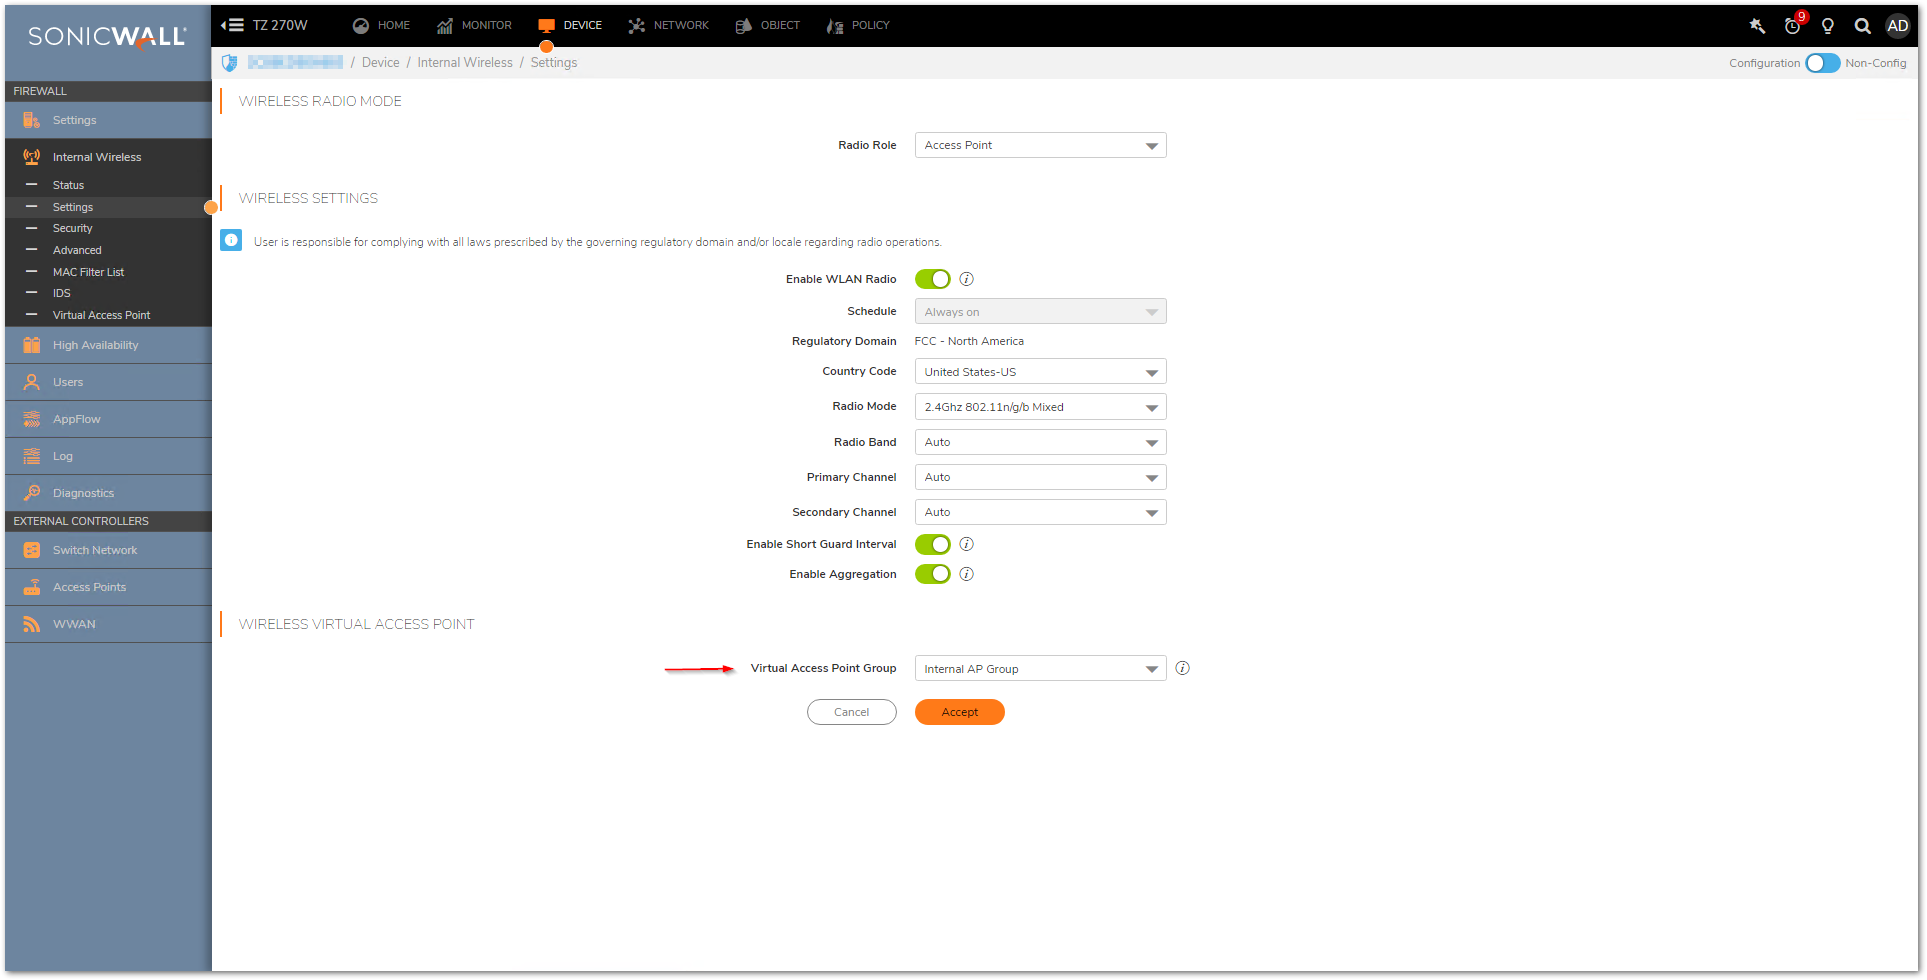
Assign VAP Group to Internal Wireless Radio
After your VAPs are configured and added to a VAP group, that group must be specified in the Device | Internal Wireless | Settings page in order for the VAPs to be available through your internal wireless radio. The default group is called Internal AP Group.
How to Test:
From you wireless client computer, scan and connect to the SSID (e.g VAP-Demo-TZs) and enter the Preshared Key (e.g. if WPA is chosen). Once connected your wireless adapter will acquire an the IP address from the appropriate WLAN sub-interface.
Resolution for SonicOS 6.5
This release includes significant user interface changes and many new features that are different from the SonicOS 6.2 and earlier firmware. The below resolution is for customers using SonicOS 6.5 firmware.
Adding a Wireless LAN (WLAN) Sub-Interface for VAP
A Wireless LAN (WLAN) subnet allows you to split a single wireless radio interface (W0) into many virtual network connections, each carrying its own set of configurations. The WLAN subnet solution allows each VAP to have its own virtual separate subinterface, even though there is only a single 802.11 radio.
- Click Manage in the top navigation menu.
- WLAN subnets are configured from the System Setup | Network | Interfaces page and clicking on the option "Add Interface" and selecting the option from the drop down " Virtual Interface"
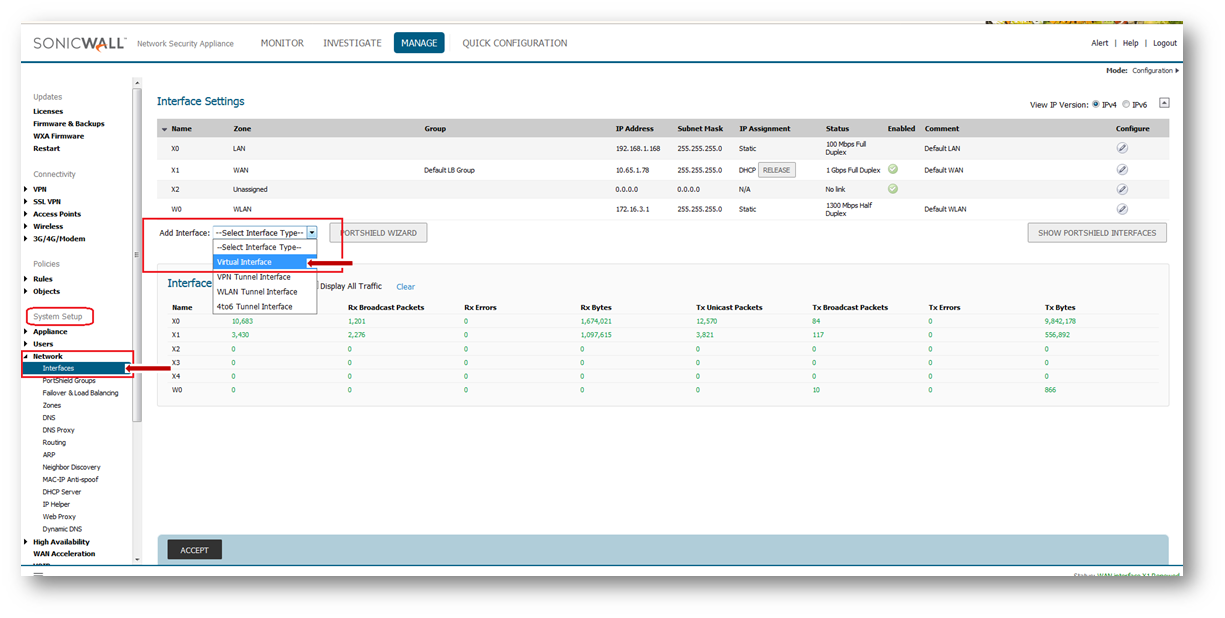
- Configure the Sub-interface
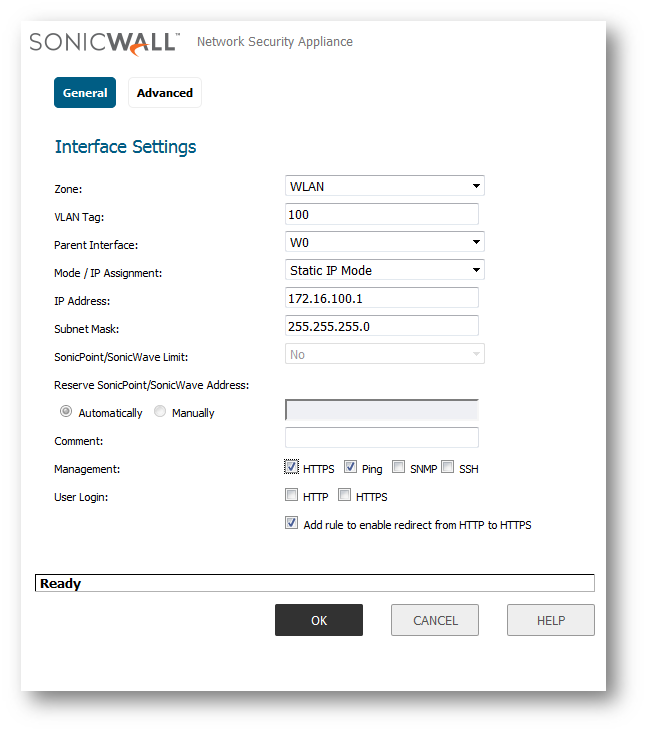 | Zone: Select WLAN |
3. Click OK
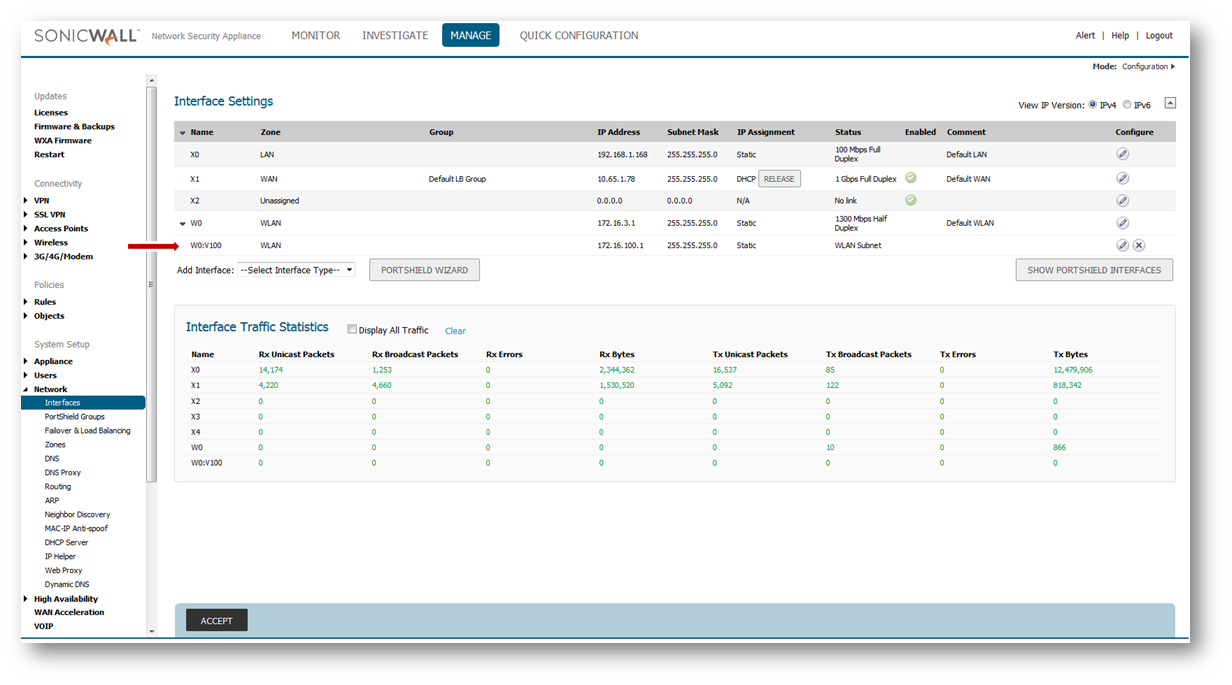
Adding a DHCP Scope for the VAP Sub-Interface
The DHCP server assigns leased IP addresses to users within specified ranges, known as "Scopes". Take care in making these settings manually, as a scope of 200 addresses for multiple interfaces that will only use 30 can lead to connection issues due to lease exhaustion. The DHCP scope should be resized as each interface/subinterface is defined to ensure that adequate DHCP space remains for all subsequently defined interfaces. Failure to do so may cause the auto-creation of subsequent DHCP scopes to fail, requiring manual creation after performing the requisite scope resizing.
1. DHCP Server Scope is set from the System Setup | Network | DHCP Server page.
2. Ensure Enable DHCP Server option is Checked
3. SonicWall appliance will automatically add a DHCP scope when an Interface/Sub-Interface is created.
Adding a New Virtual Access Point - Profile
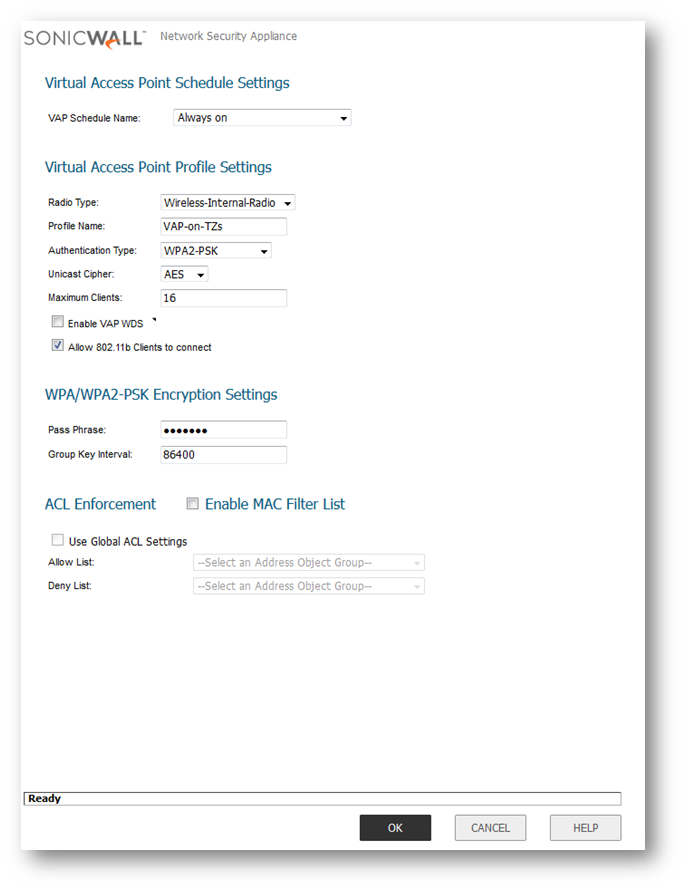
A Virtual Access Point Profile allows the administrator to pre-configure and save access point settings in a profile. VAP Profiles allows settings to be easily applied to new Virtual Access Points.
1. Virtual Access Point Profiles are configured from the Connectivity | Wireless | Virtual Access Point page.
2. Scroll to the bottom of the page to Virtual Access Point Profiles section, click Add... button and choose an Authentication Type.
SonicWall Recommends : WPA2-PSK. This authentication type is more secure as compared to WPA.

Adding a New Virtual Access Point
The VAP Settings feature allows for setup of general VAP settings. SSID and wireless subnet name are configured through VAP Settings.
- Virtual Access Points are configured from the Connectivity | Wireless | Virtual Access Point page.
- Under Virtual Access Points section, Click Add... button
- Enter the SSID
- Under Subnet Name: choose the appropriate WLAN sub-interfaces from the drop down list
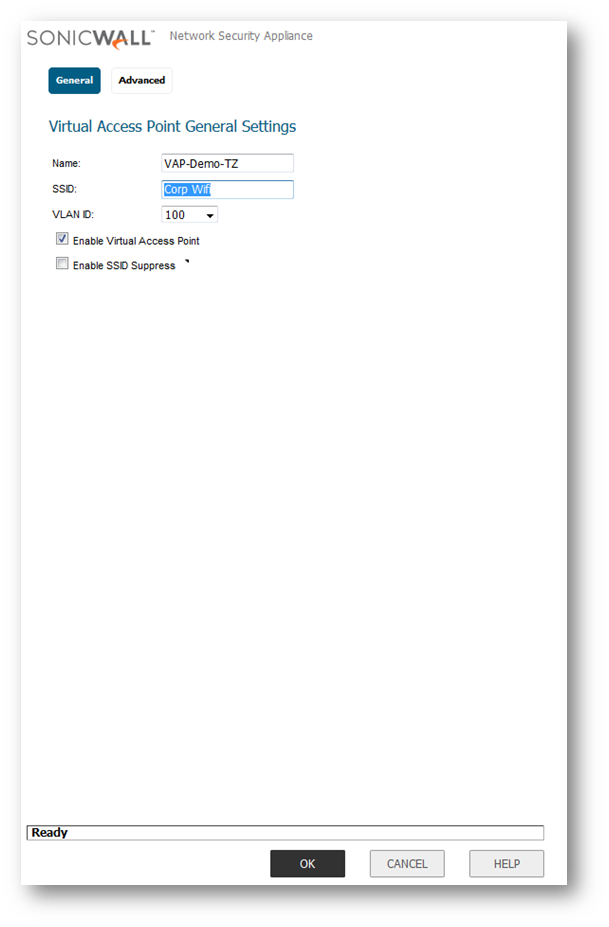
- Click on "Advanced" and from the "Profile Name" and choose the configured Profile
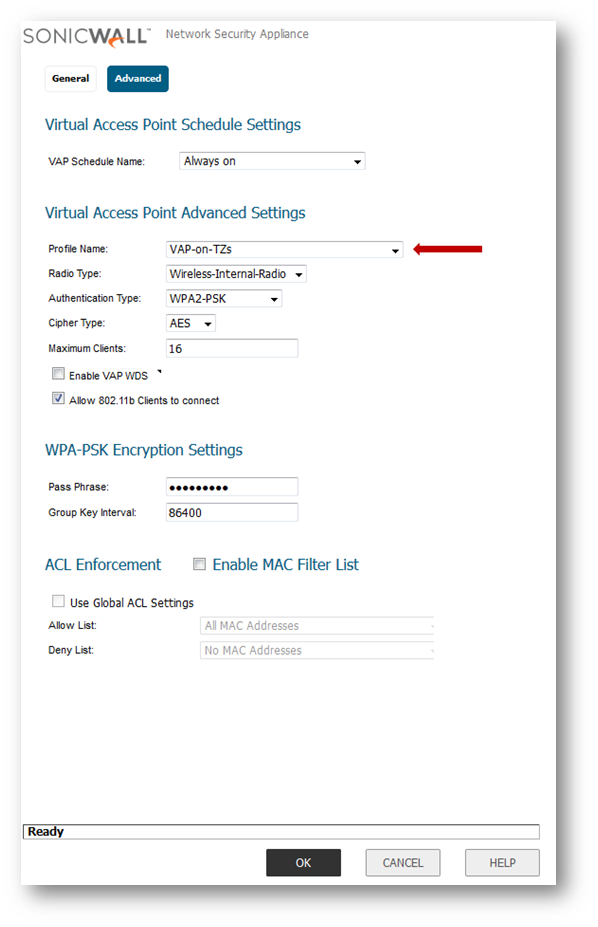
- Click "OK"

Virtual Access Point Group
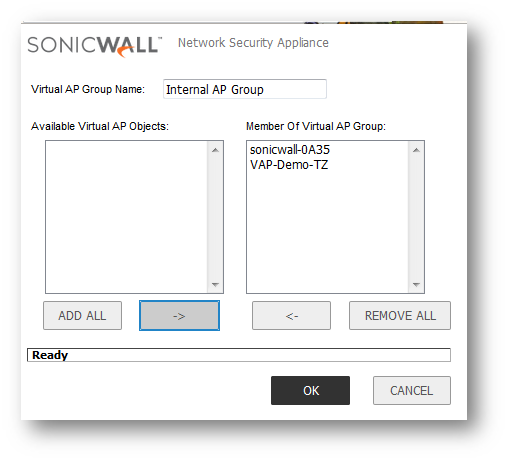
The Virtual Access Point Groups feature allows for grouping of multiple VAP objects to be simultaneously applied to your internal wireless radio. Virtual Access Point Groups are configured from the Connectivity | Wireless | Virtual Access Point page.
- Click on the Configure button as shown in the GUI

- Move the Virtual Access Point Object and make it a part of the "Member of Virtual AP Group" and click on "OK"

Assign VAP Group to Internal Wireless Radio
After your VAPs are configured and added to a VAP group, that group must be specified in the Connectivity | Wireless | Base Settings page in order for the VAPs to be available through your internal wireless radio. The default group is called Internal AP Group (scroll to the bottom of the page).

How to Test:
From you wireless client computer, scan and connect to the SSID (e.g VAP-Demo-TZs) and enter the Preshared Key (e.g. if WPA is chosen). Once connected your wireless adapter will acquire an the IP address from the appropriate WLAN sub-interface.
Resolution for SonicOS 6.2 and Below
The below resolution is for customers using SonicOS 6.2 and earlier firmware. For firewalls that are generation 6 and newer we suggest to upgrade to the latest general release of SonicOS 6.5 firmware.
Step 1: Adding a Wireless LAN (WLAN) Sub-Interface for VAP
A Wireless LAN (WLAN) subnet allows you to split a single wireless radio interface (W0) into many virtual network connections, each carrying its own set of configurations. The WLAN subnet solution allows each VAP to have its own virtual separate subinterface, even though there is only a single 802.11 radio.
1. WLAN subnets are configured from the Network | Interfaces page.
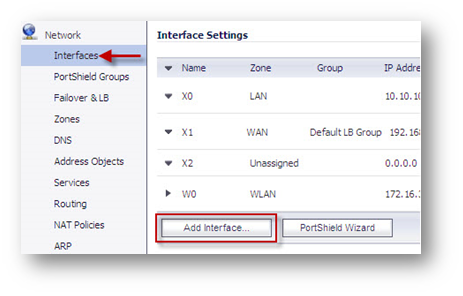
2. Click on Add Interface... button
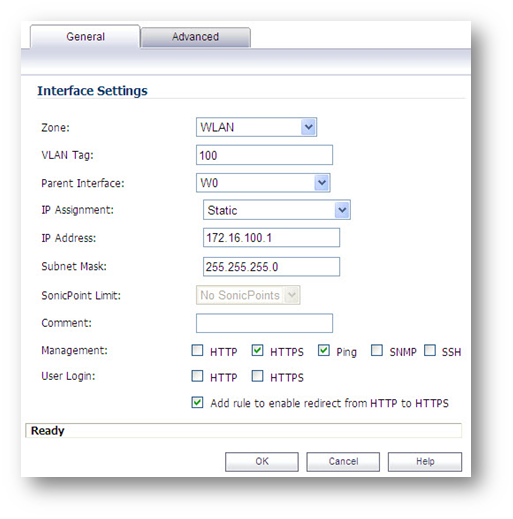 | Zone: Select WLAN |
3. Click OK

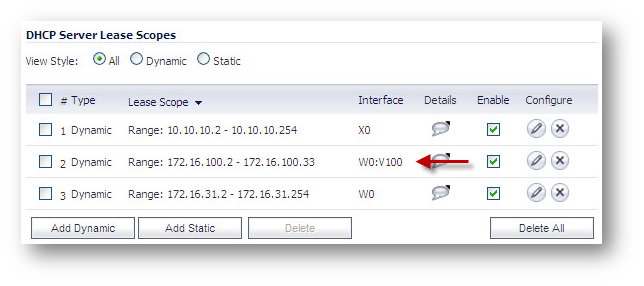
Step 2: Adding a DHCP Scope for the VAP Sub-Interface
The DHCP server assigns leased IP addresses to users within specified ranges, known as "Scopes". Take care in making these settings manually, as a scope of 200 addresses for multiple interfaces that will only use 30 can lead to connection issues due to lease exhaustion. The DHCP scope should be resized as each interface/subinterface is defined to ensure that adequate DHCP space remains for all subsequently defined interfaces. Failure to do so may cause the auto-creation of subsequent DHCP scopes to fail, requiring manual creation after performing the requisite scope resizing.
1. DHCP Server Scope is set from the Network | DHCP Server page.
2. Ensure Enable DHCP Server option is Checked
3. SonicWall appliance will automatically add a DHCP scope when an Interface/Sub-Interface is created.
Step 3: Adding a New Virtual Access Point - Profile
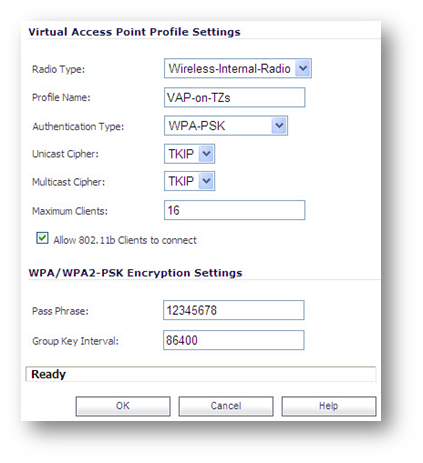
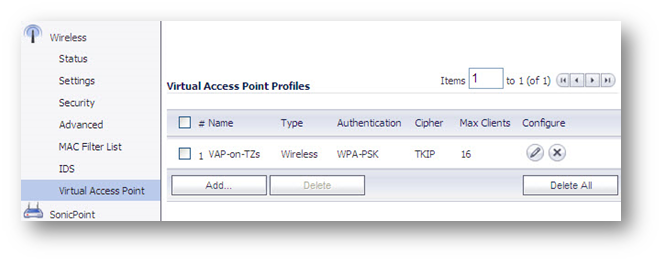
A Virtual Access Point Profile allows the administrator to pre-configure and save access point settings in a profile. VAP Profiles allows settings to be easily applied to new Virtual Access Points.
1. Virtual Access Point Profiles are configured from the Wireless | Virtual Access Point page.
2. Scroll to the bottom of the page to Virtual Access Point Profiles section, click Add... button and choose an Authentication Type.
Step 4: Adding a New Virtual Access Point
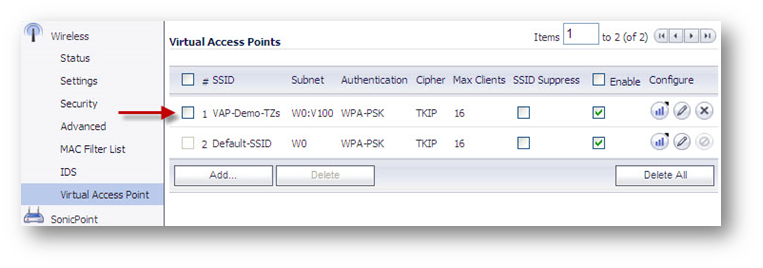
The VAP Settings feature allows for setup of general VAP settings. SSID and wireless subnet name are configured through VAP Settings.
1. Virtual Access Points are configured from the Wireless | Virtual Access Point page.
2. Under Virtual Access Points section, Click Add... button
3. Enter the SSID
4. Under Subnet Name: choose the appropriate WLAN sub-interfaces from the drop down list.
5. Click OK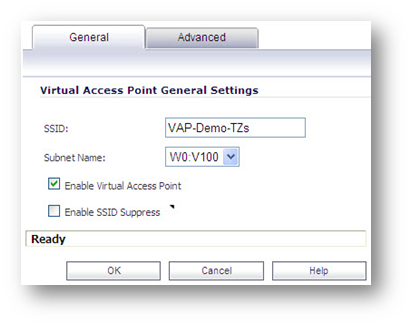
Step 5: Virtual Access Point Group
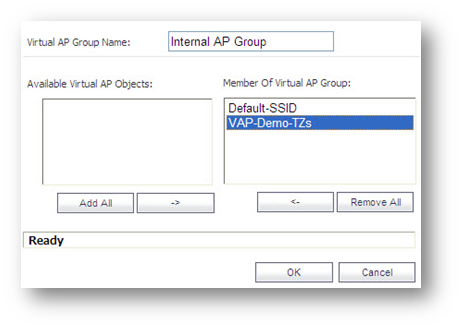
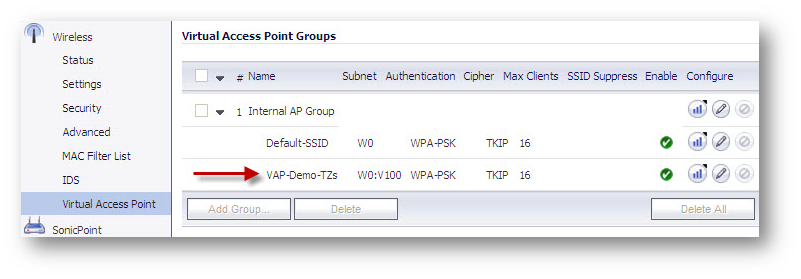
The Virtual Access Point Groups feature allows for grouping of multiple VAP objects to be simultaneously applied to your internal wireless radio. Virtual Access Point Groups are configured from the Wireless | Virtual Access Point page.
Step 6: Assign VAP Group to Internal Wireless Radio
After your VAPs are configured and added to a VAP group, that group must be specified in the Wireless | Settings page in order for the VAPs to be available through your internal wireless radio. The default group is called Internal AP Group (scroll to the bottom of the page).

How to Test:
From you wireless client computer, scan and connect to the SSID (e.g VAP-Demo-TZs) and enter the Preshared Key (e.g. if WPA is chosen). Once connected your wireless adapter will acquire an the IP address from the appropriate WLAN sub-interface.
Related Articles
- Error:"Invalid API Argument" when modifying the access rules
- Cysurance Partner FAQ
- Configure probe monitoring for WAN Failover and Loadbalancing - SonicWall UTM


 YES
YES NO
NO