-
Products
-
SonicPlatform
SonicPlatform is the cybersecurity platform purpose-built for MSPs, making managing complex security environments among multiple tenants easy and streamlined.
Discover More
-
-
Solutions
-
Federal
Protect Federal Agencies and Networks with scalable, purpose-built cybersecurity solutions
Learn MoreFederalProtect Federal Agencies and Networks with scalable, purpose-built cybersecurity solutions
Learn More - Industries
- Use Cases
-
-
Partners
-
Partner Portal
Access to deal registration, MDF, sales and marketing tools, training and more
Learn MorePartner PortalAccess to deal registration, MDF, sales and marketing tools, training and more
Learn More - SonicWall Partners
- Partner Resources
-
-
Support
-
Support Portal
Find answers to your questions by searching across our knowledge base, community, technical documentation and video tutorials
Learn MoreSupport PortalFind answers to your questions by searching across our knowledge base, community, technical documentation and video tutorials
Learn More - Support
- Resources
- Capture Labs
-
- Company
- Contact Us
Configuring a 6to4 tunnel with Hurricane Electric tunnel broker


Description
This article describes how to configure a 6to4 tunnel with Hurricane Electric tunnel broker.
Resolution
Hurricane Electric (HE) provides free IPv6 tunnel broker service to allow users to connect to IPv6 networks over IPv4 backbone. To create a 6to4 tunnel, users must register at http://www.tunnelbroker.net and specify their public IPv4 address as endpoint. Once a tunnel has been created, endpoint devices can be configured to sent IPv6 packets through the tunnel. This article describes how to configure the SonicWall to send IPv6 packets over the 6to4 tunnel. For the purpose of this article, the type of tunnel created at Hurricane Electric is a Regular Tunnel. This KB article does not describe the account nor the tunnel creation process. This information can be found at www.tunnelbroker.net/.
On successful completion of the tunnel creation process at Hurricane Electric, the following details can be found in the Tunnel Details page of the site:
- Server IPv4 Address: This is the IPv4 address of the server at the tunnel broker (server endpoint) end of the tunnel.
- Server IPv6 Address: This is the IPv6 address of the server at the tunnel broker end of the tunnel.
- Client IPv4 Address: This is the public (WAN) facing IPv4 address of the SonicWall (client endpoint) end of the tunnel. This IP address must be entered during the tunnel creation process at Hurricane Electric. This address must be pingable by the tunnel broker.
- Client IPv6 Address: This is the IPv6 address assigned by the tunnel broker. This will be used during the configuration process in the SonicWall.
- Available DNS Resolvers: These are recursive caching name servers that you can use through your tunnel either over IPv6 or IPv4. They will also allow you to access Google's websites along with other organizations who have white-listed the servers as part of their IPv6 participation programs.
- Routed IPv6 Prefixes: A 64 bit or, on request, a 48 bit network block is assigned by the tunnel broker. In this article, we statically assign the X0 (LAN) interface of the SonicWall with an IPv6 address within this 64 bit network block. IPv6 enabled hosts behind the X0 interface (LAN) will automatically obtain an IPv6 address within this block.
- rDNS Delegations: These are the Name Servers delegated by Hurricane Electric with authority for the "Routed /64" and "Routed /48" above.
Here is a screenshot of the Tunnel Details page with the above information filled-in: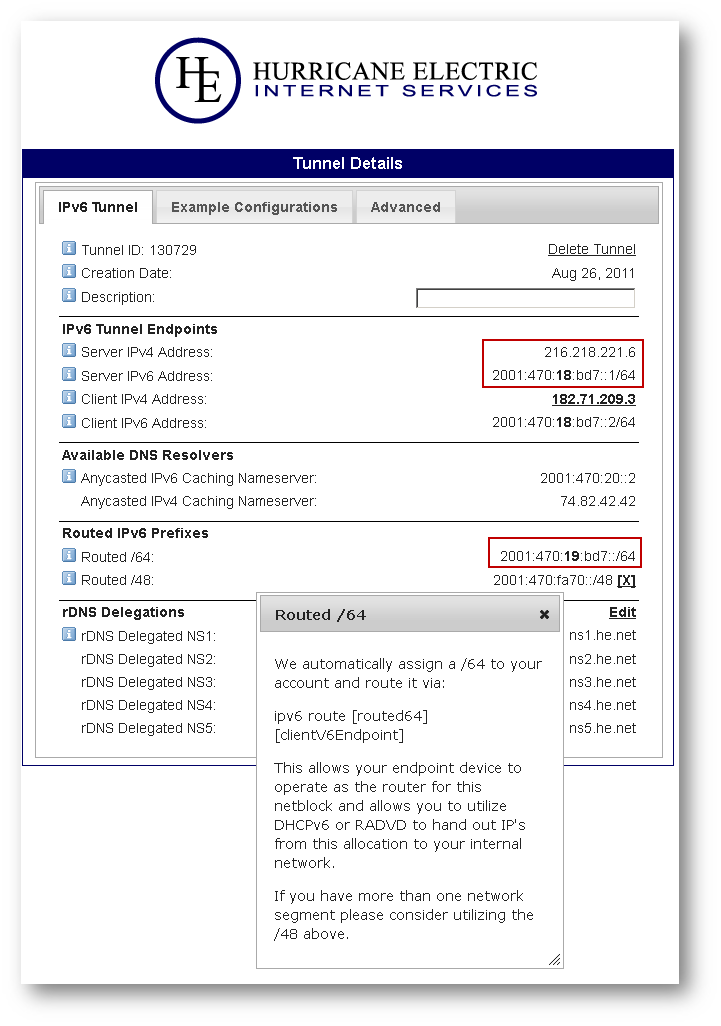
SonicWall Firewall Configurations:
Resolution for SonicOS 7.X
This release includes significant user interface changes and many new features that are different from the SonicOS 6.5 and earlier firmware. The below resolution is for customers using SonicOS 7.X firmware.
 NOTE: The IPv4 and IPv6 addresses shown here are for example purposes only. Replace them with the IP addresses of your network. The tunnel broker addresses must be replaced with the addresses you obtain for your account.
Interface Configuration :
- Login to the SonicWall management GUI.
- Navigate to the NETWORK | System | Interfaces.
- Under Interface Settings, click on tab IPv6.
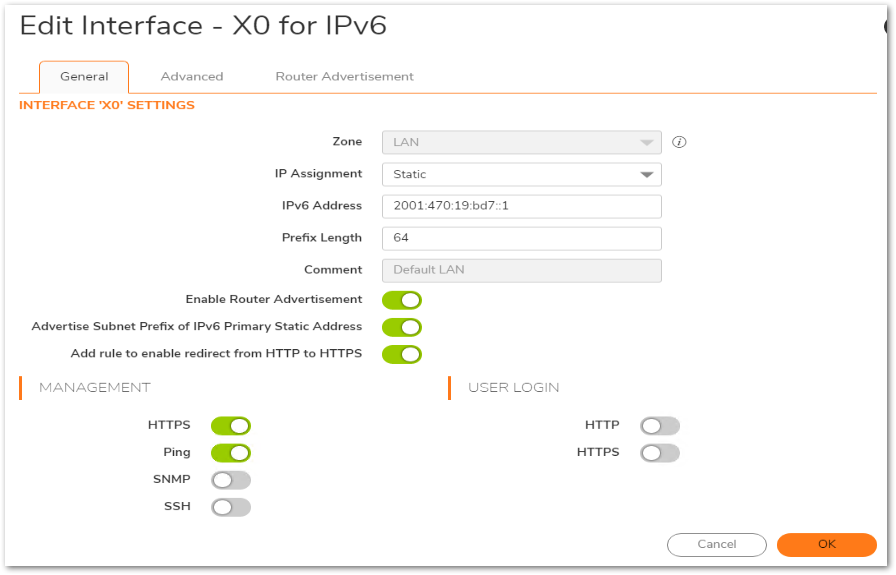
- Click on the configure button under X0 to open the Edit Interface - X0 for IPv6 window.
- Select Static from the drop-down under IP Assignment.
- Enter an IPv6 address from the /64 Routed IPv6 network block assigned by the tunnel broker. Adding a "1" at the end of the prefix would make it a valid IPv6 address. In this example, 2001:470:19:bd7::1
- Set Prefix Length to 64.
- Enable check box Enable Router Advertisement: This would automatically assign IP addresses in the 2001:470:19:bd7:: prefix to the IPv6 enabled hosts connected to this interface.
- Enable check boxes HTTPS, Ping etc. (optional)
- Click on OK to save the changes.
Creating IPv4 and IPv6 address objects :
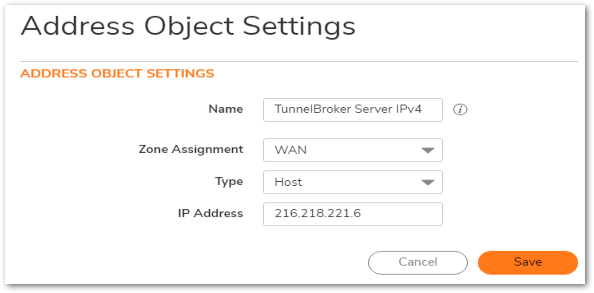
- Navigate to the OBJECT | Match Objects| Addresses page.
- Create the following IPv4 address object - This would be the tunnel broker server IPv4 address. This can be found in the Tunnel Details page of Hurricane Electric.
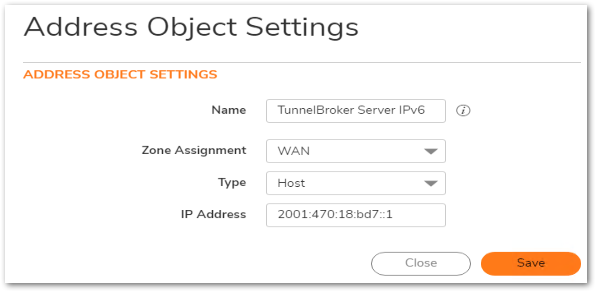
- Create the following IPv6 address object - This would be the tunnel broker server IPv6 address. This can be found in the Tunnel Details page of Hurricane Electric.
- Create the following IPv6 address object - This is an address object for all IPv6 addresses.
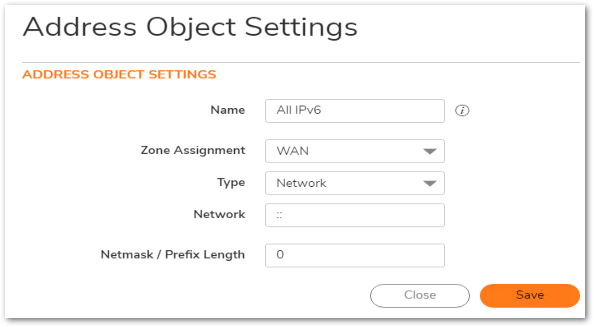
Create a manual 6to4 Tunnel Interface:
- Navigate to the NETWORK | System| Interfaces page.
- Click on ADD Interface. Select Tunnel Interface. This will open the Edit Interface - for IPv6 window.
- Enter the following information:
- Zone: WAN.
- Interface Type: Tunnel Interface (pre-selected).
- Tunnel Type: IPv6 Manual Tunnel Interface.
- Name: Enter a name for this interface.
- Remote IPv4 Address: Select the IPv4 address object created earlier for the tunnel broker server IPv4 address.
- Remote IPv6 Network: Select the IPv6 address object created earlier for the tunnel broker server IPv6 address.
- Management: Enable check boxes as required.
- Click on OK to save.
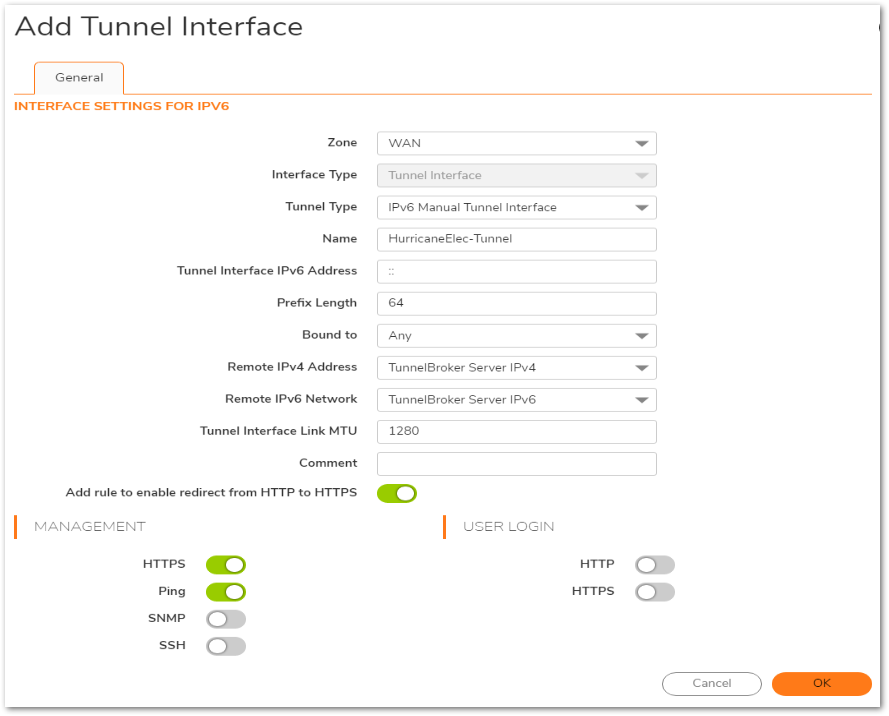
The new tunnel interface will be listed under Interface Settings.
Creating a static route to route all IPv6 traffic to the tunnel broker server.
- Navigate to the POLICY | Rules and Policies | Routing Rules.
- Change to the IPv6 by selecting IPv6 from drop down. Select the drop down Default & Custom. In this view, you will be able to see the routes auto-created when the manual 6to4 tunnel interface and the X0 IPv6 interface were created.

- Click on Add to create the following static route:
- Set Source to Any.
- Set Destination to All IPv6 - The earlier created address object for all IPv6 addresses.
- Service: Any.
- Gateway: This is the IPv6 address of the server endpoint. Set the address object of IPv6 server created earlier.
- Interface: Select the IPv6 tunnel interface (in this example, HurricaneElectric).
- Metric: Set it to 10.
- Click on SAVE.
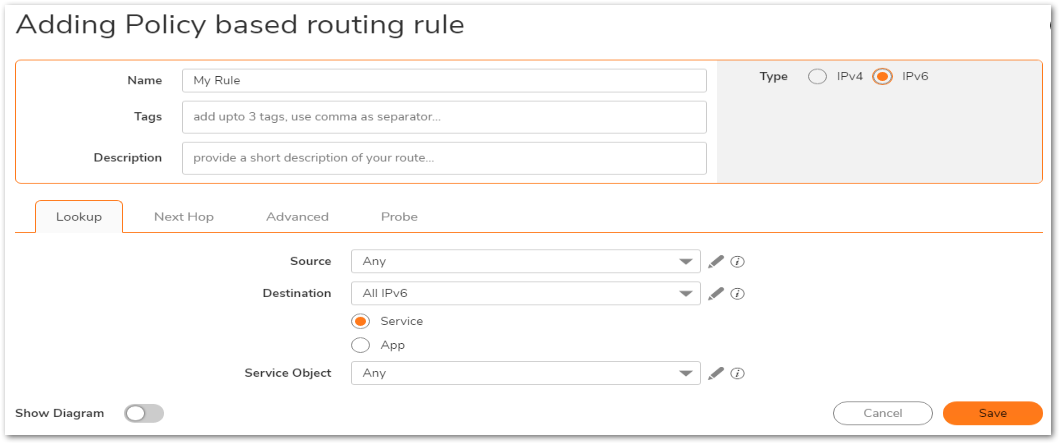
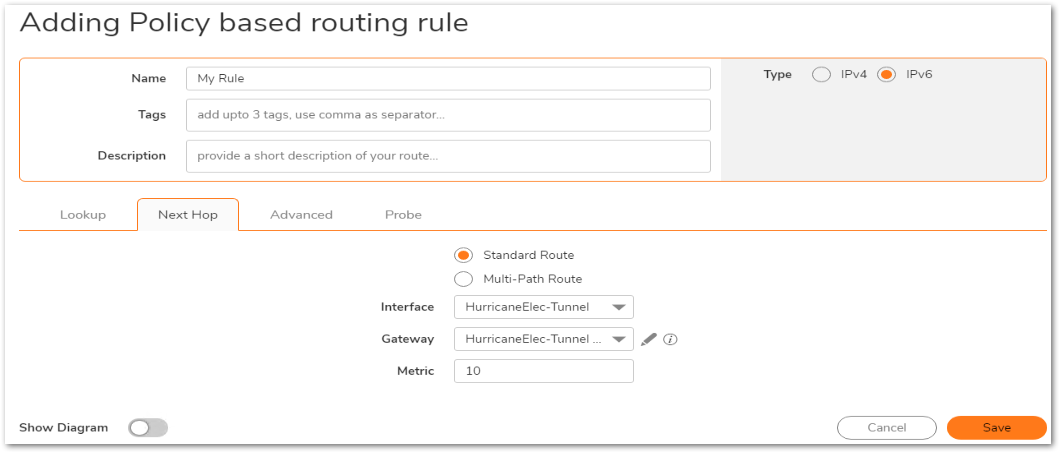
Resolution for SonicOS 6.5
This release includes significant user interface changes and many new features that are different from the SonicOS 6.2 and earlier firmware. The below resolution is for customers using SonicOS 6.5 firmware.
 NOTE: The IPv4 and IPv6 addresses shown here are for example purposes only. Replace them with the IP addresses of your network. The tunnel broker addresses must be replaced with the addresses you obtain for your account.
Interface Configuration :
- Login to the SonicWall management GUI.
- Navigate to the MANAGE | Network | Interfaces page.
- Under View IP Version, change to radio-button IPv6.
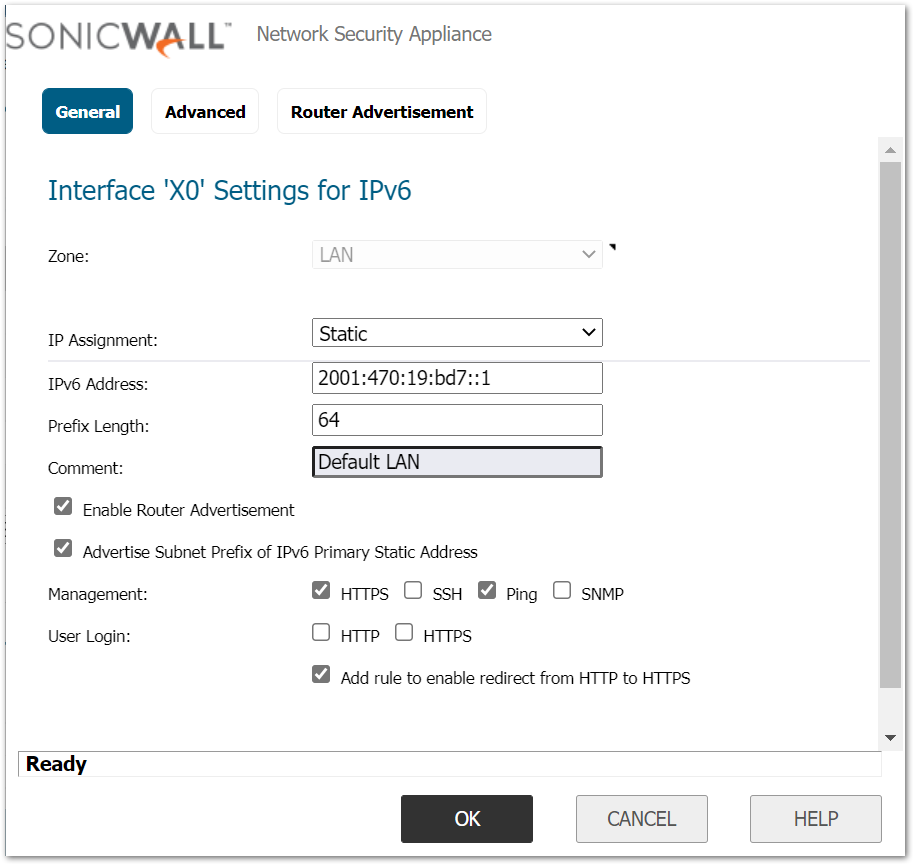
- Click on the configure button under X0 to open the Edit Interface - X0 for IPv6 window.
- Select Static from the drop-down under IP Assignment.
- Enter an IPv6 address from the /64 Routed IPv6 network block assigned by the tunnel broker (see above). Adding a "1" at the end of the prefix would make it a valid IPv6 address. In this example, 2001:470:19:bd7::1
- Set Prefix Length to 64.
- Enable check box Enable Router Advertisement: This would automatically assign IP addresses in the 2001:470:19:bd7:: prefix to the IPv6 enabled hosts connected to this interface.
- Enable check boxes HTTPS, Ping etc. (optional)
- Click on OK to save the changes.
Creating IPv4 and IPv6 address objects :
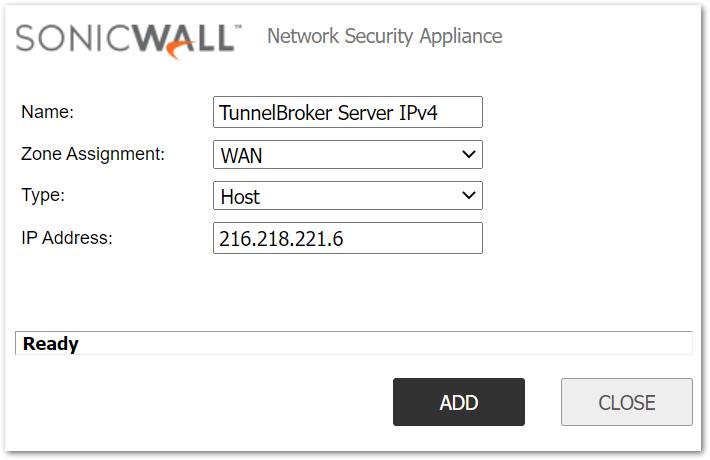
- Navigate to the MANAGE | Objects | Address Objects page.
- Create the following IPv4 address object - This would be the tunnel broker server IPv4 address. This can be found in the Tunnel Details page of Hurricane Electric.
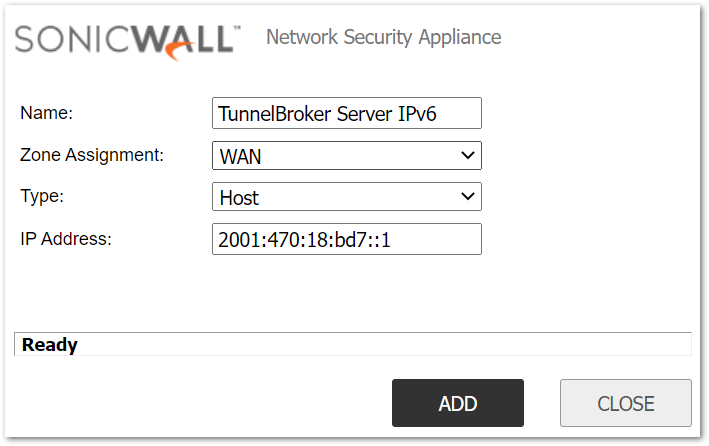
- Create the following IPv6 address object - This would be the tunnel broker server IPv6 address. This can be found in the Tunnel Details page of Hurricane Electric.
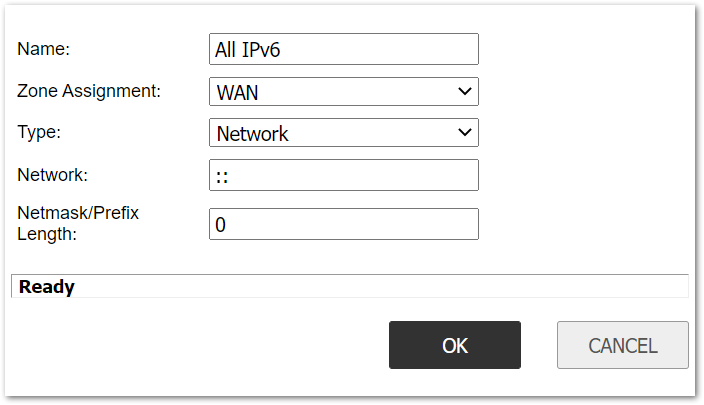
- Create the following IPv6 address object - This is an address object for all IPv6 addresses.
Create a manual 6to4 Tunnel Interface:
- Navigate to the MANAGE | Network | Interfaces page.
- At the bottom, select Tunnel Interface from the drop-down under Add Interface. This will open the Edit Interface - for IPv6 window.
- Enter the following information:
- Zone: WAN.
- Interface Type: Tunnel Interface (pre-selected).
- Tunnel Type: IPv6 Manual Tunnel Interface.
- Name: Enter a name for this interface.
- Remote IPv4 Address: Select the IPv4 address object created earlier for the tunnel broker server IPv4 address.
- Remote IPv6 Network: Select the IPv6 address object created earlier for the tunnel broker server IPv6 address.
- Management: Enable check boxes as required.
- Click on OK to save.
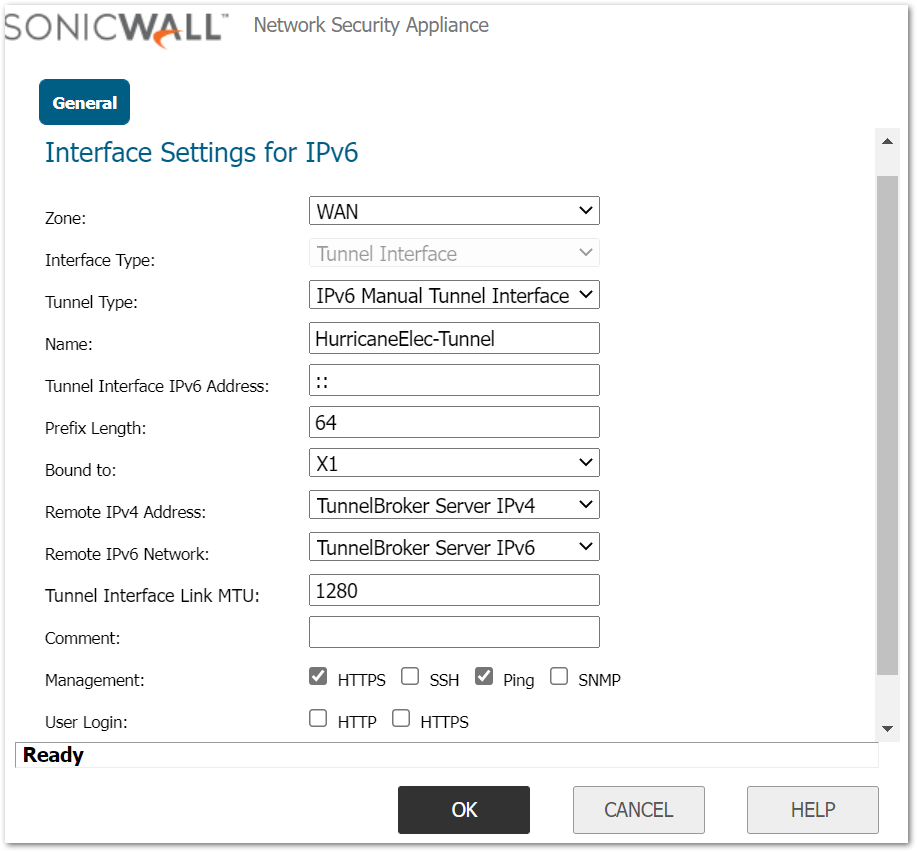
The new tunnel interface will be listed under Interface Settings.
Creating a static route to route all IPv6 traffic to the tunnel broker server.
- Navigate to the MANAGE | Network | Routing.
- Change to the IPv6 view by clicking on the IPv6 radio-button. Select radio-button to display all policies. In this view, you will be able to see the routes auto-created when the manual 6to4 tunnel interface and the X0 IPv6 interface were created.

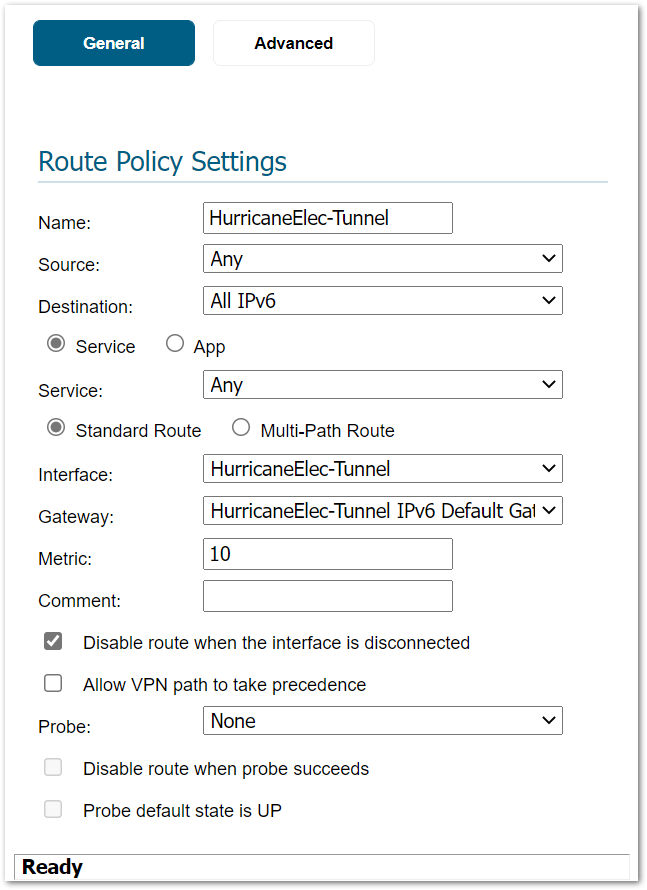
- Click on Add to create the following static route:
- Set Source to Any.
- Set Destination to All IPv6 - The earlier created address object for all IPv6 addresses.
- Service: Any.
- Gateway: This is the IPv6 address of the server endpoint. Set the address object of IPv6 server created earlier.
- Interface: Select the IPv6 tunnel interface (in this example, HurricaneElectric).
- Metric: Set it to 10.
- Click on OK to save.
Resolution for SonicOS 6.2 and Below
The below resolution is for customers using SonicOS 6.2 and earlier firmware. For firewalls that are generation 6 and newer we suggest to upgrade to the latest general release of SonicOS 6.5 firmware.
 NOTE: The IPv4 and IPv6 addresses shown here are for example purposes only. Replace them with the IP addresses of your network. The tunnel broker addresses must be replaced with the addresses you obtain for your account.
Interface Configuration :
- Login to the SonicWall management GUI.
- Navigate to the Network | Interfaces page.
- Under View IP Version, change to radio-button IPv6.
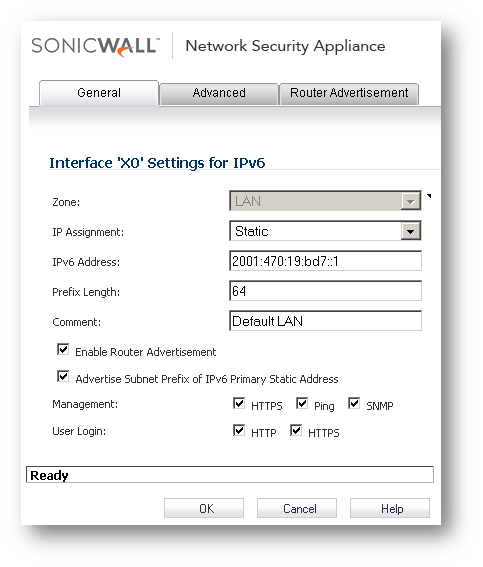
- Click on the configure button under X0 to open the Edit Interface - X0 for IPv6 window.
- Select Static from the drop-down under IP Assignment.
- Enter an IPv6 address from the /64 Routed IPv6 network block assigned by the tunnel broker (see above). Adding a "1" at the end of the prefix would make it a valid IPv6 address. In this example, 2001:470:19:bd7::1
- Set Prefix Length to 64.
- Enable check box Enable Router Advertisement: This would automatically assign IP addresses in the 2001:470:19:bd7:: prefix to the IPv6 enabled hosts connected to this interface.
- Enable check boxes HTTPS, Ping etc. (optional)
- Click on OK to save the changes.
Creating IPv4 and IPv6 address objects:
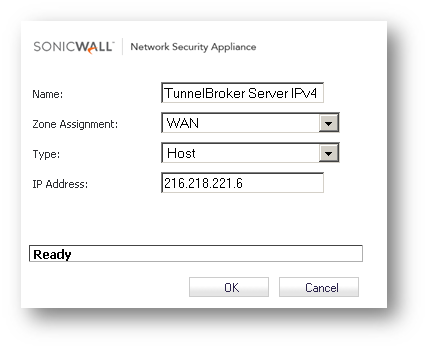
- Navigate to the Network | Address Objects page.
- Create the following IPv4 address object - This would be the tunnel broker server IPv4 address. This can be found in the Tunnel Details page of Hurricane Electric.
- Create the following IPv6 address object - This would be the tunnel broker server IPv6 address. This can be found in the Tunnel Details page of Hurricane Electric.
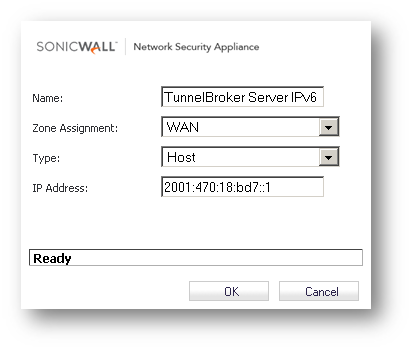
- Create the following IPv6 address object - This is an address object for all IPv6 addresses.
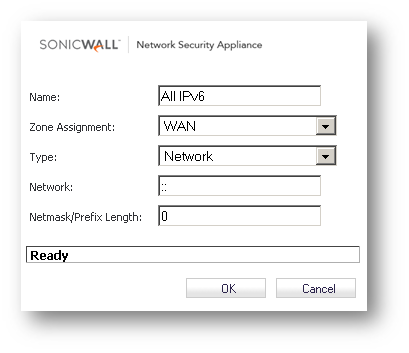
Create a manual 6to4 Tunnel Interface :
- Navigate to the Network | Interfaces page.
- At the bottom, select Virtual Interface from the drop-down under Add Interface. This will open the Edit Interface - for IPv6 window.
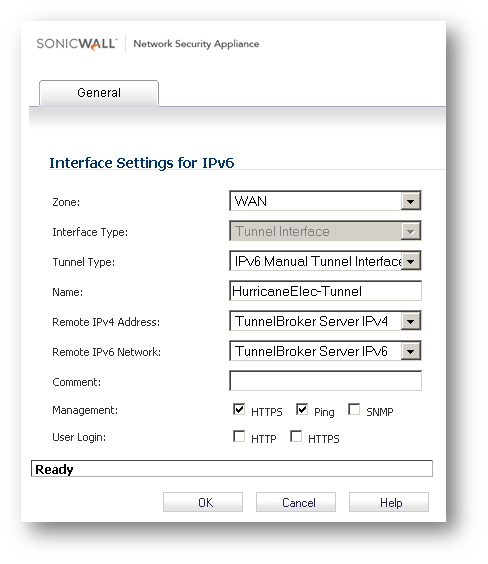
- Enter the following information:
- Zone: WAN.
- Interface Type: Tunnel Interface (pre-selected).
- Tunnel Type: IPv6 Manual Tunnel Interface.
- Name: Enter a name for this interface.
- Remote IPv4 Address: Select the IPv4 address object created earlier for the tunnel broker server IPv4 address.
- Remote IPv6 Network: Select the IPv6 address object created earlier for the tunnel broker server IPv6 address.
- Management: Enable check boxes as required.
- Click on OK to save.
The new tunnel interface will be listed under Interface Settings.
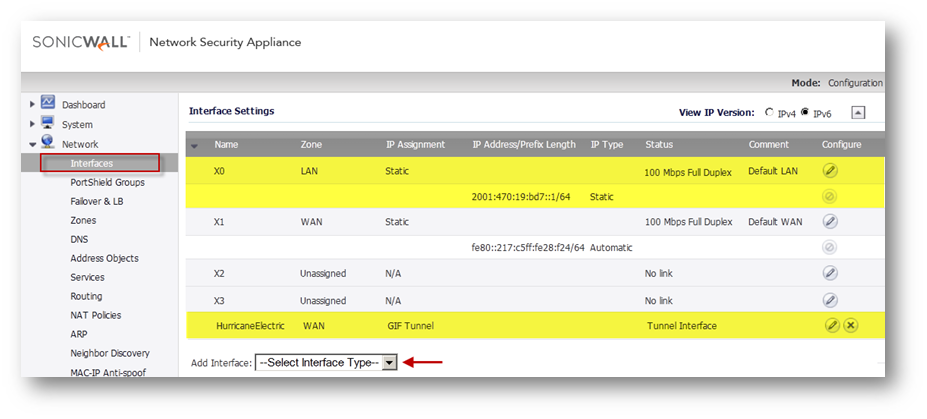
Creating a static route to route all IPv6 traffic to the tunnel broker server.
- Navigate to the Network | Routing.
- Change to the IPv6 view by clicking on the IPv6 radio-button. Select radio-button to display all policies. In this view, you will be able to see the routes auto-created when the manual 6to4 tunnel interface and the X0 IPv6 interface were created.

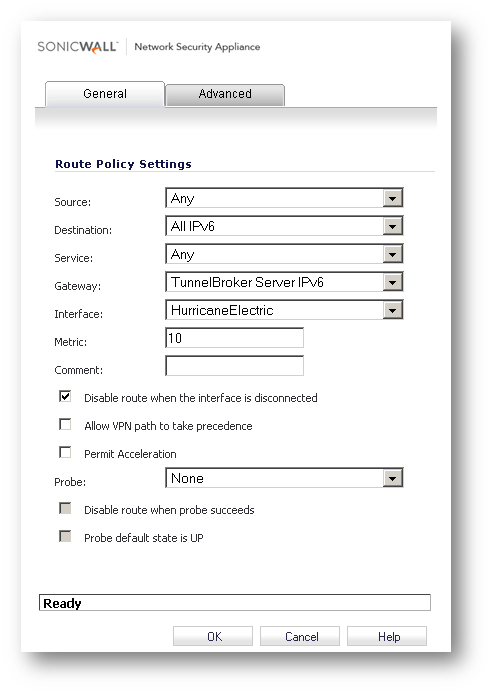
- Click on Add to create the following static route:
- Set Source to Any.
- Set Destination to All IPv6 - The earlier created address object for all IPv6 addresses.
- Service: Any.
- Gateway: This is the IPv6 address of the server endpoint. Set the address object of IPv6 server created earlier.
- Interface: Select the IPv6 tunnel interface (in this example, HurricaneElectric).
- Metric: Set it to 10.
- Click on OK to save.
HOW TO TEST :
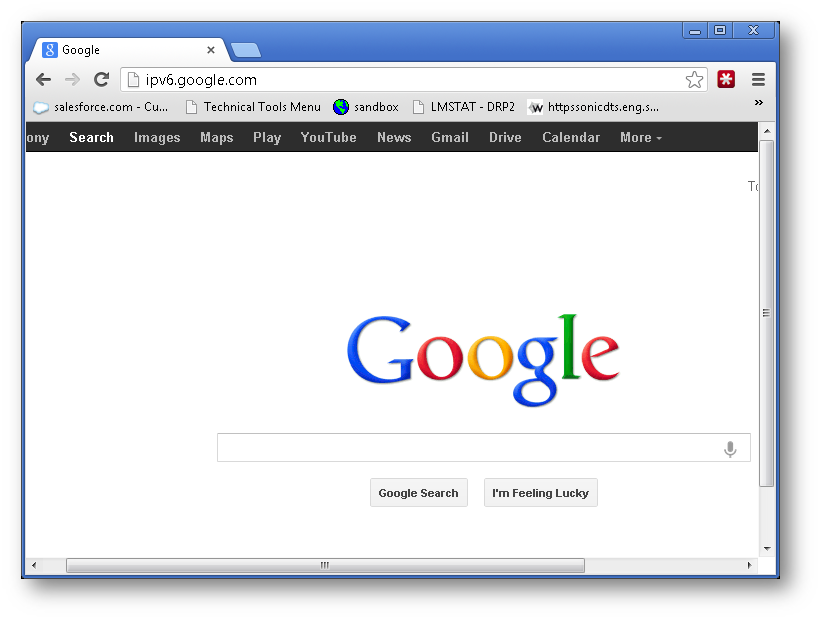
To test IPv6 connectivity, browse to, or ping, an IPv6 enabled website (example, ipv6.google.com) either by name or its IPv6 address. Before accessing by name, make sure the DNS server is capable of serving IPv6 addresses. If not, use Hurricane Electric's DNS server addresses (see Tunnel Details above) or the public 4.2.2.2 or 8.8.8.8 DNS server addresses.
Related Articles
- Error:"Invalid API Argument" when modifying the access rules
- Cysurance Partner FAQ
- Configure probe monitoring for WAN Failover and Loadbalancing - SonicWall UTM
Categories
- Firewalls > TZ Series
- Firewalls > SonicWall SuperMassive E10000 Series
- Firewalls > SonicWall SuperMassive 9000 Series
- Firewalls > SonicWall NSA Series


 YES
YES NO
NO